
Docker19.03.13安装MongoDB:laster
一、拉取镜像
[root@localhost ~]# sudo docker pull mongo:latest latest: Pulling from library/mongo c49d0f: Pull complete d26: Pull complete 61e52f: Pull complete ca4521: Pull complete 06e2d54757a5: Pull complete e2f7d90822f3: Pull complete f518d: Pull complete feb8e9d469d8: Pull complete 69705b: Pull complete c7daea26376d: Pull complete 13d1f9e1fc77: Pull complete f87e65fe7ffd: Pull complete Digest: sha256:a4448eb5f6ed0ab97eb50aeb0238bb4e60c37ed3c2c4fc73eb9 Status: Downloaded newer image for mongo:latest docker.io/library/mongo:latest讯享网
二、创建容器
讯享网[root@localhost ~]# sudo docker images REPOSITORY TAG IMAGE ID CREATED SIZE mongo latest ba0c2ff8d362 11 days ago 492MB [root@localhost ~]# docker run -itd --name mongo -p 27017:27017 mongo --auth 72edb188bdb4748f656b1d689eca7d6e94adcafad453f778f021dd0df1ad1e14
在上面的命令中,几个命令参数的详细解释如下:
- -p 27017:27017 :映射容器服务的 27017 端口到宿主机的 27017 端口。外部可以直接通过 宿主机 ip:27017 访问到 mongo 的服务。
- --auth:需要密码才能访问容器服务
三、创建用户
1、进入mongodb容器
[root@localhost ~]# docker exec -it mongo mongo admin MongoDB shell version v4.4.1 connecting to: mongodb://127.0.0.1:27017/admin?compressors=disabled&gssapiServiceName=mongodb Implicit session: session { "id" : UUID("e6f2fd2b-0d9f-46e9-9d65-062ed487ed88") } MongoDB server version: 4.4.1 Welcome to the MongoDB shell. For interactive help, type "help". For more comprehensive documentation, see https://docs.mongodb.com/ Questions? Try the MongoDB Developer Community Forums https://community.mongodb.com --- The server generated these startup warnings when booting: 2020-10-07T16:01:12.931+00:00: Access control is not enabled for the database. Read and write access to data and configuration is unrestricted 2020-10-07T16:01:12.931+00:00: /sys/kernel/mm/transparent_hugepage/enabled is 'always'. We suggest setting it to 'never' 2020-10-07T16:01:12.931+00:00: /sys/kernel/mm/transparent_hugepage/defrag is 'always'. We suggest setting it to 'never' --- --- Enable MongoDB's free cloud-based monitoring service, which will then receive and display metrics about your deployment (disk utilization, CPU, operation statistics, etc). The monitoring data will be available on a MongoDB website with a unique URL accessible to you and anyone you share the URL with. MongoDB may use this information to make product improvements and to suggest MongoDB products and deployment options to you. To enable free monitoring, run the following command: db.enableFreeMonitoring() To permanently disable this reminder, run the following command: db.disableFreeMonitoring() --- >2、创建用户信息
讯享网> db.createUser({ user:'admin',pwd:'',roles:[ { role:'userAdminAnyDatabase', db: 'admin'},"readWriteAnyDatabase"]}); Successfully added user: { "user" : "admin", "roles" : [ { "role" : "userAdminAnyDatabase", "db" : "admin" }, "readWriteAnyDatabase" ] }
3、切换用户信息

> db.auth('admin', '') 1四、开放端口号
进入宿主机,开放端口号
讯享网[root@localhost ~]# firewall-cmd --zone=public --add-port=27017/tcp --permanent success [root@localhost ~]# firewall-cmd --reload success
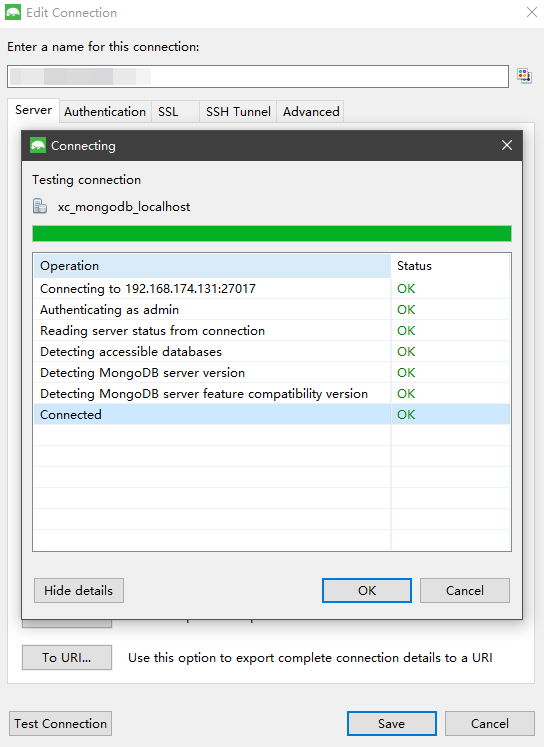
五、远程连接测试
使用客户端工具Studio 3T连接mongo,下载地址https://studio3t.com/download/
版权声明:本文内容由互联网用户自发贡献,该文观点仅代表作者本人。本站仅提供信息存储空间服务,不拥有所有权,不承担相关法律责任。如发现本站有涉嫌侵权/违法违规的内容,请联系我们,一经查实,本站将立刻删除。
如需转载请保留出处:https://51itzy.com/kjqy/14641.html