
文章大纲
一、权限框架介绍
二、Shiro基础介绍
三、Spring Boot整合Shiro代码实战
四、项目源码与资料下载
五、参考文章

一、权限框架介绍
1. 什么是权限管理
权限管理属于系统安全的范畴,权限管理实现对用户访问系统的控制,按照安全规则或者安全策略控制用户可以访问而且只能访问自己被授权的资源。
权限管理包括用户身份认证和授权两部分,简称认证授权。对于需要访问控制的资源用户首先经过身份认证,认证通过后用户具有该资源的访问权限方可访问。
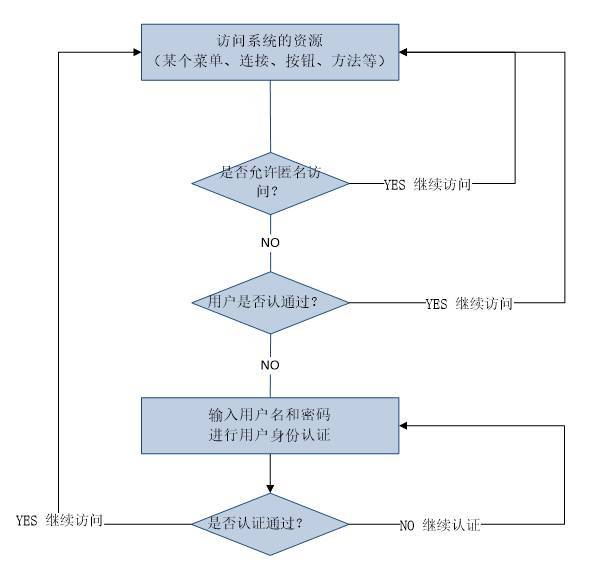
1.1 用户身份认证
身份认证,就是判断一个用户是否为合法用户的处理过程。最常用的简单身份认证方式是系统通过核对用户输入的用户名和口令,看其是否与系统中存储的该用户的用户名和口令一致,来判断用户身份是否正确。对于采用指纹等系统,则出示指纹;对于硬件Key等刷卡系统,则需要刷卡。
用户名密码身份认证流程:

2. 常见权限框架
2.3 Shiro和Spring Security比较
(1)Shiro比Spring更容易使用,实现和最重要的理解
(2)Spring Security更加知名的唯一原因是因为品牌名称
(3)“Spring”以简单而闻名,但讽刺的是很多人发现安装Spring Security很难
(4)Spring Security却有更好的社区支持
(5)Apache Shiro在Spring Security处理密码学方面有一个额外的模块
(6)Spring-security 对spring 结合较好,如果项目用的springmvc ,使用起来很方便。但是如果项目中没有用到spring,那就不要考虑它了。
(7)Shiro 功能强大、且 简单、灵活。是Apache 下的项目比较可靠,且不跟任何的框架或者容器绑定,可以独立运行
二、Shiro基础介绍
1. Shiro三个核心组件
1.3 Realm
Realm充当了Shiro与应用安全数据间的“桥梁”或者“连接器”。也就是说,当对用户执行认证(登录)和授权(访问控制)验证时,Shiro会从应用配置的Realm中查找用户及其权限信息。
从这个意义上讲,Realm实质上是一个安全相关的DAO:它封装了数据源的连接细节,并在需要时将相关数据提供给Shiro。当配置Shiro时,你必须至少指定一个Realm,用于认证和(或)授权。配置多个Realm是可以的,但是至少需要一个。
Shiro内置了可以连接大量安全数据源(又名目录)的Realm,如LDAP、关系数据库(JDBC)、类似INI的文本配置资源以及属性文件等。如果缺省的Realm不能满足需求,你还可以插入代表自定义数据源的自己的Realm实现。
2. Shiro相关类介绍
(1)Authentication 认证 ---- 用户登录
(2)Authorization 授权 --- 用户具有哪些权限
(3)Cryptography 安全数据加密
(4)Session Management 会话管理
(5)Web Integration web系统集成
(6)Interations 集成其它应用,spring、缓存框架
3. Shiro 特点
(1)易于理解的 Java Security API;
(2)简单的身份认证(登录),支持多种数据源(LDAP,JDBC,Kerberos,ActiveDirectory 等);
(3)对角色的简单的签权(访问控制),支持细粒度的签权;
(4)支持一级缓存,以提升应用程序的性能;
(5)内置的基于 POJO 企业会话管理,适用于 Web 以及非 Web 的环境;
(6)异构客户端会话访问;
(7)非常简单的加密 API;
(8)不跟任何的框架或者容器捆绑,可以独立运行
三、Spring Boot整合Shiro代码实战
1. Spring Boot基础
https://www.cnblogs.com/WUXIAOCHANG/p/10877266.html
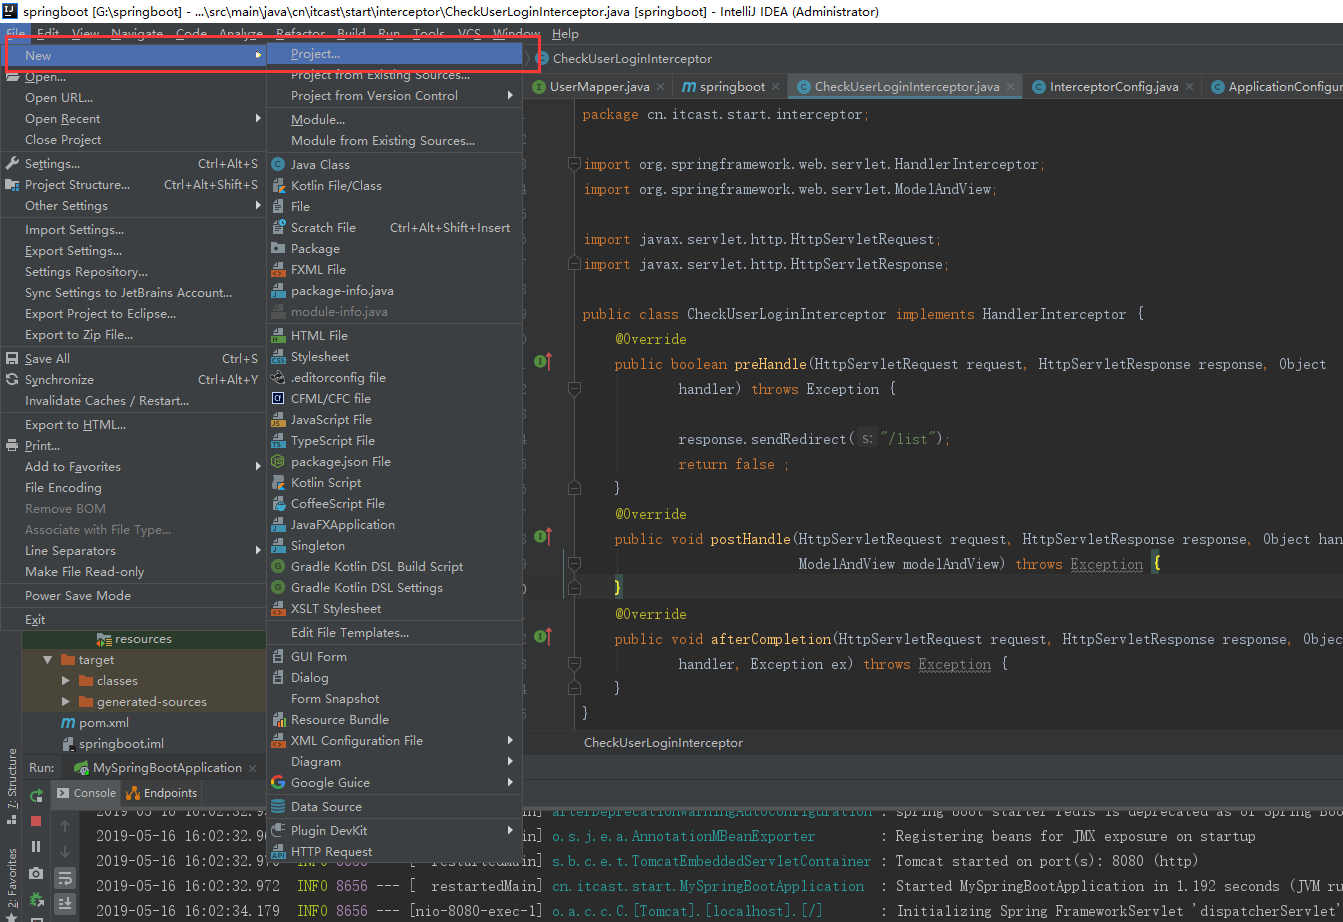
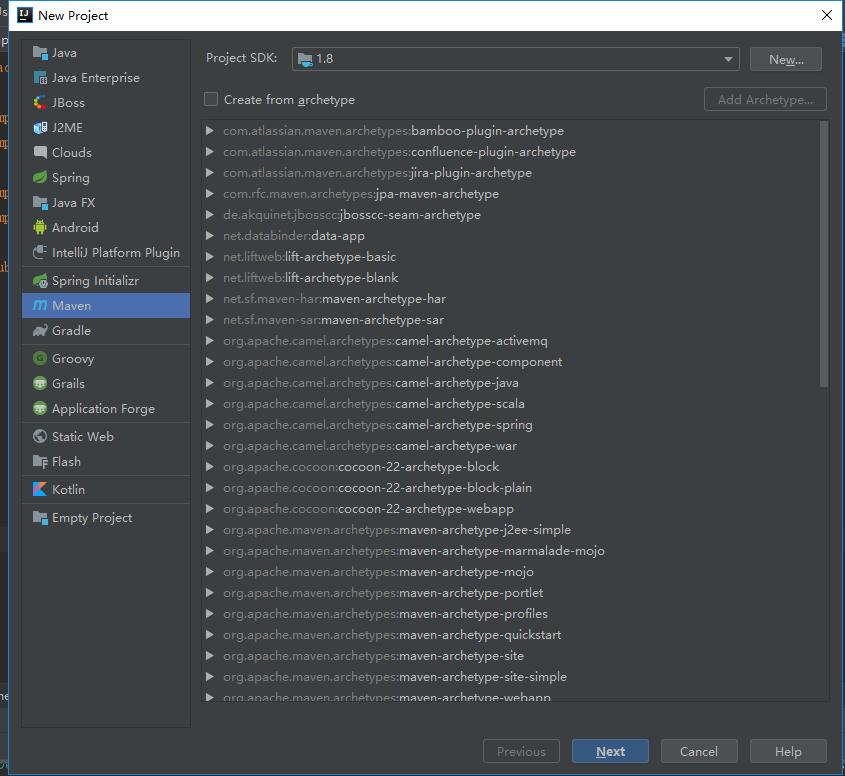
2. 创建Spring Boot的基础项目
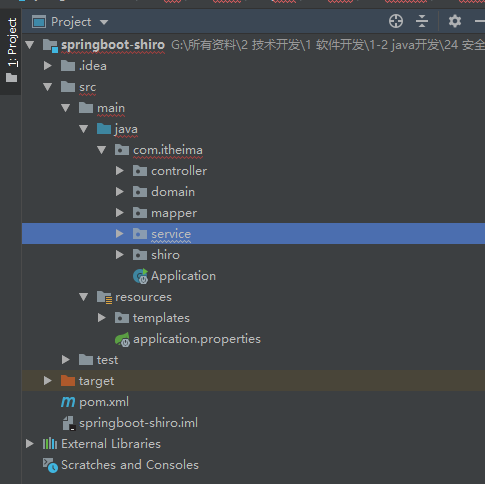
2.1 新建maven项目
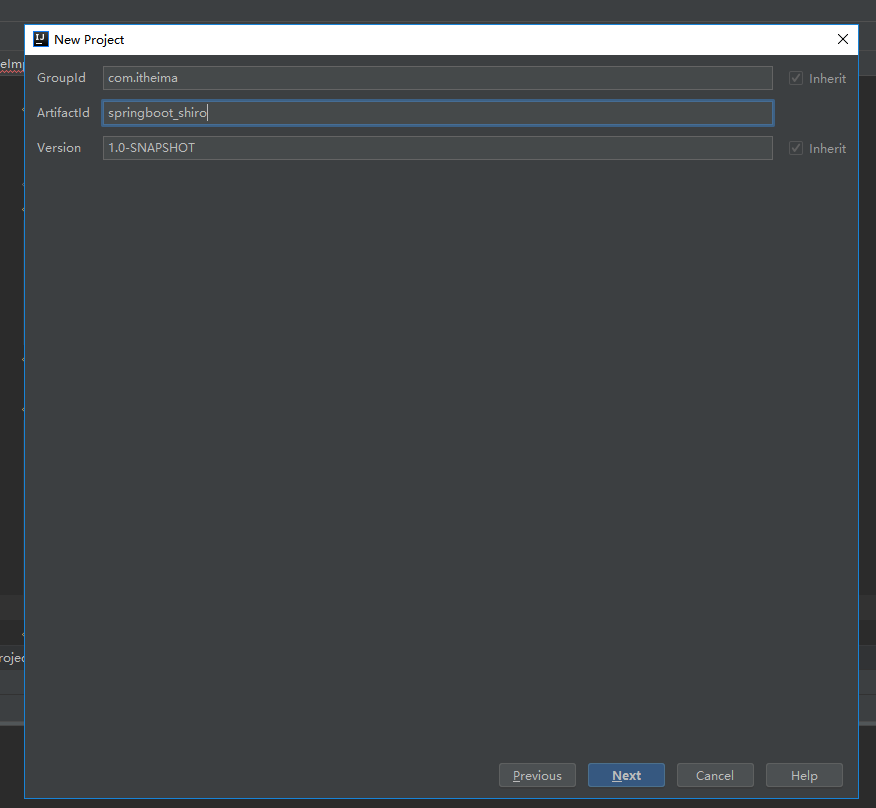
创建后项目结构如下:
2.2 pom.xml中添加依赖
<project xmlns="http://maven.apache.org/POM/4.0.0" xmlns:xsi="http://www.w3.org/2001/XMLSchema-instance" xsi:schemaLocation="http://maven.apache.org/POM/4.0.0 http://maven.apache.org/xsd/maven-4.0.0.xsd"> <modelVersion>4.0.0</modelVersion> <!-- 继承Spring Boot的默认父工程 --> <!-- Spring Boot 父工程 --> <parent> <groupId>org.springframework.boot</groupId> <artifactId>spring-boot-starter-parent</artifactId> <version>1.5.4.RELEASE</version> </parent> <groupId>com.itheima</groupId> <artifactId>springboot-shiro</artifactId> <version>0.0.1-SNAPSHOT</version> <!-- 导入依赖 --> <dependencies> <!-- 导入web支持:SpringMVC开发支持,Servlet相关的程序 --> <!-- web支持,SpringMVC, Servlet支持等 --> <dependency> <groupId>org.springframework.boot</groupId> <artifactId>spring-boot-starter-web</artifactId> </dependency> </dependencies> <!-- 修改参数 --> <properties> <!-- 修改JDK的编译版本为1.8 --> <java.version>1.8</java.version> </properties> </project> 讯享网
讯享网package com.itheima.controller; import org.springframework.stereotype.Controller; import org.springframework.web.bind.annotation.RequestMapping; import org.springframework.web.bind.annotation.ResponseBody; @Controller public class UserController { / * 测试方法 */ @RequestMapping("/hello") @ResponseBody public String hello(){ System.out.println("UserController.hello()"); return "ok"; } }
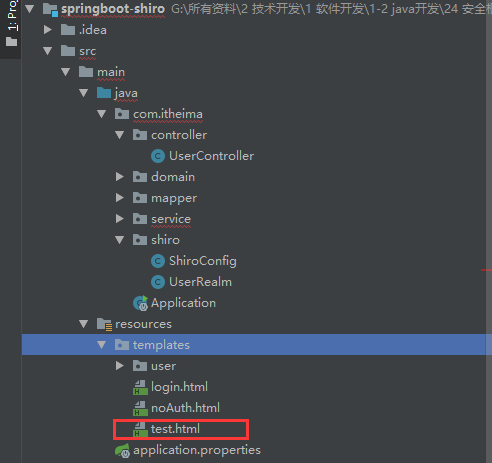
<!-- 导入thymeleaf依赖 --> <dependency> <groupId>org.springframework.boot</groupId> <artifactId>spring-boot-starter-thymeleaf</artifactId> </dependency> UserController.java类中添加测试方法
讯享网    /
     * 测试thymeleaf
     */
    @RequestMapping("/testThymeleaf")
    public String testThymeleaf(Model model){
        //把数据存入model
        model.addAttribute("name", "吴先生");
        //返回test.html
        return "test";
    }
<!DOCTYPE html>
<html>
<head>
<meta charset="UTF-8">
<title>测试Thymeleaf的使用</title>
</head>
<body>
<h3 th:text="${name}"></h3>
</body>
</html>
访问项目


3. Spring Boot与Shiro整合实现用户认证
3.1 分析Shiro的核心API
Subject: 用户主体(把操作交给SecurityManager)
SecurityManager:安全管理器(关联Realm)
Realm:Shiro连接数据的桥梁
讯享网<project xmlns="http://maven.apache.org/POM/4.0.0" xmlns:xsi="http://www.w3.org/2001/XMLSchema-instance" xsi:schemaLocation="http://maven.apache.org/POM/4.0.0 http://maven.apache.org/xsd/maven-4.0.0.xsd"> <modelVersion>4.0.0</modelVersion> <!-- 继承Spring Boot的默认父工程 --> <!-- Spring Boot 父工程 --> <parent> <groupId>org.springframework.boot</groupId> <artifactId>spring-boot-starter-parent</artifactId> <version>1.5.4.RELEASE</version> </parent> <groupId>com.itheima</groupId> <artifactId>springboot-shiro</artifactId> <version>0.0.1-SNAPSHOT</version> <!-- 导入依赖 --> <dependencies> <!-- 导入web支持:SpringMVC开发支持,Servlet相关的程序 --> <!-- web支持,SpringMVC, Servlet支持等 --> <dependency> <groupId>org.springframework.boot</groupId> <artifactId>spring-boot-starter-web</artifactId> </dependency> <!-- 导入thymeleaf依赖 --> <dependency> <groupId>org.springframework.boot</groupId> <artifactId>spring-boot-starter-thymeleaf</artifactId> </dependency> <!-- shiro与spring整合依赖 --> <dependency> <groupId>org.apache.shiro</groupId> <artifactId>shiro-spring</artifactId> <version>1.4.0</version> </dependency> <!-- 导入mybatis相关的依赖 --> <dependency> <groupId>com.alibaba</groupId> <artifactId>druid</artifactId> <version>1.0.9</version> </dependency> <!-- mysql --> <dependency> <groupId>mysql</groupId> <artifactId>mysql-connector-java</artifactId> </dependency> <!-- SpringBoot的Mybatis启动器 --> <dependency> <groupId>org.mybatis.spring.boot</groupId> <artifactId>mybatis-spring-boot-starter</artifactId> <version>1.1.1</version> </dependency> <!-- thymel对shiro的扩展坐标 --> <dependency> <groupId>com.github.theborakompanioni</groupId> <artifactId>thymeleaf-extras-shiro</artifactId> <version>2.0.0</version> </dependency> </dependencies> <!-- 修改参数 --> <properties> <!-- 修改JDK的编译版本为1.8 --> <java.version>1.8</java.version> <!-- 修改thymeleaf的版本 --> <thymeleaf.version>3.0.2.RELEASE</thymeleaf.version> <thymeleaf-layout-dialect.version>2.0.4</thymeleaf-layout-dialect.version> </properties> <build> <!--解决项目运行后mapper.xmlw文件找不到情况--> <resources> <resource> <directory>src/main/java</directory> <includes> <include>/*.xml</include> </includes> </resource> </resources> </build> </project>

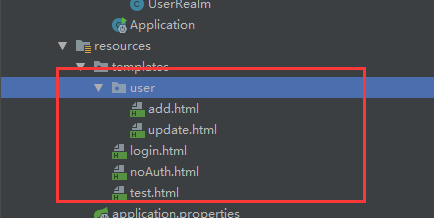
spring.datasource.driverClassName=com.mysql.jdbc.Driver spring.datasource.url=jdbc:mysql://localhost:3306/shiro_test spring.datasource.username=root spring.datasource.password= spring.datasource.type=com.alibaba.druid.pool.DruidDataSource mybatis.type-aliases-package=com.itheima.domain templates文件夹下加入相关模板页面
add.html
讯享网<!DOCTYPE html>
<html>
<head>
<meta charset="UTF-8">
<title>用户添加页面</title>
</head>
<body>
用户添加
</body>
</html>
update.html
<!DOCTYPE html>
<html>
<head>
<meta charset="UTF-8">
<title>用户更新页面</title>
</head>
<body>
用户更新
</body>
</html>
login.html
讯享网<!DOCTYPE html>
<html>
<head>
<meta charset="UTF-8">
<title>登录页面</title>
</head>
<body>
<h3>登录</h3>
<h3 th:text="${msg}" style="color: red"></h3>

<form method="post" action="login">
    用户名:<input type="text" name="name"/><br/>
    密码:<input type="password" name="password"/><br/>
    <input type="submit" value="登录"/>
</form>
</body>
</html>
noAuth.html
<!DOCTYPE html>
<html>
<head>
<meta charset="UTF-8">
<title>未授权提示页面</title>
</head>
<body>
亲,你未经授权访问该页面
</body>
</html>
讯享网package com.itheima.shiro;

import java.util.LinkedHashMap;
import java.util.Map;

import org.apache.shiro.spring.web.ShiroFilterFactoryBean;
import org.apache.shiro.web.mgt.DefaultWebSecurityManager;
import org.springframework.beans.factory.annotation.Qualifier;
import org.springframework.context.annotation.Bean;
import org.springframework.context.annotation.Configuration;

import at.pollux.thymeleaf.shiro.dialect.ShiroDialect;

/
 * Shiro的配置类
 *
 * 关于Configuration的讲解,可参考一下博客:https://www.cnblogs.com/WUXIAOCHANG/p/10877266.html
 * @author lenovo
 *
 */
@Configuration
public class ShiroConfig {

    /
     * 创建ShiroFilterFactoryBean
     */
    @Bean
    public ShiroFilterFactoryBean getShiroFilterFactoryBean(@Qualifier("securityManager")DefaultWebSecurityManager securityManager){

        ShiroFilterFactoryBean shiroFilterFactoryBean = new ShiroFilterFactoryBean();

        //设置安全管理器
        shiroFilterFactoryBean.setSecurityManager(securityManager);

        //添加Shiro内置过滤器
        /
         * Shiro内置过滤器,可以实现权限相关的拦截器
         *    常用的过滤器:
         *       anon: 无需认证(登录)可以访问
         *       authc: 必须认证才可以访问
         *       user: 如果使用rememberMe的功能可以直接访问
         *       perms: 该资源必须得到资源权限才可以访问
         *       role: 该资源必须得到角色权限才可以访问
         */
        Map<String,String> filterMap = new LinkedHashMap<String,String>();
        /*filterMap.put("/add", "authc");
        filterMap.put("/update", "authc");*/

        filterMap.put("/testThymeleaf", "anon");
        //放行login.html页面
        filterMap.put("/login", "anon");

        //授权过滤器
        //注意:当前授权拦截后,shiro会自动跳转到未授权页面
        //perms括号中的内容是权限的值
        filterMap.put("/add", "perms[user:add]");
        filterMap.put("/update", "perms[user:update]");

        filterMap.put("/*", "authc");

        //修改调整的登录页面
        shiroFilterFactoryBean.setLoginUrl("/toLogin");
        //设置未授权提示页面
        shiroFilterFactoryBean.setUnauthorizedUrl("/noAuth");

        shiroFilterFactoryBean.setFilterChainDefinitionMap(filterMap);


        return shiroFilterFactoryBean;
    }

    /
     * 创建DefaultWebSecurityManager
     *
     * 里面主要定义了登录,创建subject,登出等操作
     */
    @Bean(name="securityManager")
    public DefaultWebSecurityManager getDefaultWebSecurityManager(@Qualifier("userRealm")UserRealm userRealm){
        DefaultWebSecurityManager securityManager = new DefaultWebSecurityManager();
        //关联realm
        securityManager.setRealm(userRealm);
        return securityManager;
    }

    /
     * 创建Realm
     */
    @Bean(name="userRealm")
    public UserRealm getRealm(){
        return new UserRealm();
    }

    /
     * 配置ShiroDialect,用于thymeleaf和shiro标签配合使用
     */
    @Bean
    public ShiroDialect getShiroDialect(){
        return new ShiroDialect();
    }
}
com.itheima.shiro包下新建UserRealm.java类
package com.itheima.shiro; import org.apache.shiro.SecurityUtils; import org.apache.shiro.authc.AuthenticationException; import org.apache.shiro.authc.AuthenticationInfo; import org.apache.shiro.authc.AuthenticationToken; import org.apache.shiro.authc.SimpleAuthenticationInfo; import org.apache.shiro.authc.UsernamePasswordToken; import org.apache.shiro.authz.AuthorizationInfo; import org.apache.shiro.authz.SimpleAuthorizationInfo; import org.apache.shiro.realm.AuthorizingRealm; import org.apache.shiro.subject.PrincipalCollection; import org.apache.shiro.subject.Subject; import org.springframework.beans.factory.annotation.Autowired; import com.itheima.domain.User; import com.itheima.service.UserService; / * 自定义Realm * (1)AuthenticatingRealm:shiro中的用于进行认证的领域,实现doGetAuthentcationInfo方法实现用户登录时的认证逻辑; * (2)AuthorizingRealm:shiro中用于授权的领域,实现doGetAuthrozitionInfo方法实现用户的授权逻辑,AuthorizingRealm继承了AuthenticatingRealm, * 所以在实际使用中主要用到的就是这个AuthenticatingRealm类; * (3)AuthenticatingRealm、AuthorizingRealm这两个类都是shiro中提供了一些线程的realm接口 * (4)在与spring整合项目中,shiro的SecurityManager会自动调用这两个方法,从而实现认证和授权,可以结合shiro的CacheManager将认证和授权信息保存在缓存中, * 这样可以提高系统的处理效率。 * */ public class UserRealm extends AuthorizingRealm{ @Autowired private UserService userSerivce; / * 执行认证逻辑 */ @Override protected AuthenticationInfo doGetAuthenticationInfo(AuthenticationToken arg0) throws AuthenticationException { System.out.println("执行认证逻辑"); //编写shiro判断逻辑,判断用户名和密码 //1.判断用户名 token中的用户信息是登录时候传进来的 UsernamePasswordToken token = (UsernamePasswordToken)arg0; User user = userSerivce.findByName(token.getUsername()); if(user==null){ //用户名不存在 return null;//shiro底层会抛出UnKnowAccountException } //2.判断密码 //第二个字段是user.getPassword(),注意这里是指从数据库中获取的password。第三个字段是realm,即当前realm的名称。 //这块对比逻辑是先对比username,但是username肯定是相等的,所以真正对比的是password。 //从这里传入的password(这里是从数据库获取的)和token(filter中登录时生成的)中的password做对比,如果相同就允许登录, // 不相同就抛出IncorrectCredentialsException异常。 //如果认证不通过,就不会执行下面的授权方法了 return new SimpleAuthenticationInfo(user,user.getPassword(),""); } / * 执行授权逻辑 */ @Override protected AuthorizationInfo doGetAuthorizationInfo(PrincipalCollection arg0) { //doGetAuthorizationInfo方法可能会执行多次,权限判断次数多少,就会执行多少次 System.out.println("执行授权逻辑1"); System.out.println("执行授权逻辑2"); //给资源进行授权 SimpleAuthorizationInfo info = new SimpleAuthorizationInfo(); //添加资源的授权字符串 //info.addStringPermission("user:add"); //到数据库查询当前登录用户的授权字符串 //获取当前登录用户 Subject subject = SecurityUtils.getSubject(); User user = (User)subject.getPrincipal(); User dbUser = userSerivce.findById(user.getId()); info.addStringPermission(dbUser.getPerms()); return info; } } 讯享网package com.itheima.domain; public class User { private Integer id; private String name; private String password; private String perms; public String getPerms() { return perms; } public void setPerms(String perms) { this.perms = perms; } public Integer getId() { return id; } public void setId(Integer id) { this.id = id; } public String getName() { return name; } public void setName(String name) { this.name = name; } public String getPassword() { return password; } public void setPassword(String password) { this.password = password; } }
package com.itheima.mapper; import com.itheima.domain.User; public interface UserMapper { public User findByName(String name); public User findById(Integer id); } com.itheima.mapper包下新建UserMapper.xml
讯享网<?xml version="1.0" encoding="UTF-8" ?> <!DOCTYPE mapper PUBLIC "-//mybatis.org//DTD Mapper 3.0//EN" "http://mybatis.org/dtd/mybatis-3-mapper.dtd"> <!-- 该文件存放CRUD的sql语句 --> <mapper namespace="com.itheima.mapper.UserMapper"> <select id="findByName" parameterType="string" resultType="user"> SELECT id, NAME, PASSWORD FROM user where name = #{value} </select> <select id="findById" parameterType="int" resultType="user"> SELECT id, NAME, PASSWORD, perms FROM user where id = #{value} </select> </mapper>
package com.itheima.service; import com.itheima.domain.User; public interface UserService { public User findByName(String name); public User findById(Integer id); } com.itheima.service.impl下新建UserServiceImpl.java
讯享网package com.itheima.service.impl; import org.apache.tomcat.util.net.openssl.ciphers.Authentication; import org.springframework.beans.factory.annotation.Autowired; import org.springframework.stereotype.Service; import org.springframework.transaction.annotation.Transactional; import com.itheima.domain.User; import com.itheima.mapper.UserMapper; import com.itheima.service.UserService; @Service public class UserServiceImpl implements UserService{ //注入Mapper接口 @Autowired private UserMapper userMapper; @Override public User findByName(String name) { return userMapper.findByName(name); } @Override public User findById(Integer id) { return userMapper.findById(id); } }
package com.itheima.controller;

import org.apache.shiro.SecurityUtils;
import org.apache.shiro.authc.AuthenticationException;
import org.apache.shiro.authc.IncorrectCredentialsException;
import org.apache.shiro.authc.UnknownAccountException;
import org.apache.shiro.authc.UsernamePasswordToken;
import org.apache.shiro.subject.Subject;
import org.springframework.beans.factory.annotation.Autowired;
import org.springframework.stereotype.Controller;
import org.springframework.ui.Model;
import org.springframework.web.bind.annotation.RequestMapping;
import org.springframework.web.bind.annotation.ResponseBody;

import com.itheima.service.UserService;

@Controller
public class UserController {

    /
     * 测试方法
     */
    @RequestMapping("/hello")
    @ResponseBody
    public String hello(){
        System.out.println("UserController.hello()");
        return "ok";
    }

    @RequestMapping("/add")
    public String add(){
        return "/user/add";
    }

    @RequestMapping("/update")
    public String update(){
        return "/user/update";
    }

    @RequestMapping("/toLogin")
    public String toLogin(){
        return "/login";
    }

    @RequestMapping("/noAuth")
    public String noAuth(){
        return "/noAuth";
    }

    /
     * 测试thymeleaf
     */
    @RequestMapping("/testThymeleaf")
    public String testThymeleaf(Model model){
        //把数据存入model
        model.addAttribute("name", "吴先生");
        //返回test.html
        return "test";
    }

    /
     * 登录逻辑处理
     */
    @RequestMapping("/login")
    public String login(String name,String password,Model model){
        System.out.println("name="+name);
        /
         * 使用Shiro编写认证操作
         */
        //1.获取Subject
        Subject subject = SecurityUtils.getSubject();

        //2.封装用户数据
        UsernamePasswordToken token = new UsernamePasswordToken(name,password);

        //3.执行登录方法
        try {
            subject.login(token);

            //登录成功
            //跳转到test.html
            return "redirect:/testThymeleaf";
        } catch (UnknownAccountException e) {
            //e.printStackTrace();
            //登录失败:用户名不存在,UnknownAccountException是Shiro抛出的找不到用户异常
            model.addAttribute("msg", "用户名不存在");
            return "login";
        }catch (IncorrectCredentialsException e) {
            //e.printStackTrace();
            //登录失败:密码错误,IncorrectCredentialsException是Shiro抛出的密码错误异常
            model.addAttribute("msg", "密码错误");
            return "login";
        }
    }
}
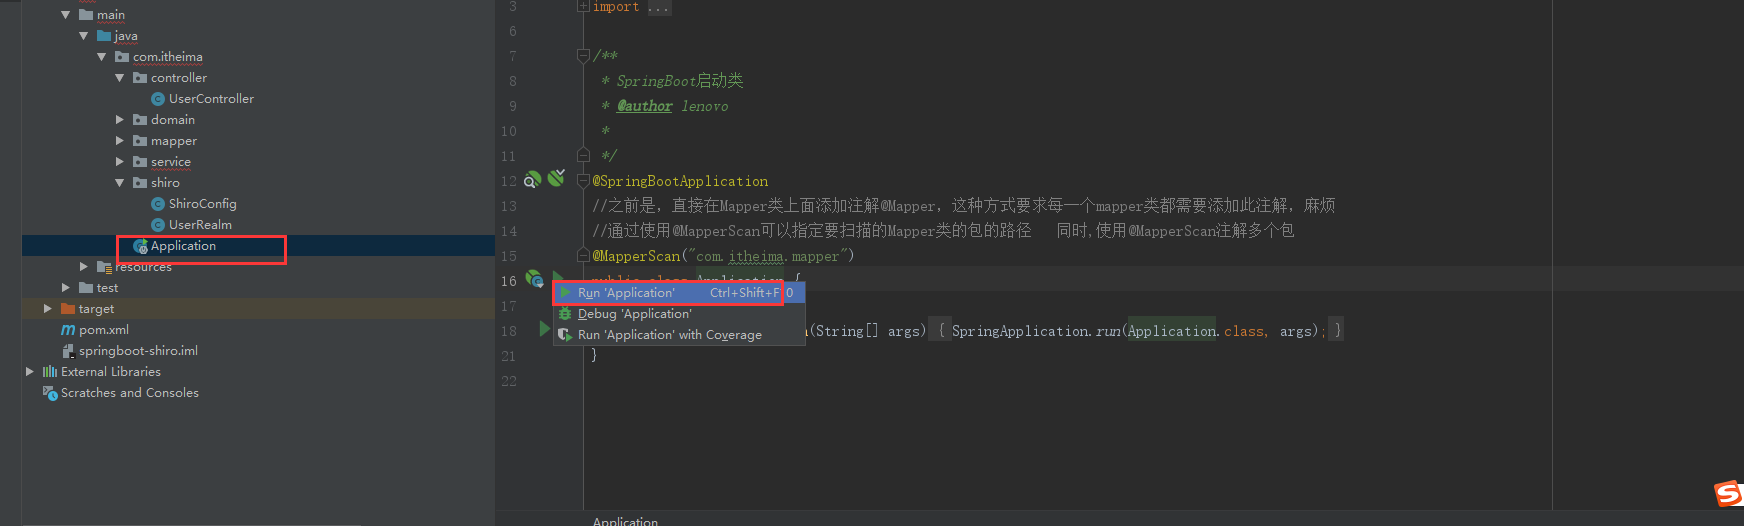
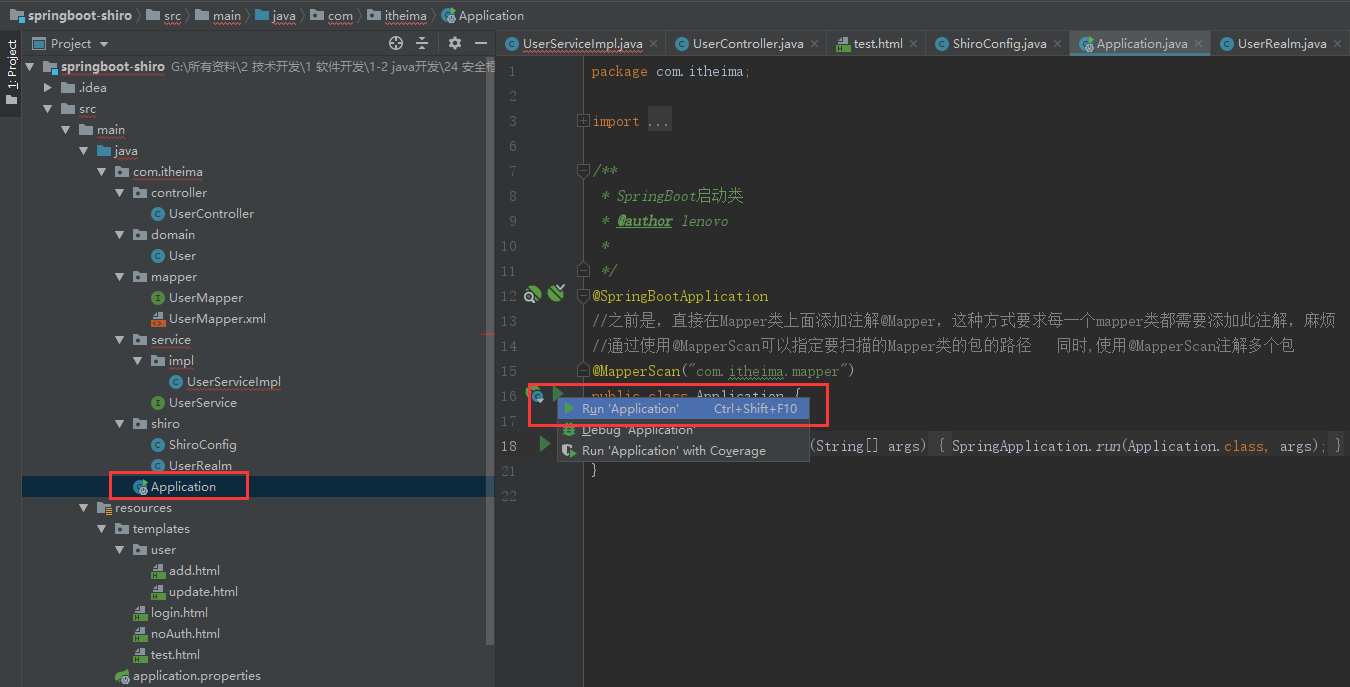
3.9 Application启动类配置
讯享网package com.itheima; import org.mybatis.spring.annotation.MapperScan; import org.springframework.boot.SpringApplication; import org.springframework.boot.autoconfigure.SpringBootApplication; / * SpringBoot启动类 * @author lenovo * */ @SpringBootApplication //之前是,直接在Mapper类上面添加注解@Mapper,这种方式要求每一个mapper类都需要添加此注解,麻烦 //通过使用@MapperScan可以指定要扫描的Mapper类的包的路径 同时,使用@MapperScan注解多个包 @MapperScan("com.itheima.mapper") public class Application { public static void main(String[] args) { SpringApplication.run(Application.class, args); } }
3.10 创建后项目结构
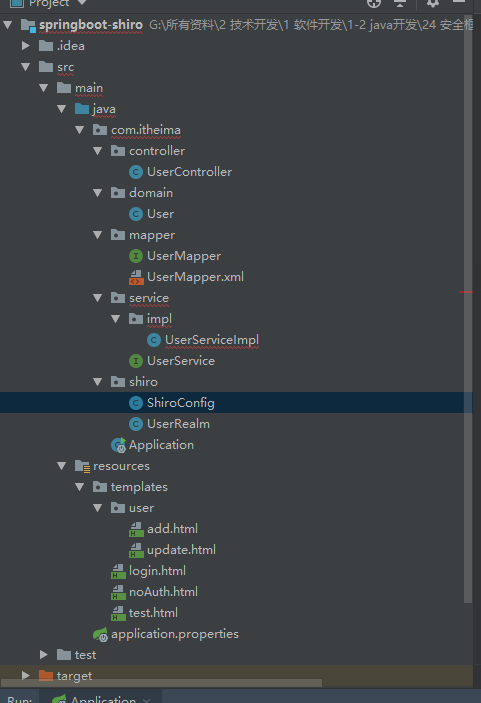
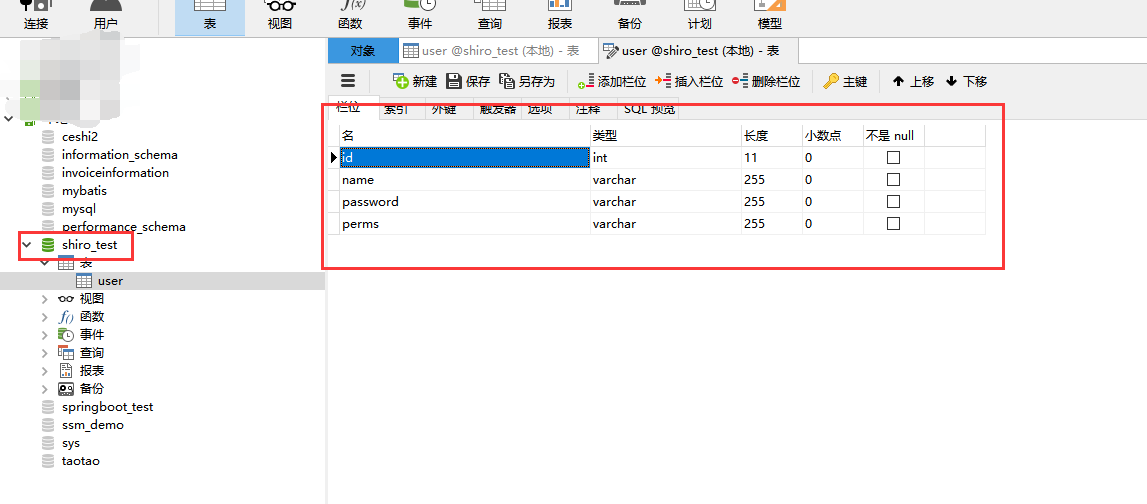
往数据库插入一条数据

3.12 运行项目并访问
访问http://localhost:8080/add或者http://localhost:8080/update,可以看到被拦截了,重定向到了登录页面


访问http://localhost:8080/login,进行登录
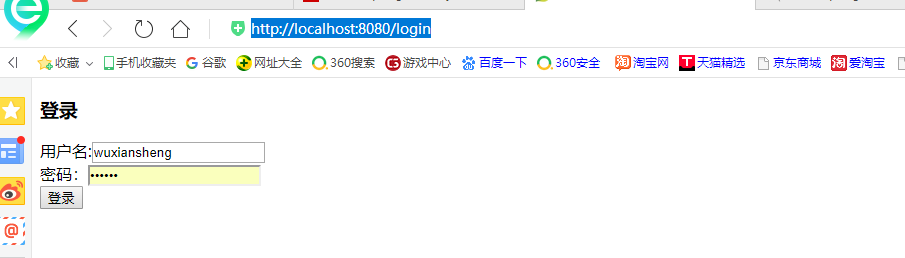
登录成功

我们在数据库添加的权限是修改的,我们试试登录后,访问添加页面

可以看到,已经被拦截了
四、项目源码与资料下载
五、参考文章
-
- https://www.cnblogs.com/jpfss/p/8352031.html
- https://blog.csdn.net/liyuejin/article/details/
- http://yun.itheima.com/open/283.html?1810mcg
版权声明:本文内容由互联网用户自发贡献,该文观点仅代表作者本人。本站仅提供信息存储空间服务,不拥有所有权,不承担相关法律责任。如发现本站有涉嫌侵权/违法违规的内容,请联系我们,一经查实,本站将立刻删除。
如需转载请保留出处:https://51itzy.com/kjqy/71478.html