
最近在改进公司的研发流程,发现数据库脚本这块确实头疼,虽然与代码一样在gitlab上管理,但是数据库的运行状态确实失控的。应用版本的回退总是收到数据库结构的限制,不能按需回退。
在github上发现flyway这个开源项目可以对数据库的脚本的变更进行管理,并且记录变化,动态执行DDL,实现脚本状态与数据库结构联动。Flyway的具体使用方法参见github的官方说明:https://github.com/flyway/flyway
突然想到可以将Flyway纳入到pipeline中,通过与代码的CI/CD流水线关联,岂不是可以实现数据库与应用版本的同步更新。
实现原理:
一、环境准备
- 代码托管:GitLab
- 流水线工具:Jenkins
- 镜像构建:docker
- 数据库:mysql 5.7
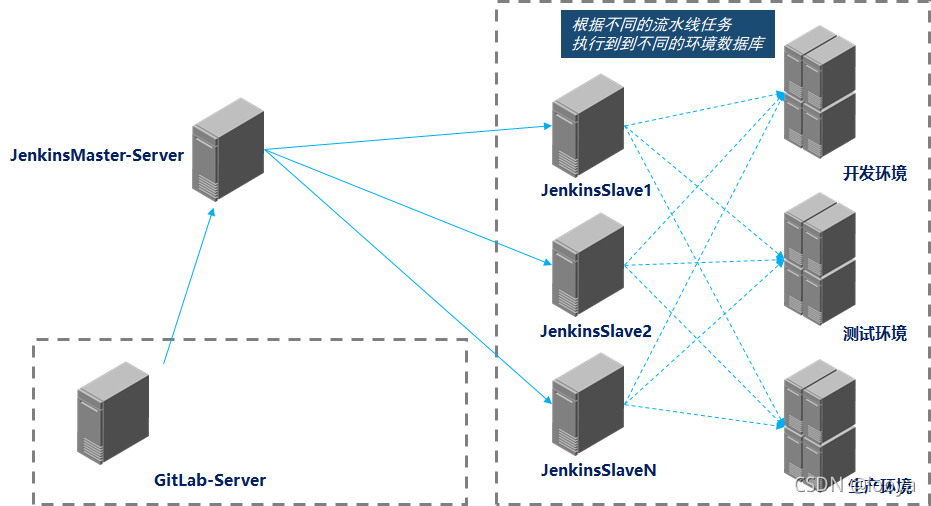
- 容器运行平台:K8S 1.20.1(在k8s中运行jenkins代理服务,用于运行flyway的容器。非必须,也可以直接在jenkins服务器上运行)
二、数据准备
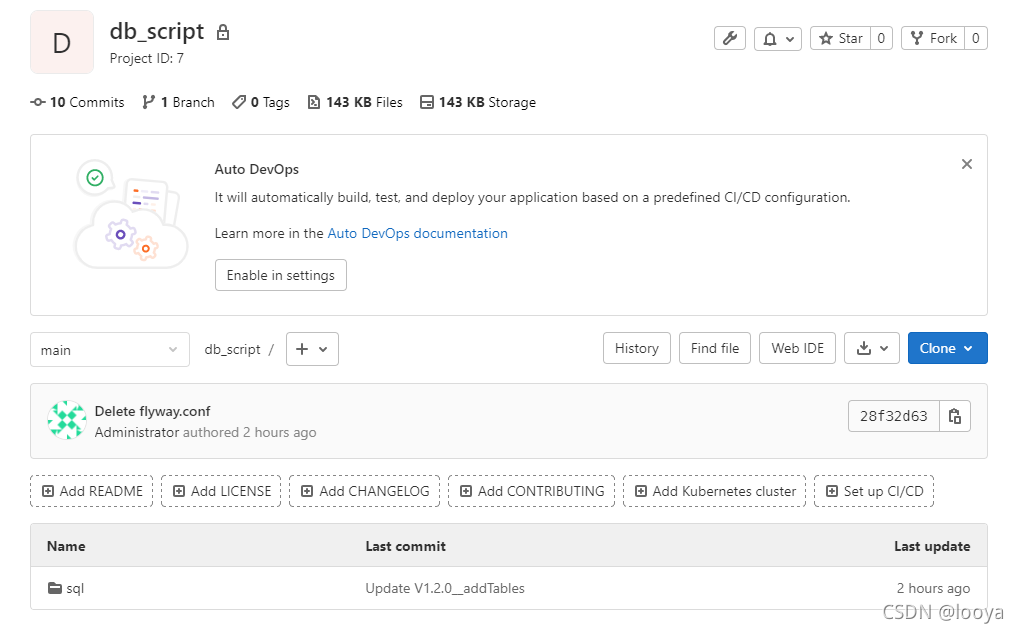
1、创建数据库脚本仓库
在gitlab中创建数据库脚本的仓库“db_script”,其目录结构只有一个“sql”目录,用于存放不通阶段的sql脚本,如下:
2、创建流水线脚本
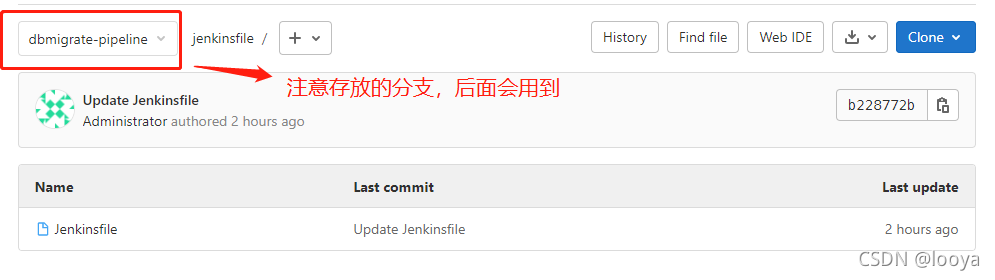
2.1 在gitlab中创建jenkinsfile的仓库“jenkinsfile”,用来存放执行的pipeline脚本。如下:
2.2 编写Jenkinsfile文件,这是pipeline脚本,这里启用的是jenkins master/salve模式的声明式流水线,savle在k8s集群中运行。里面jenkins的Credentials请替换为自己环境的,k8s环境也替换为自己环境的。
这段流水线脚本中,在k8s容器中启动了一个pod,其中运行了4个容器,一个是jnlp用于和jenkins master节点通信;一个是migrate,用于执行sql脚本;其他两个是docker构建和kubectl操作的,这里没有用,其他项目使用到,没有删除。
pipeline { agent { kubernetes { cloud 'kubernetes-default' slaveConnectTimeout 120 yaml ''' apiVersion: v1 kind: Pod spec: containers: - args: [\'$(JENKINS_SECRET)\', \'$(JENKINS_NAME)\'] image: \'registry.cn-hangzhou.aliyuncs.com/luanyang_citools/jnlp:alpine\' name: jnlp imagePullPolicy: IfNotPresent volumeMounts: - mountPath: "/etc/localtime" name: "volume-2" readOnly: false - mountPath: "/etc/hosts" name: "volume-hosts" readOnly: false - command: - "cat" env: - name: "LANGUAGE" value: "en_US:en" - name: "LC_ALL" value: "en_US.UTF-8" - name: "LANG" value: "en_US.UTF-8" image: "registry.cn-hangzhou.aliyuncs.com/luanyang_citools/flyway:8.0.5-alpine-su" imagePullPolicy: "IfNotPresent" name: "migrate" tty: true volumeMounts: - mountPath: "/etc/localtime" name: "volume-2" readOnly: false - mountPath: "/etc/hosts" name: "volume-hosts" readOnly: false - command: - "cat" env: - name: "LANGUAGE" value: "en_US:en" - name: "LC_ALL" value: "en_US.UTF-8" - name: "LANG" value: "en_US.UTF-8" image: "registry.cn-hangzhou.aliyuncs.com/luanyang_citools/kubectl:self-1.17" imagePullPolicy: "IfNotPresent" name: "kubectl" tty: true volumeMounts: - mountPath: "/etc/localtime" name: "volume-2" readOnly: false - mountPath: "/var/run/docker.sock" name: "volume-docker" readOnly: false - mountPath: "/mnt/.kube/" name: "volume-kubeconfig" readOnly: false - mountPath: "/etc/hosts" name: "volume-hosts" readOnly: false - command: - "cat" env: - name: "LANGUAGE" value: "en_US:en" - name: "LC_ALL" value: "en_US.UTF-8" - name: "LANG" value: "en_US.UTF-8" image: "registry.cn-hangzhou.aliyuncs.com/luanyang_citools/docker:19.03.9-git" imagePullPolicy: "IfNotPresent" name: "docker" tty: true volumeMounts: - mountPath: "/etc/localtime" name: "volume-2" readOnly: false - mountPath: "/var/run/docker.sock" name: "volume-docker" readOnly: false - mountPath: "/etc/hosts" name: "volume-hosts" readOnly: false value: "en_US.UTF-8" restartPolicy: "Never" nodeSelector: build: "true" securityContext: {} volumes: - hostPath: path: "/var/run/docker.sock" name: "volume-docker" - hostPath: path: "/usr/share/zoneinfo/Asia/Shanghai" name: "volume-2" - hostPath: path: "/etc/hosts" name: "volume-hosts" - name: volume-maven-repo persistentVolumeClaim: claimName: dockercicd-data - name: "volume-kubeconfig" secret: secretName: "multi-kube-config" ''' } } stages { stage('pulling Code') { parallel { stage('pulling Code') { when { expression { env.gitlabBranch == null } } steps { git(branch: "${BRANCH}", credentialsId: 'cf-e10f-477c-a066-3711f9fe44d7', url: "${REPO_URL}") } } stage('pulling Code by trigger') { when { expression { env.gitlabBranch != null } } steps { git(url: "${REPO_URL}", branch: env.gitlabBranch, credentialsId: 'cf-e10f-477c-a066-3711f9fe44d7') } } } } stage('migrate-dbconfig') { steps { withCredentials(bindings: [usernamePassword(credentialsId: 'DATABASE_USER', passwordVariable: 'Password', usernameVariable: 'Username')]){ container(name: 'migrate') { sh """ flyway -user=${Username} -password=${Password} -url="${DBURL}" -connectRetries=60 migrate """ } } } } } } 讯享网
3、配置Jenkins的基础环境
3.1 需要安装的插件,详见列表。插件安装请自行百度,这里不在详述。
- Hidden Parameter
- List Git Branches (and more)
- String Parameter
- kubernetes
3.2 创建Jenkins的管理集群,“Manage Jenkins”—>“Configure System”—>“Cloud”(最下面)—>“Configure Clouds”。
3.2.1 集群命名,此处命名与pipeline流水线中集群名称一致。

3.2.2 编辑详情
如果jenkins与应用在同一个k8s集群中,只要配置“kubernetes地址”与“Jenkins地址”两个参数即可。
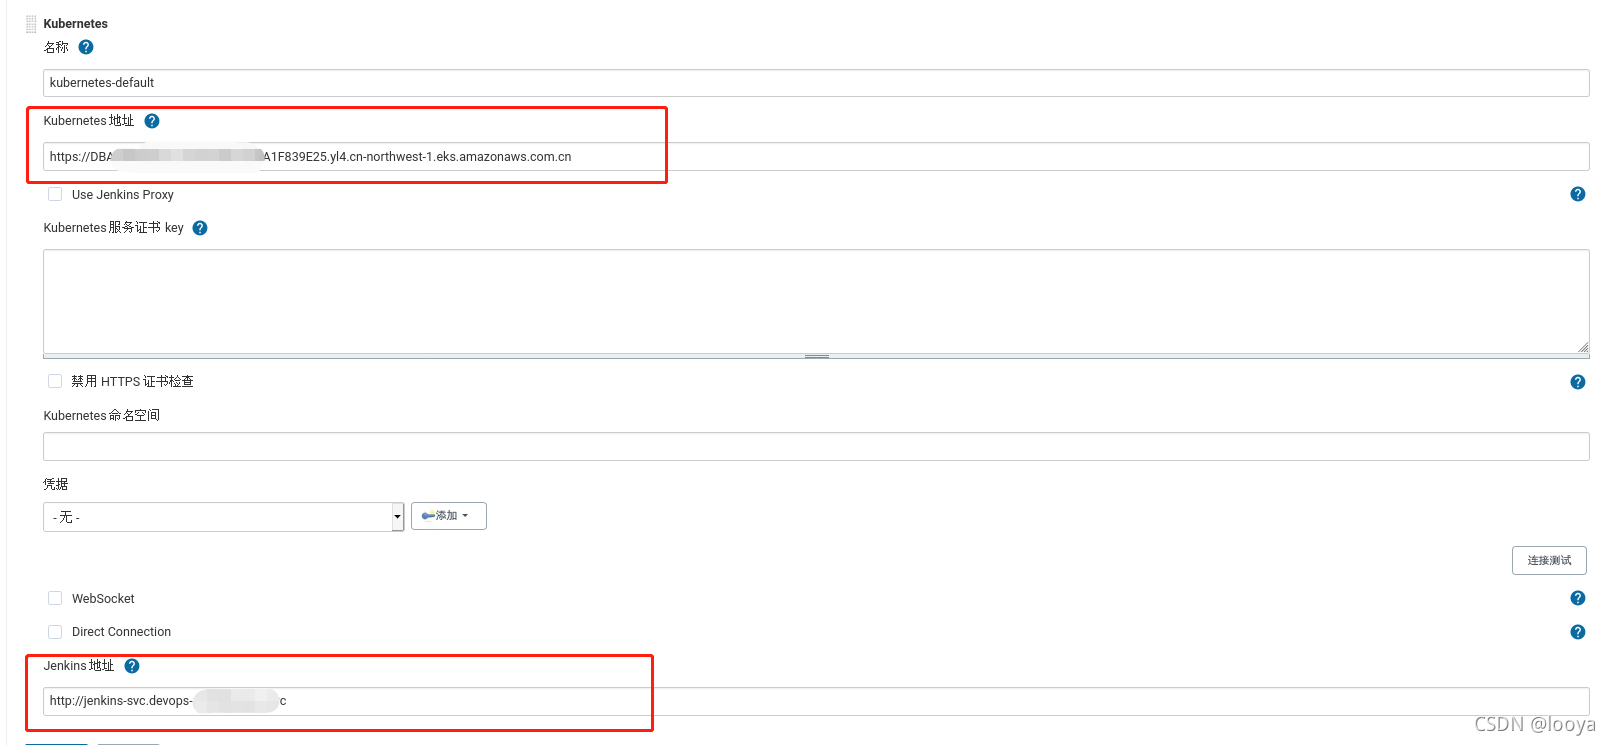
如果jenkins与应用不在在同一个k8s集群中,或者要管理多个k8s集群,则还需要完善“Kubernetes server certificate key(服务证书)”、“Credentials(凭据)”两个参数。两个参数的配置详见博客Jenkins基于https的k8s配置
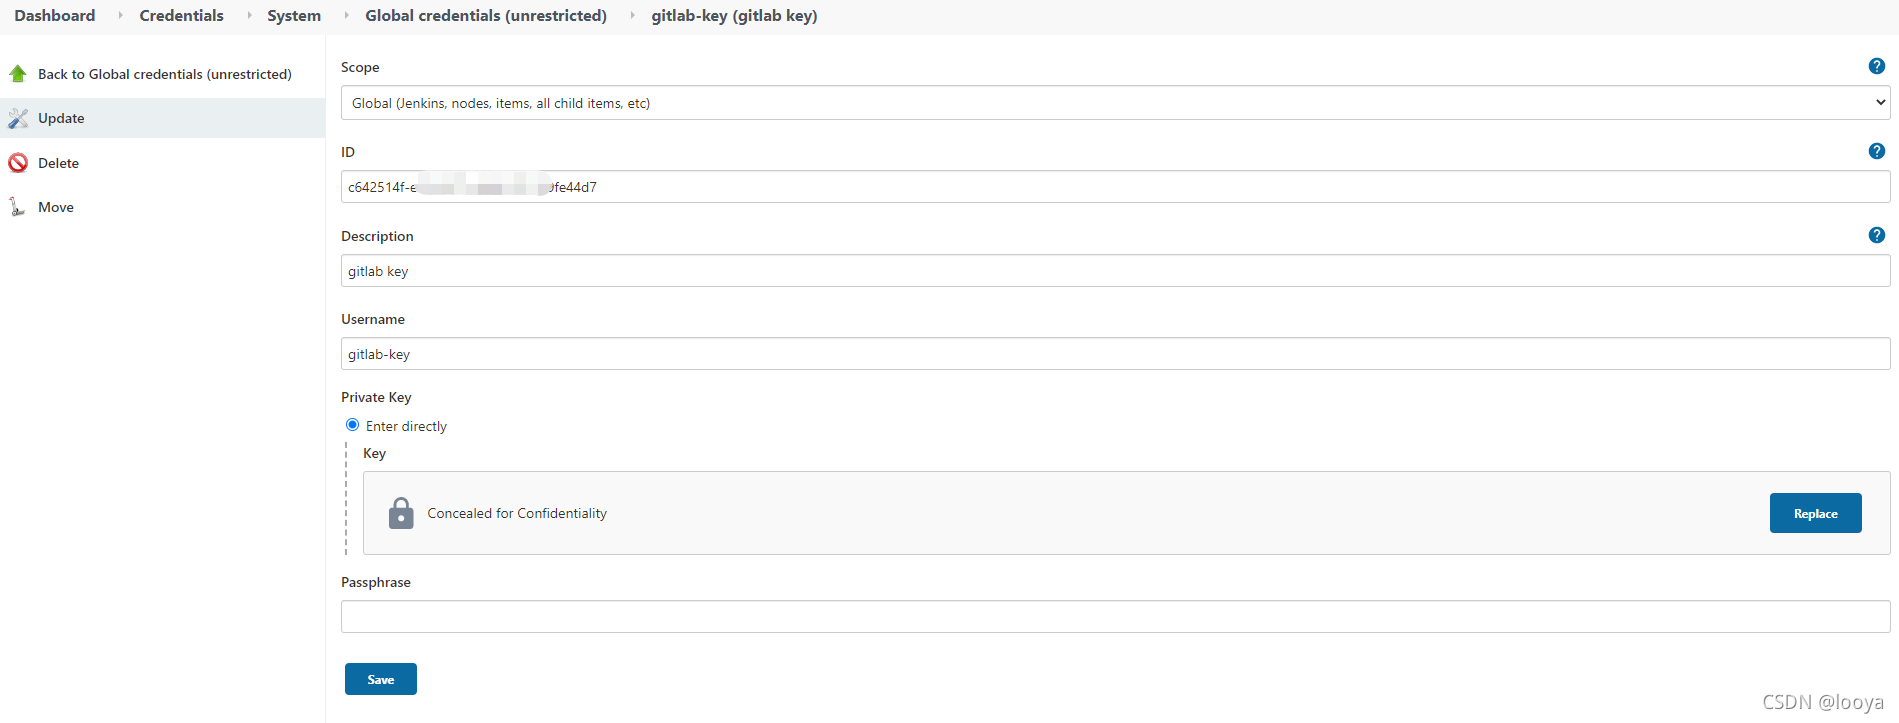
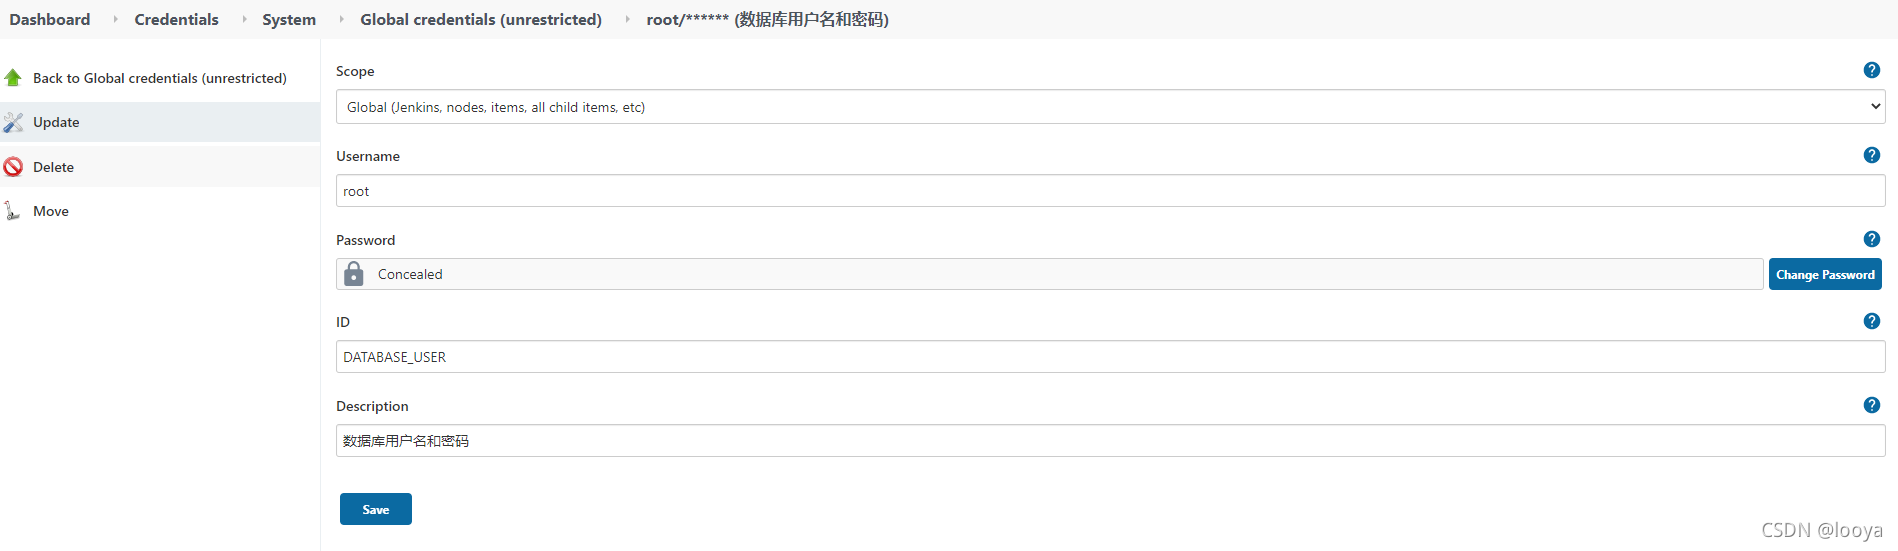
3.2.3 添加凭据
- 登录gitlab服务器的凭据(类型:SSH Username with private key)
- 登录数据库服务器的凭据(类型:Username with password)
三、流水线任务
1、制作镜像
经过测试,DockerHub上的官方镜像使用的flyway用户运行command,在流水线启动容器的时候执行sh脚本,会卡主不动,替换为root用户,则可以正常执行sh。
1.1 修改Dockerfile
那么就不能直接使用flyway/flyway:8.0.0-alpine镜像,从github上下载https://github.com/flyway/flyway-docker,修改“flyway-docker/alpine/Dockerfile”,去掉添加用户部分:
讯享网FROM eclipse-temurin:11-alpine RUN apk --no-cache add --update bash openssl # Add the flyway user and step in the directory # RUN addgroup flyway \ #注释掉的 # && adduser -S -h /flyway -D -G flyway flyway #注释掉的 RUN mkdir /flyway #新增的 WORKDIR /flyway # Change to the flyway user # USER flyway #注释掉的 ENV FLYWAY_VERSION 8.0.5 RUN wget https://repo1.maven.org/maven2/org/flywaydb/flyway-commandline/${FLYWAY_VERSION}/flyway-commandline-${FLYWAY_VERSION}.tar.gz \ && tar -xzf flyway-commandline-${FLYWAY_VERSION}.tar.gz \ && mv flyway-${FLYWAY_VERSION}/* . \ && rm flyway-commandline-${FLYWAY_VERSION}.tar.gz ENV PATH="/flyway:${PATH}" ENTRYPOINT ["flyway"] CMD ["-?"]
1.2 运行docker build:
docker build -t registry.cn-hangzhou.aliyuncs.com/<自己的命名空间>/flyway:8.0.5-alpine-su .编译完成:
Sending build context to Docker daemon 15.36kB
Step 1/9 : FROM eclipse-temurin:11-alpine
11-alpine: Pulling from library/eclipse-temurin
ae5f: Already exists
56981b1bb25b: Already exists
bcff: Already exists
c6fc9c4c0237: Already exists
Digest: sha256:7ee2b4a4bd50151bcd63a3d32c8d2a6249c0cb3665c8fa9f8d4aba72e
Status: Downloaded newer image for eclipse-temurin:11-alpine
---> 7a2d
Step 2/9 : RUN apk --no-cache add --update bash openssl
---> Running in 19b82c0f9d2a
fetch https://dl-cdn.alpinelinux.org/alpine/v3.14/main/x86_64/APKINDEX.tar.gz
fetch https://dl-cdn.alpinelinux.org/alpine/v3.14/community/x86_64/APKINDEX.tar.gz
(1/5) Installing ncurses-terminfo-base (6.2_p-r0)
(2/5) Installing ncurses-libs (6.2_p-r0)
(3/5) Installing readline (8.1.0-r0)
(4/5) Installing bash (5.1.4-r0)
Executing bash-5.1.4-r0.post-install
(5/5) Installing openssl (1.1.1l-r0)
Executing busybox-1.33.1-r6.trigger
OK: 12 MiB in 22 packages
Removing intermediate container 19b82c0f9d2a
---> 3c511a5d3bef
Step 3/9 : RUN mkdir /flyway
---> Running in 1a7b0d6f0c19
Removing intermediate container 1a7b0d6f0c19
---> df6257bbb491
Step 4/9 : WORKDIR /flyway
---> Running in 7b3945b16420
Removing intermediate container 7b3945b16420
---> 4d81195e7589
Step 5/9 : ENV FLYWAY_VERSION 8.0.5
---> Running in 5f2186eb599b
Removing intermediate container 5f2186eb599b
---> ba92f02ab9e8
Step 6/9 : RUN wget https://repo1.maven.org/maven2/org/flywaydb/flyway-commandline/${FLYWAY_VERSION}/flyway-commandline-${FLYWAY_VERSION}.tar.gz && tar -xzf flyway-commandline-${FLYWAY_VERSION}.tar.gz && mv flyway-${FLYWAY_VERSION}/* . && rm flyway-commandline-${FLYWAY_VERSION}.tar.gz
---> Running in c22a1df47872
Connecting to repo1.maven.org (151.101.24.209:443)
saving to 'flyway-commandline-8.0.5.tar.gz'
flyway-commandline-8 0% | | 176k 0:07:45 ETA
flyway-commandline-8 1% | | 882k 0:03:04 ETA
flyway-commandline-8 3% | | 2494k 0:01:35 ETA
flyway-commandline-8 6% | | 5182k 0:00:59 ETA
flyway-commandline-8 14% | | 11.5M 0:00:29 ETA
flyway-commandline-8 14% | | 11.5M 0:00:35 ETA
flyway-commandline-8 24% |* | 19.3M 0:00:22 ETA
flyway-commandline-8 32% | | 26.3M 0:00:16 ETA
flyway-commandline-8 39% | | 32.1M 0:00:13 ETA
flyway-commandline-8 43% | | 35.2M 0:00:12 ETA
flyway-commandline-8 49% |* | 40.0M 0:00:11 ETA
flyway-commandline-8 57% | | 46.2M 0:00:08 ETA
flyway-commandline-8 65% | | 52.2M 0:00:06 ETA
flyway-commandline-8 73% |* | 58.8M 0:00:05 ETA
flyway-commandline-8 74% |* | 60.0M 0:00:05 ETA
flyway-commandline-8 79% |* | 64.1M 0:00:04 ETA
flyway-commandline-8 89% | | 72.2M 0:00:01 ETA
flyway-commandline-8 99% |* | 79.8M 0:00:00 ETA
flyway-commandline-8 100% || 80.3M 0:00:00 ETA
'flyway-commandline-8.0.5.tar.gz' saved
Removing intermediate container c22a1df47872
---> 2a48fd38d034
Step 7/9 : ENV PATH="/flyway:${PATH}"
---> Running in 220c1f982e72
Removing intermediate container 220c1f982e72
---> eb460c
Step 8/9 : ENTRYPOINT ["flyway"]
---> Running in f725e59d8465
Removing intermediate container f725e59d8465
---> 20d54593b3ae
Step 9/9 : CMD ["-?"]
---> Running in bd26e146fdc4
Removing intermediate container bd26e146fdc4
---> c2ec13a36110
Successfully built c2ec13a36110
查询制作好的镜像:


1.3 推送到自己的镜像仓库:
讯享网docker push registry.cn-hangzhou.aliyuncs.com/<自己的命名空间>/flyway:8.0.5-alpine-su
推送成功:
The push refers to repository [registry.cn-hangzhou.aliyuncs.com/<自己的命名空间>/flyway]
e413cc4bca80: Pushed
492e18b869df: Pushed
c9a8fbe9621f: Pushed
c3fb54c0d681: Layer already exists
ba: Layer already exists
d4c9267a80dd: Layer already exists
1a058d5342cc: Layer already exists
8.0.5-alpine-su: digest: sha256:e69aacac6efa4f9242e3e50f87d7f5d782ec2 size: 1788
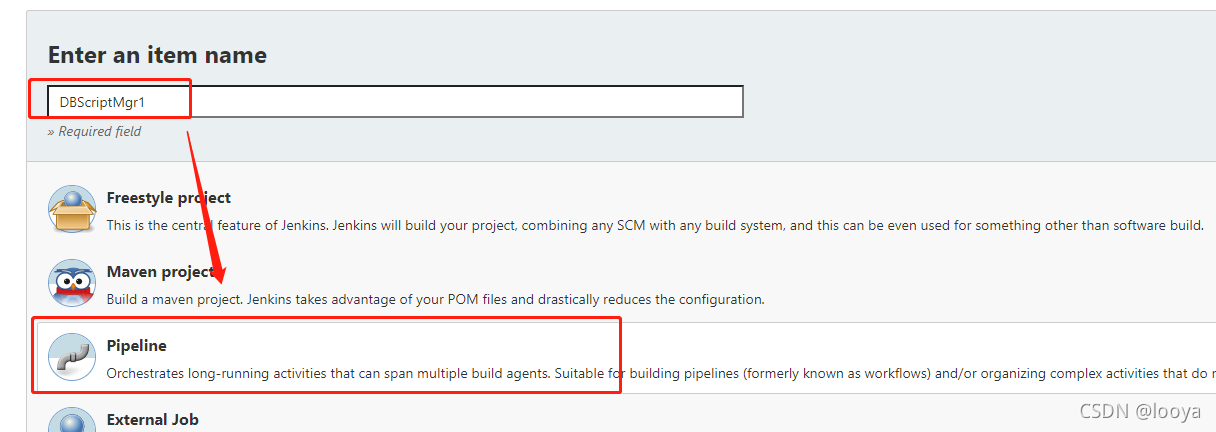
2、创建jenkins的任务
2.1 创建jenkins的pipeline任务
2.2 编辑参数
2.2.1 添加“List Git Branch (and more)”
添加该参数用于获取sql的分支或者tag(按照业务需求获取),这里演示的按照分支获取sql脚本文件分支号。
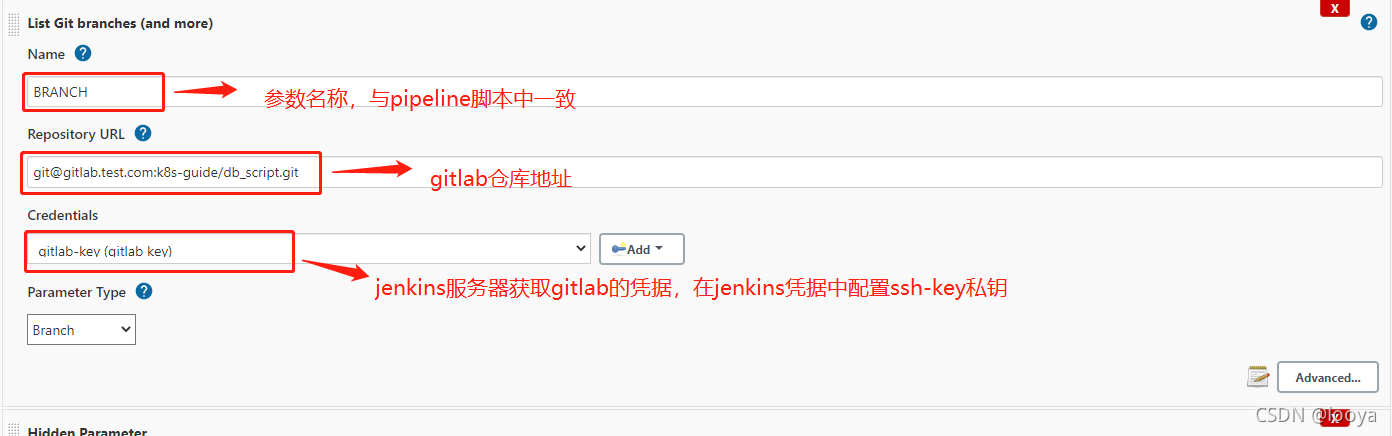
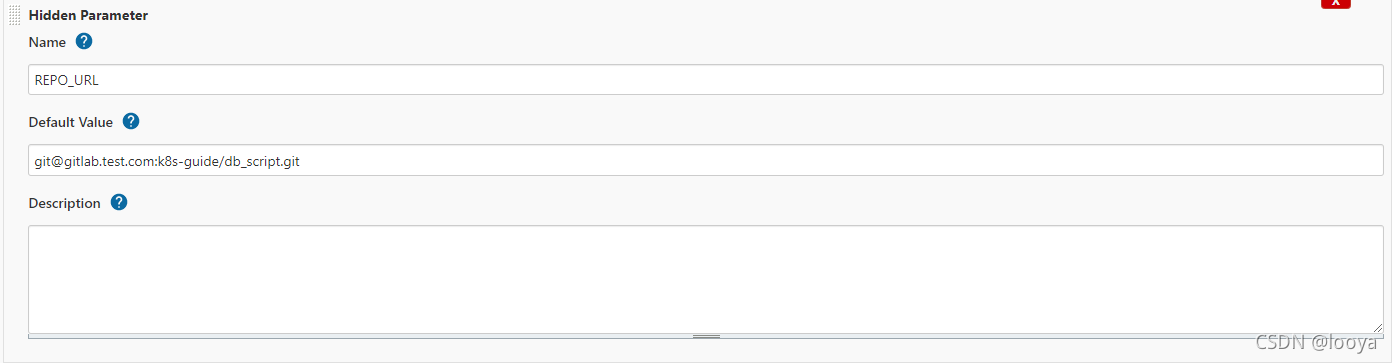
2.2.2 添加 git仓库地址配置
添加该参数用于获取git仓库地址。
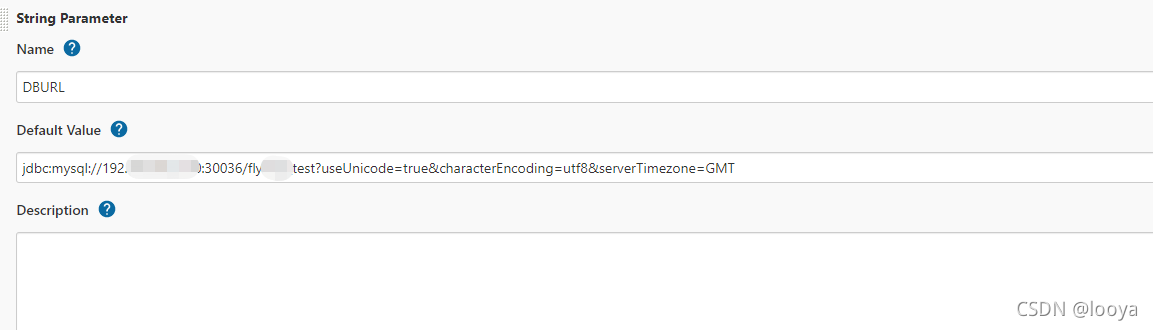
2.2.3 添加数据库连接配置
2.2.4 pipeline脚本编辑
因为之前已经在gitlab上托管了pipeline脚本,所以这里不在jenkins中编写脚本,而是直接从gitlab上下载。

3、编辑脚本测试
3.1 准备sql
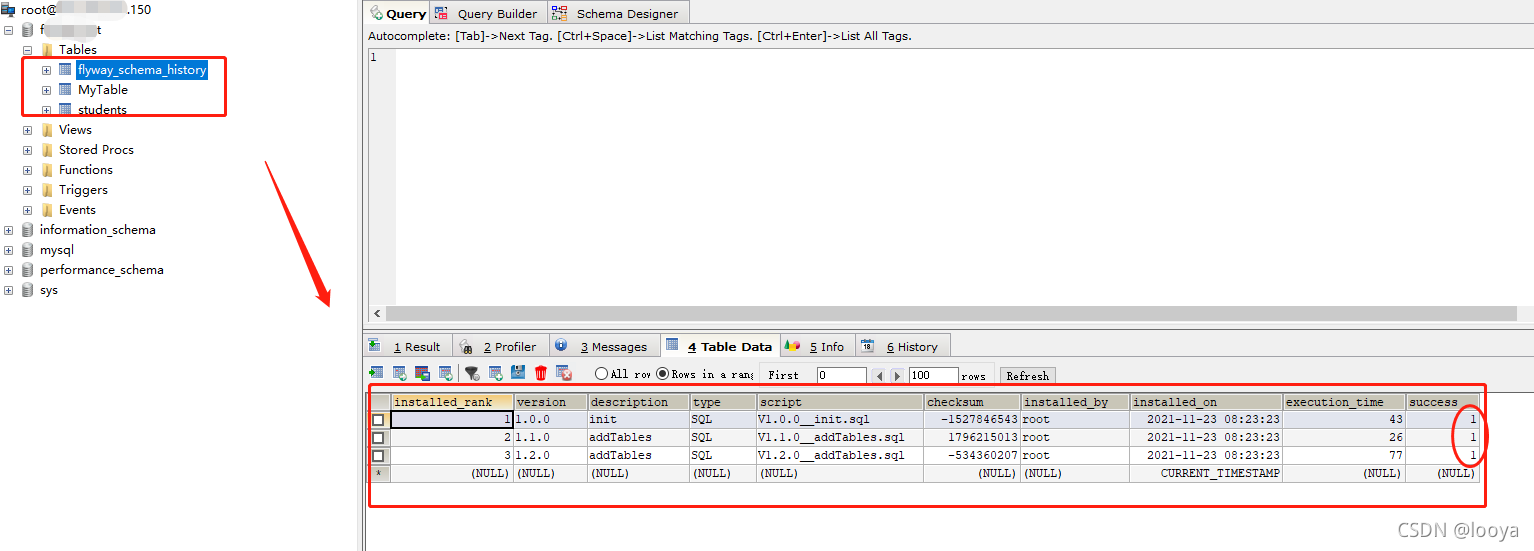
3.1.1 sql/V1.0.0__init.sql
CREATE TABLE MyTable ( MyColumn VARCHAR(100) NOT NULL ); 3.1.2 sql/V1.1.0__addTables.sql
讯享网CREATE TABLE students ( id VARCHAR(100) NOT NULL, name VARCHAR(100) NOT NULL, sex char(1) NOT NULL, address VARCHAR(500) );
3.1.3 sql/V1.2.0__addTables.sql
alter table students MODIFY COLUMN sex varchar(10) NOT NULL; insert into students values('1','zhangsan','male','sdasdada'); insert into students values('2','lisi','fmale','2'); insert into MyTable values('testTable'); 3.2 准备数据库
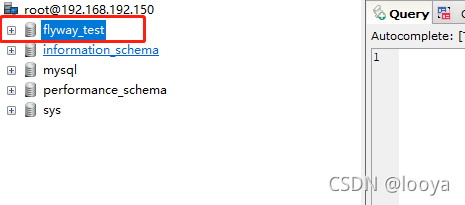
创建数据库连接中对应的数据库。
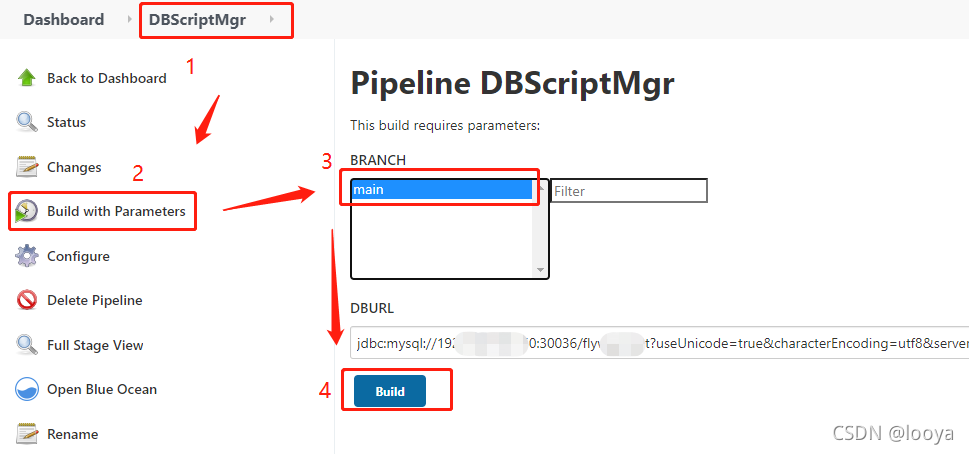
3.3 运行流水线
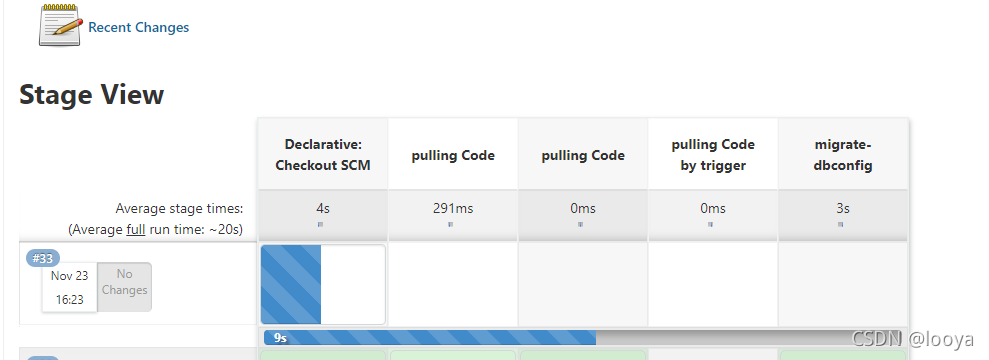
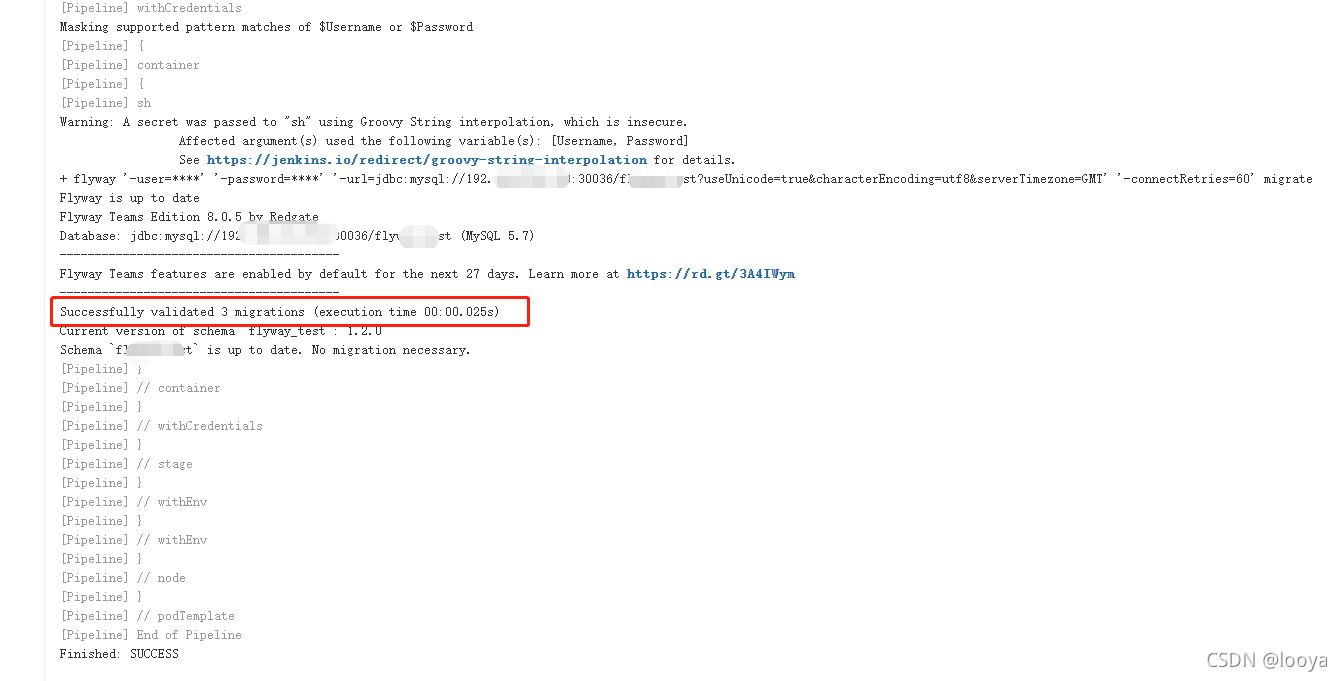
3.3.1 执行流水线
3.3.2 执行结果
版权声明:本文内容由互联网用户自发贡献,该文观点仅代表作者本人。本站仅提供信息存储空间服务,不拥有所有权,不承担相关法律责任。如发现本站有涉嫌侵权/违法违规的内容,请联系我们,一经查实,本站将立刻删除。
如需转载请保留出处:https://51itzy.com/kjqy/58897.html