
用户组基本概念
用户组group,就是具有相同特征的用户的集合体。
【官方文档】
Users and groups:
. Every process (running program) on the system runs as a particular user.
. Every file is owned by a particular user.
. Access to files and directories are restricted by user.
. The user associated with a running process determines the files and directories
accessible to that process.
用户和组:
. 系统上的每个进程(运行程序)都作为特定用户运行。
. 每个文件都由特定用户拥有。
. 用户对文件和目录的访问受到限制。
. 与运行中的进程相关联的用户确定该进程可访问的文件和目录。
使用者标识符:UID和GID
UID 用户标识符
| UID范围 | 用户 | 该UID用户特性 |
|---|---|---|
| 0 | 系统管理员 | 具有root权限,可将其他账号的UID改为0使其具有root权限(不建议) |
| 1~999 | 系统账号 | 通常不可登录(所以才存在/sbin/nologin特殊shell) |
| 1000~60000 | 可登录账号 | 一般用户使用(目前Linux内核3.10.x版支持到2^32-1的UID号码) |
| /sbin/nologin这个特殊的shell可以使账号在登录时无法获得shell环境 | ||
| 根据名称解析库/etc/passswd名称解析:Username<-------->UID |
GID 组标识符
组类别1
管理员组 0
普通用户组 1-65535
系统用户组 1-499(CentOS6), 1-999(CentOS7)
登录用户组 500-60000(CentOS6), 1000-60000(CentOS7)
信息保存位置 /etc/group
根据名称解析库/etc/group名称解析:Groupname<-------->GID
组类别2
用户的基本组
用户的附加组
组类别3
私有组 组名为用户名,且只包含一个用户
公共组 组内包含了一个用户
用户组管理
groupadd 添加组
groupadd [options] group 讯享网
OPTION
-g GID 指定GID 默认是上一个组的GID+1
-r 创建系统组
实例
讯享网[root@localhost etc]# groupadd linux [root@localhost etc]# groupadd -g 1111 java [root@localhost etc]# groupadd -r python [root@localhost etc]# groupadd -r php [root@localhost etc]# cat group linux:x:1001: java:x:1111: python:x:995: php:x:994:
groupmod 修改组属性
groupmod [options] GROUP OPTION
-n 修改组名 groupmod -n newname oldname
-g GID 修改GID
实例
讯享网[root@localhost etc]# groupmod -n linux01 linux [root@localhost etc]# groupmod -g 1234 java [root@localhost etc]# cat group java:x:1234: linux01:x:1001:
groupdel 删除组
groupdel [options] GROUP 不能删除有用户的用户组
讯享网[root@localhost ~]# id anliu uid=12121(anliu) gid=1004(wo) groups=1004(wo) [root@localhost ~]# groupdel wo groupdel: cannot remove the primary group of user 'anliu'
useradd 创建用户
useradd [options] LOGIN useradd -D ;显示创建用户的默认配置 useradd -D [options] ;修改默认选项的值,修改的结果保存于/etc/default/useradd OPTION
-u 指定UID
-g GID/GROUP 指定基本组ID 组需已存在
-r 创建系统用户
-G 指明用户所属的附加组 多个组之间用逗号分隔
-d 指定家目录 家目录之前的目录需已存在
当useradd创建一个新用户时,系统会将这/etc/skel个目录下的所有隐藏文件复制到新用户的home下;指定的家目录路径如果事先存在,则不会为用户复制环境配置文件。
-s 指定用户的默认shell shell列表存储在/etc/shells
-c 指明注释信息
-M --no-create-home,不要自动建立用户的家目录
创建用户时的诸多默认设定配置文件为/etc/login.defs
添加一个用户,变化的文件有
/etc/passwd:用户信息
/etc/shadow:用户密码信息
/etc/group:组用户信息
/etc/gshadow:组用户的密码信息
/home/username
usermod 修改用户属性(只针对已存在的用户)
讯享网usermod [options] LOGIN
OPTION
-u UID 修改UID
-g GID 修改用户所属的基本组
-G --groups GROUP1[,GROUP2,…[,GROUPN]]],修改用户所属的附加组 原来的附加组会被覆盖
-a --append,为用户追加新的附加组 与-G一同使用
-s --shellSHELL,修改用户的默认shell
-l --loginNEW_LOGIN,修改用户名
-c --commentCOMMENT,修改注释信息
-d 修改用户的家目录 用户原有的文件不会被转移至新位置
-m --move-home,将原来的家目录移动为新的家目录 只能与-d选项一同使用
-L --lock,锁定用户密码 即在用户原来的密码字符串之前添加一个"!"
-U --unlock,解锁用户的密码
#将apps用户追加至users用户组 usermod -a -G users apps userdel 删除用户
讯享网userdel [options] LOGIN
OPTION
-r 删除用户并删除其家目录
passwd 修改用户密码
请点击查看passwd命令详解
gpasswd 管理/etc/group和/etc/gshadow
gpasswd [option] group OPTION
-a USERNAME 向组中添加用户
-d USERNAME 从组中移除用户
将apps从wheel组移除:gpasswd -d apps wheel
newgrp 临时切换指定的组为基本组
讯享网newgrp [-] [group]
- 会模拟用户重新登录以实现重新初始化其工作环境
chage 更改用户密码过期信息
chage [options] LOGIN OPTION
-d 指定密码最后修改日期
-E 密码到期的日期 过了这天,此账号不可用,0表示马上过期,-1表示永不过期
-W 密码过期前,提前收到警告信息的天数
-m 密码可以更改的最小天数 为零代表任何时候都可以更改密码
-M 密码保持有效的最大天数
id 显示用户的有效ID
讯享网id [OPTION]... [USER]
OPTION
-u 仅显示有效的UID
-g 仅显示用户的基本组ID
-G 仅显示用户所属的所有组的ID
-n 显示名字而非ID
实例
[root@localhost opt]# id zhao uid=1000(zhao) gid=1000(zhao) groups=1000(zhao) 解析库文件详解
/etc/passwd
讯享网[root@localhost ~]# head -n 1 /etc/passwd root:x:0:0:root:/root:/bin/bash 用户名:口令:用户标识号:组标识号:注释性描述:主目录:登录Shell
用户名(login) 代表用户账号 由大小写字母和/或数字组成,长度不超过8个字符
口令(passwd) 加密后的用户口令字 加密后的用户口令字存放到/etc/shadow文件中
用户标识号(UID) 系统内部用来标识用户
组标识号(GID) 用户所属的用户组对应/etc/group文件中的一条记录
注释性描述 字段记录着用户的一些个人情况
家目录 用户的起始工作目录
登录Shell 用户与Linux系统之间的接口,负责将用户的操作传给内核 系统使用bash为默认的登录Shell
/etc/shadow
[root@localhost opt]# head -n 1 /etc/shadow root:$6$G6rrTzzz75OjgLKl$lNe/HfL9IA2rC1LaGX4RxQxLHYtaSqEionyPsTYFdKGJKPBxZWS8oN9A/6uvoya4/J65AxzV/zuV8qeNPXW1T0::0:99999:7::: 登录名:加密口令:最后一次修改时间:最小时间间隔:最大时间间隔:警告时间:不活动时间: 失效时间:标志 登录名 必须与/etc/passwd中的登录名相一致
加密口令 经过编码的密码(摘要)
| 内容 | 含义 |
|---|---|
| 空 | 对应用户登录时不需要口令 |
| * | 帐号被锁定 |
| !! | 密码过期 |
| $6$ | SHA-512加密 |
| $1$ | MD5加密 |
| $2$ | Blowfish加密 |
| $5$ | SHA-256加密 |
最后一次修改时间 最近修改密码的日期 以1970.01.01开始累加的天数
查看最后一次修改密码是哪一天date -d " number days"
最小时间间隔 密码不可被修改的天数(与第三字段相比)passwd -n #
最大时间间隔 密码需要重新修改的天数(与第三字段相比) 若数值为9999(计算为273年),表示密码的修改不强制;未重新设置密码,这个密码将会变为过期特性
警告时间 密码需要修改期限前的警告天数(与第五字段相比) 密码到期的n天之内,系统会警告该用户
不活动时间 密码过期后的账号宽限时间(密码失效日)(与第五字段相比) 用户没有登录活动但账号仍能保持有效的最大天数
失效时间 账号失效日期 若指定,期满后,该账号就不再是一个合法的账号,不能再用来登录
保留
讯享网[root@localhost ~]# tail -n 1 /etc/shadow zhao:$6$66FVAJVw$FyfAM5mGHn3wrcLgNkfQjC1xwGXGlCnF1Le95Lo1SaFfRL93HvoQwSaV9IInaRbaONB4xGnUv1eCLSfh16Wev0:18174:5:60:7:5:16679:
综合练习
[root@localhost ~]# groupadd -g 2000 net01 [root@localhost ~]# grep "net01" /etc/group net01:x:2000: [root@localhost ~]# groupdel net01 [root@localhost ~]# useradd user01 [root@localhost ~]# grep 'user01' /etc/passwd /etc/shadow /etc/group /etc/gshadow /etc/passwd:user01:x:1002:1007::/home/user01:/bin/bash /etc/shadow:user01:!!:18185:0:99999:7::: /etc/group:user01:x:1007: /etc/gshadow:user01:!:: [root@localhost ~]# id user01 uid=1002(user01) gid=1007(user01) groups=1007(user01) [root@localhost ~]# ls -li /var/spool/mail/user01 -rw-rw----. 1 user01 mail 0 Oct 16 19:51 /var/spool/mail/user01 小结: 如果创建一个用户时,未指定任何选项,系统会创建一个和用户名相同的组作为用户的Primary Group基本组
练习1:创建用户gentoo,UID为4001,基本组为gentoo,附加组为distro(GID为5000)和peguin(GID为5001)
讯享网[root@localhost home]# groupadd distro -g 5000 [root@localhost home]# groupadd peguin -g 5001 [root@localhost home]# useradd gentoo -u 4001 -G distro,peguin [root@localhost home]# id gentoo uid=4001(gentoo) gid=4001(gentoo) groups=4001(gentoo),5000(distro),5001(peguin)
练习2:创建用户fedora,其注释信息为"Fedora Core",默认shell为/bin/tcsh
[root@localhost home]# useradd fedora -c "Fedora Core" -s /bin/tcsh [root@localhost home]# grep 'fedora' /etc/passwd /etc/passwd:fedora:x:1002:1002:Fedora Core:/home/fedora:/bin/tcsh 练习3:修改gentoo用户的家目录为/var/tmp/gentoo,要求其原有文件仍能被用户访问
讯享网[root@localhost home]# usermod gentoo -md /var/tmp/gentoo [root@localhost gentoo]# ls -a /var/tmp/gentoo . .. .bash_logout .bash_profile .bashrc
练习4:为gentoo新增附加组netadmin
[root@localhost ~]# groupadd netadmin [root@localhost ~]# usermod -aG netadmin gentoo [root@localhost ~]# id gentoo uid=1001(gentoo) gid=1001(gentoo) groups=1001(gentoo),5000(distro),5001(peguin),5002(netadmin) 给普通用户提权
方法一 通过su命令切换为更高权限的用户
讯享网su - username
带-表示将使用目标用户的shell登录环境
密码验证
su的优缺点
优点:su 命令为管理带来方便
缺点:通过su切换到root后,有不安全因素
默认情况下,任何用户都允许使用 su 命令,从而有机会反复尝试其他用户(如 root)的登录密码,这样带来了安全风险。
PAM安全认证
加强su命令的使用控制
借助于 pam_wheel认证模块,只允许个别用户使用 su 命令进行切换
实现过程
步骤一 开启wheel用户安全模块
[root@localhost ~]# vi /etc/pam.d/su ;去掉auth required pam_wheel.so use_uid 前的# 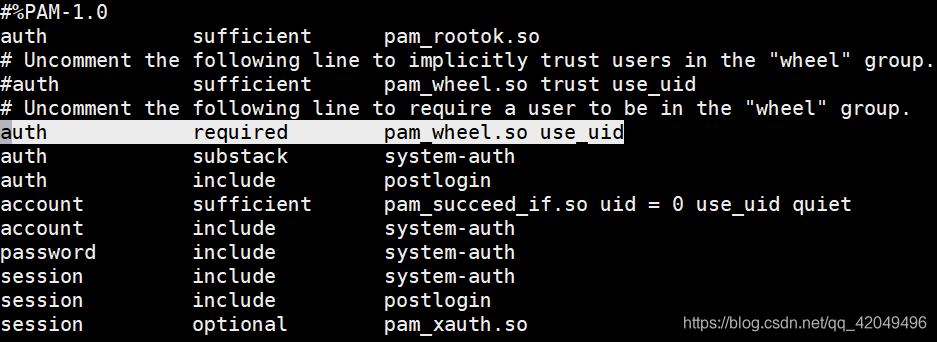
讯享网[zhao@localhost ~]$ id zhao uid=1000(zhao) gid=1000(zhao) groups=1000(zhao) [zhao@localhost ~]$ su - root Password: su: Permission denied
步骤二 将用户username加入到wheel组
[root@localhost ~]# gpasswd -a zhao wheel Adding user zhao to group wheel [root@localhost ~]# id zhao uid=1000(zhao) gid=1000(zhao) groups=1000(zhao),10(wheel) [zhao@localhost ~]$ id zhao uid=1000(zhao) gid=1000(zhao) groups=1000(zhao),10(wheel) [zhao@localhost ~]$ su - root Password: Last login: Mon Oct 21 20:05:17 CST 2019 on pts/0 方法二 使用sudo以root身份运行命令
概念
Sudoers allows particular users to run various commands as the root user, without needing the root password.
sudo是linux下常用的允许普通用户使用超级用户权限的工具,让普通用户执行一些或者全部的root命令,如halt,reboot,su等等。
优点
减少了root用户的登陆和管理时间,提高了安全性 不需要知道root密码
特性
1.sudo能够限制用户只在某台主机上运行某些命令
2.sudo提供了丰富的日志,详细地记录了每个用户干了什么,它能够将日志传到中心主机或者日志服务器
3.sudo使用时间戳文件–日志来执行类似的“检票”系统:当用户调用sudo并且输入它的密码时,用户获得了一张存活期为5分钟的票(这个值可以在编译的时候改变)
4.sudo的配置文件是/etc/sudoers,属性必须为0440,它允许系统管理员集中的管理用户的使用权限和使用的主机
sudo配置文件/etc/sudoers详解
别名规则
定义格式
讯享网Alias_Type NAME = item1, item2, ... Alias_Type NAME = item1, item2, item3 : NAME = item4, item5 ;别名之间用“:”号隔开
| Alias_Type 别名类型 | 含义 |
|---|---|
| Host_Alias | 主机别名 |
| User_Alias | 用户别名(用户,%用户组) |
| Runas_Alias | 允许sudo使用root权限的用户 |
| Cmnd_Alias | 命令别名(这些命令必须是系统存在的文件,要用绝对路径,文件名可以用通配符表示) |
| NAME 别名 |
|---|
| 包含大写字母、下划线以及数字,但必须以一个大写字母开头 |
授权规则
授权用户 主机=命令动作
或
授权用户 主机=[(切换到哪些用户或用户组)] [是否需要密码验证] 命令1,[(切换到哪些用户或 用户组)] [是否需要密码验证] [命令2],[(切换到哪些用户或用户组)] [是否需要密码验证] [命令3] …
如果不需要密码直接运行命令,加NOPASSWD:参数
授权规则举例 student ALL=(root) /bin/chown,/bin/chmod
语法参数
sudo [ -Vhl LvkKsHPSb ] │ [ -p prompt ] [ -c class│- ] [ -a auth_type ] [-u username│#uid ] command
command:要以系统管理者身份(或以 -u 更改为其他人)执行的指令
-l 列出当前用户可以执行的命令 只有在sudoers里的用户才能使用该选项
-u username/#uid 以指定用户的身份执行命令 不加此参数,以 root 的身份执行指令
-k 清除存活期时间,下次再使用sudo时要再输入密码
-b 在后台执行知道的命令
配置sudo授权
编辑配置文件命令:visudo 或 vi /etc/sudoers
visudo调用vi去编辑,但是保存时会进行语法检查,有错会有提示
记录格式 用户 主机名列表 = 命令程序列表
实例
实例一 以root身份授权普通用户
讯享网[root@localhost ~]# visudo Same thing without a password %wheel ALL=(ALL) NOPASSWD: ALL [root@localhost ~]# useradd ybc -G wheel [root@localhost ~]# id ybc uid=1006(ybc) gid=1006(ybc) groups=1006(ybc),10(wheel) [root@localhost ~]# su - ybc [ybc@localhost ~]$ useradd ye -bash: /usr/sbin/useradd: Permission denied [ybc@localhost ~]$ sudo useradd ye [ybc@localhost ~]$ id ye uid=1007(ye) gid=1007(ye) groups=1007(ye)
实例二 使用户use1能够有权限挂载/dev/sr0到/media目录下
[root@localhost ~]# visudo use1 ALL=(ALL) /bin/mount /dev/sr0 /media [use1@localhost ~]$ mount /dev/sr0 /media mount: only root can do that [use1@localhost ~]$ sudo mount /dev/sr0 /media [sudo] password for use1: mount: /dev/sr0 is write-protected, mounting read-only [use1@localhost ~]$ df /dev/sr0 Filesystem 1K-blocks Used Available Use% Mounted on /dev/sr0 0 100% /media 实例三 使user1和user2用户能够有权限修改IP,使用别名实现,且不需要输入密码
讯享网[root@localhost ~]# visudo User_Alias NETUSER=user1,user2 Cmnd_Alias IP=/sbin/ip NETUSER ALL=(root) NOPASSWD: IP [user1@localhost ~]$ ip add add 192.168.42.200/24 dev ens33 RTNETLINK answers: Operation not permitted [user1@localhost ~]$ sudo ip add add 192.168.42.200/24 dev ens33 [user1@localhost ~]$ ip a|grep ens33 2: ens33: <BROADCAST,MULTICAST,UP,LOWER_UP> mtu 1500 qdisc pfifo_fast state UP group default qlen 1000 inet 192.168.182.188/24 brd 192.168.182.255 scope global noprefixroute ens33 inet 192.168.42.200/24 scope global ens33 [user2@localhost ~]$ ip add add 192.168.182.88/24 dev ens33 RTNETLINK answers: Operation not permitted [user2@localhost ~]$ sudo ip add add 192.168.182.88/24 dev ens33 [user2@localhost ~]$ ip a|grep ens33 2: ens33: <BROADCAST,MULTICAST,UP,LOWER_UP> mtu 1500 qdisc pfifo_fast state UP group default qlen 1000 inet 192.168.182.188/24 brd 192.168.182.255 scope global noprefixroute ens33 inet 192.168.42.200/24 scope global ens33 inet 192.168.182.88/24 scope global secondary ens33
实例四 使user2用户能够有权限使用/user/sbin/下的所有命令,除了/use/sbin/userdel
[root@localhost ~]# visudo user2 ALL=(root) /usr/sbin/,!/usr/sbin/userdel [root@localhost ~]# su - user2 Last login: Mon Oct 21 21:23:23 CST 2019 on pts/1 [user2@localhost ~]$ useradd test -bash: /usr/sbin/useradd: Permission denied [user2@localhost ~]$ sudo useradd test We trust you have received the usual lecture from the local System Administrator. It usually boils down to these three things: #1) Respect the privacy of others. #2) Think before you type. #3) With great power comes great responsibility. [sudo] password for user2: [user2@localhost ~]$ id test uid=1011(test) gid=1011(test) groups=1011(test) [user2@localhost ~]$ sudo userdel -r test Sorry, user user2 is not allowed to execute '/sbin/userdel -r test' as root on localhost.localdomain. 实例五 使用户user2能够有权限查看var/log/message后的所有文件
讯享网[root@localhost ~]# visudo user2 ALL=(root) /bin/cat /var/log/message* [user2@localhost ~]$ sudo cat /var/log/messages|head -n 2 Oct 20 09:10:01 localhost rsyslogd: [origin software="rsyslogd" swVersion="8.24.0-34.el7" x-pid="6848" x-info="http://www.rsyslog.com"] rsyslogd was HUPed Oct 20 09:23:27 localhost systemd: Started Session 33 of user root.
这样有一个问题:后面跟一个其他文件也能查看
[user2@localhost ~]$ sudo cat /var/log/messages /etc/shadow|tail -n 2 user2:$6$H4bnlRFn$6WWlKfHu2stS.zeb2Qd5aDyX4bl86Q4LFcs8HworEqYHa5987LnH5XUouLaj.kvnWNaVVnyfxMfXZOX8xVBPu1:18190:0:99999:7::: test:!!:18190:0:99999:7::: [user2@localhost ~]$ sudo cat /var/log/messages /etc/passwd|tail -n 2 user2:x:1010:1010::/home/user2:/bin/bash test:x:1011:1011::/home/test:/bin/bash 解决方法
讯享网[root@localhost ~]# visudo user2 ALL=(root) /bin/cat /var/log/message*,!/bin/cat /var/log/message* * [user2@localhost ~]$ sudo cat /var/log/messages /etc/shadow|tail -n 2 Sorry, user user2 is not allowed to execute '/bin/cat /var/log/messages /etc/shadow' as root on localhost.localdomain.
在使用*号时,要特别注意安全问题
用户管理命令练习
增加两个用户并设置好密码(写2行):John、Lucy
[root@localhost ~]# useradd John;useradd Lucy [root@localhost ~]# passwd John Changing password for user John. New password: BAD PASSWORD: The password is shorter than 8 characters Retype new password: passwd: all authentication tokens updated successfully. [root@localhost ~]# echo ""|passwd --stdin Lucy Changing password for user Lucy. passwd: all authentication tokens updated successfully. 查看各用户的基本信息(相关文件在/etc中)
讯享网[root@localhost ~]# grep John /etc/passwd;grep Lucy /etc/passwd John:x:1003:1003::/home/John:/bin/bash Lucy:x:1004:1004::/home/Lucy:/bin/bash
查看各用户的密码信息(相关文件在/etc中)
[root@localhost ~]# grep John /etc/shadow;grep Lucy /etc/shadow John:$6$4SkAtRN5$eokz2Ba1DczHQxble5/ia85656YmS5N7YwwTEPutLPT8F3BDlv66z6wyqcFHoy7J/gxgzfoms2qWGDyMRIcnI1:18188:0:99999:7::: Lucy:$6$djEuYIPu$YocDNKDDzgoVn/Sk/ollfdcpHnUt0DvSj14HjE7DZh1wBDpB/qz2AkUwDCOiJBChSrEedn/ecf8n5ZTkIRH1j1:18188:0:99999:7::: [root@localhost ~]# 查找用户summer并显示其相关信息
讯享网[root@localhost ~]# useradd summer [root@localhost ~]# id summer uid=1005(summer) gid=1005(summer) groups=1005(summer)
将当前用户切换到John(进入其主目录) su - John
显示当前登录用户名 whoami
将John的登录密码改为:mima1234
[root@localhost John]# echo "mima1234"|passwd --stdin John Changing password for user John. passwd: all authentication tokens updated successfully. 将John的帐号有效期设为2019年12月31号 chage -E John或 usermod -e 2019-12-31 John
将John加入到summer组中

讯享网[root@localhost ~]# gpasswd -a John summer Adding user John to group summer
将用户名John改为Jack usermod -l Jack John
删除用户Lucy userdel -r Lucy
组管理命令练习
增加以一个student组 groupadd student
查看所有组的基本信息(相关文件在etc中) cat /etc/group
查看summer组中包含哪些用户名 awk -F ":" '/summer/{print $4}' /etc/group
将student组名改为teacher groupmod -n teacher student
删除teacher组 groupdel teacher
Linux文件系统权限管理
1.权限对象
| 权限对象 | 说明 |
|---|---|
| owner | 属主 |
| group | 属组 |
| others | 其他 |
 |
2.权限类型
| 权限类型 | 说明 |
|---|---|
| read | 可读 |
| write | 可写 |
| execute | 可执行 |
3.r、w、x权限说明
权限对文件的意义
| 权限 | 说明 |
|---|---|
| r | 可获取文件的数据 |
| w | 可修改文件数据 |
| x | 可将此文件运行为进程(./test) |
权限对目录的意义
| 权限 | 说明 |
|---|---|
| r | 可以使用ls获取其下的所有文件列表 |
| w | 可修改此目录下的文件列表(可创建或删除文件) |
| x | 可cd到此目录,且可使用ls-l来获取所有文件的详细属性信息 |
4.权限管理命令
chmod 权限管理
chmod [OPTION]... MODE[,MODE]... FILE... chmod [OPTION]... OCTAL-MODE FILE... chmod [OPTION]... --reference=RFILE FILE... 基本权限 UGO模式
| 用户类型 | 说明 |
|---|---|
| u | 属主user |
| g | 属组group |
| o | 其他other |
| a | 所有all |
赋权表示法 直接操作一类用户的所有权限位 rwx
chmod u=rwx filename
授权表示法 直接操作一类用户的一个权限位 r/w/x
chmod u+r filename
chmod g-w filename
chmod o+x filename
数字操作法
| r | w | x |
|---|---|---|
| 4 | 2 | 1 |
令文件属主、所在组和其他都有可读、可写、可执行权限 chmod 777 filename |
chown 修改文件的属主 仅管理员可用
讯享网chown [OPTION]... [OWNER][:[GROUP]] FILE... chown [OPTION]... --reference=RFILE FILE...
OPTION
-R 递归修改
chgrp 修改文件的属组 仅管理员可用
chgrp [OPTION]... GROUP FILE... chgrp [OPTION]... --reference=RFILE FILE... 5.进程安全上下文
讯享网[root@localhost zhao]# pwd /home/zhao [root@localhost zhao]# ll total 8 --w----r--. 1 root root 5 Oct 20 10:01 123 --w-rw-r--. 1 root zhao 15 Oct 20 10:02 456 -rw-rw-r--. 1 zhao zhao 0 Oct 20 09:59 789 [root@localhost zhao]# su - zhao Last login: Sun Oct 20 10:18:58 CST 2019 on pts/2 [zhao@localhost ~]$ ll total 8 --w----r--. 1 root root 5 Oct 20 10:01 123 --w-rw-r--. 1 root zhao 15 Oct 20 10:02 456 -rw-rw-r--. 1 zhao zhao 0 Oct 20 09:59 789 [zhao@localhost ~]$ ll /bin/cat -rwxr-xr-x. 1 root root 54160 Oct 31 2018 /bin/cat
情况一 判断进程的属主与文件的属主是否相同,如果相同,则应用属主权限
[zhao@localhost ~]$ /bin/cat 789 zhao | 进程属主 | 文件属主 |
|---|---|
| zhao | zhao |
情况二 检查进程的属主是否属于文件的属组,如果是,则应用属组权限
讯享网[zhao@localhost ~]$ /bin/cat 456 this is a test
| 进程属主 | 文件属主 | 文件属组 |
|---|---|---|
| zhao | root | zhao |
| 情况三 应用other的权限 |
[zhao@localhost ~]$ /bin/cat 123 | 进程属主 | 文件属主 | 文件属组 |
|---|---|---|
| zhao | root | root |
Linux的进程安全上下文法则
启动进程的权限问题:(先不讨论特殊权限SBIT)
能否启动一个可执行程序文件作为一个进程PID,取决于此用户是否对这个文件有可执行权限x
例:能否将/bin/cat执行为一个进程,取决于用户是否对此文件有x权限
/bin/cat的owner,group,other都具备x权限,所以都可以将此文件启动为一个进程
6.基本权限 ACL (CentOS 6.8)
ACL的全称是 Access Control List (访问控制列表) ,一个针对文件/目录的访问控制列表。它在UGO权限管理的基础上为文件系统提供一个额外的、更灵活的权限管理机制,是对UNIX文件权限管理的补充。
UGO办不到,但ACL可以做到的有:
- 针对用户来设置权限
- 针对用户组来设置权限
- 子文件/目录继承父目录的权限
检查是否支持ACL
ACL需要Linux内核和文件系统的配合才能工作
讯享网[root@zyceotos6 ~]# tune2fs -l /dev/sda1 |grep "Default mount options:" Default mount options: user_xattr acl
设置ACL
setfacl [-bkndRLPvh] [{
   -m|-x} acl_spec] [{
   -M|-X} acl_file] file
OPTION
-m 配置后面的ACL参数给文件/目录使用 不可与-x合用
-x 删除后续的ACL参数 不可与-m合用
-b 移除所有的ACL配置参数
-k 移除默认的ACL参数
-R 递归配置ACL
-d 配置默认ACL参数 只对目录有效,在该目录新建的数据会引用此默认值
getfacl 文件/目录名 查看当前ACL权限
范例一 针对用户设置ACL
讯享网[root@zyceotos6 tmp]# touch aclfile ;创建aclfile [root@zyceotos6 tmp]# ll aclfile ;查看权限信息 -rw-r--r--. 1 root root 0 Oct 23 05:22 aclfile [root@zyceotos6 tmp]# su - zhao ;切换到普通用户 [zhao@zyceotos6 ~]$ echo "hello" > /tmp/aclfile -bash: /tmp/aclfile: Permission denied ;无写权限 [zhao@zyceotos6 ~]$ exit logout [root@zyceotos6 tmp]# setfacl -m u:zhao:rw aclfile ;赋权 [root@zyceotos6 tmp]# ll aclfile ;查看权限,后缀有+ -rw-rw-r--+ 1 root root 0 Oct 23 05:22 aclfile [root@zyceotos6 tmp]# getfacl aclfile ;查看ACL权限 # file: aclfile # owner: root # group: root user::rw- user:zhao:rw- group::r-- mask::rw- other::r-- [root@zyceotos6 tmp]# su - zhao [zhao@zyceotos6 ~]$ echo "hello" > /tmp/aclfile ;有权限写入 [zhao@zyceotos6 ~]$ cat /tmp/aclfile hello
范例二 针对用户组设置ACL
[zhao@zyceotos6 tmp]$ mkdir mydir [zhao@zyceotos6 tmp]$ ll -d mydir/ drwxrwxr-x. 2 zhao zhao 4096 Oct 23 05:45 mydir/ [zhao@zyceotos6 tmp]$ [zhao@zyceotos6 tmp]$ [zhao@zyceotos6 tmp]$ setfacl -m d:u:tom:rwx mydir/ [zhao@zyceotos6 tmp]$ getfacl mydir/ # file: mydir/ # owner: zhao # group: zhao user::rwx group::rwx other::r-x default:user::rwx default:user:tom:rwx default:group::rwx default:mask::rwx default:other::r-x default 权限信息只能在目录上设置,会被目录中创建的文件和目录继承
讯享网[zhao@zyceotos6 tmp]$ cd mydir/ [zhao@zyceotos6 mydir]$ touch testfile [zhao@zyceotos6 mydir]$ mkdir testdir [zhao@zyceotos6 mydir]$ getfacl test testdir/ testfile [zhao@zyceotos6 mydir]$ getfacl testfile # file: testfile # owner: zhao # group: zhao user::rw- user:tom:rwx #effective:rw- ;testfile继承了父目录的acl权限,因此用户tom对它有读写执行权限 group::rwx #effective:rw- mask::rw- other::r-- [zhao@zyceotos6 mydir]$ getfacl testdir/ # file: testdir/ # owner: zhao # group: zhao user::rwx user:tom:rwx ;子目录继承了父目录的权限 group::rwx mask::rwx other::r-x default:user::rwx default:user:tom:rwx default:group::rwx default:mask::rwx default:other::r-x
范例三 更改ACL权限
-m 选项用来更改文件和目录的ACL权限
当一个用户或组的ACL权限不存在时,-m选项执行的是添加
当一个用户或组的ACL权限已经存在时,-m选项执行的是更新操作
[root@zyceotos6 tmp]# getfacl aclfile # file: aclfile # owner: root # group: root user::rw- user:zhao:rw- ;原权限rw group::r-- mask::rw- other::r-- [root@zyceotos6 tmp]# setfacl -m u:zhao:rwx aclfile [root@zyceotos6 tmp]# getfacl aclfile # file: aclfile # owner: root # group: root user::rw- user:zhao:rwx ;更改为rwx group::r-- mask::rwx other::r-- 范例四 删除ACL权限
讯享网[root@zyceotos6 tmp]# getfacl aclfile # file: aclfile # owner: root # group: root user::rw- user:zhao:rwx group::r-- mask::rwx other::r-- [root@zyceotos6 tmp]# setfacl -x u:zhao aclfile [root@zyceotos6 tmp]# getfacl aclfile # file: aclfile # owner: root # group: root user::rw- group::r-- mask::r-- other::r--
范例五 备份和恢复ACL权限
[root@zyceotos6 tmp]# getfacl -R mydir/ > mydir.acl ;备份 [root@zyceotos6 tmp]# cat mydir.acl # file: mydir/ # owner: zhao # group: zhao user::rwx group::rwx other::r-x default:user::rwx default:user:tom:rwx default:group::rwx default:mask::rwx default:other::r-x # file: mydir//testdir # owner: zhao # group: zhao user::rwx user:tom:rwx group::rwx mask::rwx other::r-x default:user::rwx default:user:tom:rwx default:group::rwx default:mask::rwx default:other::r-x # file: mydir//testfile # owner: zhao # group: zhao user::rw- user:tom:rwx #effective:rw- group::rwx #effective:rw- mask::rw- other::r-- [root@zyceotos6 tmp]# setfacl -R -b mydir ;删除所有权限 [root@zyceotos6 tmp]# getfacl -R mydir # file: mydir # owner: zhao # group: zhao user::rwx group::rwx other::r-x # file: mydir/testdir # owner: zhao # group: zhao user::rwx group::rwx other::r-x # file: mydir/testfile # owner: zhao # group: zhao user::rw- group::rw- other::r-- [root@zyceotos6 tmp]# setfacl --restore mydir.acl ;恢复数据 [root@zyceotos6 tmp]# getfacl mydir # file: mydir # owner: zhao # group: zhao user::rwx group::rwx other::r-x default:user::rwx default:user:tom:rwx default:group::rwx default:mask::rwx default:other::r-x 7.权限掩码 umask
新创建的目录和文件本身有默认权限,由权限掩码umask所确定,即umask用来指定“目前用户在新建文件或者目录时候的权限默认值”。
umask与chmod相反,它代表默认不要的权限
查看当前umask
方式一 umask,以数值类型的方式显示权限
讯享网[root@localhost ~]# umask 0022
方式二 umask -S,以符号类型的方式显示权限
[root@localhost ~]# umask -S u=rwx,g=rx,o=rx umask与权限
文件
文件权限 = 666-umask
文件默认不能拥有执行权限
如果减得的结果中有执行权限,则需要将其加1
umask=023
666-023=644
777-023=754
目录
目录权限 = 777-umask
设置umask
讯享网umask UMASK
此类设定仅对当前shell进程有效
8.文件特殊权限 SUID,SGID,SBIT
SUID(Set UID)
让本来没有相应权限的用户运行这个程序时,可以访问他没有权限访问的资源
SUID的作用
1.SUID权限仅对二进制程序(binary program)有效
2.执行者对于该程序需要具有x的可执行权限
3.本权限仅在执行该程序的过程中有效(run-time)
4.执行者将具有该程序拥有者(owner)的权限
特点
s标志出现在文件所有者的x权限上 -rwsr-xr-x.
如果属主原本有执行权限,显示为小写s;否则,显示为大写S
[root@localhost ~]# ll -d /usr/bin/passwd -rwsr-xr-x. 1 root root 27832 Jun 10 2014 /usr/bin/passwd 实例
讯享网1./usr/bin/passwd对所有人都可执行 2./usr/bin/passwd属主为root 3.当某个用户执行/usr/bin/passwd命令的时候,就拥有了root的权限 4.于是某个用户就可以借助root用户的权力,来修改/etc/shadow文件 5.最后,把密码修改成功
这个SUID只能运行在二进制的程序上(系统中的一些命令),不能用在脚本上(script),因为脚本还是把很多的程序集合到一起来执行,而不是脚本自身在执行。同样,这个SUID也不能放到目录上,放上也是无效的。
SGID(Set GID)
获得该程序所属用户组的权限
注意事项:
1.SGID对二进制程序有用
2.程序执行者对于该程序来说,需具备x的权限
3.SGID主要用在目录上
特点
s标志出现在文件所属用户组的x权限上 -r-xr-sr-x.
如果属主原本有执行权限,显示为小写s;否则,显示为大写S
[root@localhost ~]# ll -d /usr/bin/wall -r-xr-sr-x. 1 root tty 15344 Jun 10 2014 /usr/bin/wall 如果用户在此目录下具有w权限的话,若使用者在此目录下建立新文件,则新文件的群组与此目录的群组相同
SBIT(Sticky Bit)
特点
t标志出现在文件其他用户的x权限上 drwxrwxrwt.
如果其它用户原本有执行权限,显示为小写t; 否则,显示为大写T
讯享网[root@localhost ~]# ll -d /tmp drwxrwxrwt. 15 root root 4096 Oct 23 11:34 /tmp
实例
SUID/SGID/SBIT权限设置
一种是以字符,一种是以数字
| 权限位 | 字符 | 数字 |
|---|---|---|
| SUID | u+s | 4 |
| SGID | g+s | 2 |
| SBIT | o+t | 1 |
管理特殊权限的另一方式:八进制方式赋权,于默认的三位八进制数字左侧再加一位八进制数字 chmod 1777 |
SUID的作用及设置
[root@localhost ~]# cd /tmp [root@localhost tmp]# cp /usr/bin/passwd ./ ;在/tmp目录下创建passwd文件 [root@localhost tmp]# ls -l passwd -rwxr-xr-x. 1 root root 27832 Oct 23 16:00 passwd [root@localhost tmp]# su - zhao ;切换到nebula用户 Last login: Mon Oct 21 20:05:25 CST 2019 on pts/0 [nebula@localhost ~]$ cd /tmp [nebula@localhost tmp]$ ./passwd ;修改自己的密码 Changing password for user nebula. Changing password for nebula. (current) UNIX password: passwd: Authentication token manipulation error nebula修改不了自己的密码,因为没有权限把密码写入到/etc/shadow,想让普通用户能修改/etc/shadow需要用到SUID
讯享网[root@localhost tmp]# chmod u+s passwd [root@localhost tmp]# ls -l passwd -rwsr-xr-x. 1 root root 27832 Oct 23 16:00 passwd [root@localhost tmp]# su - nebula [nebula@localhost ~]$ cd /tmp [nebula@localhost tmp]$ ./passwd Changing password for user nebula. Changing password for nebula. (current) UNIX password: New password: Retype new password: passwd: all authentication tokens updated successfully. [nebula@localhost tmp]$ exit logout [root@localhost tmp]# chmod 0755 passwd ;把SUID的权限去掉 [root@localhost tmp]# ls -l passwd -rwxr-xr-x. 1 root root 27832 Oct 23 16:00 passwd
SGID的作用及设置
[root@localhost tmp]# mkdir testdir [root@localhost tmp]# ls -ld testdir/ drwxr-xr-x. 2 root root 6 Oct 23 16:15 testdir/ [root@localhost tmp]# chmod 757 testdir/ ;令任何用户对此目录都有写入权限 [root@localhost tmp]# ls -ld testdir/ drwxr-xrwx. 2 root root 6 Oct 23 16:15 testdir/ [root@localhost tmp]# su - nebula Last login: Wed Oct 23 16:09:41 CST 2019 on pts/0 [nebula@localhost ~]$ cd /tmp [nebula@localhost tmp]$ touch testdir/file1 [nebula@localhost tmp]$ mkdir testdir/dir1 [nebula@localhost tmp]$ ls -l testdir ;文件与目录权限都是创建者的本身 total 0 drwxrwxr-x. 2 nebula nebula 6 Oct 23 16:19 dir1 -rw-rw-r--. 1 nebula nebula 0 Oct 23 16:16 file1 把这个目录加上SGID权限后,再创建文件与目录
讯享网[root@localhost tmp]# chmod g+s testdir/ [root@localhost tmp]# ls -ld testdir/ drwxr-srwx. 3 root root 31 Oct 23 16:19 testdir/ [root@localhost tmp]# su - nebula Last login: Wed Oct 23 16:16:21 CST 2019 on pts/0 [nebula@localhost ~]$ cd /tmp [nebula@localhost tmp]$ touch testdir/file2 [nebula@localhost tmp]$ mkdir testdir/dir2 [nebula@localhost tmp]$ ls -l testdir/ total 0 drwxrwxr-x. 2 nebula nebula 6 Oct 23 16:19 dir1 drwxrwsr-x. 2 nebula root 6 Oct 23 16:25 dir2 -rw-rw-r--. 1 nebula nebula 0 Oct 23 16:16 file1 -rw-rw-r--. 1 nebula root 0 Oct 23 16:24 file2
file2和dir2的属组变成了root,即它们上层目录testdir的所属用户组 这个可以应用在一个项目的共同开发上
[root@localhost tmp]# chmod g-s testdir/ ;把SGID的权限去掉 [root@localhost tmp]# ls -ls testdir/ total 0 0 drwxrwxr-x. 2 nebula nebula 6 Oct 23 16:19 dir1 0 drwxrwsr-x. 2 nebula root 6 Oct 23 16:25 dir2 0 -rw-rw-r--. 1 nebula nebula 0 Oct 23 16:16 file1 0 -rw-rw-r--. 1 nebula root 0 Oct 23 16:24 file2 [root@localhost tmp]# ls -ld testdir/ drwxr-xrwx. 4 root root 56 Oct 23 16:25 testdir/ SBIT的作用及设置
讯享网[root@localhost tmp]# rm -rf testdir/* ;清空/tmp/testdir/目录里面的全部内容 [root@localhost tmp]# su - nebula Last login: Wed Oct 23 16:24:31 CST 2019 on pts/0 [nebula@localhost ~]$ cd /tmp [nebula@localhost tmp]$ touch testdir/nebula_file [nebula@localhost tmp]$ ls -l testdir/ total 0 -rw-rw-r--. 1 nebula nebula 0 Oct 23 16:33 nebula_file [nebula@localhost tmp]$ su - tom Passwd: [tom@localhost tmp]$ cd /tmp [tom@localhost tmp]$ ls -ld testdir/ drwxr-xrwx. 2 root root 25 Oct 23 16:33 testdir/ [tom@localhost tmp]$ rm -rf testdir/nebula_file
虽然tom对nebula_file只有只读权限,但nebula _file所在的目录对其他人是全部的权限,所以,tom可以删除不属于他的文件
[root@localhost tmp]# chmod o+t testdir ;给这个目录加上SBIT权限 [root@localhost tmp]# ls -ld testdir/ drwxr-xrwt. 2 root root 6 Oct 23 16:37 testdir/ [root@localhost tmp]# su - nebula Last login: Wed Oct 23 16:35:17 CST 2019 on pts/0 [nebula@localhost ~]$ cd /tmp [nebula@localhost tmp]$ touch testdir/nebula_file [nebula@localhost tmp]$ ls -l testdir/nebula_file -rw-rw-r--. 1 nebula nebula 0 Oct 23 16:41 testdir/nebula_file [nebula@localhost tmp]$ logout [root@localhost tmp]# su - tom Last login: Wed Oct 23 16:35:39 CST 2019 on pts/0 [tom@localhost ~]$ cd /tmp [tom@localhost tmp]$ rm -rf testdir/nebula_file rm: cannot remove ‘testdir/nebula_file’: Operation not permitted 权限不够,只能由这个文件的创建者或root用户才能删除
讯享网[root@localhost tmp]# chmod o-t testdir/ ;把SBIT的权限去掉 [root@localhost tmp]# ls -ld testdir/ drwxr-xrwx. 2 root root 25 Oct 23 16:41 testdir/
9.隐藏属性 chattr,lsattr
chattr 修改文件隐藏属性
chattr [ -RVf ] [ -v version ] [ mode ] files... mode格式
准备测试文件
讯享网[root@zyceotos6 ~]# touch file1 file2 file3 [root@zyceotos6 ~]# lsattr file1 file2 file3 -------------e- file1 -------------e- file2 -------------e- file3
a append,设定该参数后,只能向文件中添加数据,而不能删除 多用于服务器日志文件安全,只有root才能设定这个属性
[root@zyceotos6 ~]# chattr +a file1 [root@zyceotos6 ~]# lsattr file1 -----a-------e- file1 [root@zyceotos6 ~]# echo append > file1 -bash: file1: Operation not permitted [root@zyceotos6 ~]# echo append >> file1 ;以追加的方式写入 [root@zyceotos6 ~]# cat file1 append [root@zyceotos6 ~]# rm -rf file1 rm: cannot remove `file1': Operation not permitted i 文件不能被删除、改名、设定硬链接关系,同时不能写入或新增内容(即使是root用户) 只有root才能设定这个属性
讯享网[root@zyceotos6 ~]# chattr +i file2 [root@zyceotos6 ~]# lsattr file2 ----i--------e- file2 [root@zyceotos6 ~]# mv file2 test mv: cannot move `file2' to `test': Operation not permitted [root@zyceotos6 ~]# ln file2 chattr ln: creating hard link `chattr' => `file2': Operation not permitted [root@zyceotos6 ~]# ln -s file2 chattr [root@zyceotos6 ~]# ll chattr lrwxrwxrwx. 1 root root 5 Oct 20 21:23 chattr -> file2 [root@zyceotos6 ~]# echo append > file2 -bash: file2: Permission denied [root@zyceotos6 ~]# echo append >> file2 -bash: file2: Permission denied
lsattr 列出文件的隐藏属性
lsattr [ -RVadv ] [ files... ] OPTION
-R 递归显示目录下所有子目录和文件的属性
-V 显示lsattr程序的版本信息
-a 显示所有文件的属性信息,包括以.开头的文件
-d 显示目录的属性,而不是目录下的文件的属性
-v 显示文件的档案号码
扩展 passwd只能由root启动
讯享网[root@localhost ~]# grep -v "^#" /etc/login.defs MAIL_DIR /var/spool/mail PASS_MAX_DAYS 99999 PASS_MIN_DAYS 0 PASS_MIN_LEN 5 PASS_WARN_AGE 7 UID_MIN 1000 UID_MAX 60000 SYS_UID_MIN 201 SYS_UID_MAX 999 GID_MIN 1000 GID_MAX 60000 SYS_GID_MIN 201 SYS_GID_MAX 999 CREATE_HOME yes UMASK 077 USERGROUPS_ENAB yes ENCRYPT_METHOD SHA512
/etc/shadow 文件没有任何权限,只有root可操作该文件
用普通用户zhao启动passwd进程,进程所有者zhao,passwd进程执行不了/etc/shadow
[root@localhost ~]# ll /etc/shadow ----------. 1 root root 1010 Oct 20 09:27 /etc/shadow 结论:passwd命令不管以什么用户运行,其进程的所有者应该都是root
讯享网[root@localhost ~]# which passwd /usr/bin/passwd [root@localhost ~]# ll /usr/bin/passwd -rwsr-xr-x. 1 root root 27832 Jun 10 2014 /usr/bin/passwd
练习
练习一 新建系统组mariadb,新建系统用户mariadb, 属于mariadb组,要求其没有家目录,且shell为/sbin/nologin,尝试root切换至用户,查看其命令提示符
[root@localhost ~]# groupadd -r mariadb [root@localhost ~]# useradd mariadb -g mariadb -M -s /sbin/nologin [root@localhost ~]# id mariadb uid=1000(mariadb) gid=995(mariadb) groups=995(mariadb) [root@localhost ~]# cat /etc/passwd|grep mariadb mariadb:x:1000:995::/home/mariadb:/sbin/nologin [root@localhost ~]# su - mariadb su: warning: cannot change directory to /home/mariadb: No such file or directory This account is currently not available. 无法将目录更改为/home/mariadb:没有此类文件或目录;此帐户当前不可用
练习二 新建GID为5000的组mageedu,新建用户gentoo,要求其家目录为/users/gentoo,密码同用户名
讯享网[root@localhost ~]# groupadd -g 5000 mageedu [root@localhost ~]# cat /etc/group|grep mageedu mageedu:x:5000: [root@localhost ~]# mkdir /users [root@localhost ~]# useradd -d /users/gentoo gentoo [root@localhost ~]# cat /etc/passwd|grep gentoo gentoo:x:1001:1001::/users/gentoo:/bin/bash [root@localhost ~]# echo "gentoo"|passwd --stdin gentoo Changing password for user gentoo. passwd: all authentication tokens updated successfully.
练习三 新建用户fedora,其家目录为/users/fedora,密码同用户名
[root@localhost ~]# mkdir /users [root@localhost ~]# useradd -d /users/fedora fedora [root@localhost ~]# cat /etc/passwd|grep fedora fedora:x:1003:1003::/users/fedora:/bin/bash [root@localhost ~]# echo "fedora"|passwd --stdin fedora Changing password for user fedora. passwd: all authentication tokens updated successfully. 练习四 新建用户www, 其家目录为/users/www,删除www用户,但保留其家目录
讯享网[root@localhost ~]# useradd -d /users/www www [root@localhost ~]# cd [root@localhost ~]# cat /etc/passwd|grep www www:x:1004:1004::/users/www:/bin/bash [root@localhost ~]# userdel www [root@localhost ~]# ll /users total 0 drwx------. 2 1004 1004 62 Oct 23 21:31 www
练习五 为用户gentoo和fedora新增附加组mageedu
[root@localhost ~]# id gentoo;id fedora uid=1002(gentoo) gid=1002(gentoo) groups=1002(gentoo) uid=1003(fedora) gid=1003(fedora) groups=1003(fedora) [root@localhost ~]# usermod -aG mageedu gentoo [root@localhost ~]# usermod -aG mageedu fedora [root@localhost ~]# id gentoo;id fedora uid=1002(gentoo) gid=1002(gentoo) groups=1002(gentoo),5000(mageedu) uid=1003(fedora) gid=1003(fedora) groups=1003(fedora),5000(mageedu) 练习六 复制目录/var/log至/tmp/目录,修改/tmp/log及其内部的所有文件的属组为mageedu,并让属组对目录本身拥有写权限
讯享网[root@localhost tmp]# cp -r /var/log /tmp [root@localhost tmp]# ll total 4 drwxr-xr-x. 7 root root 4096 Oct 23 21:39 log [root@localhost tmp]# chgrp -R mageedu /tmp/log [root@localhost tmp]# chmod g+w /tmp/log [root@localhost tmp]# ll total 4 drwxrwxr-x. 7 root mageedu 4096 Oct 23 21:39 log
版权声明:本文内容由互联网用户自发贡献,该文观点仅代表作者本人。本站仅提供信息存储空间服务,不拥有所有权,不承担相关法律责任。如发现本站有涉嫌侵权/违法违规的内容,请联系我们,一经查实,本站将立刻删除。
如需转载请保留出处:https://51itzy.com/kjqy/55183.html