
JVM是支持多线程程序的,当程序需要同时执行两个或多个任务,实现一些需要等待的任务时,如用户输入、文件读写、网络操作、搜索等多线程程序比单线程程序更具优势,可充分利用CPU资源,完成时间更短,提高应用程序的响应,增强用户体验。因此学会改善程序结构,将即长又复杂的进程分为多个线程,独立去运行,对于开发者来说至关重要。
1、多文件并发下载
以下载多个文件为例,如何使用多线程机制,高效率的完成下载任务?
提出需求:编写一个API,打包下载GitHub的所有用户头像(以zip形式返回所有用户头像)。

首先文件压缩我们统一使用apache的commons-compress相关类进行压缩,因此需要引入相关的依赖
<!-- https://mvnrepository.com/artifact/org.apache.commons/commons-compress --> <dependency> <groupId>org.apache.commons</groupId> <artifactId>commons-compress</artifactId> <version>1.24.0</version> </dependency> 讯享网
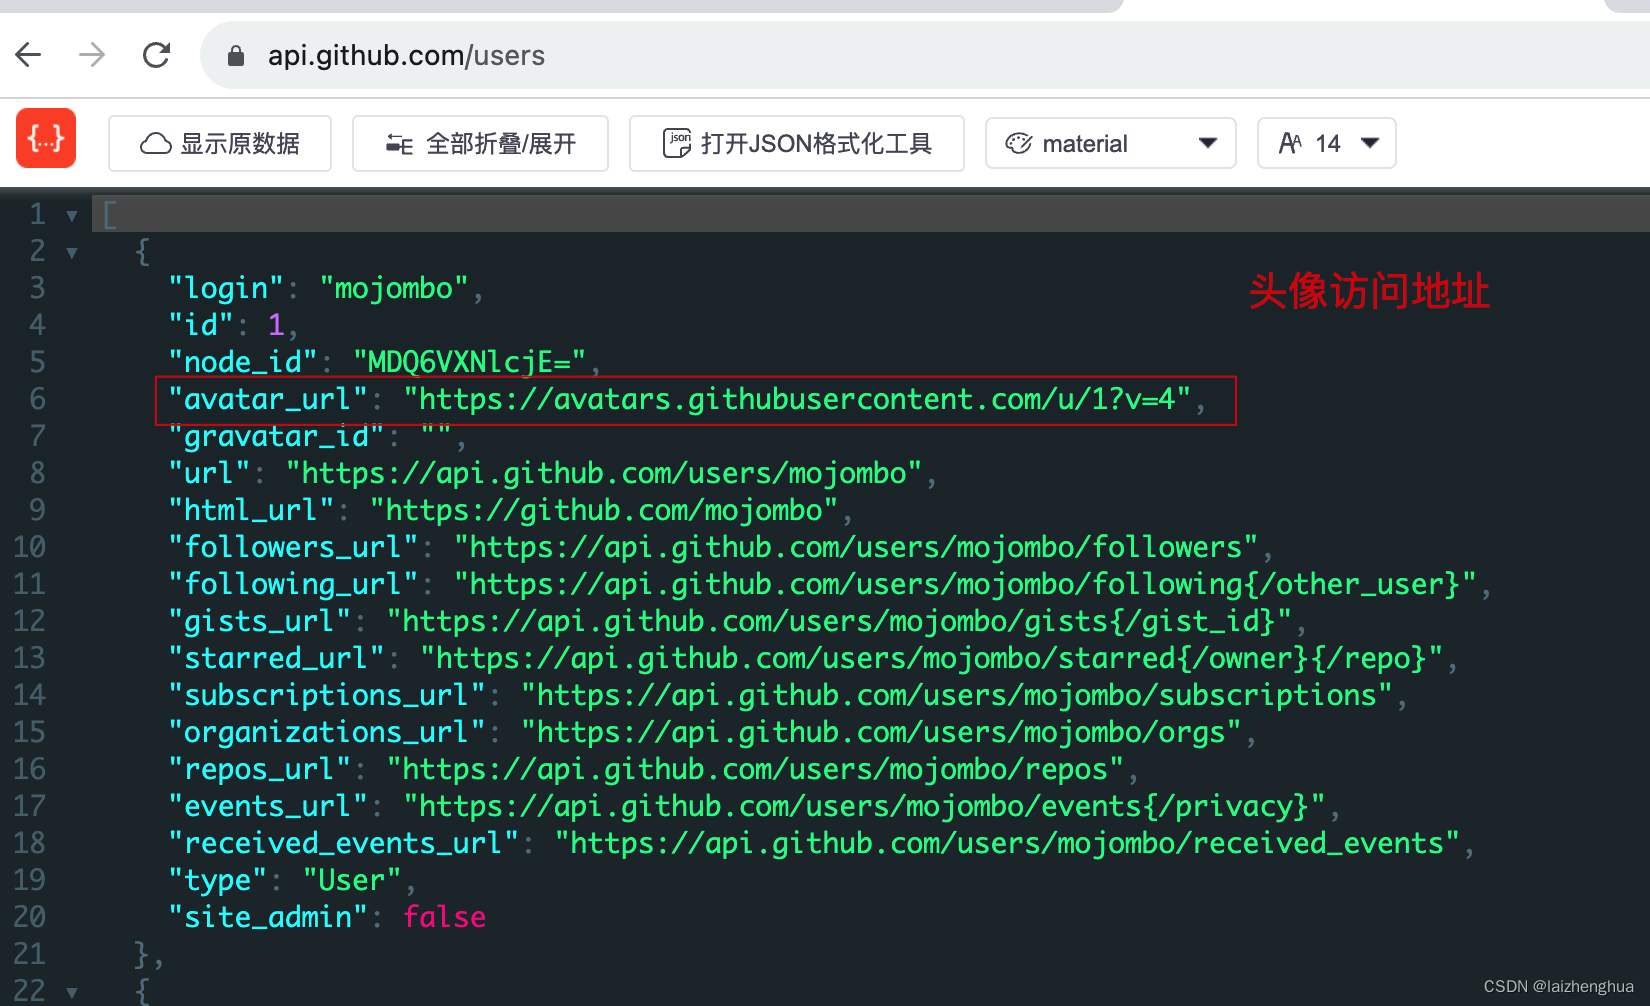
GitHub用户头像访问地址如下
所以实现的思路也就很简单了,GitHub用户API会返回多个用户信息,我们没有必要一个个下载串行的进行,完全可以采用多线程机制并行下载,这样可以大大提高下载速度,主线程负责查询与分配下载任务,等所有线程池的任务都完成了,再进行最后的压缩,返回给浏览器!完整代码如下
讯享网/ * TODO * * @Description * @Author laizhenghua * @Date 2023/8/31 09:22 / @RestController @SpringBootApplication public class TestApplication {
    public static void main(String[] args) {
    SpringApplication.run(TestApplication.class, args); } @Autowired private ServletContext servletContext; @GetMapping("/test") public void test() {
    ServletRequestAttributes servletRequestAttributes = (ServletRequestAttributes) RequestContextHolder.getRequestAttributes(); HttpServletResponse response = servletRequestAttributes.getResponse(); RestTemplate restTemplate = new RestTemplate(); String usersUrl = "https://api.github.com/users"; // 查询github用户信息 JSONArray userList = restTemplate.getForObject(usersUrl, JSONArray.class); if (CollectionUtils.isEmpty(userList)) {
    fallback("下载失败,失败原因: 查询为空", response); return; } // 下载路径准备 String rootPath = servletContext.getRealPath("/") + "avatars"; File root = new File(rootPath); if (!root.exists()) {
    root.mkdir(); } // 初始化线程池(JDK 5.0新增的线程池API更多知识可自行学习) ExecutorService executorService = Executors.newFixedThreadPool(10); userList.forEach(item -> {
    JSONObject user = new JSONObject((Map)item); String login = user.getString("login"); // github登录名 String downloadUrl = user.getString("avatar_url"); // 头像下载地址 String filePath = rootPath + File.separator + login + ".png"; // 执行下载任务(下载至本地) // 一个线程处理一个用户(主线程只负责提交任务尽可能把耗时逻辑都放到多线程任务里如下载、IO操作等)  executorService.execute(() -> {
    try {
    File file = new File(filePath); boolean newFile = file.createNewFile(); if (!newFile) {
    return; } String name = Thread.currentThread().getName(); String log = String.format("[%s] download start --- download path: %s", name, filePath); System.out.println(log); // 调用下载接口获取输入流程 ResponseEntity<Resource> responseEntity = restTemplate.getForEntity(downloadUrl, Resource.class); // 将得到的输入流写入文件 InputStream inputStream = null; OutputStream outputStream = null; try {
    inputStream = Objects.requireNonNull(responseEntity.getBody()).getInputStream(); outputStream = new FileOutputStream(file); byte[] buffer = new byte[1024]; int len; while ((len = inputStream.read(buffer)) != -1) {
    outputStream.write(buffer, 0, len); } } catch (IOException e) {
    e.printStackTrace(); } finally {
    IOUtils.close(inputStream); IOUtils.close(outputStream); } } catch (IOException e) {
    e.printStackTrace(); } }); }); // 关闭线程池 executorService.shutdown(); // 使用org.apache.commons类压缩下载好的头像 ZipArchiveOutputStream zipAos = null; try {
    // 等待线程池中所有任务执行完成(指定时间内没有执行完则返回false) boolean allTaskCompleted = executorService.awaitTermination(30, TimeUnit.MINUTES); if (!allTaskCompleted) {
    fallback("下载失败", response); } // 设置下载信息 response.setHeader("Content-Disposition", "attachment; filename=\"" + URLEncoder.encode("github_avatar.zip", "utf-8") + "\""); response.setContentType("application/zip"); zipAos = new ZipArchiveOutputStream(response.getOutputStream()); zipAos.setEncoding("UTF-8"); zipAos.setUseZip64(Zip64Mode.AsNeeded); File[] files = root.listFiles(); // 获取所有下载好的头像 assert files != null; for (File file : files) {
    // 将头像压缩至 github_avatar.zip 文件 ZipArchiveEntry entry = new ZipArchiveEntry(file, file.getName()); entry.setLastModifiedTime(FileTime.fromMillis(file.lastModified())); zipAos.putArchiveEntry(entry); try (InputStream inputStream = new FileInputStream(file)) {
    byte[] buffer = new byte[1024]; int len; while ((len = inputStream.read(buffer)) != -1) {
    zipAos.write(buffer, 0, len); } file.delete(); // 删除文件 } } zipAos.closeArchiveEntry(); } catch (Exception e) {
    e.printStackTrace(); } finally {
    IOUtils.close(zipAos); } } private void fallback(String message, HttpServletResponse response) {
    response.setCharacterEncoding("UTF-8"); response.setContentType(MediaType.APPLICATION_JSON_VALUE); PrintWriter writer = null; try {
    R error = R.error(500, message); JSONObject json = new JSONObject(error); writer = response.getWriter(); writer.append(json.toString()); } catch (IOException e) {
    e.printStackTrace(); } finally {
    if (writer != null) {
    writer.close(); } } } }
对于打包下载,我们可以用单线程,也可以用多线程,处理这种任务多线程的优势就体现出来了,可自行对比下单线程和多线程程序响应速度。


使用多线程需要注意的是:
- Executors.newFixedThreadPool()是创建一个可重用固定线程数量的线程池。实际开发中这种创建线程池的方式慎用,巨耗服务器资源,建议使用全局的线程池如tomcat的线程池,而不是每来一个线程都创建一个线程池。
- 主线程只负责分配任务,把耗时的逻辑尽可能的写到多线程任务上独立执行。
- 使用完线程池必须要关闭,先调用 shutdown() 方法关闭线程池,然后调用 awaitTermination(long timeout, TimeUnit unit) 方法等待线程池中的所有任务执行完成,只有线程池中的所有任务都执行完了,才能把响应信息写到
response上。
2、大文件分块下载
除了多文件下载,大文件下载也可以使用多线程机制,这也是优化大文件下载常用的方案,每个线程下载其中一部分,可大大提高下载速率。
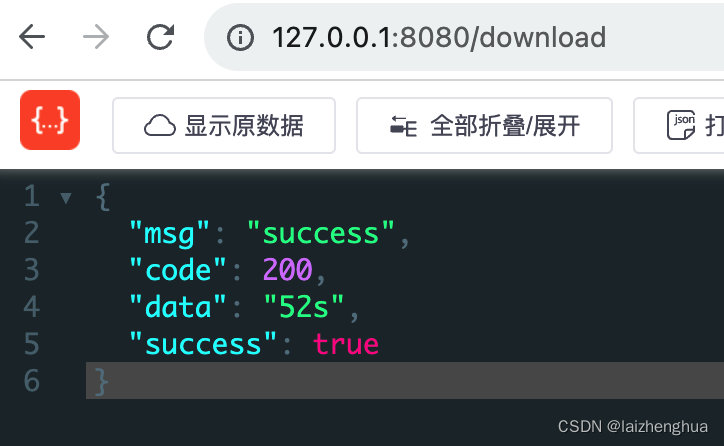
我们以下载安装包为例,如在官网上mac版的dmg有324MB,使用单线程下载大概需要52s,例如
@GetMapping("/download") public void download() throws IOException {
    ServletRequestAttributes servletRequestAttributes = (ServletRequestAttributes) RequestContextHolder.getRequestAttributes(); HttpServletResponse response = servletRequestAttributes.getResponse(); StopWatch stopWatch = new StopWatch(); stopWatch.start(); String url = "https://dldir1..com/file//NT/3a97cdda/_v6.9.21.17412.dmg"; // 获取文件名称 String fileName = url.substring(url.lastIndexOf("/") + 1); String filePath = "/Users/laizhenghua/Downloads/" + fileName; File file = new File(filePath); if (!file.exists()) {
    file.createNewFile(); } RestTemplate restTemplate = new RestTemplate(); // 下载 ResponseEntity<Resource> entity = restTemplate.getForEntity(url, Resource.class); try (InputStream inputStream = Objects.requireNonNull(entity.getBody()).getInputStream(); BufferedInputStream bufferedInputStream = new BufferedInputStream(inputStream); BufferedOutputStream bufferedOutputStream = new BufferedOutputStream(new FileOutputStream(file))) {
    int len; while ((len = bufferedInputStream.read()) != -1) {
    bufferedOutputStream.write(len); } } catch (IOException e) {
    e.printStackTrace(); } stopWatch.stop(); fallback(String.format("%ss", stopWatch.getTotalTimeMillis() / 1000), "success", response); } private void fallback (Object data, String message, HttpServletResponse response){
    response.setCharacterEncoding("UTF-8"); response.setContentType(MediaType.APPLICATION_JSON_VALUE); PrintWriter writer = null; try {
    R r = R.success(data, message); JSONObject json = new JSONObject(r); writer = response.getWriter(); writer.append(json.toString()); } catch (IOException e) {
    e.printStackTrace(); } finally {
    if (writer != null) {
    writer.close(); } } }
再来看访问api返回的信息
我们再来看使用多线程的方式下载会花费多长时间?
讯享网@GetMapping("blocking/download") public void blockingDownload() throws IOException, InterruptedException {
    ServletRequestAttributes servletRequestAttributes = (ServletRequestAttributes) RequestContextHolder.getRequestAttributes(); HttpServletResponse response = servletRequestAttributes.getResponse(); StopWatch stopWatch = new StopWatch(); stopWatch.start(); // 准备下载地址 String url = "https://dldir1..com/file//NT/3a97cdda/_v6.9.21.17412.dmg"; // 获取文件名称 String fileName = url.substring(url.lastIndexOf("/") + 1); // 目标文件创建 File file = new File("/Users/laizhenghua/Downloads/", fileName); if (!file.exists()) {
    file.createNewFile(); } /* 如果需要计算下载速度,我们需要知道每秒传输的字节数是多少,这时需要借助 SpringMVC 的 ResponseExtractor 接口实现, 当客户端和服务端连接建立后,会回调这个方法,我们可以在这个方法中监控下载的速度 */ int corePoolSize = 10; // 线程池核心线程数量 // 准备线程池 ExecutorService executorService = Executors.newFixedThreadPool(corePoolSize); RestTemplate restTemplate = new RestTemplate(); // 获取文件大小 long contentLength = restTemplate.headForHeaders(url).getContentLength(); // 换算成MB contentLength / 1024 / 1024 RandomAccessFile randomAccessFile = null; try {
    randomAccessFile = new RandomAccessFile(file, "rw"); randomAccessFile.setLength(contentLength); // 计算每个线程下载的大小 long length = contentLength / corePoolSize; long start, end; for (int i = 0; i < corePoolSize; ++i) {
    // 累加 start = i * length; end = i == corePoolSize - 1 ? contentLength: (i + 1) * length; // 分配任务 long finalStart = start; long finalEnd = end; RandomAccessFile finalRandomAccessFile = randomAccessFile; executorService.execute(() -> {
    String name = Thread.currentThread().getName(); HttpHeaders headers = new HttpHeaders(); // 使用HTTP协议Range请求头告知需要请求的资源范围格式为 Range: bytes=start-end headers.set(HttpHeaders.RANGE, String.format("bytes=%s-%s", finalStart, finalEnd)); headers.setAccept(Arrays.asList(MediaType.APPLICATION_OCTET_STREAM, MediaType.ALL)); headers.setContentType(MediaType.APPLICATION_OCTET_STREAM); log.info("[{}] download start -- range: {}", name, headers.get(HttpHeaders.RANGE)); ResponseEntity<byte[]> resp = restTemplate.exchange(url, HttpMethod.GET, new HttpEntity<>(headers), byte[].class); try {
    finalRandomAccessFile.seek(finalStart); byte[] bytes = Objects.requireNonNull(resp.getBody()); finalRandomAccessFile.write(bytes); } catch (IOException e) {
    e.printStackTrace(); } }); } } catch (IOException e) {
    e.printStackTrace(); } finally {
    executorService.shutdown(); // 等待所有下载任务都完成 boolean allTaskCompleted = executorService.awaitTermination(10, TimeUnit.MINUTES); if (allTaskCompleted) {
    // 所有线程任务 } IOUtils.closeQuietly(randomAccessFile); } stopWatch.stop(); fallback(String.format("%ss", stopWatch.getTotalTimeMillis() / 1000), "success", response); }
再来看访问api返回的信息
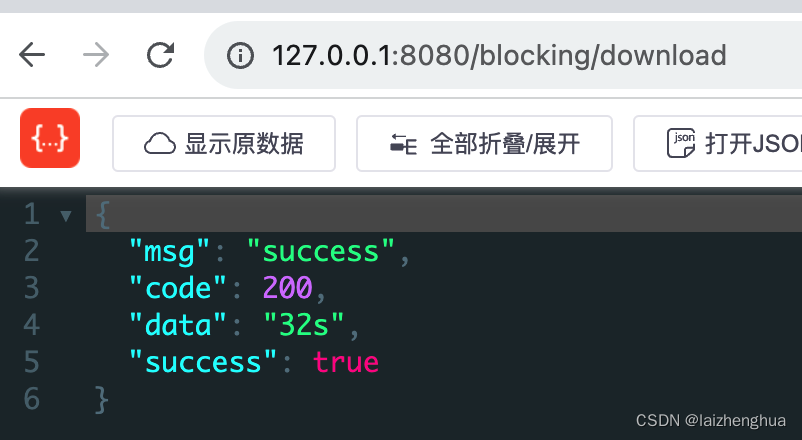
这样对比看似快了20s,实际上多线程请求文件资源,文件在磁盘上一瞬间就写完了,比较耗时的是关闭线程资源,如果换一种写法,速度上肯定还会快很多。
版权声明:本文内容由互联网用户自发贡献,该文观点仅代表作者本人。本站仅提供信息存储空间服务,不拥有所有权,不承担相关法律责任。如发现本站有涉嫌侵权/违法违规的内容,请联系我们,一经查实,本站将立刻删除。
如需转载请保留出处:https://51itzy.com/kjqy/43287.html