
文章目录:
1.创建一个SpringBoot工程——消息发送者
1.创建一个SpringBoot工程——消息接收者
3.测试结果
3.1 direct
3.2 fanout
3.3 topic
3.4 RabbitMQ管控台中查看SpringBoot工程创建的交换机和消息队列
1.创建一个SpringBoot工程——消息发送者
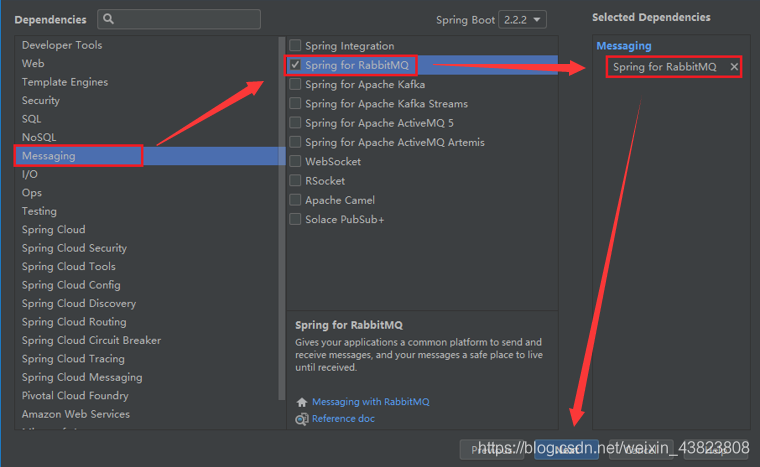
前两步都是一样的,只不过在依赖项页面中,要勾选RabbitMQ这个选项。
在核心配置文件中,配置RabbitMQ的相关连接信息。
#配置RabbitMQ的相关连接信息 spring.rabbitmq.host=192.168.40.130 spring.rabbitmq.port=5672 spring.rabbitmq.username=root spring.rabbitmq.password=root讯享网
编写实现消息发送的接口和实现类。
接口中的三个方法分别对应 direct、fanout、topic三种类型的交换机,我这里测试这三种类型的交换机来发送接收消息。
讯享网package com.szh.springboot.rabbitmq.service; / * */ public interface SendService { void sendMessage(String message); void sendFanout(String message); void sendTopic(String message); }
package com.szh.springboot.rabbitmq.service.impl; import com.szh.springboot.rabbitmq.service.SendService; import org.springframework.amqp.core.AmqpTemplate; import org.springframework.beans.factory.annotation.Autowired; import org.springframework.stereotype.Service; / * */ @Service("sendService") public class SendServiceImpl implements SendService { @Autowired private AmqpTemplate amqpTemplate; @Override public void sendMessage(String message) { / * 发送消息 * 参数1:交换机名称 * 参数2:RoutingKey * 参数3:具体发送的消息内容 */ amqpTemplate.convertAndSend("springbootDirectExchange","springbootDirectRouting",message); } @Override public void sendFanout(String message) { amqpTemplate.convertAndSend("fanoutExchange","",message); } @Override public void sendTopic(String message) { amqpTemplate.convertAndSend("topicExchange","aa.bb.cc",message); } } 然后写一个关于三种类型交换机的配置类。
讯享网package com.szh.springboot.rabbitmq.config; import org.springframework.amqp.core.*; import org.springframework.context.annotation.Bean; import org.springframework.context.annotation.Configuration; / * */ @Configuration public class RabbitMQConfig { //配置一个Direct类型的交换机 @Bean public DirectExchange directExchange() { return new DirectExchange("springbootDirectExchange"); } //配置一个队列 @Bean public Queue directQueue() { return new Queue("springbootDirectQueue"); } / * 配置一个队列和交换机的绑定 * @param directQueue : 需要绑定的队列对象,参数名必须和某个@Bean的方法名完全相同,这样就会进行自动注入,对应 .bind() * @param directExchange : 需要绑定的交换机对象,参数名必须和某个@Bean的方法名完全相同,这样就会进行自动注入,对应 .to() * .with() 方法对应的RoutingKey * @return */ @Bean public Binding directBinding(Queue directQueue,DirectExchange directExchange) { return BindingBuilder.bind(directQueue).to(directExchange).with("springbootDirectRouting"); } //配置一个Fanout类型的交换机 @Bean public FanoutExchange fanoutExchange() { return new FanoutExchange("fanoutExchange"); } //配置一个Topic类型的交换机 @Bean public TopicExchange topicExchange() { return new TopicExchange("topicExchange"); } }
最后是SpringBoot项目的启动入口类。
这里首先是通过ApplicationContext获取到了Spring容器,然后从容器中拿到sendService这个对象,最后的三行代码分别对应的是测试这三种类型的交换机。
package com.szh.springboot.rabbitmq; import com.szh.springboot.rabbitmq.service.SendService; import org.springframework.boot.SpringApplication; import org.springframework.boot.autoconfigure.SpringBootApplication; import org.springframework.context.ApplicationContext; @SpringBootApplication public class Application { public static void main(String[] args) { ApplicationContext context=SpringApplication.run(Application.class, args); SendService service= (SendService) context.getBean("sendService"); service.sendMessage("SpringBoot集成RabbitMQ的测试数据"); //service.sendFanout("SpringBoot集成RabbitMQ的测试数据"); //service.sendTopic("SpringBoot集成RabbitMQ的测试数据"); } } 1.创建一个SpringBoot工程——消息接收者
前两步都是一样的,只不过在依赖项页面中,要勾选RabbitMQ这个选项。

在核心配置文件中,配置RabbitMQ的相关连接信息。

讯享网#配置RabbitMQ的相关连接信息 spring.rabbitmq.host=192.168.40.130 spring.rabbitmq.port=5672 spring.rabbitmq.username=root spring.rabbitmq.password=root
编写实现消息接收的接口和实现类。
接口中的这些方法分别对应 direct、fanout、topic三种类型的交换机,我这里测试这三种类型的交换机来发送接收消息。
package com.szh.sprringboot.rabbitmq.service; / * */ public interface ReceiveService { void receiveMessage(); void directReceive(String message); void fanoutReceive01(String message); void fanoutReceive02(String message); void topicReceive01(String message); void topicReceive02(String message); void topicReceive03(String message); } 讯享网package com.szh.sprringboot.rabbitmq.service.impl; import com.szh.sprringboot.rabbitmq.service.ReceiveService; import org.springframework.amqp.core.AmqpTemplate; import org.springframework.amqp.rabbit.annotation.Exchange; import org.springframework.amqp.rabbit.annotation.Queue; import org.springframework.amqp.rabbit.annotation.QueueBinding; import org.springframework.amqp.rabbit.annotation.RabbitListener; import org.springframework.beans.factory.annotation.Autowired; import org.springframework.stereotype.Service; / * */ @Service("receiveService") public class ReceiveServiceImpl implements ReceiveService { @Autowired private AmqpTemplate amqpTemplate; / * receiveAndConvert()这个方法,每执行一次只能接收一次消息 * 如果有消息进入,则不会自动接收消息(不建议使用) */ @Override public void receiveMessage() { // String message= (String) amqpTemplate.receiveAndConvert("springbootDirectQueue"); // System.out.println(message); } / * @RabbitListener : 用于标记当前方法是一个RabbitMQ的消息监听方法,可以持续性的自动接收消息 * @param message * 该方法不需要手动调用,Spring会自动运行这个监听方法 * * 注意:如果该监听方法正常结束,那么Spring会自动确认消息 * 如果出现异常,则Spring不会确认消息,该消息一直存在于消息队列中 */ @Override @RabbitListener(bindings = { @QueueBinding( value = @Queue(name = "springbootDirectQueue"), exchange = @Exchange(name = "springbootDirectExchange"), key = {"springbootDirectRouting"} ) }) public void directReceive(String message) { System.out.println(message); } @Override @RabbitListener(bindings = { @QueueBinding( //完成队列和交换机的绑定 value = @Queue(), //创建一个队列,没有name属性,表示创建一个随即名称的消息队列 exchange = @Exchange(name = "fanoutExchange",type = "fanout") //创建一个交换机 ) }) public void fanoutReceive01(String message) { System.out.println(message); } @Override @RabbitListener(bindings = { @QueueBinding( //完成队列和交换机的绑定 value = @Queue(), //创建一个队列,没有name属性,表示创建一个随即名称的消息队列 exchange = @Exchange(name = "fanoutExchange",type = "fanout") //创建一个交换机 ) }) public void fanoutReceive02(String message) { System.out.println(message); } @Override @RabbitListener(bindings = { @QueueBinding( value = @Queue("topic01"), exchange = @Exchange(name = "topicExchange",type = "topic"), key = {"aa"} ) }) public void topicReceive01(String message) { System.out.println("topic01 接收到的数据:" + message); } @Override @RabbitListener(bindings = { @QueueBinding( value = @Queue("topic02"), exchange = @Exchange(name = "topicExchange",type = "topic"), key = {"aa.*"} ) }) public void topicReceive02(String message) { System.out.println("topic02 接收到的数据:" + message); } @Override @RabbitListener(bindings = { @QueueBinding( value = @Queue("topic03"), exchange = @Exchange(name = "topicExchange",type = "topic"), key = {"aa.#"} ) }) public void topicReceive03(String message) { System.out.println("topic03 接收到的数据:" + message); } }
最后是SpringBoot项目的启动入口类。
package com.szh.sprringboot.rabbitmq; import com.szh.sprringboot.rabbitmq.service.ReceiveService; import org.springframework.boot.SpringApplication; import org.springframework.boot.autoconfigure.SpringBootApplication; import org.springframework.context.ApplicationContext; @SpringBootApplication public class Application { public static void main(String[] args) { ApplicationContext context=SpringApplication.run(Application.class, args); ReceiveService service= (ReceiveService) context.getBean("receiveService"); //service.receiveMessage(); } } 3.测试结果
3.1 direct
先启动消息发送者工程,再启动消息接收者工程。


3.2 fanout
先启动消息接收者工程,再启动消息发送者工程。
因为这里fanout交换机中定义了两个消息队列,它是一对多、不需要绑定RoutingKey的,所以这些消息队列都会接收到消息数据。


3.3 topic
先启动消息接收者工程,再启动消息发送者工程。
因为这里topic交换机中定义了三个消息队列,它是一对多、需要绑定RoutingKey的,根据RoutingKey的不同会限制哪些消息队列能够接收到消息、哪些不能。当绑定的RoutingKey为aa时,只有BingKey为 aa、aa.# 这两个消息队列可以接收到(aa顾名思义、而aa.#是因为#表示0个或多个单词,aa.*接收不到是因为*仅能表示1个单词)。


3.4 RabbitMQ管控台中查看SpringBoot工程创建的交换机和消息队列
这里的消息队列只有direct、topic的,至于为什么没有fanout的,是因为fanout类型的交换机在消息发送/接收服务停止之后,对应的交换机还在,但是消息队列会自动清除掉。


版权声明:本文内容由互联网用户自发贡献,该文观点仅代表作者本人。本站仅提供信息存储空间服务,不拥有所有权,不承担相关法律责任。如发现本站有涉嫌侵权/违法违规的内容,请联系我们,一经查实,本站将立刻删除。
如需转载请保留出处:https://51itzy.com/kjqy/121158.html