
1.redis集群原理
Redis集群模式主要有2种:
- 主从集群
- 分布式集群。
Redis为了实现负载均衡,提供集群模式。以三个节点为例,集群模式相当于将1-15000片分片,分为1-5000、5000-10000、10000-15000。每个节点分一段数据片。这样的话,当一个节点宕机后,这个节点没有备份的话,此段分片将不再可以使用。所以,官方推荐,集群内的每个节点都应该配备一个从节点,作为冷备。
官网推荐的模式,是三主三从的集群部署方式。
2.redis集群部署
2.1解决依赖,获取解压安装包
$ yum -y install gcc #如果没有gcc编译容器则需要安装 $ wget http://download.redis.io/releases/redis-4.0.11.tar.gz $ tar -xf redis-4.0.11.tar.gz讯享网
2.2 安装,并配置环境变量
讯享网#编译,获取可行执行文件 $ cd redis-4.0.11 $ make #在/opt下创建redis目录,将可执行文件,配置文件,日志文件都放在/opt/redis目录下 $ mkdir -pv /opt/redis/conf /opt/redis/bin /opt/redis/log /opt/redis/data/7000 /opt/redis/data/7001 #拷贝常用的二进制文件 $ cp /opt/software/redis-4.0.11/src/redis-* /opt/redis/bin #删除.c,.o的文件 $ rm /opt/redis/bin/*.c /opt/redis/bin/*.o $ vim /etc/profile #添加以下内容 export REDIS_HOME=/opt/redis export PATH=${REDIS_HOME}/bin:$PATH #立即生效 $ source /etc/profile
在第一台机器上配置redis的主,从两个配置文件,下面是主实例的配置文件内容
$ vim /opt/redis/conf/redis7000.conf bind ${ip1} #填写第一台机器ip port 7000 cluster-enabled yes cluster-config-file nodes.conf cluster-node-timeout 5000 appendonly yes timeout 3600 daemonize yes pidfile /opt/redis/pid/redis7000.pid logfile "/opt/redis/log/redis7000.log" dir "/opt/redis/data/7000" rename-command FLUSHALL "" rename-command FLUSHDB "" rename-command KEYS ""下面是从实例的配置文件内容,只是端口不一样,和目录位置结构不一样
讯享网#这里我们使用简单一点集群配置,从实例配置文件 $ vim /opt/redis/conf/redis7001.conf bind ${ip1} port 7001 cluster-enabled yes cluster-config-file nodes.conf cluster-node-timeout 5000 appendonly yes timeout 3600 daemonize yes pidfile /opt/redis/pid/redis7001.pid logfile "/opt/redis/log/redis7001.log" dir "/opt/redis/data/7001" rename-command FLUSHALL "" rename-command FLUSHDB "" rename-command KEYS ""
2.3启动redis实例
配置完后,我们scp到其他两个机器上,并三台机器都要重动,每台启动2个实例,一个主实例,一个从实例。我们以第一台机器为例,进行重启。
#拷贝到其他两台机器上 $ scp -r /opt/redis ${ip2}:/opt $ scp -r /opt/redis ${ip3}:/opt #启动redis实例,3台机器均要启动 $ redis-server conf/redis7000.conf $ redis-server conf/redis7001.conf我们可以看到两个进程存在,其他两台机器也要启动,启动方式是一样的。
讯享网$ ps -ef |grep redis root 21882 1 0 Nov30 ? 00:09:05 redis-server ${ip1}:7000 [cluster] root 21891 1 0 Nov30 ? 00:08:45 redis-server ${ip1}:7001 [cluster]
3. 创建集群
3.1安装ruby
创建Redis集群需要借助安装包里的一个Ruby脚本,所以需要先安装ruby.
[root@bfd-yiz-1p23 /opt]# yum -y install ruby rubygems [root@bfd-yiz-1p23 /opt]# gem install redis # 安装Redis客户端for Ruby执行上述操作,可能会报下面的错误
讯享网ERROR: Error installing redis: redis requires Ruby version >= 2.2.2.
解决方案:升级ruby的版本。
[root@bfd-yiz-1p23 /opt]# curl -L get.rvm.io | bash -s stable
这里要区分是否是root用户还是普通用户,因为不同用户下载到机器上的位置是不一样的。
讯享网root用户下载到的位置是/usr/local/rvm 普通用户下载到的位置是/home/imoa/rvm
首先你会在下载的目录下找到rvm-1.29.4.tgz包,解压后,进行source 一下。
#到 /usr/local/rvm/archives目录下,要解压rvm-1.29.4包,再source root用户:source /usr/local/rvm/archives/rvm-1.29.4/scripts/rvm修改rvm的ruby安装源,修改 RVM 的 Ruby 安装源到 Ruby China 的 Ruby 镜像服务器,这样能提高安装速度。
讯享网[root@bfd-yiz-1p23 /opt]# echo "ruby_url=https://cache.ruby-china.org/pub/ruby" >/usr/lcoal/rvm/user/db #如果报错说没有上述目录或者文件,则需要手动去创建 mkdir -p /usr/lcoal/rvm/user cd /usr/lcoal/rvm/user touch db
正常情况下,我们查看ruby的版本,然后进行安装
[root@bfd-yiz-1p23 /opt]# rvm list known #查看版本 [root@bfd-yiz-1p23 /opt]# rvm install 2.4.6 #安装2.4.6版本 Searching for binary rubies, this might take some time. No binary rubies available for: centos/7/x86_64/ruby-2.4.6. Continuing with compilation. Please read 'rvm help mount' to get more information on binary rubies. Checking requirements for centos. Requirements installation successful. Installing Ruby from source to: /usr/local/rvm/archives/rvm-1.29.8/rubies/ruby-2.4.6, this may take a while depending on your cpu(s)... -bash: cd: /usr/local/rvm/archives/rvm-1.29.8/src: No such file or directory ruby-2.4.6 - #downloading ruby-2.4.6, this may take a while depending on your connection... % Total % Received % Xferd Average Speed Time Time Time Current Dload Upload Total Spent Left Speed 100 12.0M 100 12.0M 0 0 1239k 0 0:00:09 0:00:09 --:--:-- 1492k ruby-2.4.6 - #extracting ruby-2.4.6 to /usr/local/rvm/archives/rvm-1.29.8/src/ruby-2.4.6..... mv: cannot move ‘/usr/local/rvm/archives/rvm-1.29.8/tmp/rvm_src_6552/ruby-2.4.6’ to ‘/usr/local/rvm/archives/rvm-1.29.8/src/ruby-2.4.6’: No such file or directory -bash: cd: /usr/local/rvm/archives/rvm-1.29.8/src/ruby-2.4.6: No such file or directory [root@wyl01 archives]# mkdir -p /usr/local/rvm/archives/rvm-1.29.8/src/ruby-2.4.6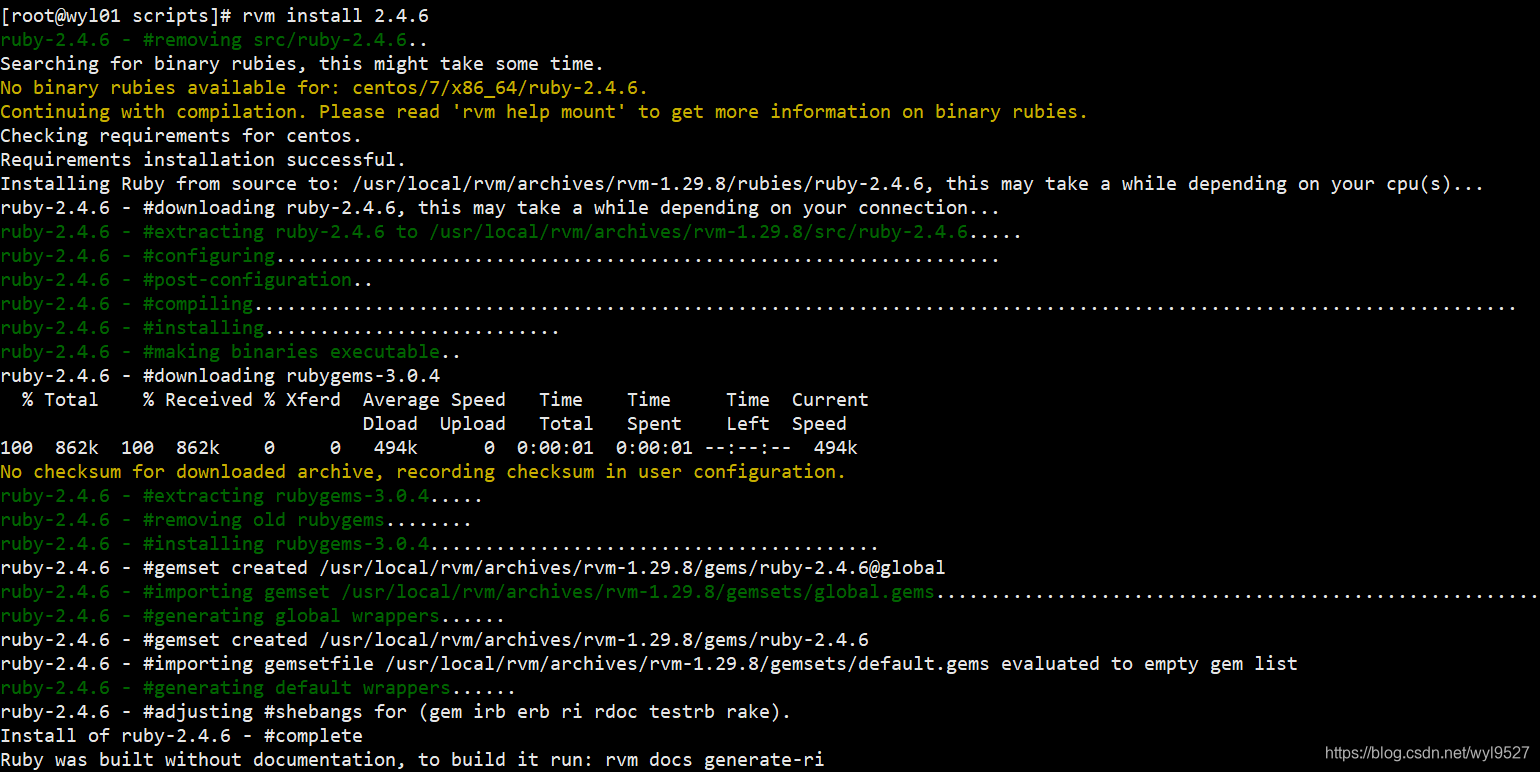
在安装的过程中可能会报一些目录不存在的错误,根据提示,去创建这些目录即可。
讯享网Continuing with compilation. Please read 'rvm help mount' to get more information on binary rubies. df: ‘/usr/local/rvm/archives/rvm-1.29.5/rubies’: No such file or directory Not enough space (0MB) to install ruby (440MB). cd: /usr/local/rvm/archives/rvm-1.29.5/archives: No such file or directory

这里注意,在安装rvm的时候,会导致你的机器ctrl+c功能失效,可参考该文章。其实卸载rvm应该就可以了。因为这个地方source一下rvm了,可能导致的。
ruby升级完后,不要忘了执行
$ gem install redis # 进行 Redis 接口安装3.2创建Redis集群.
安装完ruby2.4.4后我们就可以进行以下操作, 创建Redis集群.
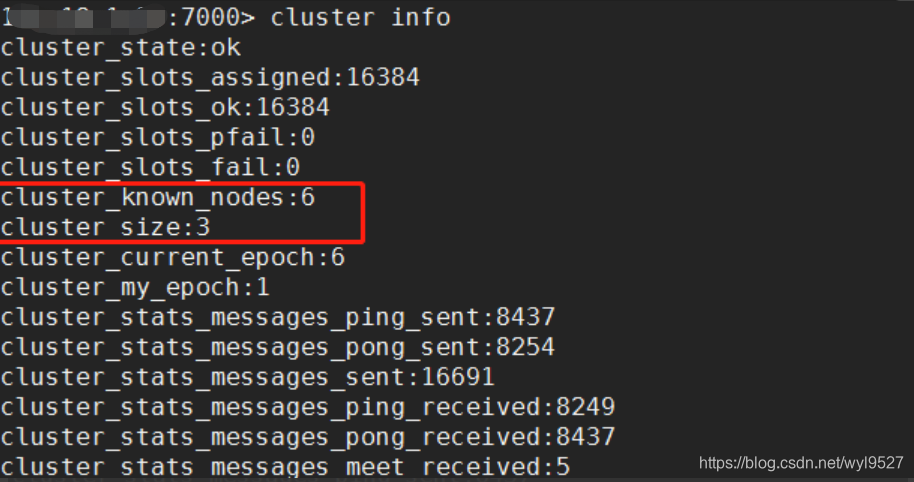
讯享网[root@bfd-yiz-1p23 /opt/redis/]# redis-trib.rb create --replicas 1 ${ip1}:7000 ${ip2}:7000 ${ip3}:7000 ${ip1}:7001 ${ip2}:7001 ${ip3}:7001 >>> Creating cluster Can I set the above configuration? (type 'yes' to accept): yes #输入yes >>> Nodes configuration updated >>> Assign a different config epoch to each node >>> Sending CLUSTER MEET messages to join the cluster Waiting for the cluster to join.... >>> Performing Cluster Check (using node 127.0.0.1:7000) M: d5a834d075fd93eefab877c6ebb86effff ${ip1}:7000 slots:0-5460 (5461 slots) master 1 additional replica(s) M: beeba4e56f696e56b75e67df720b7fc24 ${ip2}:7000 slots:10923-16383 (5461 slots) master 1 additional replica(s) M: 13d0ca0bc37b666fce83f29faa8 ${ip3}:7000 slots:5461-10922 (5462 slots) master 1 additional replica(s) S: 3d02f59bfaecc0de7b38076c ${ip1}:7001 slots: (0 slots) slave replicates 13d0ca0bc37b666fce83f29faa8 S: 99c07119a449af7699e15afa0e41952 ${ip2}:7001 slots: (0 slots) slave replicates d5a834d075fd93eefab877c6ebb86effff S: dedf672f0a75faf37407ac4edd5da23bc4651e25 ${ip3}:7001 slots: (0 slots) slave replicates beeba4e56f696e56b75e67df720b7fc24 [OK] All nodes agree about slots configuration. >>> Check for open slots... >>> Check slots coverage... [OK] All 16384 slots covered. 根据提示,输入yes,我们会看到集群创建成功。
报错1:[ERR] Sorry, can't connect to node 192.168.190.132:7000
解决方案:最容易忽略掉的一个原因是关闭防火墙和selinux.
报错2:重新搭建集群,可能出现的错误
Can I set the above configuration? (type 'yes' to accept): yes /usr/local/rvm/archives/rvm-1.29.8/rubies/ruby-2.4.6/lib/ruby/gems/2.4.0/gems/redis-4.1.2/lib/redis/client.rb:126:in `call': ERR Slot 0 is already busy (Redis::CommandError) 解决方案:重置集群信息
在Redis集群中,清空各个节点上的数据,并执行cluster reset指令。
4.测试验证
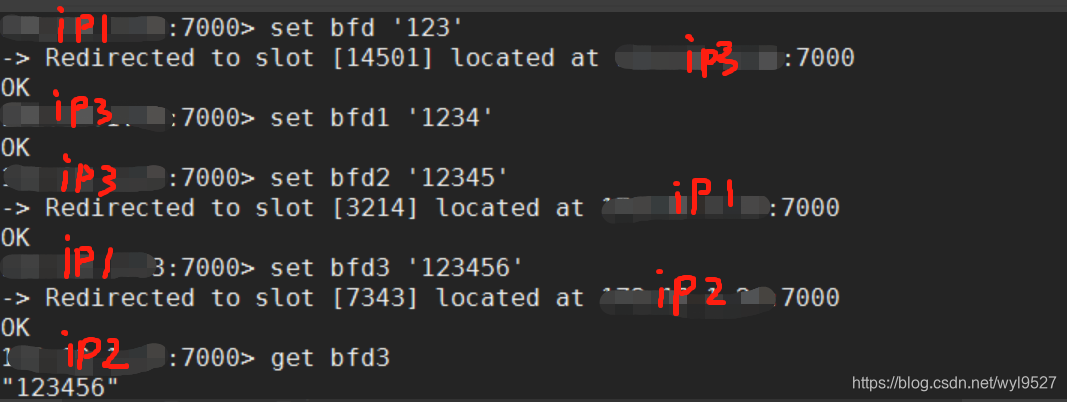
输入命令使用客户端redis-cli二进制访问某个实例,执行set和get的进行测试,如下所示:
讯享网$ redis-cli -h ${ip1} -p 7000 -c
输入命令进行测试,如下图:
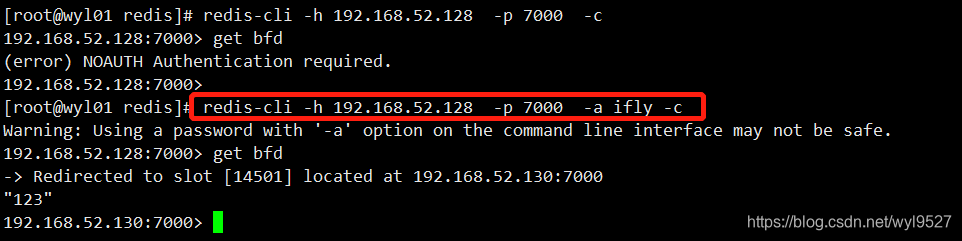
5.redis密码认证
在所有的redis实例中加上最下面的一句指令,并重启服务。
[root@wyl01 conf]# cat redis7000.conf bind ${ip1} port 7000 cluster-enabled yes cluster-config-file nodes.conf cluster-node-timeout 5000 appendonly yes timeout 3600 daemonize yes pidfile /opt/redis/pid/redis7000.pid logfile "/opt/redis/log/redis7000.log" dir "/opt/redis/data/7000" rename-command FLUSHALL "" rename-command FLUSHDB "" rename-command KEYS "" requirepass "ifly"
redis-cli 连接集群的所有实例
讯享网redis-cli -u redis://192.168.52.128:7000,192.168.52.128:7001,192.168.52.129:7000,192.168.52.129:7001,192.168.52.130:7000,192.168.52.128:7001 -c -a ifly
版权声明:本文内容由互联网用户自发贡献,该文观点仅代表作者本人。本站仅提供信息存储空间服务,不拥有所有权,不承担相关法律责任。如发现本站有涉嫌侵权/违法违规的内容,请联系我们,一经查实,本站将立刻删除。
如需转载请保留出处:https://51itzy.com/kjqy/39699.html