
版本:elasticsearch7.17,jdk8
父工程依赖
<properties> <spring-boot.version>2.3.12.RELEASE</spring-boot.version> </properties> <dependencies> <!--注意:由于 spring-boot-starter-web 默认替我们引入了核心启动器 spring-boot-starter, 因此,当 Spring Boot 项目中的 pom.xml 引入了 spring-boot-starter-web 的依赖后, 就无须在引入 spring-boot-starter 核心启动器的依赖了--> <dependency> <groupId>org.springframework.boot</groupId> <artifactId>spring-boot-starter-web</artifactId> <version>2.3.12.RELEASE</version> </dependency> <dependency> <groupId>org.springframework.boot</groupId> <artifactId>spring-boot-starter-test</artifactId> <version>2.3.12.RELEASE</version> <scope>test</scope> </dependency> <dependency> <groupId>com.meng</groupId> <artifactId>service</artifactId> <version>1.0-SNAPSHOT</version> </dependency> <dependency> <groupId>org.projectlombok</groupId> <artifactId>lombok</artifactId> <version>1.18.16</version> <scope>compile</scope> </dependency> </dependencies> 讯享网
子工程依赖
讯享网<dependencies> <dependency> <groupId>org.springframework.boot</groupId> <artifactId>spring-boot-starter-test</artifactId> <version>${spring-boot.version}</version> <scope>test</scope> </dependency> <dependency> <groupId>org.springframework.boot</groupId> <artifactId>spring-boot-starter-data-elasticsearch</artifactId> <version>${spring-boot.version}</version> </dependency> </dependencies>
application.yml(新版springboot2.3.12使用此配置,本文基于此版本)
spring: elasticsearch: rest: uris: 192.168.233.134:9200 application.yml(旧版springboot2.1.6使用此配置)
讯享网spring: data: elasticsearch: cluster-nodes: 192.168.233.134:9300
启动类
@SpringBootApplication public class EsApplication {
    public static void main(String[] args) {
    SpringApplication.run(EsApplication.class , args); } }
实体类(es7中创建索引方式好像变了,这里行不通了)
讯享网@Data @Document(indexName = "goods" , shards = 3 , replicas = 0) public class Goods {
    @Id private Integer id; @Field(type = FieldType.Text , analyzer = "ik_max_word") private String name; @Field(type = FieldType.Keyword) private String category; @Field(type = FieldType.Keyword) private String images; @Field(type = FieldType.Integer) private Integer price; }
Spring Data通过注解来声明字段的映射属性,有下面的三个注解:
- @Document 作用在类,标记实体类为文档对象,一般有四个属性
indexName:对应索引库名称 type:对应在索引库中的类型 shards:分片数量,默认5 replicas:副本数量,默认1 - @Id 作用在成员变量,标记一个字段作为id主键
- @Field 作用在成员变量,标记为文档的字段,并指定字段映射属性:
讯享网
type:字段类型,取值是枚举:FieldType index:是否索引,布尔类型,默认是true store:是否存储,布尔类型,默认是false analyzer:分词器名称:ik_max_word
Repository
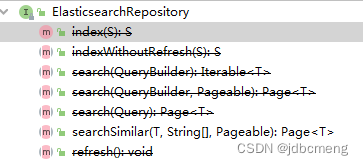
public interface EsRepository extends ElasticsearchRepository<User, Integer> {
    }
ElasticsearchTemplate、ElasticsearchRepository、ElasticsearchRestTemplate区别
ElasticsearchRepository可以做Elasticsearch的相关数据的增删改查,用法和普通的接口是一样的,这样就能统一ElasticSearch和普通的JPA操作,获得和操作mysql一样的代码体验。同时也可以看到ElasticsearchRepository的功能是比较少的,简单查询够用,但复杂查询就稍微显得力不从心了。
ElasticsearchRepository继承自PagingAndSortingRepository,PagingAndSortingRepository又继承CrudRepository
ElasticsearchRepository中的方法基本都过时了
讯享网
PagingAndSortingRepository中的两个方法,排序和分页
讯享网@NoRepositoryBean public interface PagingAndSortingRepository<T, ID> extends CrudRepository<T, ID> {
    / * Returns all entities sorted by the given options. * * @param sort * @return all entities sorted by the given options */ Iterable<T> findAll(Sort sort); / * Returns a {@link Page} of entities meeting the paging restriction provided in the {@code Pageable} object. * * @param pageable * @return a page of entities */ Page<T> findAll(Pageable pageable); }
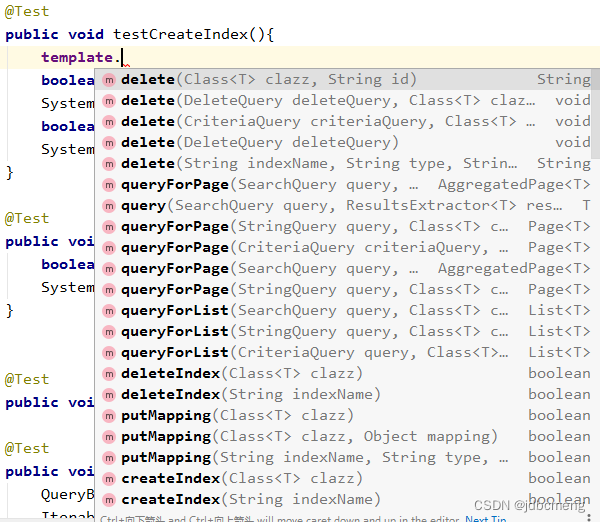
CrudRepository中的方法就是简单的增删查改

详见es中ElasticsearchRepository 的原理和使用
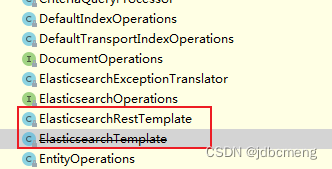
ElasticsearchTemplate 则提供了更多的方法,同时也包括分页之类的,他其实就是一个封装好的ElasticSearch Util功能类,通过直接连接client来完成数据的操作
详见es中ElasticSearchTemplate类的实现原理及使用
ElasticsearchRestTemplate 在新版的SpringBoot项目中,在这个包下,推荐使用的是ElasticsearchRestTemplate这个类(ElasticsearchTemplate不推荐使用了),和之前的用法有些不同。
本文使用springboot版本:2.3.12
参考:ElasticsearchRestTemplate使用
创建索引
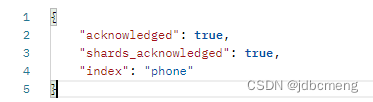
@Test public void testIndex(){
    boolean goods = template.indexOps(Goods.class).create();//新版本用这个方法 boolean goods1 = template.createIndex(User.class); // 此方法已过时 System.out.println("goods = " + goods); }
结果
现在新版的API创建的索引没有mapping了,两种方式解决这个问题
1、插入数据时使用默认生成的mapping(不推荐)
![[外链图片转存失败,源站可能有防盗在这里插入!链机制,建描述]议将图片上https://传(imbMOhjlog.csdnimg.cn/18e28d59bae64590a955668922a940bf.png)https://img-blog.csdnim自动g.cn/1ae68e28d59b4590a955668922a940bf.png)]](https://img-blog.csdnimg.cn/d0df2b3f5b6e45d2a0b83dc956948748.png)
这种方式生成的mapping字段的type并不是和实体类上用@Field声明的一致,而是自己生成的默认的。

2、已创建的索引,设置mapping
讯享网 / * 如果已经创建了index,可用此方法设置mapping */ @Test public void testCreateIndexWithoutIndex(){
    IndexCoordinates indexCoordinates = IndexCoordinates.of("phone");//已创建的索引 // 根据索引实体,获取mapping字段 Document mapping = restTemplate.indexOps(indexCoordinates).createMapping(Phone.class); // 创建索引mapping restTemplate.indexOps(indexCoordinates).putMapping(mapping); }
这种方式生成的mapping就是实体类中用@Field声明的类型了
还可以使用外部json文件方式创建索引
把setting放到项目中的一个文件中
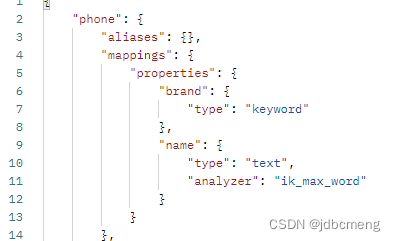
phone_setting.json
{
  "index": {
    "max_result_window": "500000",
    "analysis": {
      "filter": {
        "limit_len": {
          "type": "length",
          "min": "1"
        }
      },
      "analyzer": {
        "ik_max_custom": {
          "filter": [
            "limit_len"
          ],
          "char_filter": [
            "html_strip"
          ],
          "tokenizer": "ik_max_word"
        },
        "ik_smart_custom": {
          "type":      "custom",
          "tokenizer": "ik_smart",
          "char_filter": [],
          "filter": [
            "limit_len"
          ]
        },
        "default_pattern_analyzer": {
          "type":"pattern"
        }
      }
    }
  }
}
讯享网@Autowired private ElasticsearchRestTemplate restTemplate; @Value("classpath:phone_setting.json") private Resource esSetting; @Test public void testCreateIndex() throws Exception{
    IndexCoordinates indexCoordinates = IndexCoordinates.of("phone"); // 根据索引实体,获取mapping字段 Document mapping = restTemplate.indexOps(indexCoordinates).createMapping(Phone.class); // 创建索引 // 读取setting配置文件 String esSettingStr = IOUtils.toString(esSetting.getInputStream(), Charset.forName("utf-8")); // setting Document setting = Document.parse(esSettingStr); restTemplate.indexOps(indexCoordinates).create(setting); // 创建索引mapping restTemplate.indexOps(indexCoordinates).putMapping(mapping); }
可以参考这里es7创建索引
插入数据
 @Autowired private PhoneRepository phoneRepository; //插入数据 @Test public void testSave(){
    Phone phone = new Phone(1 , "诺基亚5300" , "诺基亚"); restTemplate.save(phone); } //批量插入数据 @Test public void testBatchSave(){
    List<Phone> list = new ArrayList<>(); Phone phone2 = new Phone(2 , "小米12pro" , "小米"); Phone phone3 = new Phone(3 , "iphone12" , "苹果"); list.add(phone2); list.add(phone3); phoneRepository.saveAll(list); }
修改数据
再插入一遍,只要id一致,就是修改
讯享网 //修改数据 @Test public void testUpdate(){
    Phone phone3 = new Phone(3 , "iphonese 3" , "苹果"); restTemplate.save(phone3); }
删除数据
删除数据的方法就比较多了
 //删除数据 @Test public void testDelete(){
    Phone phone3 = new Phone(3 , "iphonese 3" , "苹果"); String delete = restTemplate.delete(phone3); System.out.println("delete = " + delete);//delete = 3 } //删除数据2 @Test public void testDelete2(){
    String delete = restTemplate.delete("3" , Phone.class); System.out.println("delete = " + delete);//delete = 3 } //删除数据3 @Test public void testDelete3(){
    phoneRepository.deleteById(2); } //删除id大于20的goods数据 @Test public void test0DeleteByQueryBuilder(){
RangeQueryBuilder id = QueryBuilders.rangeQuery("id").gt(20); NativeSearchQuery query = new NativeSearchQueryBuilder().withQuery(id).build(); template.delete(query , Goods.class , IndexCoordinates.of("goods")); } 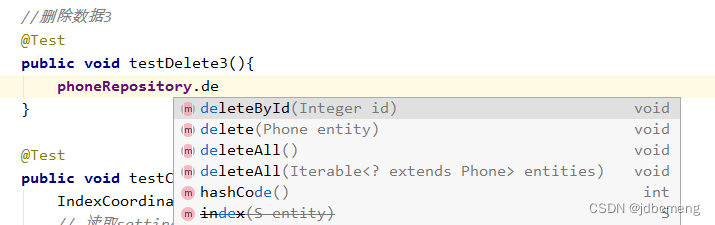
查询数据
重点就在查询了
简单查询
讯享网 //查询全部 @Test public void testQuery(){
    Iterable<Phone> phones = phoneRepository.findAll(); phones.forEach(System.out::println); } //根据id查询 @Test public void testQuery2(){
    Optional<Phone> phone = phoneRepository.findById(3); phone.ifPresent(System.out::println); } //根据ids查询 @Test public void testQuery3(){
    Iterable<Phone> phones = phoneRepository.findAllById(Arrays.asList(1,2,3)); phones.forEach(System.out::println); }
使用ElasticsearchRepository提供的自定义方法查询
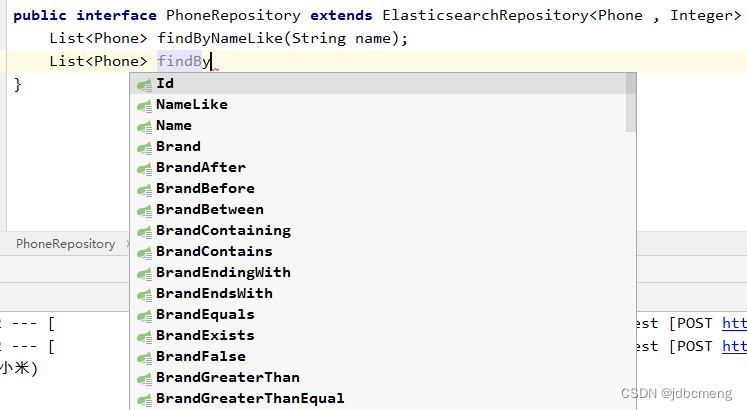
 //repository自定义方法查询 @Test public void testQuery4(){
    List<Phone> phones = phoneRepository.findByNameLike("小米"); phones.forEach(System.out::println); }
ElasticsearchRepository只能进行简单的查询,复杂的还要靠ElasticsearchRestTemplate
ElasticsearchRestTemplate复杂查询
讯享网 //查询name中包含“小米”的数据 @Test public void testQuery(){
    NativeSearchQuery nativeSearchQuery = new NativeSearchQueryBuilder() .withQuery(QueryBuilders.matchQuery("name", "小米")) .build(); SearchHits<Phone> searchPhone = restTemplate.search(nativeSearchQuery, Phone.class); searchPhone.forEach(System.out::println); //SearchHit{id='2', score=1., sortValues=[], content=Phone(id=2, name=小米12pro, brand=小米), highlightFields={}} } //分页+排序 @Test public void testQuery3(){
    NativeSearchQuery nativeSearchQuery = new NativeSearchQueryBuilder() .withQuery(QueryBuilders.matchQuery("name", "手机")) .withPageable(PageRequest.of(0, 10)) // 分页 .withSort(SortBuilders.fieldSort("id").order(SortOrder.DESC))//排序 .build(); SearchHits<Phone> search = template.search(nativeSearchQuery, Phone.class); SearchPage<Phone> page = SearchHitSupport.searchPageFor(search, nativeSearchQuery.getPageable()); System.out.println(page.getTotalElements()); System.out.println(page.getTotalPages()); System.out.println(page.getNumber()); System.out.println(page.getSize()); }
版权声明:本文内容由互联网用户自发贡献,该文观点仅代表作者本人。本站仅提供信息存储空间服务,不拥有所有权,不承担相关法律责任。如发现本站有涉嫌侵权/违法违规的内容,请联系我们,一经查实,本站将立刻删除。
如需转载请保留出处:https://51itzy.com/kjqy/36816.html