
完整项目源码在gitee:https://gitee.com/li-zhi_xiang/ssm_pictureSystem/blob/master/%E7%B3%BB%E7%BB%9F%E5%8A%9F%E8%83%BD%E9%A2%84%E8%A7%88.md
项目目的:
在掌握SpringMVC、Spring、MyBatis/Hibernate框架的特点和使用的基础上,掌握利用Spring框架整合SpringMVC和MyBatis/Hibernate的基本思想和方法。熟练掌握Spring整合SpringMVC控制器配置及Spring容器的启动配置,掌握Spring整合MyBatis/Hibernate的数据源配置、ORM映射配置和参数设置等。能够利用整合后的SSM/SSH框架进行简单的基于Web的javaEE应用。
项目环境(硬/软件要求):
硬件:CPU主频2.0GHz以上,硬盘20G以上,内存1G以上
软件:Eclipse,Maven,Tomcat7,JDK622,Mysql5
内容:
简单图片管理系统设计与实现
功能需求: 完成图片上传与共享传播的功能
1、 用户管理:注册、登录、搜索用户、信息修改、密码修改
2、 关注管理:用户可以关注其他用户,或取消关注
3、 图片管理:用户可以在个人空间中上传图片,并制定图片标签、图片浏览、删除自己的图片,搜索图片
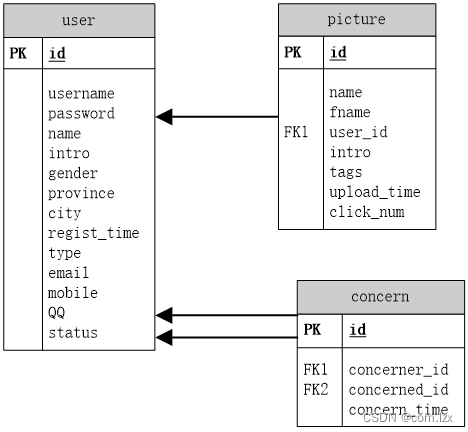
数据库设计
创建项目、搭建环境、依赖配置……暂不展示!
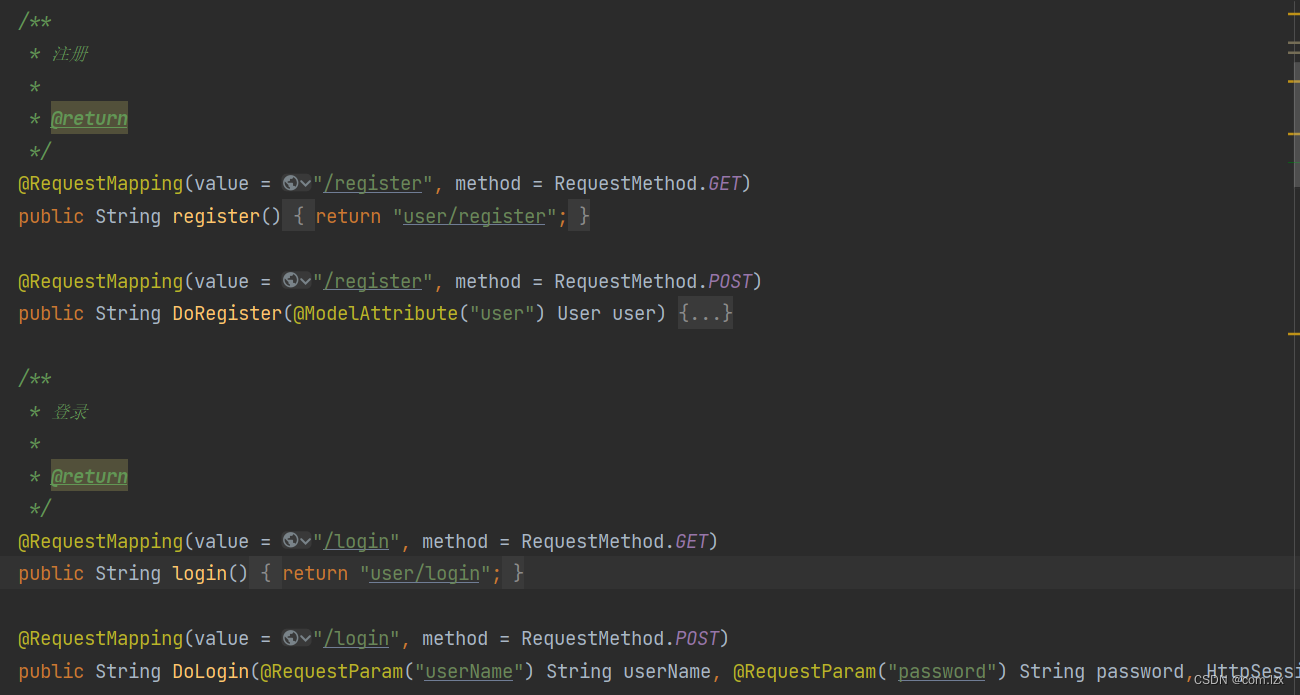
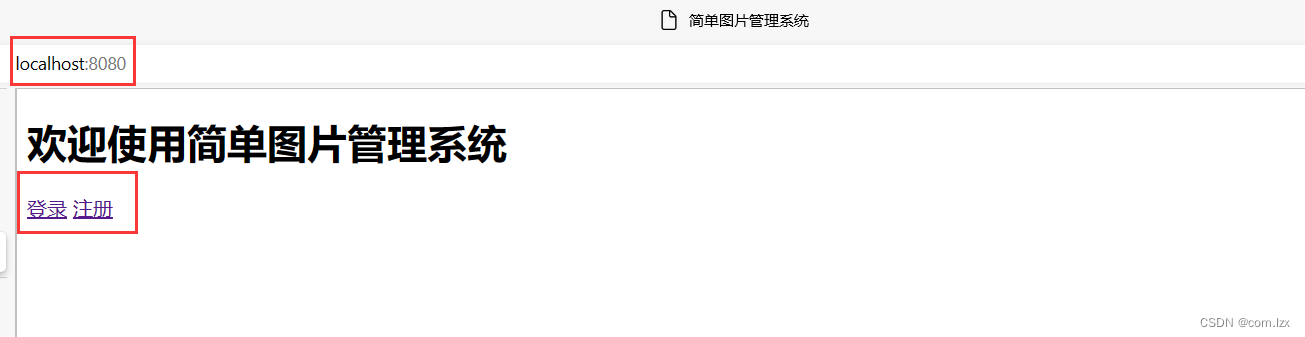
系统采用Tomcat或者Jetty启动都可以,项目运行起来后,访问index页面:http://localhost:8080 可以看到登录、注册两个按钮。
登录时会判断用户是否存在、用户名密码是否正确,错误页面以Error.jsp做简单提示,关键信息存入HttpSession
进入系统主页面
页面分上中下三部分。
上面部分:提供搜索用户、我的空间、上传图片等功能;
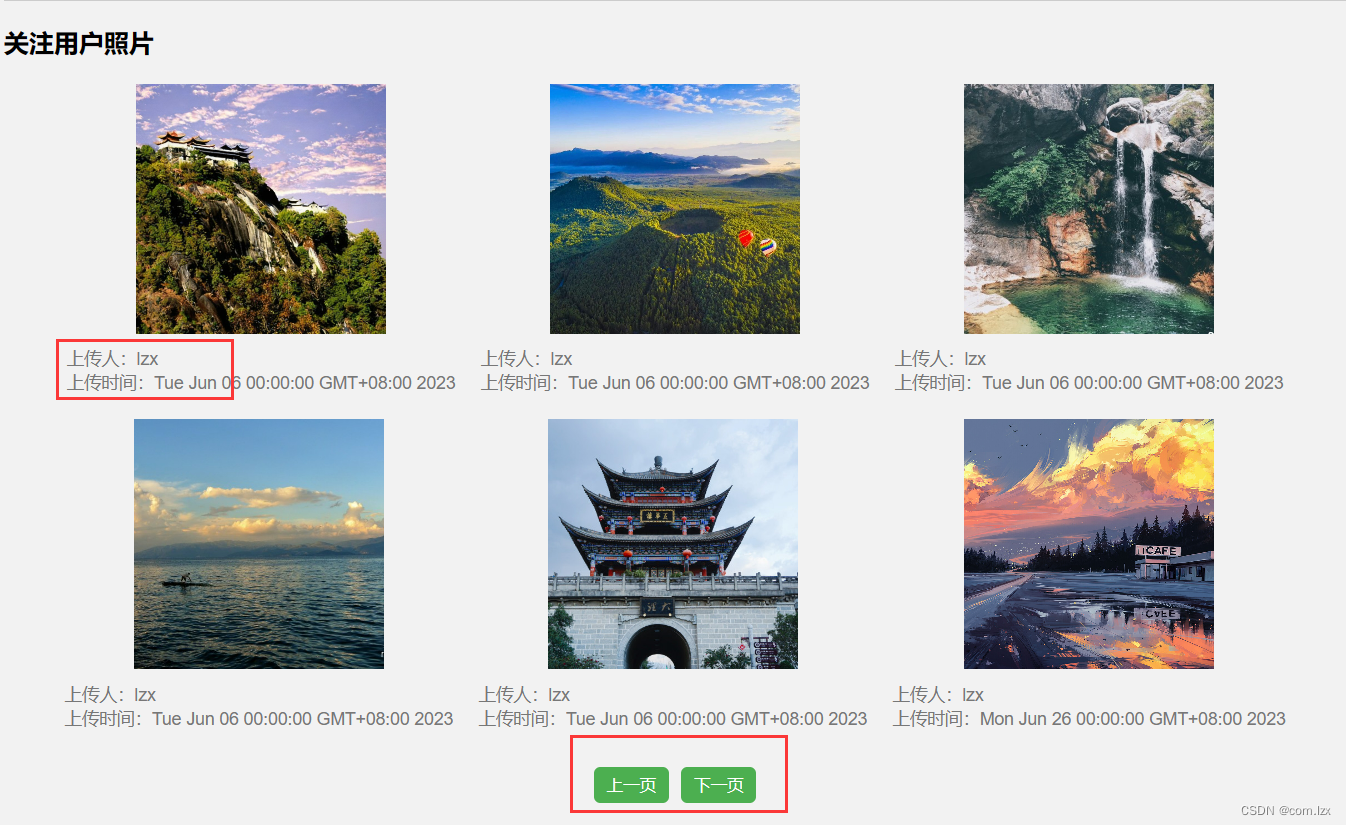
中间部分:展示目前登录的用户的关注用户的照片。这里用户可以关注多人,而且一人可以发布多张图片。我的处理逻辑是这样的:
先根据目前用户从数据库中查到其所以关注者的id集合,遍历ids,同时遍历每一个关注用户的所有图片。最后将准备好的图片集合pictureInfoList放入model中,传给jsp页面展示出来。
值得注意的是:数据库中我存放图片的方式是picture表中的fname字段,即图片在项目中的相对路径(每一张图片都存入项目webapp/images文件夹下,后面会说)。
并且,对应展示在页面上的诸多图片,我采用了分页方式,便于用户查看。
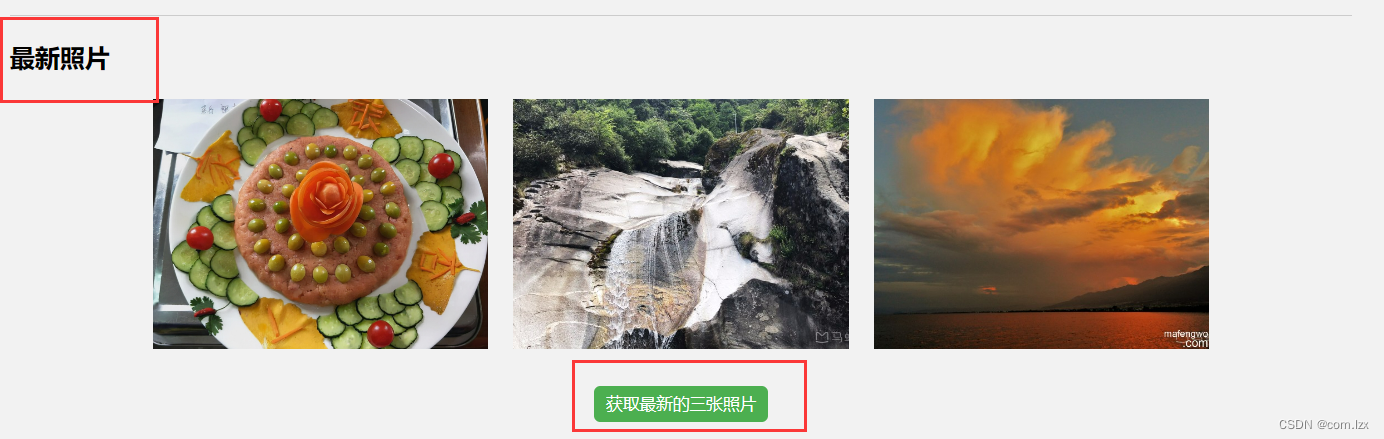
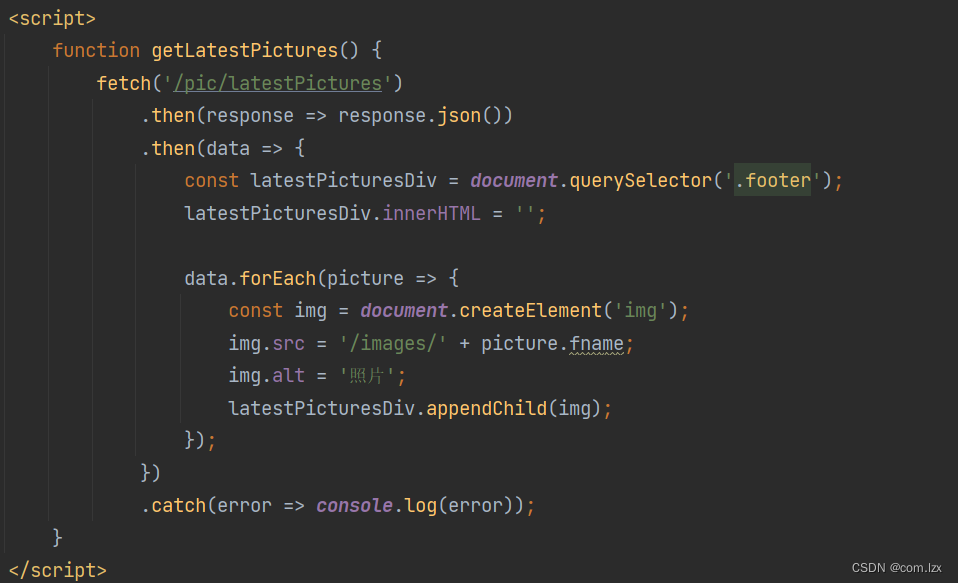
下面部分:系统主页底部,提供获取最新照片的功能。这里我采用的是点击“获取最新照片”按钮,发送异步请求,后端获取最新上传的三张图片,返会jsp页面展示。
下面是关键的controller请求代码和效果图。

 / * 获取当前用户关注者的图片路径 */ @GetMapping("/home") public String getConcernedPictures(HttpSession session, Model model, @RequestParam(defaultValue = "1") int page) {
    User user = (User) session.getAttribute("user"); List<Integer> ids = userService.getConcernedIds(user.getId()); //得到关注者ids int pageSize = 6; int start = (page - 1) * pageSize; List<PictureInfo> pictureInfoList = new ArrayList<>(); for (Integer id : ids) {
    List<Picture> list = pictureService.getById(id, start, pageSize); for (Picture p : list) {
    String picturePath = "/images/" + p.getFname(); String userName = userService.getUserNameById(p.getUserId()); Date uploadTime = p.getUploadTime(); PictureInfo pictureInfo = new PictureInfo(picturePath, userName, uploadTime); pictureInfoList.add(pictureInfo); } } model.addAttribute("user", user); model.addAttribute("pictures", pictureInfoList); model.addAttribute("page", page); //将当前页码传递给页面 return "home"; } / * 获取最新照片 * * @return */ @GetMapping("/latestPictures") @ResponseBody public List<Picture> getLatestPictures() {
    List<Picture> latestPictures = pictureService.getLatestPictures(3); return latestPictures; }
讯享网
下面进行“我的空间”的展示:

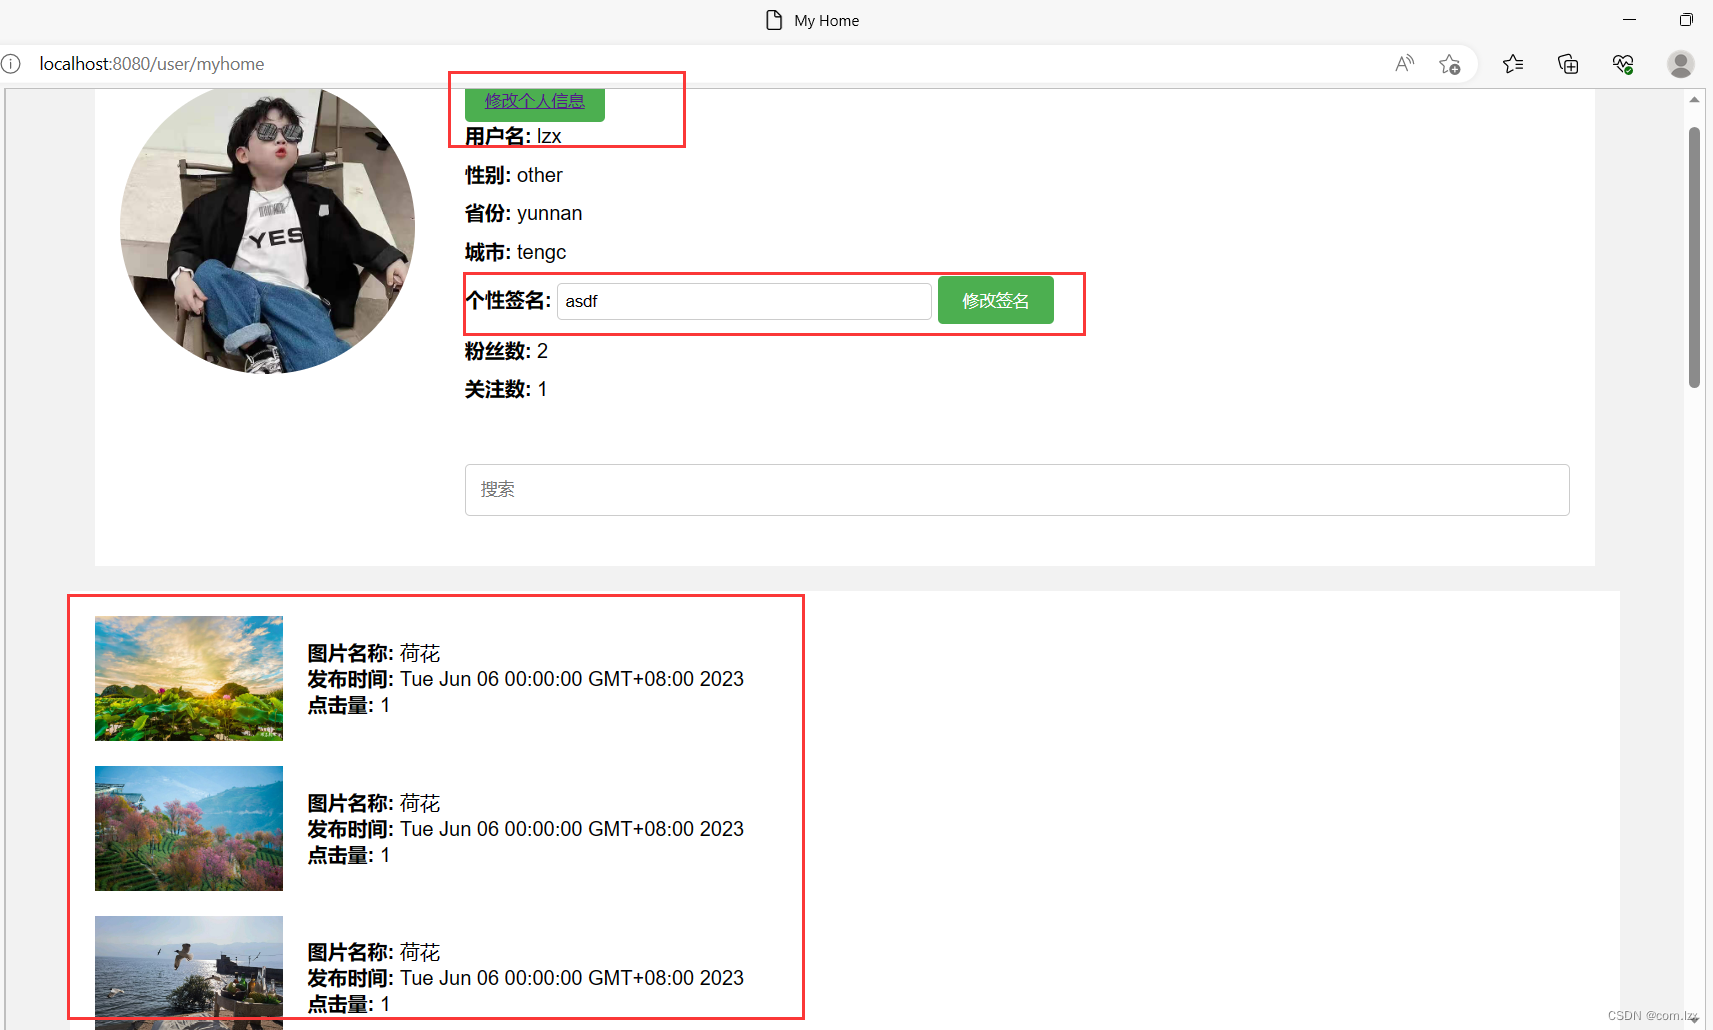
用户点击“我的空间”按钮进入/user/myhome.jsp页面,这个页面分两部分。
上面展示用户信息:根据用户登录时存入的session信息,从数据库中查出该用户信息,在页面展示出来。并且提供“修改个人信息功能”
下面列出该用户发布的所有图片:同样根据session信息,从picture表中查出该用户发布的所有图片,展示出来。
这是进入“我的空间”的核心请求代码:
讯享网 / * 我的空间 */ @GetMapping("/myhome") public String myHome(Model model, HttpSession session) {
    User user = (User) session.getAttribute("user"); // 获取用户信息 User userInfo = userService.getUserByUserName(user.getUserName()); // 获取用户发布的图片 List<Picture> pictures = pictureService.getPicByUserId(user.getId()); //获取用户的关注和粉丝 int followerCount = userService.getCountFenS(user.getId()); int followingCount = userService.getContConcern(user.getId()); model.addAttribute("user", userInfo); model.addAttribute("pictures", pictures); model.addAttribute("followerCount", followerCount); model.addAttribute("followingCount", followingCount); return "user/myhome"; }
以及/user/myhome.jsp页面代码:
<%@ taglib prefix="c" uri="http://java.sun.com/jsp/jstl/core" %> <%@ page contentType="text/html;charset=UTF-8" language="java" %> <%@ page isELIgnored="false" %> <html> <head> <meta charset="UTF-8"> <title>My Home</title> <style> /* 样式省略,完整代码请访问gitee */ </style> </head> <body> <div class="container"> <div class="left-section"> <img src="/images/${user.toux}" alt="用户头像"> </div> <div class="right-section"> <div class="info-section"> <button><a href="/user/update">修改个人信息</a></button> <div><strong>用户名:</strong> ${
   user.userName}</div> <div><strong>性别:</strong> ${
   user.gender}</div> <div><strong>省份:</strong> ${
   user.province}</div> <div><strong>城市:</strong> ${
   user.city}</div> <div> <strong>个性签名:</strong> <input type="text" value="${user.intro}"> <button class="modify-button" onclick="updateIntro()">修改签名</button> </div> <div><strong>粉丝数:</strong> ${
   followerCount}</div> <div><strong>关注数:</strong> ${
   followingCount}</div> </div> <div class="search-section"> <input type="text" placeholder="搜索"> </div> </div> </div> <div class="picture-section"> <c:forEach items="${pictures}" var="picture"> <div class="picture-item"> <img src="/images/${picture.fname}" alt="图片"> <div class="details"> <div><strong>图片名称:</strong> ${
   picture.name}</div> <div><strong>发布时间:</strong> ${
   picture.uploadTime}</div> <div><strong>点击量:</strong> ${
   picture.clickNum}</div> </div> </div> </c:forEach> </div> </body> </html>
下面展示“修改个人信息”功能页面。
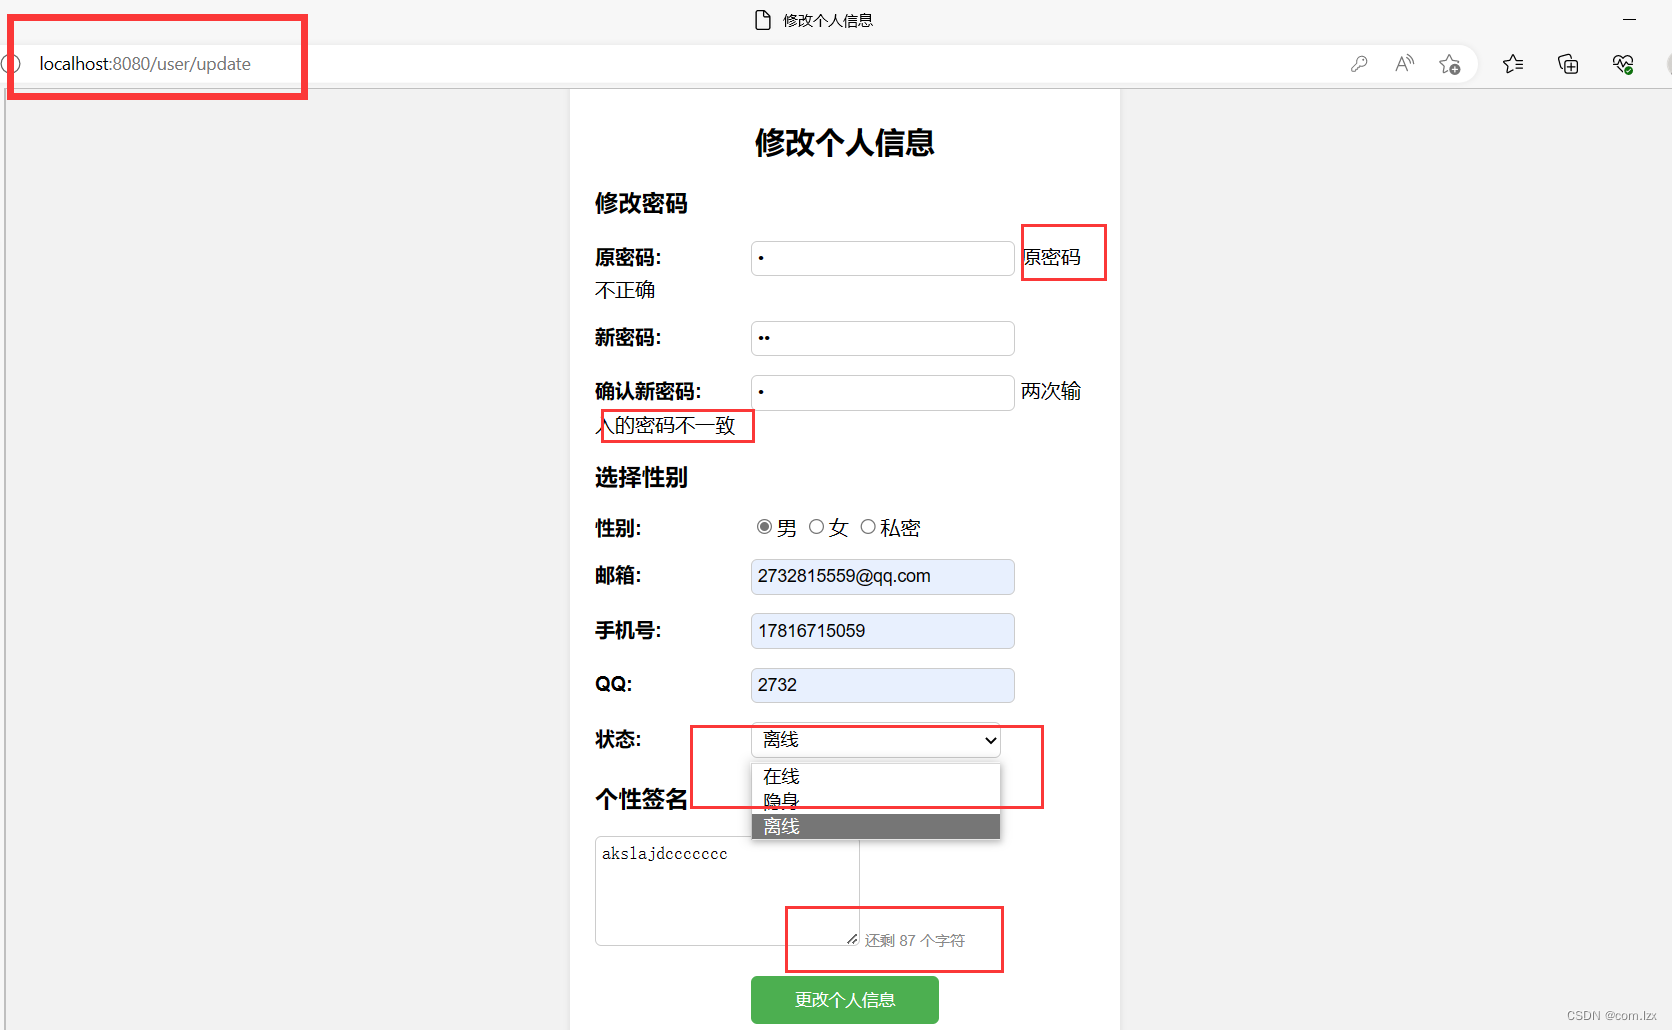
当用户点击myhome页面顶部的“修改个人信息”按钮,进入/user/update.jsp页面,在这里可以修改密码、以及相关信息。
值得一提的是:“修改密码”时,我们会先进行身份认证,即确认密码,通过用户输入的密码与数据库中进行比对,并且给出相应提示。同样,新密码也需要两次输入校验。
而且在“个性签名”栏中,右下角我们给出字数限制,动态提示还可以输入的字符长度。
下面是效果图和核心代码:
updateInformation.jsp页面代码,以及controller核心请求代码:
讯享网<%@ page language="java" contentType="text/html; charset=UTF-8" pageEncoding="UTF-8" %> <!DOCTYPE html> <html> <head> <meta charset="UTF-8"> <title>修改个人信息</title> <script src="https://code.jquery.com/jquery-3.6.0.min.js"></script> <style> //布局样式省略,完整代码在gitee </style> <script> $(document).ready(function() {
    $('#currentPassword').blur(function() {
    // 发送Ajax请求到后端验证密码 var currentPassword = $(this).val(); $.get("/user/checkPassword", {
    password: currentPassword }, function(response) {
    if (response === "false") {
    $('#currentPasswordWarning').text("原密码不正确"); } else {
    $('#currentPasswordWarning').text(""); } }); }); $('#confirmPassword').blur(function() {
    // 检查两次输入的新密码是否一致 var newPassword = $('#newPassword').val(); var confirmPassword = $(this).val(); if (newPassword !== confirmPassword) {
    $('#confirmPasswordWarning').text("两次输入的密码不一致"); } else {
    $('#confirmPasswordWarning').text(""); } }); $('#intro').keyup(function() {
    // 显示还剩多少字符 var remainingChars = 101 - $(this).val().length; $('#charCount').text("还剩 " + remainingChars + " 个字符"); if (remainingChars < 0) {
    $('#charCount').addClass("warning"); } else {
    $('#charCount').removeClass("warning"); } }); }); </script> </head> <body> <div class="container"> <div class="card"> <h2>修改个人信息</h2> <form method="post" action="/user/update"> <h3>修改密码</h3> <div class="row"> <label for="currentPassword">原密码:</label> <input type="password" id="currentPassword" name="currentPassword"> <span id="currentPasswordWarning"></span> </div> <div class="row"> <label for="newPassword">新密码:</label> <input type="password" id="newPassword" name="newPassword"> </div> <div class="row"> <label for="confirmPassword">确认新密码:</label> <input type="password" id="confirmPassword" name="confirmPassword"> <span id="confirmPasswordWarning"></span> </div> <h3>选择性别</h3> <div class="row"> <label>性别:</label> <input type="radio" name="gender" value="male">男 <input type="radio" name="gender" value="female">女 <input type="radio" name="gender" value="other">私密 </div> <div class="row"> <label for="email">邮箱:</label> <input type="text" id="email" name="email"> </div> <div class="row"> <label for="mobile">手机号:</label> <input type="text" id="mobile" name="mobile"> </div> <div class="row"> <label for="">:</label> <input type="text" id="" name=""> </div> <div class="row"> <label for="status">状态:</label> <select id="status" name="status"> <option value="online">在线</option> <option value="invisible">隐身</option> <option value="offline">离线</option> </select> </div> <h3>个性签名</h3> <div> <textarea id="intro" name="intro" rows="5" cols="50" maxlength="1000"></textarea> <span id="charCount">还剩 101 个字符</span> </div> <div class="row1"> <input type="submit" value="更改个人信息"> </div> </form> </div> </div> </body> </html>
 / * 修改个人信息 */ @GetMapping("/update") public String showUpdateForm() {
    return "user/updateInformation"; } @PostMapping("/update") public ModelAndView updateInformation(@RequestParam(value = "currentPassword", required = false) String currentPassword, @RequestParam(value = "newPassword", required = false) String newPassword, @RequestParam(value = "confirmPassword", required = false) String confirmPassword, @RequestParam(value = "gender", required = false) String gender, @RequestParam(value = "email", required = false) String email, @RequestParam(value = "mobile", required = false) String mobile, @RequestParam(value = "", required = false) String , @RequestParam(value = "status", required = false) String status, @RequestParam(value = "intro", required = false) String intro, HttpSession session) {
    User user = (User) session.getAttribute("user"); ModelAndView modelAndView = new ModelAndView("redirect:/user/login"); // 验证密码是否正确 if (!userService.checkPassword(user.getUserName(), currentPassword)) {
    // 密码不正确,返回错误信息 // return "密码不正确,返回错误信息"; modelAndView.addObject("errorMsg", "密码不正确,返回错误信息"); modelAndView.setViewName("error"); } // 更新用户信息 user.setPassword(newPassword); user.setGender(gender); user.setIntro(intro); user.setEmail(email); user.set(); user.setStatus(status); user.setMobile(mobile); userService.updateMessages(user); return modelAndView; }
系统主页的“图片上传”功能:
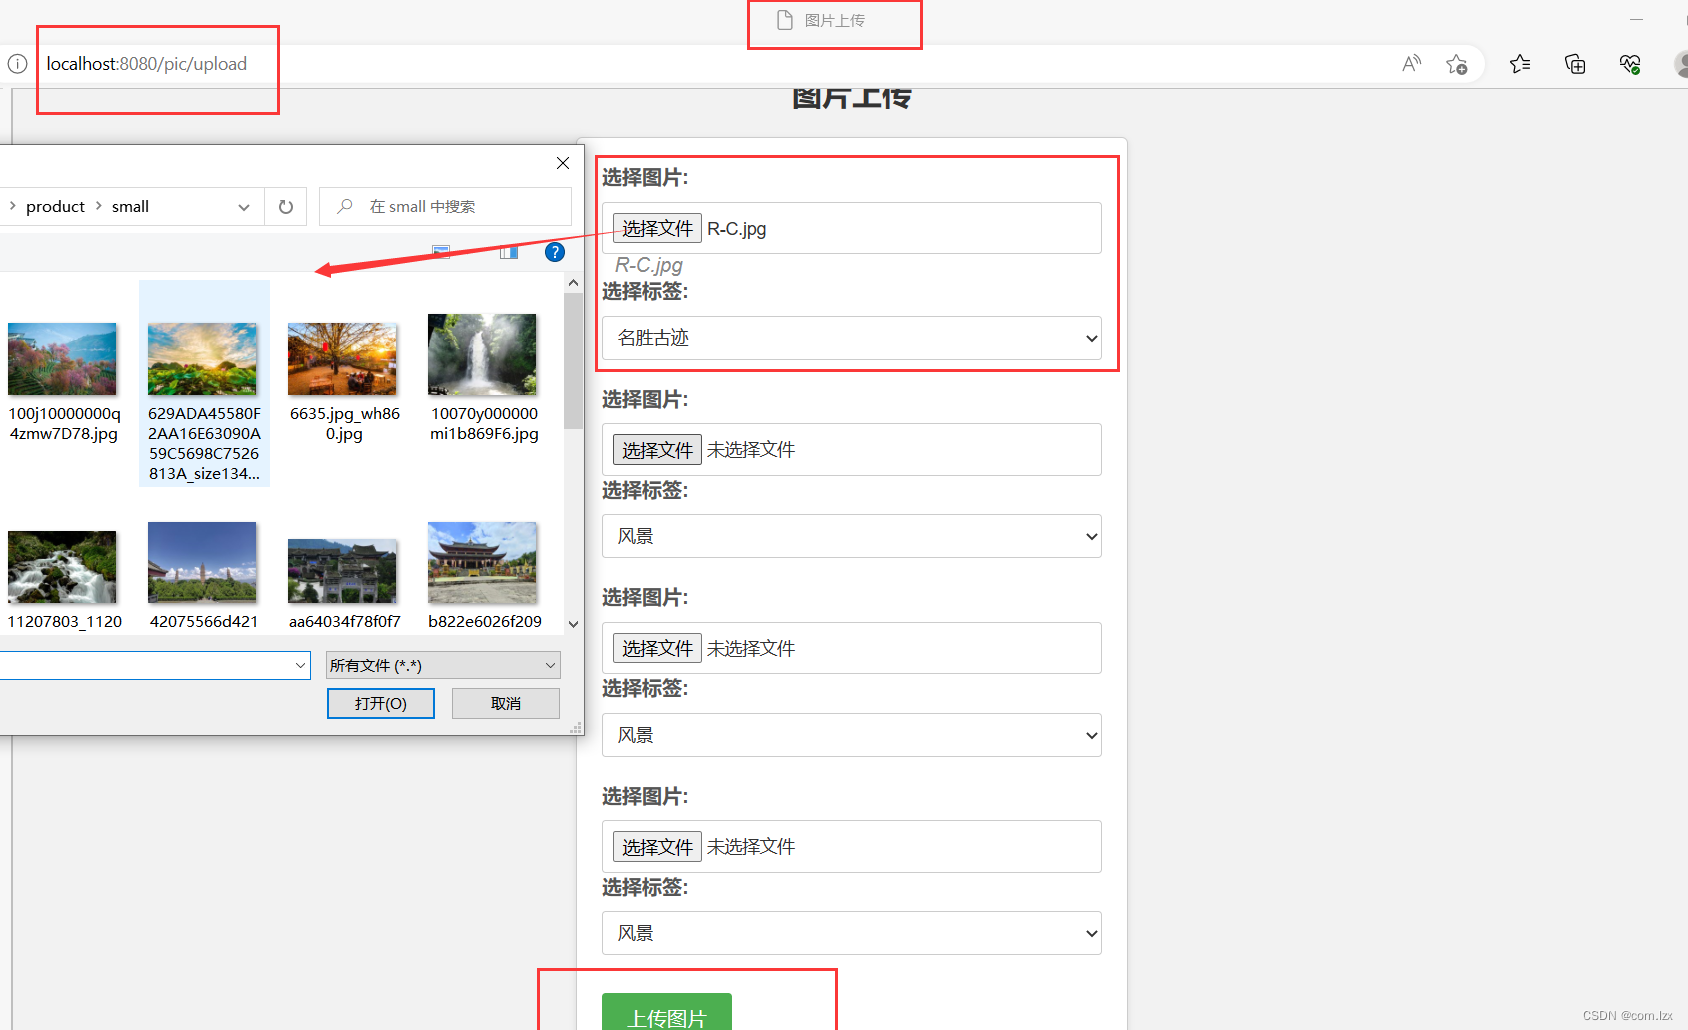
当用户点击“上传图片”按钮访问到/picture/upload.jsp页面,在此页面你可以选择电脑任意位置的四张图片,并且给它们选择对应的标签,然后上传。
这里的图片以文件名加后缀的方式传递到后端,后台首先将图片“转存”到项目的webapp/images文件夹下,同时将图片名存入数据库picture表中对应的fname字段。这样保证系统在任何服务器上运行都能成功加载出任意用户在任意电脑上传的图片信息。
upload.jsp页面代码:
讯享网<%@ page language="java" contentType="text/html; charset=UTF-8" pageEncoding="UTF-8" %> <!DOCTYPE html> <html> <head> <meta charset="UTF-8"> <title>图片上传</title> <style> //页面布局样式不展示。完整代码在gitee </style> <script src="https://code.jquery.com/jquery-3.6.0.min.js"></script> <script> $(document).ready(function() {
    $(".image-input").change(function() {
    var index = $(this).data("index"); var imageName = $("#imageName" + index); imageName.text(this.files[0].name); }); }); </script> </head> <body> <h2>图片上传</h2> <form class="upload-form" method="post" action="/pic/upload" enctype="multipart/form-data"> <div class="form-group"> <label for="image1">选择图片:</label> <input type="file" id="image1" name="image1" accept="images/*" class="image-input" data-index="1"> <span class="image-name" id="imageName1"></span> <label for="tags1">选择标签:</label> <select id="tags1" name="tags[0]"> <option value="风景">风景</option> <option value="名胜古迹">名胜古迹</option> <option value="家乡">家乡</option> <option value="学习">学习</option> <option value="生活">生活</option> </select> </div> <div class="form-group"> <label for="image2">选择图片:</label> <input type="file" id="image2" name="image2" accept="images/*" class="image-input" data-index="2"> <span class="image-name" id="imageName2"></span> <label for="tags2">选择标签:</label> <select id="tags2" name="tags[1]"> <option value="风景">风景</option> <option value="名胜古迹">名胜古迹</option> <option value="家乡">家乡</option> <option value="学习">学习</option> <option value="生活">生活</option> </select> </div> <div class="form-group"> <label for="image3">选择图片:</label> <input type="file" id="image3" name="image3" accept="images/*" class="image-input" data-index="3"> <span class="image-name" id="imageName3"></span> <label for="tags3">选择标签:</label> <select id="tags3" name="tags[2]"> <option value="风景">风景</option> <option value="名胜古迹">名胜古迹</option> <option value="家乡">家乡</option> <option value="学习">学习</option> <option value="生活">生活</option> </select> </div> <div class="form-group"> <label for="image4">选择图片:</label> <input type="file" id="image4" name="image4" accept="images/*" class="image-input" data-index="4"> <span class="image-name" id="imageName4"></span> <label for="tags4">选择标签:</label> <select id="tags4" name="tags[3]"> <option value="风景">风景</option> <option value="名胜古迹">名胜古迹</option> <option value="家乡">家乡</option> <option value="学习">学习</option> <option value="生活">生活</option> </select> </div> <div class="form-group"> <input type="submit" value="上传图片"> </div> </form> </body> </html>
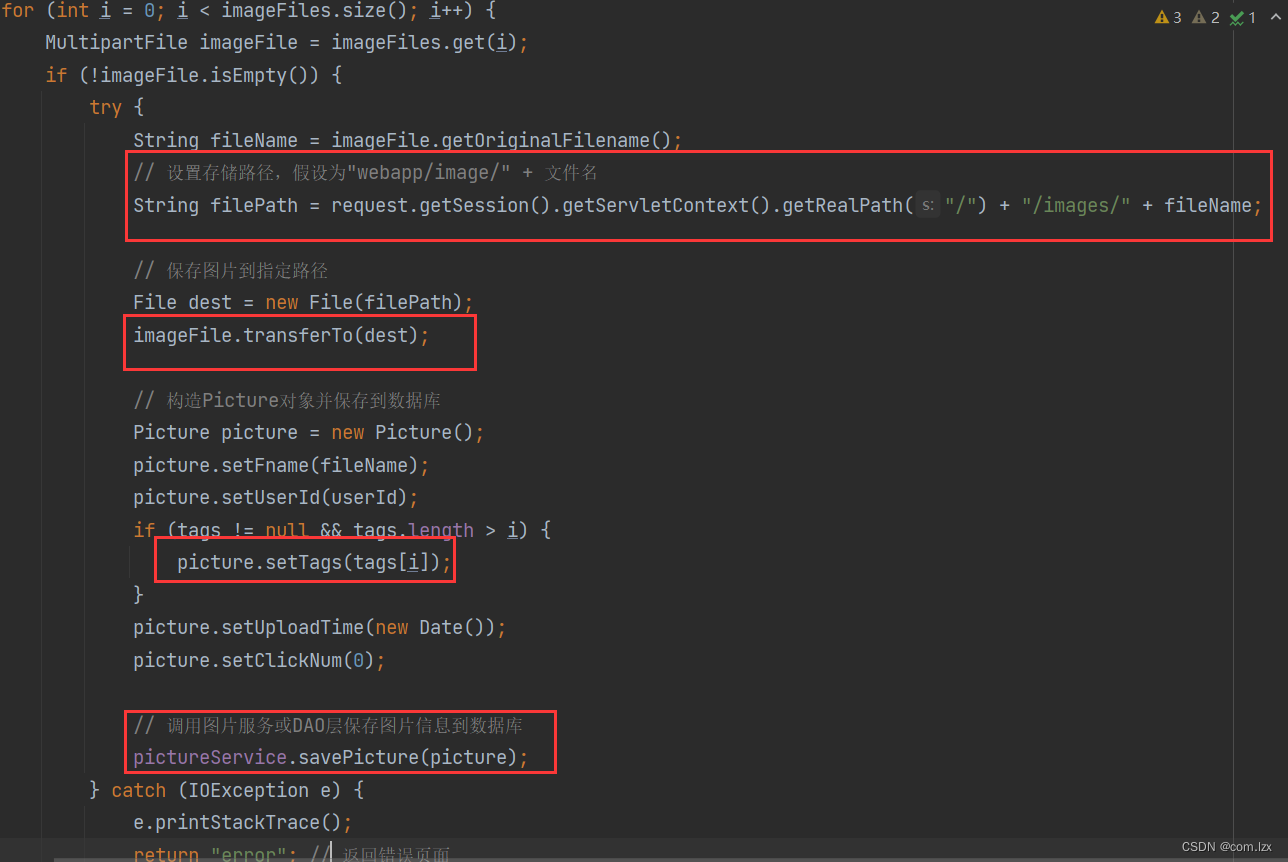
这是上传图片的controller核心请求代码:
 / * 上传图片 */ @GetMapping("/upload") public String showUploadPage() {
    return "picture/upload"; } @PostMapping("/upload") public String uploadPictures(HttpServletRequest request, @RequestParam("image1") MultipartFile image1, @RequestParam("image2") MultipartFile image2, @RequestParam("image3") MultipartFile image3, @RequestParam("image4") MultipartFile image4, @RequestParam(value = "tags", required = false) String[] tags, HttpSession session) {
    // 获取用户ID User user = (User) session.getAttribute("user"); Integer userId = user.getId(); // 处理上传的图片和对应的标签 List<MultipartFile> imageFiles = Arrays.asList(image1, image2, image3, image4); for (int i = 0; i < imageFiles.size(); i++) {
    MultipartFile imageFile = imageFiles.get(i); if (!imageFile.isEmpty()) {
    try {
    String fileName = imageFile.getOriginalFilename(); // 设置存储路径,假设为"webapp/image/" + 文件名 String filePath = request.getSession().getServletContext().getRealPath("/") + "/images/" + fileName; // 保存图片到指定路径 File dest = new File(filePath); imageFile.transferTo(dest); // 构造Picture对象并保存到数据库 Picture picture = new Picture(); picture.setFname(fileName); picture.setUserId(userId); if (tags != null && tags.length > i) {
    picture.setTags(tags[i]); } picture.setUploadTime(new Date()); picture.setClickNum(0); // 调用图片服务或DAO层保存图片信息到数据库 pictureService.savePicture(picture); } catch (IOException e) {
    e.printStackTrace(); return "error"; // 返回错误页面 } } } return "redirect:/user/myhome"; }
其中,这里比较关键!
最后是系统页面顶部的“搜索用户”按钮,以及“关注”功能:
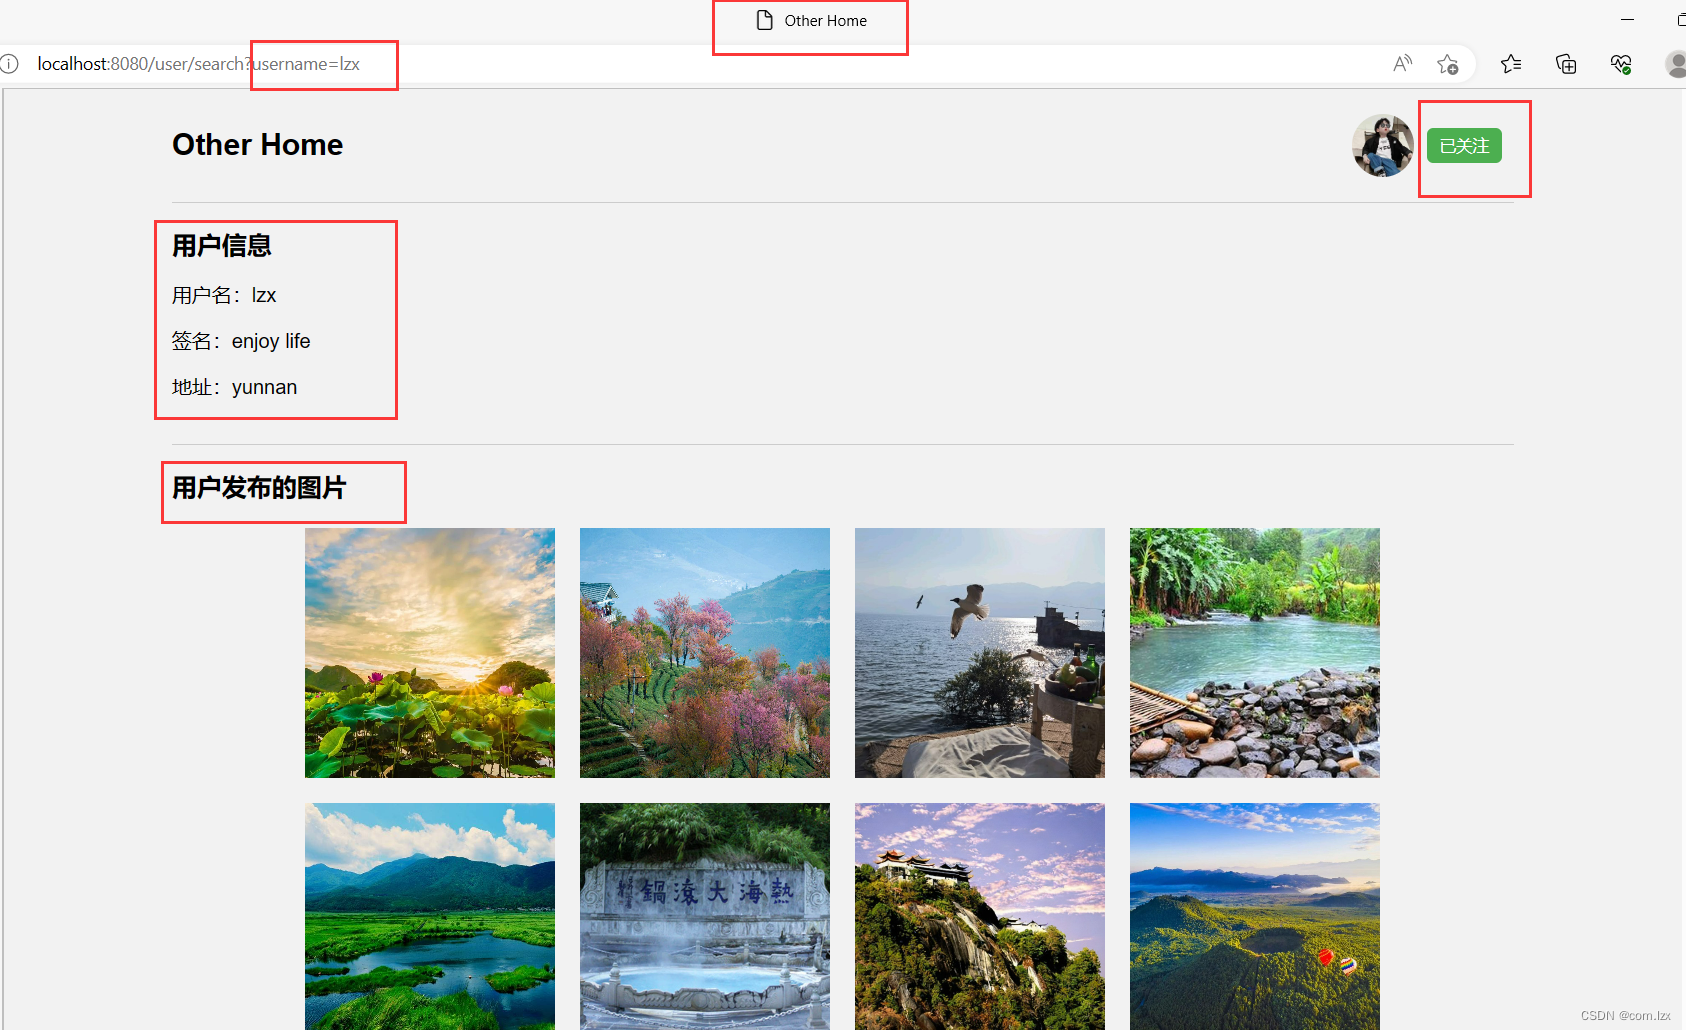
当用户通过“搜索”按钮输入“用户名”搜索时,通过@RequestParam,路径传参,将/user/search?username=的用户名name传到后端,根据此参数从数据库中查出搜索结果。可以进入该用户主页(若用户不存在,则Error提示)。在该用户主页other home页面,首先展示出该用户基本信息;
同时,右上角提供“关注”功能。我们进入其主页时就得判断“是否已经关注了该用户”,毕竟“关注”和“已关注”是需要提前判断,才能在页面正确展示的。
其中“关注”功能,相对重点:需要一个isFollowing参数来进行辅助判断,前提是,isFollowing需要后端执行好后存入model备用
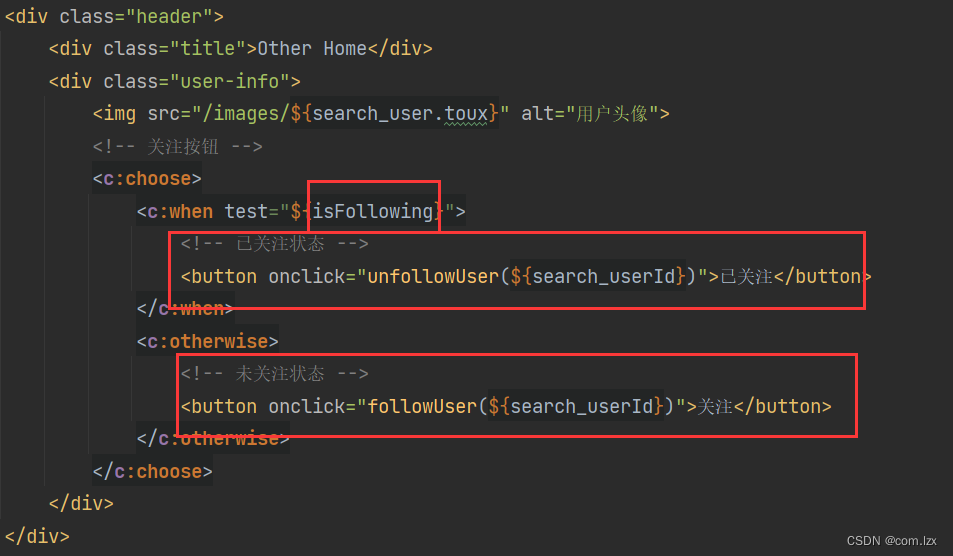
这是/user/otherhome.jsp页面代码:
讯享网<%@ page language="java" contentType="text/html; charset=UTF-8" pageEncoding="UTF-8" %> <%@ taglib prefix="c" uri="http://java.sun.com/jsp/jstl/core" %> <!DOCTYPE html> <html> <head> <meta charset="UTF-8"> <title>Other Home</title> <style> //页面样式不展示,完整代码在gitee </style> </head> <body> <div class="container"> <div class="header"> <div class="title">Other Home</div> <div class="user-info"> <img src="/images/${search_user.toux}" alt="用户头像"> <!-- 关注按钮 --> <c:choose> <c:when test="${isFollowing}"> <!-- 已关注状态 --> <button onclick="unfollowUser(${search_userId})">已关注</button> </c:when> <c:otherwise> <!-- 未关注状态 --> <button onclick="followUser(${search_userId})">关注</button> </c:otherwise> </c:choose> </div> </div> <div class="section"> <div class="section-title">用户信息</div> <div> <p>用户名:${
   search_user.userName}</p> <p>签名:${
   search_user.intro}</p> <p>地址:${
   search_user.province}</p> </div> </div> <div class="section"> <div class="section-title">用户发布的图片</div> <div class="main"> <c:forEach var="picture" items="${pictures}"> <img src="/images/${picture.fname}" alt="照片"> </c:forEach> </div> </div> </div> <script src="https://code.jquery.com/jquery-3.6.0.min.js"></script> <script> // 关注用户 function followUser(userId) {
    // 发送 AJAX 请求到后端控制器 $.post("/user/follow", {
    followedUserId: userId }, function(response) {
    if (response === "success") {
    // 刷新页面或更新按钮状态 location.reload(); } else {
    alert("关注用户失败!"); } }); } // 取消关注用户 function unfollowUser(userId) {
    // 发送 AJAX 请求到后端控制器 $.post("/user/unfollow", {
    followedUserId: userId }, function(response) {
    if (response === "success") {
    // 刷新页面或更新按钮状态 location.reload(); } else {
    alert("取消关注用户失败!"); } }); } </script> </body> </html>
这是“搜索”、“关注”、“取消关注”controller核心请求代码:
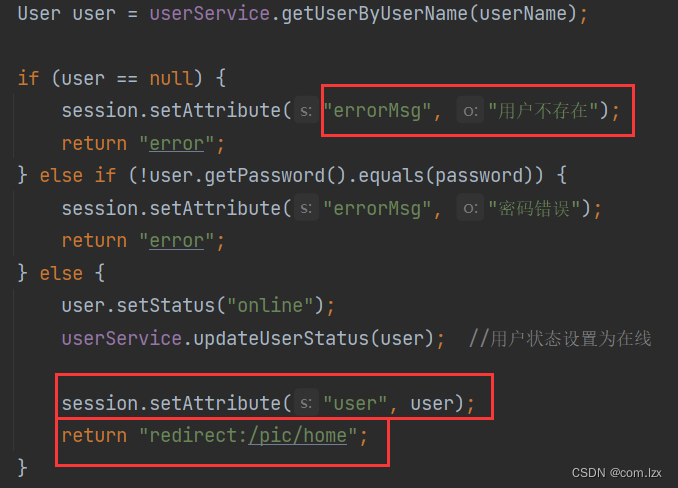
@GetMapping("/search") public String showOtherHome(HttpSession session, Model model, @RequestParam String username) {
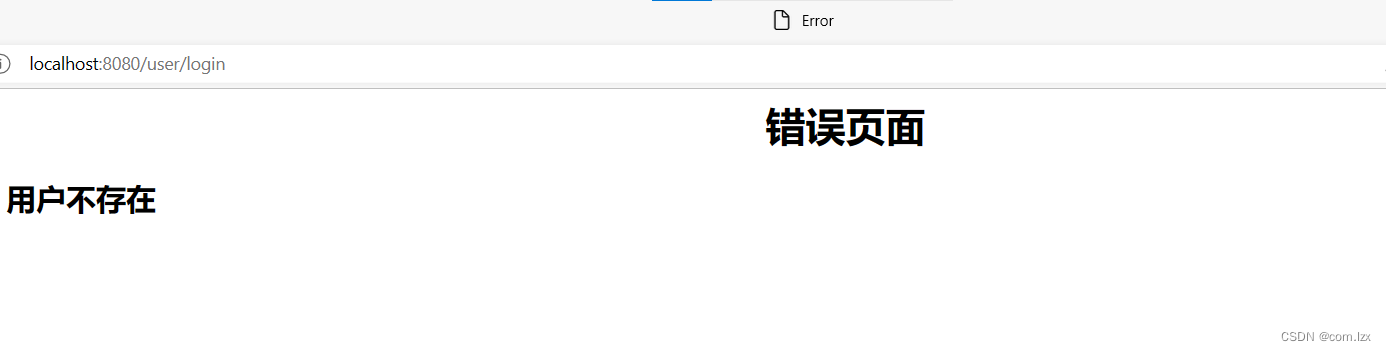
User currentUser = (User) session.getAttribute("user"); // 根据用户名查询用户信息 User user = userService.getUserByUserName(username); if (user == null) {
// 用户不存在,处理异常情况 // 可以根据实际需求进行逻辑处理或页面跳转 session.setAttribute("errorMsg","用户不存在"); return "error"; } // 获取用户发布的图片 List<Picture> pictures = pictureService.getPicByUserId(user.getId()); boolean isFollowing = userService.isFollowing(currentUser.getId(), user.getId()); model.addAttribute("isFollowing", isFollowing); model.addAttribute("search_user", user); model.addAttribute("search_userId", user.getId()); model.addAttribute("pictures", pictures); return "user/otherhome"; } @PostMapping("/follow") @ResponseBody public String followUser(HttpSession session, @RequestParam("followedUserId") int userId) {
User currentUser = (User) session.getAttribute("user"); Date concernTime = new Date(); try {
userService.followUser(currentUser.getId(), userId, concernTime); return "success"; } catch (Exception e) {
e.printStackTrace(); return "error"; } } @PostMapping("/unfollow") @ResponseBody public String unfollowUser(HttpSession session, @RequestParam("followedUserId") int userId) {
User currentUser = (User) session.getAttribute("user"); try {
userService.unfollowUser(currentUser.getId(), userId); return "success"; } catch (Exception e) {
e.printStackTrace(); return "error"; } } 下面是效果图:

到此,本系统基本功能以及核心代码逻辑已经展示完成。
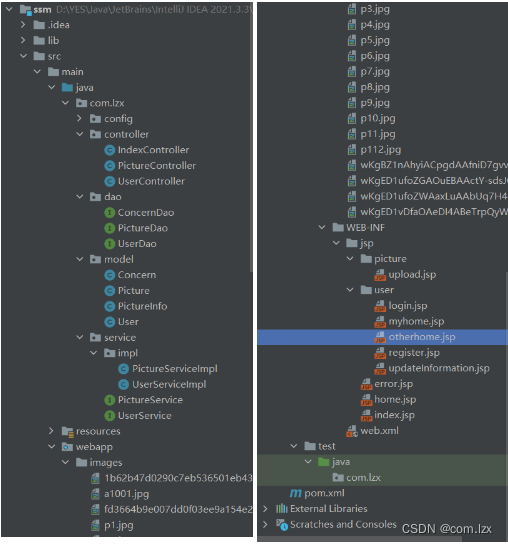
这是完整项目结构:
完整项目源码在gitee:https://gitee.com/li-zhi_xiang/ssm_pictureSystem/blob/master/%E7%B3%BB%E7%BB%9F%E5%8A%9F%E8%83%BD%E9%A2%84%E8%A7%88.md
版权声明:本文内容由互联网用户自发贡献,该文观点仅代表作者本人。本站仅提供信息存储空间服务,不拥有所有权,不承担相关法律责任。如发现本站有涉嫌侵权/违法违规的内容,请联系我们,一经查实,本站将立刻删除。
如需转载请保留出处:https://51itzy.com/kjqy/35529.html