
https://blog.csdn.net/changexhao/article/details/
Real Time 的定義
一個real time的系統需要保證其工作在給定的時間限制內完成(稱為deadline)。 系統不需要以最快的速度(real fast)完成任務,但需要時常或每次皆在deadline之內完成。
在這個前提下,real time系統的任務完成時間是可確定的(deterministic)。 而根據系統的限制不同,real time可分為:
- Soft Real Time
系統不一定每次皆需要遵守deadline,但較多的deadline miss會導致服務品質降低。
- Hard Real Time
系統能每次皆能在deadline內完成任務。
Real time on Linux
- PREEMPT_RT (in-kernel; single kernel)
修改原本的 GNU/Linux 核心 (vanilla kernel),以減少non-preemptible section的方式,使其逐步改善 real-time 能力。
- dual kernel (如 RTLinux, RTAI, Xenomai)
運作一個 real-time 核心,然後將修改過的 GNU/Linux 核心程式碼視為該 real-time 核心的 idle task。
在xenomai中,dual kernel 就是 Xenomai 的 Nucleus / Cobalt Core 和 Linux kernel。Xenomai 改變整個系統架構,讓 ipipe -> xenomai scheduler 來預先處理 real-time task,而 Linux 則拉到上層成為一個task。這樣可以避免 Linux 因為龐大的架構而影響處理 real-time 的時間。
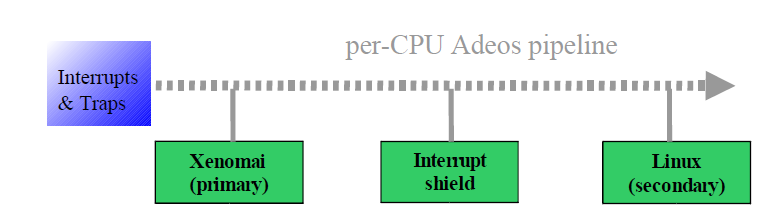
Xenomai系統架構
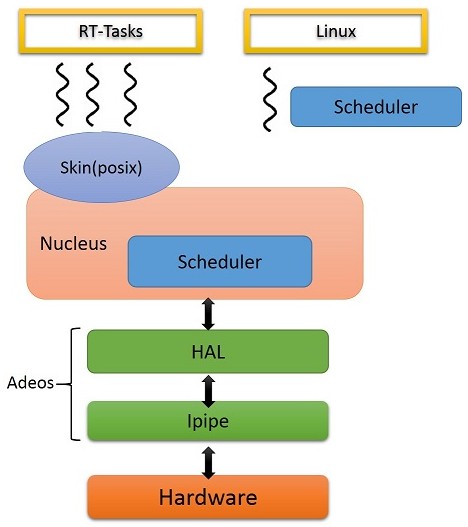
Xenomai是一個linux kernel的patch 藉由在底層增加一個架構 負責硬體與接收interrupt 並將interrupt 傳給上層的OS(這邊稱為domain)
這個底層的架構是Adeos 是另一個open source的project
在api呼叫上可以看到不同層級的抽象化
ipipe_XXX -> rthal_XXX -> xnXXX
負責傳送interrupt的程式稱為ipipe 示意圖 :
可以找到ipipe_raise_irq()將interrupt推到pipeline
在ipipe上每個domain都有自己的優先度 高優先度的domain會先接收到interrupt 高優先度的domain的thread 可以preempt低優先度domain的thread
Xenomai 3
xenomai3有兩種configuration:
- Cobalt: 採用dual kernel架構,是xenomai 2的延伸
- Mercury: 使用單kernel形式,在linux kernel上提供xenomai api,由於本身依賴linux,一般來說會以PREEMPT_RT提供real-time services
Xenomai 3 dual kernal configuration : Cobalt
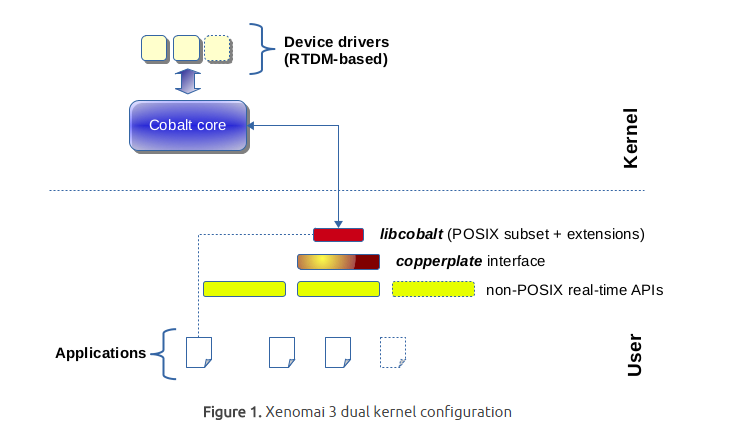
多一個 priority 比 linux 還高叫 cobalt 的 core 去處理 real-time 的事情,提供不同的 real-time API 給不同的 applications 使用。並且利用Optimistic interrupt protection 機制減少 changing the interrupt mask,一般的機制在每次進入critical section時都要interrupt mask,而Optimistic interrupt protection可以不用。而real-time 在意的 “deadline”,實際上就是探討 latency (latency 越大,系統越難在時限內完成完成高優先權任務,自然即時能力就越差),而 latency 很大的來源則是 interrupt handling。
Xenomai 3 single kernel configuration :Mercury
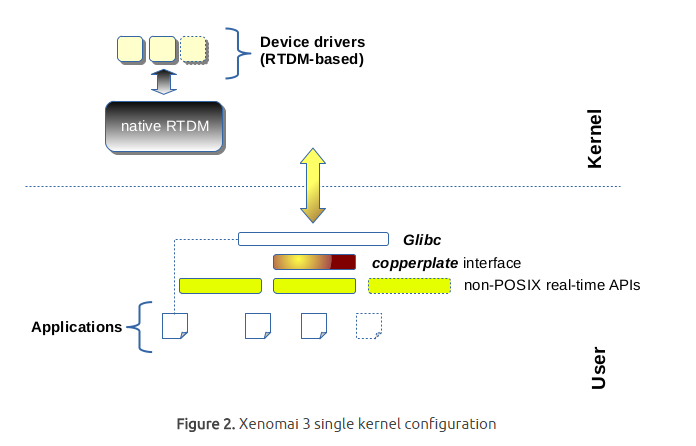
運用本機的 linux core 在 PREEMPT_RT之上達到 real-time 的事情,這裡不是強制的,看 applications 對反應時間和 maximum jitter 的要求,有些甚至會作到某種程度 deadline 的忽略。
Adeos / iPipe
主要負責處理irq 與 high resolution timer, ipipe的工作很簡單 就是設定timer並將interrupt往上丟
- Adeos feature
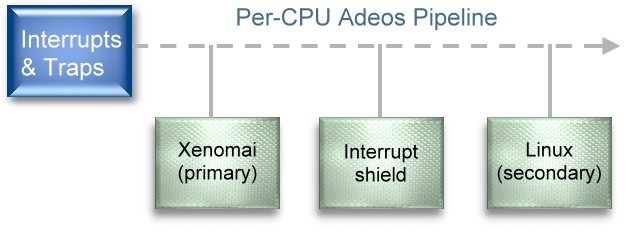
- event pipeline :
利用pipeline的方式將不同domain的interrupt或system call往上丟
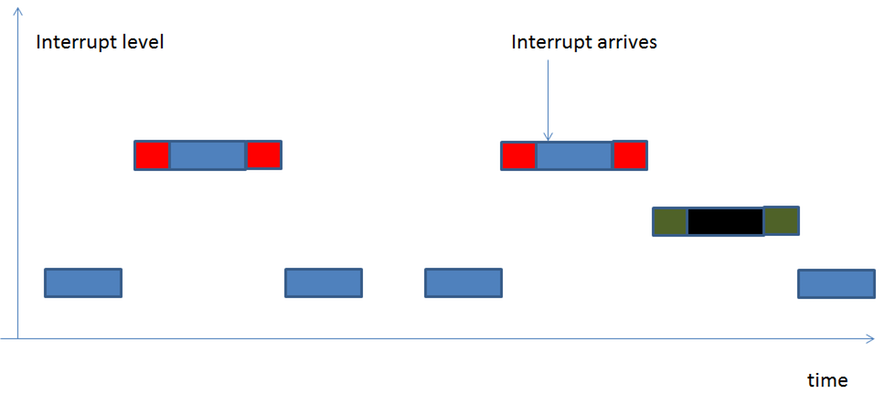
- Optimistic interrupt protection :
當同一個domain在處理interrupt時,有跟她相同domain的interrupt要進來時,會將它進pending狀態,等到所有pending interrupt完成時,才會處理下個domain的interrupt。但更高優先權domain的interrupt會preempt較低優先權domain的interrupt。
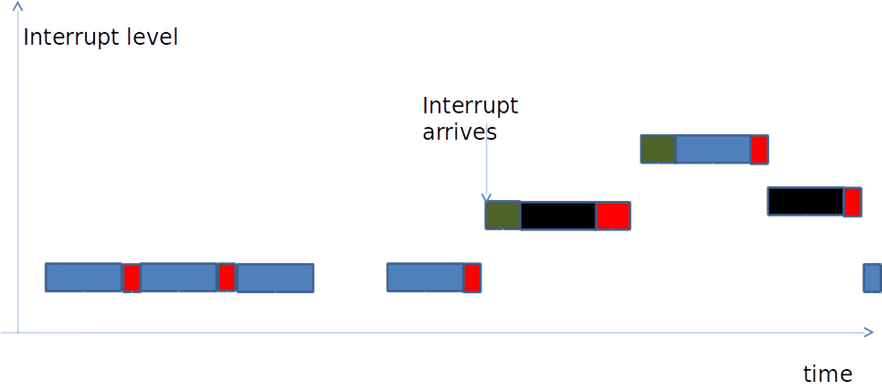
- Optimistic v.s Original :
Original case:

Optimistic case:
從前兩張圖可看出一般的機制在每次進入critical section時都要interrupt mask,而Optimistic interrupt protection可以不用,所以在interrupt management的時間差很多。而real-time 在意的 “deadline”,實際上就是探討 latency (latency 越大,系統越難在時限內完成完成高優先權任務,自然即時能力就越差),而 latency 很大的來源則是 interrupt handling。
- System event propagation :
system event(ex : page fault handle) 傳遞方式不同於interrupt,基本上是不可被stall的。
- realtime support to threads running in the secondary domain
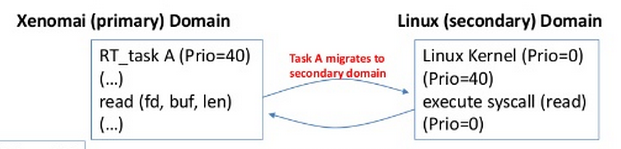
- Common priority scheme :
當xenomai task migrates to linux domain時,linux domain會繼承xenomai task的priority。
- Predictability of program execution times :
當xenomai threads 進入linux(secondary) domain時,不可被linux domain interrupt preempt掉,也不能被其他low priority activity at linux kernel preempt掉。通常最簡單實作方式就是加一個interrupt shield domain。
- Fine-grained Linux kernel :
In order to get the best from secondary domain,we need the Linux kernel to exhibit the shortest possible nonpreemptible section, so that rescheduling opportunities are taken as soon as possible after a Xenomai thread running in the secondary domain becomes ready to run.
- Priority inversion management :
Both the real-time nucleus and the Linux kernel should handle the case where a high priority thread is kept from running because a low priority one holds a contented resourse for a possibly unbounded amount of time.
- 相關檔案︰
- gic.c(舊版) -> irq-gic.c(新版) :
Generic Interrupt Controller(GIC)為ARM架構中負責分配interrupt至cpu的裝置。此檔案實作gic功能的界面,包含init、mask、產生軟體interrupt、end of interrupt、取得資訊等。內容除了gic register操作外,也包含了spin locks。
- it8152.c:提供ITE8152 (PCI Bridge)的支援。目前該硬體已經停止生產 。
- timer-sp.c:ARM Dual-Timer Module (SP804)的界面。SP804提供兩個32/64bit count down counter,並提供timer interrupt。
- vic.c -> irq-vic.c:
提供Vectored Interrupt Controller(VIC)的界面。VIC主要存在於armv6或以前的架構中,提供priority、IRQ vector等功能,但並不支援SMP。在armv7之後的架構中,其漸漸被NVIC(Cortex-M)與GIC(Cortex-R/A)取代。
- ipipe-tsc.c -> ipipe_tsc.c:Time Stamp Counter的界面,提供自reset起cycle數的計算。
- ipipe/compat.c:與I-pipe legacy interface相關。
- sched/clock.c:取得cpu_clock 解析度為nanosecond,開機後從0開始上數。在新版(3.18)ipipe中,此檔案並無修改。

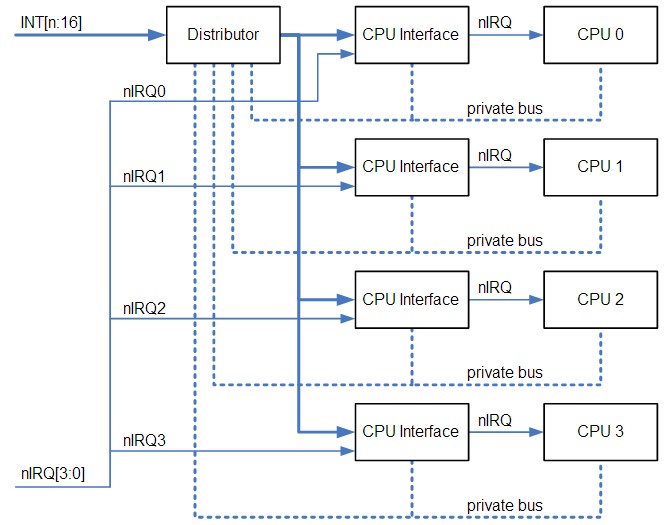
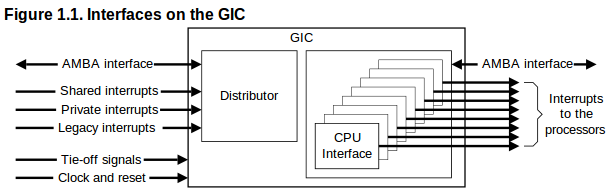
GIC大約是上圖的distributor的位置
但raspberry pi只有一顆CPU所以不會有SMP與 CPU affinity設定的問題
HAL
檔案位置在 : xenomai-head/ksrc/arch/arm/hal.c (xenomai 2.6)
Hardware Abstract Layer:process 透過HAL呼叫ipipe的服務。這一層主要是包裝ipipe 與底層資訊 讓nucleus可以不用看到硬體資訊。
Nucleus / Cobalt
檔案位置在 : xenomai-head/ksrc/nucleus (xenomai 2.6) ; xenomai-head/kernel/cobalt (xenomai 3)
Xenomai的kernel, 包含schedule、timer、synch、thread、lock等等一般該有的RTOS功能,負責real-time tasks的執行。
Scheduler
優先處理realtime task ,linux也被視為其中一個thread,本身也有scheduler,但須等到沒有real-time task時(idle state),才會執行linux thread
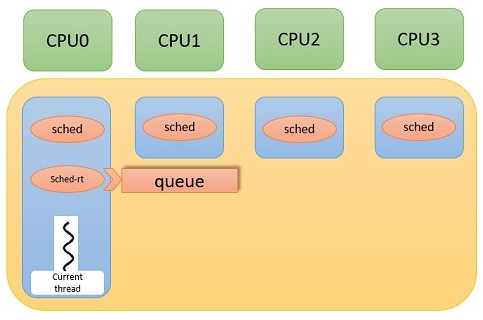
就檔案有五個關於sched.c應該有四種不同的schedule方式
sched-idle.c :是專門處理idle狀態給linux schedule使用
sched-rt.c : 給real-time scheduler使用(FIFO+RR)
sched-sporadic.c : POSIX SCHED_SPORADIC scheduling class.
sched-tp.c : Temporal partitioning (typical of IMA systems)
sched.c : 應該是負責四個schedule方式的檔案
Skins
檔案位置在xenomai-head/ksrc/skins (xenomai 2.6)
呼叫xenomai的界面, 有native rtdm posix psos+ uitron vrtx vxworks等。
Xenomai與PREEMPT_RT的差異
- Linux kernel preemption model 組態 (realtime程度 ↑ => latency↓ but throughput↓)
- PREEMPT_NONE
著重fairness和throughput,process在執行system call時無法被preempt。
- PREEMPT_VOLUNTARY(DESKTOP)
允許一個低優先權的 process把自己 preempt掉(即便該 process正在 kernel mode 執行著一個系統呼叫)
- PREEMPT(Low-Latency Desktop)
- PREEMPT_RT
著重determinism,對即時系統而言,作業系統的「可決定性」比 throughput 更為重要,使用固定優先權的 preemptive 排程策略 (POSIX SCHED_FIFO 與 SCHED_RR)。
- PREEMPT_RT 機制
- Preemptible critical sections
- Preemptible interrupt handlers
- Preemptible “interrupt disable” code sequences
- Priority inheritance for in-kernel spinlocks and semaphores
- Deferred operations
- Latency-reduction measures
- Execute all activities (including IRQ) in “schedulable/thread” context
原本無法preempt的地方讓他可以preemt,讓spinlock 區塊在區分成可以preempt的地方跟不能preempt的地方,將IRQ handler移到thread中執行。
Priority inheritance 是讓握有spinlock 或 semaphore的process可以暫時的提高優先權 讓他可以盡快做完critical section釋放spinlock或semaphore
高Priority的 process才有辦法繼續執行。
- PREEMPT_RT 與 xenomai的差異
RT_PREEMPT是基於linux架構去改進 讓更多地方能preempt 達到real-time的能力
Xenomai則是改變整個系統架構 新增一個scheduler與IRQ管理的機制
讓處理real-time task流程簡化到只剩ipipe->scheduler 就能執行
不會因linux龐大的架構影響到real-time task的處理時間
建立 Xenomai 環境
Xenomai 2.6 on raspberry pi
- 下載 Raspbian: http://www.raspberrypi.org/downloads/
- 將raspbian的img檔燒進sd card上
sudo dd if=<raspbian image file> of=/dev/mmcblk0 bs=4M
讯享网 if為 input file,of為 output file,bs為 block size- 燒錄詳細介紹: http://life-of-raspberrypi.blogspot.tw/
- Install Cross complier
讯享网
cd <working dir>wget https://github.com/raspberrypi/tools/archive/master.tar.gztar xzfv master.tar.gz
- Download kernel
git clone -b rpi-3.8.y --depth 1 git://github.com/raspberrypi/linux.git linux-rpi-3.8.y - Download Xenomai
讯享网
git clone git://git.xenomai.org/xenomai-head.git xenomai-head - Download minimal config
wget https://www.dropbox.com/s/dcju74md5sz45at/rpi_xenomai_config - Apply ipipe core pre-patch
讯享网
cd linux-rpi-3.8.ypatch -Np1 < ../xenomai-head/ksrc/arch/arm/patches/raspberry/ipipe-core-3.8.13-raspberry-pre-2.patch
- Apply Xenomai ipipe core patch
cd <working dir>./xenomai-head/scripts/prepare-kernel.sh --arch=arm --linux=linux-rpi-3.8.y --adeos=xenomai-head/ksrc/arch/arm/patches/ipipe-core-3.8.13-arm-4.patch
- Apply ipipe core post-patch
讯享网
cd linux-rpi-3.8.ypatch -Np1 < ../xenomai-head/ksrc/arch/arm/patches/raspberry/ipipe-core-3.8.13-raspberry-post-2.patch
- Create build directory
cd <working dir>mkdir linux-rpi-3.8.y/build
- Configure kernel
讯享网
cp rpi_xenomai_config linux-rpi-3.8.y/build/.configcd linux-rpi-3.8.ymake mrpropermake ARCH=arm O=build oldconfig
- Compile Linux Kernel (此步驟耗時長,建議用make -j平行加速)
在作此步驟之前須export library
export PATH=<working dir(full path)>/tools-master/arm-bcm2708/arm-bcm2708hardfp-linux-gnueabi/bin/:$PATHmake ARCH=arm O=build CROSS_COMPILE=<working dir(full path)>/tools-master/arm-bcm2708/arm-bcm2708hardfp-linux-gnueabi/bin/arm-bcm2708hardfp-linux-gnueabi-
- Install modules
讯享网
make ARCH=arm O=build INSTALL_MOD_PATH=dist modules_install - Install headers
make ARCH=arm O=build INSTALL_HDR_PATH=dist headers_installfind build/dist/include \( -name .install -o -name ..install.cmd \) -delete
- 編譯好的kernelImage(/linux-rpi-3.8.y/build/arch/arm/boot/Image),移到SD卡的
/boot/路徑下並更改名稱為kernel.img - 將
linux-rpi-3.8.y/build/dist中的Module,移到SD卡中的/lib/modules - Compile Xenomai
讯享网
cd xenomai-headexport PATH=<working dir(full path)>/tools-master/arm-bcm2708/arm-bcm2708hardfp-linux-gnueabi/bin/:$PATH./configure --host=arm-bcm2708hardfp-linux-gnueabicd srcmkdir distmake install DESTDIR=`pwd`/dist
- dist中會出現
usr/xenomai, 將這個資料夾移到sd卡中/usr/ - 用 minicom 連進 raspberry pi 中執行以下動作
export PATH=/usr/xenomai/bin:$PATHexport LD_LIBRARY_PATH=/usr/xenomai/libsudo modprobe xeno_posix
Xenomai 3 on raspberry pi
- 取得 xenomai 3.0-rc、rpi-linux 3.18.y、ipipe 3.18.12 arm patch、toolchain
讯享网
git clone -b rpi-3.18.y git://github.com/raspberrypi/linux.git rpi-linuxgit clone -b v3.0-rc4 git://git.xenomai.org/xenomai-3.git xenomai-3wget http://download.gna.org/adeos/patches/v3.x/arm/ipipe-core-3.18.12-arm-1.patchgit clone https://github.com/raspberrypi/tools.git --depth=1
- checkout rpi-linux至3.18.12
git checkout c963de6d8caec6278c0dde76831f9fdab5bace52git checkout -b 3.18.12
- 由此處取得rpi post patch
post patch
- 上 ipipe patch
讯享网
cd rpi-linux../xenomai-3/scripts/prepare-kernel.sh --arch=arm --ipipe=<你的patch位置>/ipipe-core-3.18.12-arm-1.patch --linux=.
- ipipe post patch (註:pre patch為解決ipipe patch衝突之用,此處無衝突故不需要)
patch -Np1 < <你的patch位置>/3.18.12-xenomai3-temp.patch - configure kernel(使用rpi提供的default)
讯享网
export CCPI=($working_dir)/tools/arm-bcm2708/gcc-linaro-arm-linux-gnueabihf-raspbian-x64/bin/arm-linux-gnueabihf-mkdir buildmake mrpropermake ARCH=arm O=build CROSS_COMPILE=$CCPI bcmrpi_defconfigmake ARCH=arm O=build CROSS_COMPILE=$CCPI menuconfig
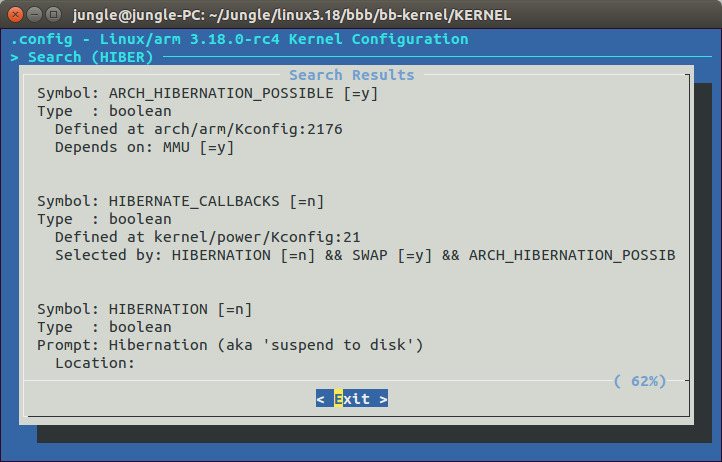
若patch正確,會在設定表裡看到xenomai相關選項。
使用manuconfig或編輯build/.config,找到CONFIG_CPU_FREQ , CONFIG_CPU_IDLE , CONFIG_KGDB , CONFIG_CONTEXT_TRACKING_FORCE(若有的話)設為n。
- compile kernel
make -j 5 ARCH=arm O=build CROSS_COMPILE=$CCPI - 安裝kernel modules
讯享网
make ARCH=arm O=build INSTALL_MOD_PATH=dist modules_install - 安裝headers
make ARCH=arm O=build INSTALL_HDR_PATH=dist headers_install - xenomai
讯享网
cd ../xenomai-3mkdir distexport PATH=/home/erickitten/workspace/xenomai/pi/tools/arm-bcm2708/gcc-linaro-arm-linux-gnueabihf-raspbian-x64/bin/:$PATH
- 設定bootstrap
./scripts/bootstrap --with-core=cobalt –enable-debug=partial - configure
讯享网
./configure CFLAGS="-mcpu=arm1176jzf-s -mfpu=vfp -mfloat-abi=hard" LDFLAGS="-mcpu=arm1176jzf-s -mfpu=vfp -mfloat-abi=hard" --host=arm-linux-gnueabihf --with-core=cobalt - install
make DESTDIR=`pwd`/dist install - 複製kernel
將linux-rpi/build/arch/arm/boot/Image複製到SD卡的/boot (partition),並改名成kernel.img。或使用config.txt,以kernel=指定名稱。
- 移動module / patches (權限問題,需使用sudo)
讯享网
cd ..sudo cp -r rpi-linux/build/dist/lib/modules $(sdcard)/libsudo cp -r xenomai-3/dist/usr/xenomai $(sdcard)/usr
Beaglebone Black 環境設置
使用舊版linux(Angstrom)來做測試,核心編譯步驟參考上面步驟 或 http://elinux.org/EBC_Installing_Kernel_Source
- 下載Kernel Source & 編譯
host$ git clone git://github.com/RobertCNelson/bb-kernel.githost$ cd bb-kernelhost$ git tag (This shows what versions can be checked out.)host$ git checkout 3.8.13-bone67 -b 3.8.13-bone67
- 預設username/password
讯享网
host$ ./build_kernel.shusername:root
- 設定cross compile
在Kernel Configuration中選擇General setup,輸入
CROSS_COMPILE=arm-linux-gnueabi-- 安裝必要套件
讯享网
sudo apt-get updatesudo apt-get install build-essential device-tree-compiler fakeroot lzma lzop u-boot-tools libncurses5-dev:amd64 libc6:i386 libncurses5:i386 libstdc++6:i386 zlib1g:i386
- 完成上述步驟後即可上電,按 boot select button 讓它從 sd card 開機,開機後進入登入畫面,帳號/密碼寫在上面
- 登入後查詢版本
sudo suuname -a
Xenomai 2.6 on Beaglebone
Kernel裝好後,測試可以成功從 SD 卡開機,接著更換換 Kernel
參考資料 http://elinux.org/EBC_Xenomai 與 http://emplearn.blogspot.tw/search?q=xenomai
- 設定路徑
讯享网
mkdir bbbcd bbbexport BBB=$(pwd)
- 取得xenomai-2.6.4 (與 beaglebone-kernel 同一層目錄)
wget http://download.gna.org/xenomai/stable/latest/xenomai-2.6.4.tar.bz2 - 檢查版本
讯享网
cd bb-kernel/KERNELuname -agit tags | sort | less
- 選擇跟所編譯 Kernel 最接近版本,在此為 3.8.13
git checkout 3.8.13-bone67 -b xenomai - Patch the kernel
讯享网
cd bb-kernel/KERNELpatch -p1 < ../../xenomai-2.6.4/ksrc/arch/arm/patches/beaglebone/ipipe-core-3.8.13-beaglebone-pre.patchpatch -p1 < ../../xenomai-2.6.4/ksrc/arch/arm/patches/ipipe-core-3.8.13-arm-4.patchpatch -p1 < ../../xenomai-2.6.4/ksrc/arch/arm/patches/beaglebone/ipipe-core-3.8.13-beaglebone-post.patch
- Prepare the kernel
cd ../../xenomai-2.6.4/scripts./prepare-kernel.sh --arch=arm --linux=../../bb-kernel/KERNEL/
- Prepare the kernel
讯享网
cd ../../bb-kernel - 確認已經關掉AUTO_BUILD
vi system.sh - 確認最後一行為
讯享网
#AUTO_BUILD=1 - 關掉 CPU Power Management —> CPU Frequency scaling中的 [ ] CPU Frequency scaling.
- 將Real-time sub-system —> Drivers —> Testing drivers中的選項全部打開
cd ../../bb-kernel/KERNELmake ARCH=arm menuconfig
- 再重新編譯
讯享网
make -j8 ARCH=arm CROSS_COMPILE=arm-linux-gnueabi- LOADADDR=0x uImage dtbs modules - 編譯完後將 SD 卡內的 Kernel 換掉
mkdir sd - 掛載 sd 卡
- 確認掛載的目錄內一定要有這些路徑
讯享网
sudo mount /dev/mmcblk0p1 sdsudo cp beagle-kernel/kernel/arch/arm/boot/uImage sd/boot/uImage-3.8.13cd beagle-kernel/kernelsudo make ARCH=arm CROSS_COMPILE=arm-linux-gnueabi- INSTALL_MOD_PATH=$BBB/sd modules_installcd -mkdir sd/home/root/xeno_driverscp beagle-kernel/kernel/drivers/xenomai/testing/*.ko sd/home/root/xeno_drivers/cp -r xenomai-2.6.3 sd/home/root./configure --target=arm-linux-gnueabimkdir -p dist; make DESTDIR=`pwd`/dist install
- 將編譯後dist內的內容複製放到beaglebone上
sudo umount sd - 測試,掛載driver
讯享网
cd ~/xeno_driversinsmod xeno_klat.ko/usr/xenomai/bin/cyclictest -p 90
Xenomai 3 on Beaglebone Black
- 先下載 linux kernel:
- 參考資料 : http://elinux.org/EBC_Installing_Kernel_Source
git clone git://github.com/RobertCNelson/bb-kernel.gitcd bb-kernelgit tag (This shows what versions can be checked out.)git checkout 3.18-rc7 -b 3.18-rc7./build_kernel.sh
- Prepare the kernel
讯享网
cd ../../xenomai-2.6.4/scripts./prepare-kernel.sh --arch=arm --linux=../../bb-kernel/KERNEL/
- Compile Kernel
cd ../../bb-kernel - 確認狀態,關掉休眠
- 關掉 CPU Power Management —> CPU Frequency scaling中的 [ ] CPU Frequency scaling.
- 將Real-time sub-system —> Drivers —> Testing drivers中的選項全部打開

讯享网 make ARCH=arm menuconfig
- 再重新編譯
make -j 8 ARCH=arm CROSS_COMPILE=arm-linux-gnueabihf- LOADADDR=0x uImage dtbs modules - 把 SD card format 並 燒錄 debian (要進入 root 模式)
讯享网
sudo mkfs -t ext4 /dev/mmcblk0sudo xz -dkc bone-debian-7.5-2014-05-14-2gb.img.xz > /dev/mmcblk0
- 把dtb file (or dts) and zImage 換掉,把 zImage 放入到 SD card 內 就可以成功開機了!
- 然後去下載 Xenomai3.git
- 參考資料 :http://git.xenomai.org/xenomai-3.git
wget http://git.xenomai.org/xenomai-3.git/snapshot/xenomai-3-3.0-rc4.tar.bz2tar jxvf xenomai-3-3.0-rc4.tar.bz2wget http://download.gna.org/adeos/patches/v3.x/arm/ipipe-core-3.18.12-arm-1.patch //載 ipipe patchcd bb-kernel/KERNELpatch -p1 < ../../ipipe-core-3.18.12-arm-1.patch
- Compile Xenomai 3
讯享网
cd xenomai-3-3.0-rc4mkdir distexport PATH=/home/neal/Xenomai/tool-master/arm-bcm2708/gcc-linaro-arm-linux-gnueabihf-raspbian-x64/bin/:$PATH./scripts/bootstrap --with-core=cobalt –enable-debug=partial./configure CFLAGS="-march=armv7-a -mtune=cortex-a8 -mfloat-abi=hard -mfpu=neon -ffast-math" --host=arm-linux-gnueabihf --target=arm-linux-gnueabihfmkdir -p dist; make DESTDIR=`pwd`/dist install
- dist中會出現usr/xenomai, 將這個資料夾移到sd卡中 /usr/
- Install module :
cd bb-kernel/KERNELmkdir distsudo make ARCH=arm INSTALL_MOD_PATH=dist modules_install
- 把 modules 移到 SD card /lib/modules 內
讯享网
sudo cp -rp dist/lib/modules/3.18.0-rc7+/ /media/neal/rootfs/lib/modules/ - 即可成功 run xenomai 3 的 內建執行檔.
- ex : sudo /usr/xenomai/bin/arm-linux-gnueabihf-latency
Xenomai 3 on Raspberry Pi 3
linux 核心部份
- 下載 raspberrypi linux kernel source
$ git clone https://github.com/raspberrypi/linux.git$ git checkout rpi-4.1.y
為了配合xenomai最新版本只支援linux kernel 4.1
- 下載 xenomai3 source
讯享网
$ git clone http://git.xenomai.org/xenomai-3.git/$ git checkout v3.0.2
4.1.18的patch檔只有3.0.2之後才有
- 下載 xenomai3 on bcm2709 patch
$ wget http://wiki.csie.ncku.edu.tw/_showraw/patch-xenomai-3-on-bcm-2709.patch - Patch Xenomai 到 Linux kernel 中
讯享网
$ cd xenomai-3$ scripts/prepare-kernel.sh --linux=../linux/ --ipipe=kernel/cobalt/arch/arm/patches/ipipe-core-4.1.18-arm-4.patch --arch=arm
- 打入xenomai3 on bcm2709 patch
$ cd linux$ cat ../patch-xenomai-3-on-bcm-2709.patch | patch -p1
- 修改linux組態
讯享网
$ make ARCH=arm CROSS_COMPILE=arm-linux-gnueabihf- bcm2709_defconfig$ make ARCH=arm CROSS_COMPILE=arm-linux-gnueabihf- menuconfig
修改下列組態([ ]為不選,[X]為選取):
CPU Power Management --->CPU Frequency scaling --->[ ] CPU Frequency scalingCPU idle --->[ ] CPU idle PM supportKernel Features --->[ ] Contiguous Memory Allocator[ ] Allow for memory compactionKernel Hacking --->[ ] KGDB: kernel debuggerBoot options --->Kernel command line type --->[X] Extend bootloader kernel arguments
- 開始編譯核心
讯享网
$ make ARCH=arm CROSS_COMPILE=arm-linux-gnueabihf- zImage modules dtbs使用 -jx 來建立x個thread平行編譯
- 輸出編譯完的模組
$ mkdir dist$ make ARCH=arm CROSS_COMPILE=arm-linux-gnueabihf- INSTALL_MOD_PATH=dist modules_install
- 複製 zImage 及 device tree 至 SD 卡上
讯享网
$ cp arch/arm/boot/zImage /media/${USER}/boot$ cp arch/arm/boot/dts/bcm2710-rpi-3-b.dtb /media/${USER}/boot$ rm -rf /media/${USER}/boot/overlays/*$ cp arch/arm/boot/dts/overlays/*.dtb* /media/${USER}/boot/overlays/
- 複製模組至 SD 卡上
# sudo cp -r linux/dist/lib/modules/* /media/${USER}/${ROOTFS}/lib/modules - 修改 /boot/config.txt 內文最後加上
讯享网
kernel=${zImage name}device_tree=bcm2710-rpi-3-b.dtb
Xenomai cobalt 核心部份
- cobalt kernel 參數設定
$ cd xenomai-3$ ./scripts/bootstrap --with-core=cobalt –enable-debug=partial$ ./configure CFLAGS="-march=armv7-a -mtune=cortex-a8 -mfloat-abi=hard -mfpu=neon -ffast-math" --host=arm-linux-gnueabihf --target=arm-linux-gnueabihf --enable-smp
- 編譯
讯享网
$ make DESTDIR=${PWD}/target install - 放入 SD 卡中
$ sudo cp -a target/* /media/${USER}/${ROOTFS}/All Done!!
觀察與分析
讯享网
pi@raspberrypi:~$ cat /proc/xenomai/statCPU PID MSW CSW PF STAT %CPU NAME0 0 0 206 0 00 100.0 ROOT0 0 0 0 00000000 0.0 IRQ3: [timer]
- CPU : 目前這個tread是使用哪個CPU在運行,而rpi是單核心CPU,故顯示皆為0
- MSW : Mode SWitches, This value should only increase over time for threads that are expected to interact with Linux services.
- 當process從primary mode轉成secondary mode或是secondary mode轉成primary mode時,將會紀錄一次的轉換。
- cyclictest的RT task因為會執行到memset,所以會從xenomai schedule跳到linux schedule,MSW+1,而執行完memset後將在跳回xenomai schedule,故再+1
- CSW : Number of Context SWitches (or IRQ hits for the particular CPU)
- PF : Number of Page Faults (should stop increasing as soon as mlockall is in effect)
- STAT : A bitfield describing the internal state of the thread. Bit values are defined in include/nucleus/thread.h (See status and mode bits). The STAT field from /proc/xenomai/sched gives a 1-letter-per-bit symbolic translation of a the most significant subset of those bits.
- %CPU : CPU share of the thread (or IRQ handler) since the last retrieval of the statistics.
- NAME : Name of the thread (or IRQ number and registered driver). Can be set, e.g., with the (non portable) POSIX-API-function pthread_set_name_np. See API documentation of the RTOS skin in question.
pi@raspberrypi:~$ sudo /usr/xenomai/bin/cyclictest >/dev/null 2>/dev/null &[1] 2253
讯享网
pi@raspberrypi:~$ ps aux | grep -i "cy"root 2253 0.5 0.3 4580 1464 ? S 03:34 0:00 sudo /usr/xenomai/bin/cyclictestroot 2254 2.7 0.4 2340 2132 ? SLl 03:34 0:00 /usr/xenomai/bin/cyclictestpi 2259 0.0 0.1 3540 820 ttyAMA0 S+ 03:34 0:00 grep --color=auto -i cy
pi@raspberrypi:~$ cat /proc/xenomai/statCPU PID MSW CSW PF STAT %CPU NAME0 0 0 255 0 00 100.0 ROOT0 2254 1 1 0 00b00380 0.0 cyclictest0 2256 2 48 0 00 0.0 cyclictest0 0 0 0 00000000 0.0 IRQ3: [timer]
讯享网
pi@raspberrypi:~$ watch -n 1 cat /proc/xenomai/statEvery 1.0s: cat /proc/xenomai/stat Wed Jan 8 03:38:43 2014CPU PID MSW CSW PF STAT %CPU NAME0 0 0 442 0 00 99.9 ROOT0 2254 1 1 0 00b00380 0.0 cyclictest0 2256 2 235 0 00 0.0 cyclictest0 0 0 0 00000000 0.1 IRQ3: [timer]
在這邊可以看到cyclictest有兩個pid,因為/usr/xenomai/bin/cyclictest它會先創一個thread,並讓這個thread跑nanosleep,所以會有兩個process。接著看向CSW,pid 2254的cyclictest, 他的CSW只有1。pid 2256的卻有235,這是因為2256是一個xenomai realtime task,而 2254是一個 linux的process,所以2256會優先執行,直到realtime task都做完才會換low priority的linux domain process取得CPU,因此2254的CSW值才會是1而沒有增加。
pi@raspberrypi:~$ sudo kill 2254pi@raspberrypi:~$ ps aux | grep -i "cy"pi 2324 0.0 0.1 3540 820 ttyAMA0 R+ 03:46 0:00 grep --color=auto -i cy[1]+ Done sudo /usr/xenomai/bin/cyclictest > /dev/null 2> /dev/nullpi@raspberrypi:~$ sudo /usr/xenomai/bin/cyclictest -p FIFO >/dev/null 2>/dev/null &
- 在我們了解MSW時,嘗試了在-p後面加上了文字(如:FIFO、RR……)
- 發現MSV的值開始往上增加,也發現一開始對於MSW的定義理解錯誤
讯享网
CPU PID MSW CSW PF STAT %CPU NAME0 0 0 75266 0 00 99.9 ROOT0 2978 1 1 0 00b00380 0.0 cyclictest0 2980 2 26846 0 00 0.0 cyclictest0 7559 1 1 0 00b00380 0.0 cyclictest0 7561 66 130 0 00b00184 0.0 cyclictest0 0 0 0 00000000 0.1 IRQ3: [timer]
- trace後才了解,這是xenomai在-p的指令上是使用atoi,將輸入的數字轉為int,但並沒有進行偵錯,才導致segment fault,而需跳轉到linux domain進行除錯。
效能表現
- Stock Linux
cyclictest -p 90 - m -c 0 -i 200 -n -h 100 -q -l 1000 >log
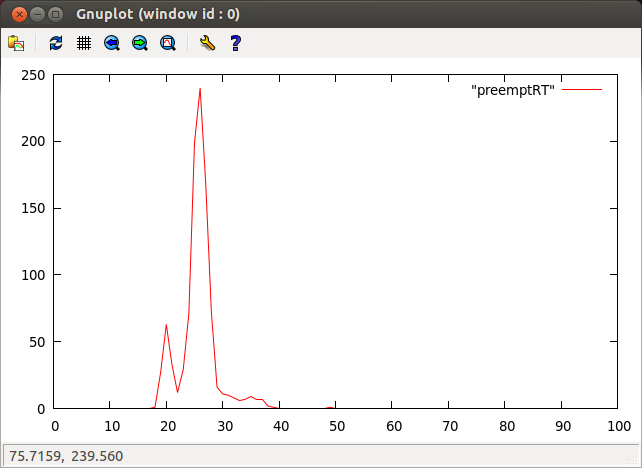
- PREEMPT_RT-patched Linux
讯享网
cyclictest -p 90 - m -c 0 -i 200 -n -h 100 -q -l 1000 >log
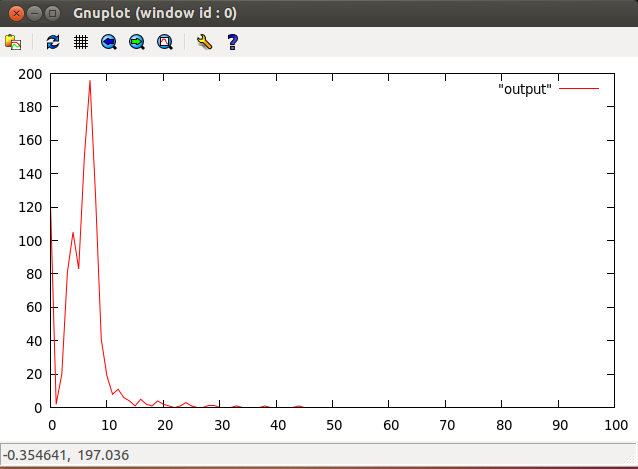
- Xenomai-patched Linux
/usr/xenomai/bin/cyclictest -p 90 - m -c 0 -i 200 -n -v 100 -q -l 100" >log
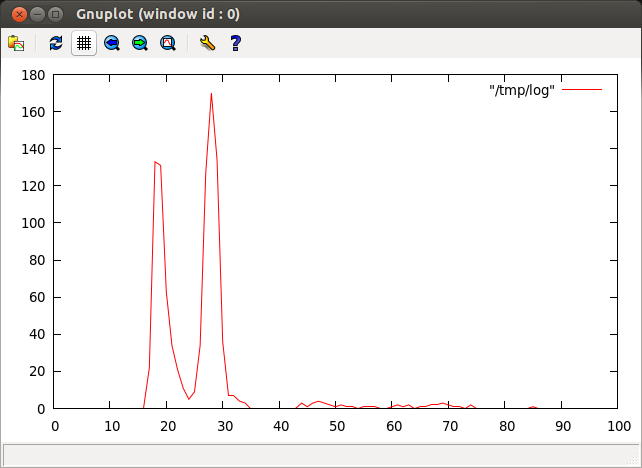
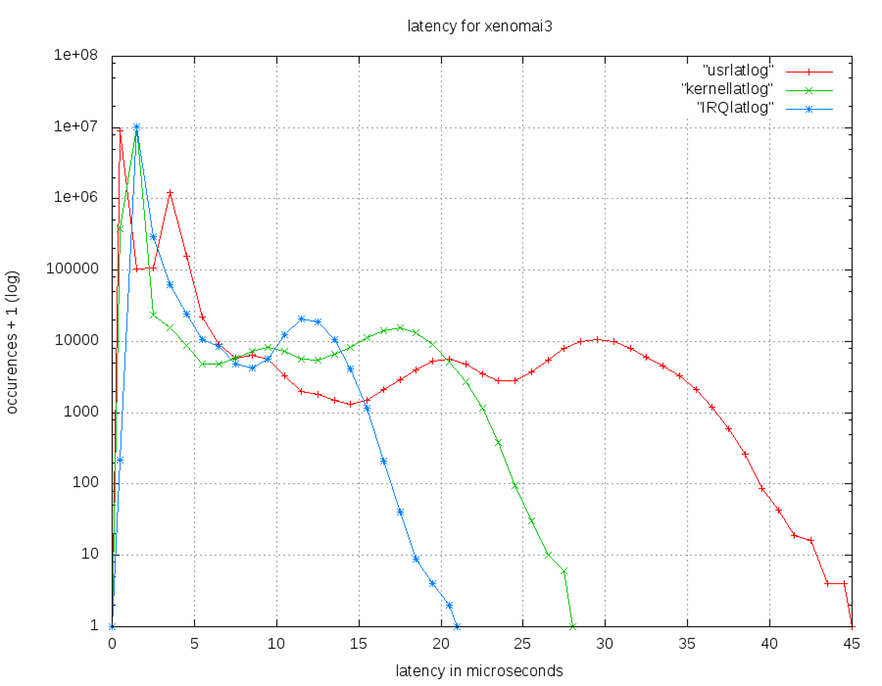
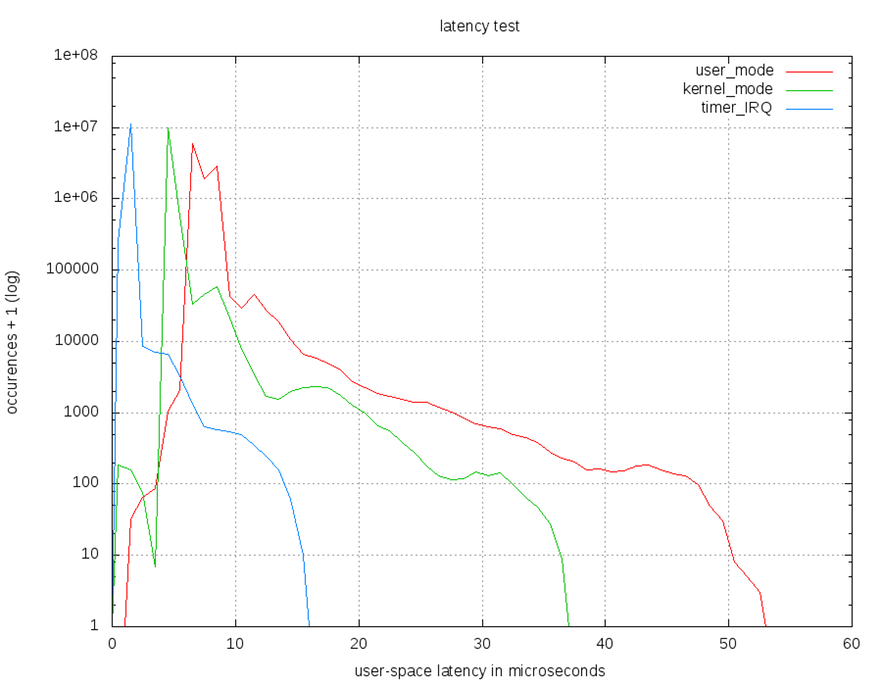
- User,kernal,timer IRQ 在R-pi上使用Xenomai 2.6與Xenomai 3.0之比較圖
- Xenomai 3.0

- Xenomai 2.6

- User,kernal,timer IRQ 在Beaglebone上使用Xenomai 2.6與Xenomai 3.0之比較圖
- Xenomai 3.0
- Xenomai 2.6
Cyclictest 原理
- 概念:設定一個時間間隔->取得現在時間->讓process 睡一個間隔->process醒來後再取一次時間->比對兩次取得的時間差與設定的間隔差距
- pseudocode:
讯享网
clock_gettime((&now))next = now + par->intervalwhile (!shutdown) {clock_nanosleep((&next))clock_gettime((&now))diff = calcdiff(now, next)# update stat-> min, max, total latency, cycles# update the histogram datanext += interval}
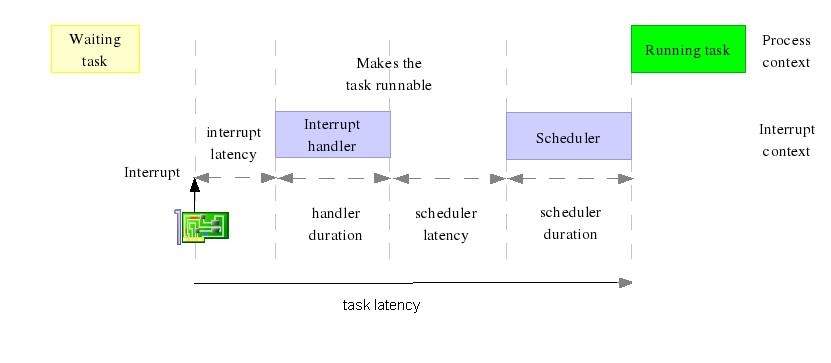
- 造成時間差的原因
- timer精準度
- IRQ latency
- IRQ handler duration
- scheduler latency
- scheduler duration
- Cyclictest 實作流程
1.cyclictest建立一個timerthread, 它一個 realtime 的 thread
2.timerthread會重複的執行取第一次時間 nanosleep(interval) 取第二次時間 比對兩次時間差與interval的差異
3.最後將結果輸出在terminal
- Clock_nanosleep 的 timer
clock_nanosleep 使用的timer 是 high resolution timer(HRT) ,讓睡眠時間可以更精確,達到nanosecond的精準度(但還是要看硬體能提供的精準度)
因為能在更準確得時間讓process醒來並取的nanoscecond單位的時間 所以可以計算到由systick無法計算到的duration + latency
- Clock_nanosleep 實作流程
1.使用 spinlock (xnlock_get_irqsave) 令 CPU 不接受 Interrupt
2.使用 xnpod_suspend_thread 改變目前 thread 的狀態
3.使用 xntimer_get_timeout_stopped 取得 tick
4.使用 ticks2ts 轉換時間單位
int clock_nanosleep (clockid_t clock_id, int flags, const struct timespec *rqtp, struct timespec *rmtp){xnthread_t *cur;spl_t s;int err = 0;if (xnpod_unblockable_p())return EPERM;if (clock_id != CLOCK_MONOTONIC && clock_id != CLOCK_REALTIME)return ENOTSUP;if ((unsigned long)rqtp->tv_nsec >= ONE_BILLION)return EINVAL;if (flags & ~TIMER_ABSTIME)return EINVAL;cur = xnpod_current_thread();xnlock_get_irqsave(&nklock, s);thread_cancellation_point(cur);xnpod_suspend_thread(cur, XNDELAY, ts2ticks_ceil(rqtp) + 1,clock_flag(flags, clock_id), NULL);thread_cancellation_point(cur);if (xnthread_test_info(cur, XNBREAK)) {if (flags == 0 && rmtp) {xnsticks_t rem;rem = xntimer_get_timeout_stopped(&cur->rtimer);xnlock_put_irqrestore(&nklock, s);ticks2ts(rmtp, rem > 1 ? rem : 0);} elsexnlock_put_irqrestore(&nklock, s);return EINTR;}xnlock_put_irqrestore(&nklock, s);return err;}
- Cyclictest
- Test case: POSIX interval timer, Interval 500 micro seconds,. loops, 100% load.
- Commandline:
讯享网
cyclictest -t1 -p 80 -i 500 -l - 使用 PREEMPT LINUX
root@raspberrypi:/home/pi# sudo ./cyclictest -t1 -p 80 -i 500 -l# /dev/cpu_dma_latency set to 0uspolicy: fifo: loadavg: 0.00 0.01 0.05 1/61 2064T: 0 ( 2063) P:80 I:500 C: Min: 27 Act: 49 Avg: 42 Max: 1060
- 使用 RT-PREEMPT
讯享网
Linux raspberrypi 3.6.11+ #474 PREEMPT Thu Jun 13 17:14:42 BST 2013 armv6l GNU/LinuxMin: 22 Act: 31 Avg: 32 Max: 169
- 使用 Xenomai
Linux raspberrypi 3.8.13-core+ #1 Thu Feb 27 03:02:16 CST 2014 armv6l GNU/LinuxMin: 1 Act: 5 Avg: 6 Max: 41
讯享网
root@raspberrypi:/home/pi# /usr/xenomai/bin/cyclictest -t1 -p 80 -i 500 -l 100000.08 0.06 0.05 1/61 2060T: 0 ( 2060) P:80 I: 500 C: Min: -4 Act: -2 Avg: 0 Max: 30
T:thread
P:priority
I:interval
C:執行cycle數
Min:最小延遲
Act:此次延遲時間
Avg:平均延遲
Max:最大延遲
最重要的是Max值 為了確保realtime 要能知道worst case,讓開發者可以評估最差的情況可以在多少時間內可以做出回應
- 比較Cyclictest 於使用 PREEMPT LINUX,RT-PREEMPT以及Xenomai
- 使用R-pi model B+ , Xenoami 2.6.4
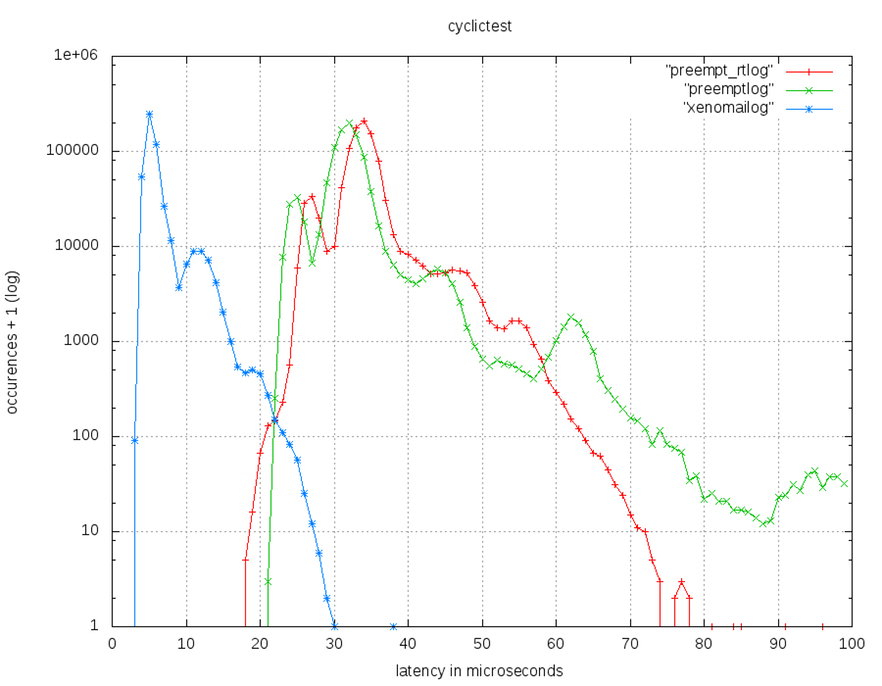
- 實驗數據 | Kernel Type | Max latency(µs) | |:—————-|:—————-| | Linux preempt | 271 | | Full preempt_rt | 96 | | Xenomai 2.6.4 | 38 |
示波器 實驗
試著撰寫driver驅動板子,進而使用示波器測試latency,驗證在不同因素之下造成不同的 max latency
- Source code
https://github.com/jacky6016/GPIO-test
https://github.com/erickitten/GPIO_test_xenomai3_2
- 實驗數據
| Driver model | max latency(µs) |
|---|---|
| rpi xenomai-2 RTDM |
4.71 |
| beaglebone xenomai-2 RTDM |
7.46 |
| rpi xenomai-3 RTDM |
7.022 |
| rpi xenomai-2 linux native |
10.92 |
| rpi xenomai-2 user-level(python) |
244 |
- 詳細實驗紀錄
展示
在 RPi B+ 上結合 Xenomai 3 的成果:CNC 繪圖機
Q&A
- Q1:handler duration 與 schedule latency 之間的延遲原因為何?
- A:
- Q2:ipipe的效益為何?為什麼要切割damain?切割完要如何確保real-time的穩定速度?
- A:
ipipe的主要效益是用來切割domain,讓real-time和linux interrupt可以在不同domain下進行運作。
切割domain原因是因為real-time domain的優先序是最高的,當有real-time interrupt進來,就會直接進入real-time domain去執 行,不會在經過整個linux的複雜架構下進行preempt的動作,可確保real-time 能在短時間內進行處理。
- Q3:ipipe/Adeos理論基礎中的Fine-grained是什麼?
- A:
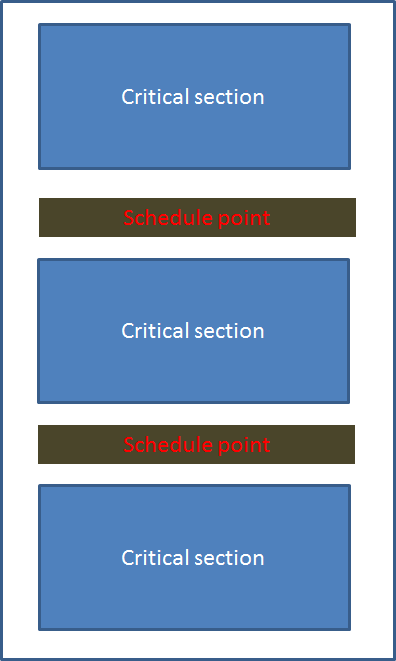
在life with andeos這篇指的fine-grained linux kernel,是指在編寫linux kernel code時,盡量讓critical section能愈短愈好,確保當real-time thread running in the secondary domain能在一定時間內遇到schedule point,也就可以在schedule point處理real-time thread。
- Q4:ipipe的相關檔案,gic.c、it8152.c … 之類的有什麼關係?
- A:
- Q5:請解釋下圖

- A:
GIC:Generic Interrupt Controller(GIC)是arm用來集中分配interrupt至cpu的裝置。它主要分為distributor與cpu interfaces.
distributor:負責分配interrupts,紀錄執行狀態,並提供registers以決定每個interrupt的enable、priority level、target processor。每個interrupt會有固定的interrupt ID,以供接收的cpu辨認。
cpu interface:向cpu傳送interrupt request,並提供distributor接收(acknowledge)interrupt、完成interrupt等訊息;它也提供決定priority mask、preemption policy的registers。
當啟動時,cpu interface會收到priority最高的pending interrupt,並決定它是否有足夠的priority被此cpu執行(參考mask、running interrupt、preemption),若是則signal cpu。cpu讀取interface的register(GICC_HPPIR)以接收interrupt,此讀取會得到interrupt ID,當接收後 distributor會改變狀態(由pending->active(and pending));完成之後,cpu寫入register以示意interrupt已經完成。
Interrupt types:- Private Peripheral Interrupt (PPI) ID:16-31
每個cpu各自獨立的硬體interrupt。
- Shared Peripheral Interrupt (SPI) ID:32~1019
外部硬體interrupt。
- Software-generated interrupt (SGI) ID:0~15
軟體interrupt,由一個cpu發出,可指定至一個或多個cpu,cpu以寫入GICD_SGIR的方式產生SGI,其中PPI與SGI是N-N model,每個cpu的interrupt狀態各自獨立;SPI是1-N model,一旦其中一個目標cpu接受,interrupt即視為已處理。
- Q6:Xenimai2與Xenomai3架構圖
- A:
- Q7:要如何知道每個CPU上跑哪一個task? SMP是如何排程?
- A:
對CPU來講 thread, process都是程式(program),一如作業系統,CPU只是在其間跳來跳去;有一個 load balancer 會定期得去處理 Processor 間的 Balance 會將 loading 較重的 Processor 內的工作移到 Loading 較輕的 Processor 上去執行,其中會用到 Processor 間的 interrupt 這種 interrupt 叫 IPI (inter-processor interrupt)
- inter-processor interrupt (IPI):
IPI is a special type of interrupt by which one processor may interrupt another processor in a multiprocessor system if the interrupting processor requires action from the other processor.
- PPI :
An interrupt generated by a peripheral.
共筆編輯紀錄
版权声明:本文内容由互联网用户自发贡献,该文观点仅代表作者本人。本站仅提供信息存储空间服务,不拥有所有权,不承担相关法律责任。如发现本站有涉嫌侵权/违法违规的内容,请联系我们,一经查实,本站将立刻删除。
如需转载请保留出处:https://51itzy.com/kjqy/31388.html