
本文基于微软的《mcp-for-beginners》教程进行实践和总结。
随着生成式AI应用变得越来越复杂,我们需要一个标准使应用以一致的方式构建,这就是 模型上下文协议(MCP) 的价值所在。
模型上下文协议(MCP)是一个开放的、标准化接口,允许大型语言模型(LLMs)无缝地与外部工具、API和数据源交互。它提供了一致的架构,增强了AI模型超越其训练数据的能力。
在MCP出现之前,模型与工具的集成存在以下问题: - 需要为每个工具-模型对编写定制代码 - 使用非标准化的API - 频繁因更新而中断 - 难以随工具数量增加而扩展
MCP通过以下方式解决了这些问题:
| 优势 | 描述 |
|---|---|
| 互操作性 | LLM能够无缝地与来自不同供应商的工具协作 |
| 一致性 | 在平台和工具之间实现统一的行为 |
| 可重用性 | 一次构建的工具可以在多个项目中重复使用 |
| 加速开发 | 通过标准化的即插即用接口减少开发时间 |
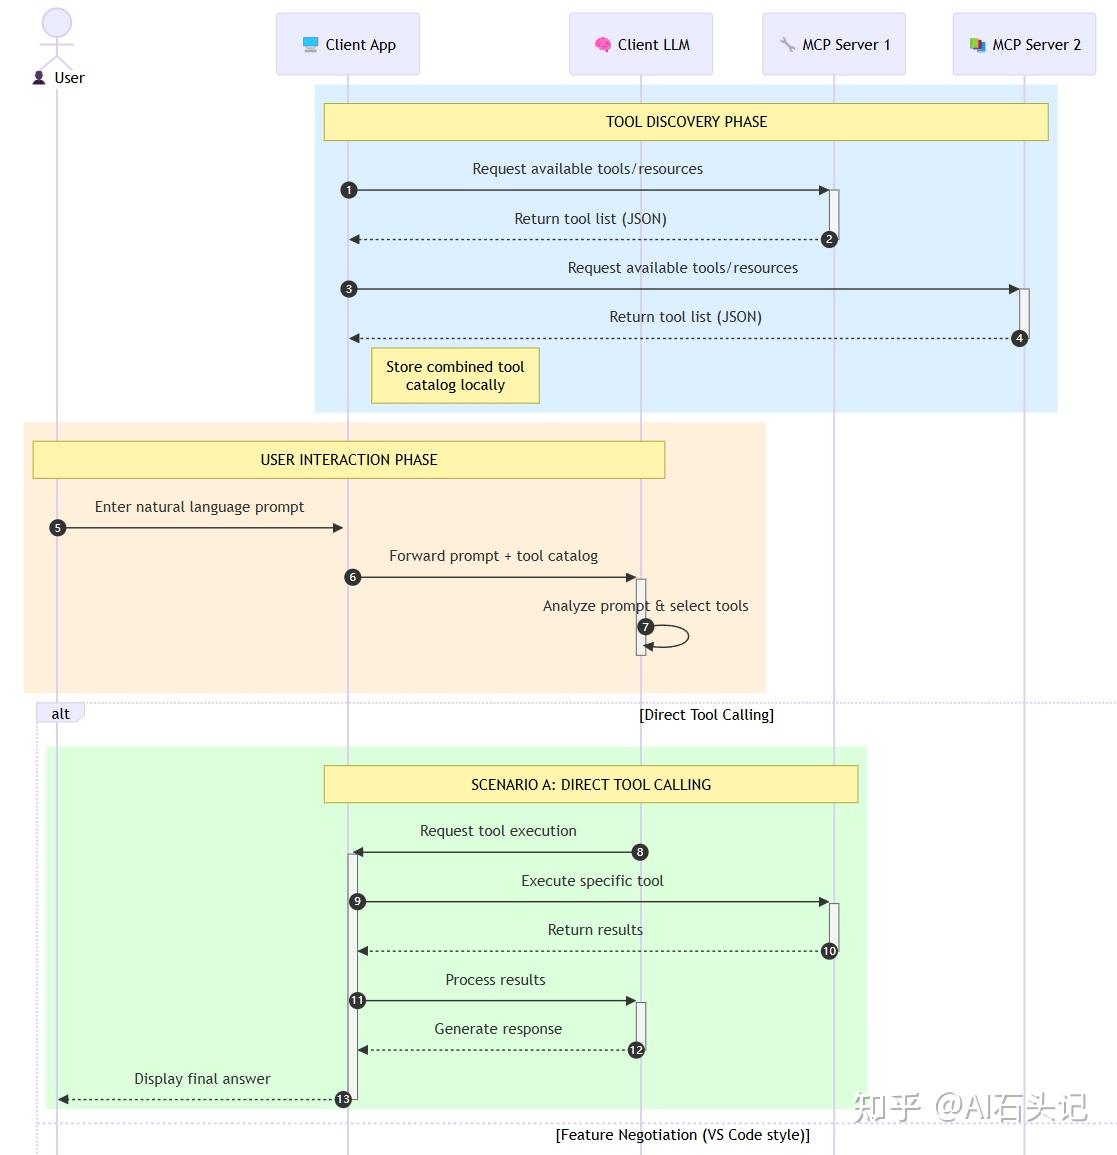
MCP采用客户端-服务器模型:
终端用户 -> MCP客户端 -> MCP主机 -> MCP服务器 -> 本地/远程资源1. MCP主机(Hosts) - 运行AI模型的应用程序
- 如VSCode、Claude Desktop、IDE等
- 执行或与AI模型交互生成响应
- 管理对话流程和用户界面
- 控制权限和安全约束
2. MCP客户端(Clients) - 促进主机与服务器交互的连接器
- 维护与服务器1:1连接
- 发送请求到服务器
- 处理并向用户显示响应
3. MCP服务器(Servers) - 提供特定功能的轻量级程序
- 注册可用功能(资源、提示、工具)
- 接收并执行来自客户端的工具调用
- 提供上下文信息以增强模型响应
MCP服务器提供三大核心功能:
- 上下文数据:用于决策和任务执行的信息
- 知识库:结构化和非结构化数据集合
- 本地文件和数据库:存储在设备中的数据
- API和Web服务:外部接口和服务
示例访问方式:
file://log.txt database://schema- 模板化消息:预结构化的消息和流程
- 预定义交互模式:标准化的操作和响应序列
- 专用对话模板:为特定类型对话定制的模板
示例模板:
Generate a product slogan based on the following {{product}} with the following {{keywords}}- 可执行功能:AI模型可调用的离散功能
- 唯一标识:每个工具都有独特名称和详细描述
- 结构化输入输出:接受特定参数并返回结构化结果
# 安装依赖 pip install mcp# server.py from mcp.server.fastmcp import FastMCP# 创建MCP服务器 mcp = FastMCP(“Demo”)
# 添加加法工具 @mcp.tool() def add(a: int, b: int) -> int:
"""Add two numbers""" return a + b # 添加动态问候资源 @mcp.resource(“greeting://{name}”) def get_greeting(name: str) -> str:
"""Get a personalized greeting""" return f"Hello, {name}!"- 运行服务器
mcp run server.py- 使用Inspector可视化界面调试
mcp dev server.py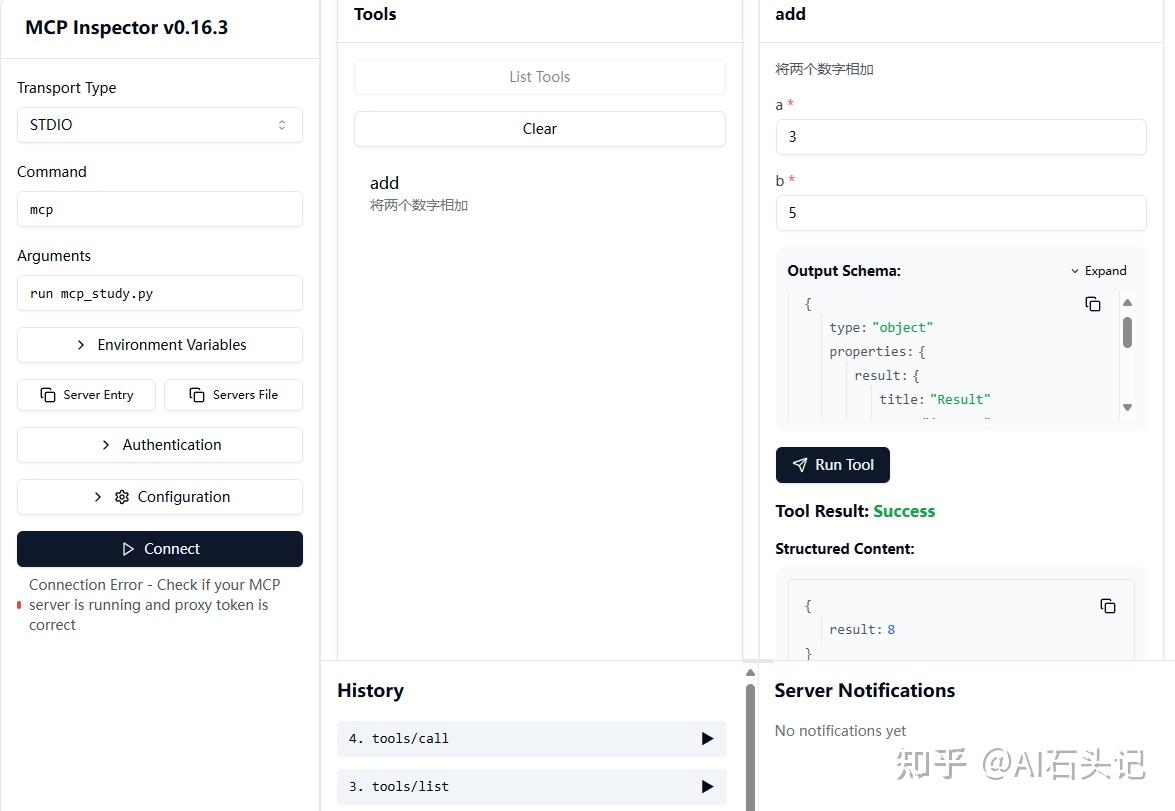
- CLI 测试
# 列出工具 npx @modelcontextprotocol/inspector –cli mcp run server.py –method tools/list
# 调用工具 npx @modelcontextprotocol/inspector –cli mcp run server.py –method tools/call –tool-name add –tool-arg a=1 –tool-arg b=2
# client.py from mcp import ClientSession, StdioServerParameters from mcp.client.stdio import stdio_client import asyncio # 创建服务器参数 server_params = StdioServerParameters(
command="mcp", args=["run", "server.py"], env=None,
)
asyncdefrun():
asyncwith stdio_client(server_params) as (read, write): asyncwith ClientSession(read, write) as session: # 初始化连接 await session.initialize() # 列出资源 resources = await session.list_resources() print("LISTING RESOURCES") for resource in resources: print("Resource: ", resource) # 列出工具 tools = await session.list_tools() print("LISTING TOOLS") for tool in tools.tools: print("Tool: ", tool.name) # 读取资源 print("READING RESOURCE") content, mime_type = await session.read_resource("greeting://hello") print(content) # 调用工具 print("CALL TOOL") result = await session.call_tool("add", arguments={"a": 1, "b": 7}) print(result.content)
if name == “main”:
asyncio.run(run())
- 将 MCP 工具转换为 LLM 可识别格式,支持自然语言调用。
- 动态处理用户提示,自动调用相关工具。
import json from openai import OpenAI
def convert_to_llm_tool(tool):
"""将MCP工具转换为LLM可理解的格式""" return { "type": "function", "function": { "name": tool.name, "description": tool.description, "parameters": { "type": "object", "properties": tool.inputSchema["properties"] } } } def call_llm(prompt, functions, client, model_name):
"""调用LLM并处理工具调用""" response = client.chat.completions.create( messages=[ {"role": "system", "content": "You are a helpful assistant."}, {"role": "user", "content": prompt}, ], model=model_name, tools=functions, temperature=1.0, max_tokens=1000, top_p=1.0 ) response_message = response.choices[0].message functions_to_call = [] if response_message.tool_calls: for tool_call in response_message.tool_calls: name = tool_call.function.name args = json.loads(tool_call.function.arguments) functions_to_call.append({"name": name, "args": args}) return functions_to_call测试:
prompt = "Add 2 to 20" client = OpenAI() model_name = “gpt-4o-mini” functions = [] for tool in tools.tools:
print("Tool: ", tool.name) print("Tool", tool.inputSchema["properties"]) functions.append(convert_to_llm_tool(tool)) call_llm(prompt, functions, client, model_name)
MCP支持多种传输方式:
- 适用于本地和命令行工具
- 简单但不适合Web或云环境
SSE(服务器发送事件)是一种服务器到客户端的流式传输标准,允许服务器通过 HTTP 向客户端推送实时更新。SSE 需要处理两件事:连接和消息,用 Web 框架管理。
from starlette.applications import Starlette from starlette.routing import Mount from mcp.server.fastmcp import FastMCP mcp = FastMCP(“My App”)
@mcp.tool() def add(a: int, b: int) -> int:
"""Add two numbers""" return a + b
# 挂载SSE服务器 app = Starlette(
routes=[Mount('/', app=mcp.sse_app())]
)
运行命令:
uvicorn server:app基于现代 HTTP 的流式传输机制,推荐用于大多数生产环境和云场景,支持: - 实时更新和通知 - 更好的可扩展性 - 多客户端支持
| 传输方式 | 实时更新 | 流式传输 | 可扩展性 | 使用场景 |
|---|---|---|---|---|
| STDIO | 否 | 否 | 低 | 本地CLI工具 |
| SSE | 是 | 是 | 中 | Web,实时更新 |
| 可流式HTTP | 是 | 是 | 高 | 云,多客户端 |
流式传输 是一种网络编程技术,允许数据以小块或事件序列的形式发送和接收,而不是等待整个响应准备好后再发送。这种技术特别适用于以下场景: - 大型文件或数据集。 - 实时更新(例如聊天、进度条)。 - 长时间运行的计算任务,用户需要实时了解进展。
@mcp.tool(description=“A tool that sends progress notifications”) async def process_files(message: str, ctx: Context) -> TextContent: await ctx.info("Processing file 1/3...") await ctx.info("Processing file 2/3...") await ctx.info("Processing file 3/3...") return TextContent(type="text", text=f"Done: {message}")
# 启用流式传输 mcp.run(transport=“streamable-http”)
async def message_handler(message): if isinstance(message, types.ServerNotification): print("NOTIFICATION:", message) else: print("SERVER MESSAGE:", message)
async with ClientSession(
read_stream, write_stream, message_handler=message_handler,
) as session:
# 会话代码
| 级别 | 描述 | 示例使用场景 |
|---|---|---|
| debug | 详细调试信息 | 函数入口/退出点 |
| info | 一般信息性消息 | 操作进度更新 |
| notice | 正常但重要的事件 | 配置更改 |
| warning | 警告条件 | 使用已弃用功能 |
| error | 错误条件 | 操作失败 |
| critical | 严重条件 | 系统组件故障 |
在VSCode设置中启用:chat.mcp.discovery.enabled
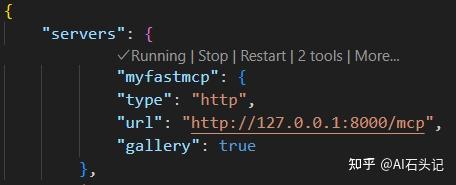
创建 .vscode/mcp.json:
{ "inputs": [], "servers": { "myfastmcp": { "type": "http", "url": "http://127.0.0.1:8000/mcp", "gallery": true } } }
在mcp.json文件中点击“播放”图标启动服务器,GitHub Copilot Chat会显示可用工具数量增加。

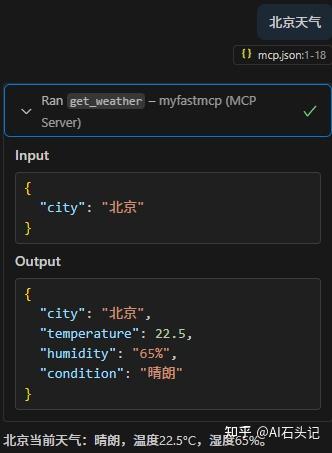
GitHub Copilot 选择 Agent 模式,对话即可(输入 # 可以直接指定使用特定的MCP工具):
Sampling 是 MCP 的一个强大功能,允许服务器通过客户端请求 LLM,从而实现复杂的 Agent 行为,同时保持安全性和隐私。
class DynamicSamplingService: def __init__(self, mcp_client): self.client = mcp_client async def generate_with_adaptive_sampling(self, prompt, task_type, user_preferences=None): # 定义不同任务类型的采样预设 sampling_presets = { "creative": {"temperature": 0.9, "top_p": 0.95, "frequency_penalty": 0.7}, "factual": {"temperature": 0.2, "top_p": 0.85, "frequency_penalty": 0.2}, "code": {"temperature": 0.3, "top_p": 0.9, "frequency_penalty": 0.5}, "analytical": {"temperature": 0.4, "top_p": 0.92, "frequency_penalty": 0.3} } # 选择基础预设 sampling_params = sampling_presets.get(task_type, sampling_presets["factual"]) # 根据用户偏好调整 if user_preferences: if "creativity_level" in user_preferences: creativity = min(max(user_preferences["creativity_level"], 1), 10) / 10 sampling_params["temperature"] = 0.1 + (0.9 * creativity) # 发送请求 response = await self.client.send_request( prompt=prompt, sampling_params ) return { "text": response.generated_text, "applied_sampling": sampling_params, "task_type": task_type }
MCP 不仅支持基于文本的交互,还支持多模态功能,使模型能够处理图像、音频及其他数据类型。
class ImageGenerationTool(Tool): def get_name(self): return "imageGeneration" def get_description(self): return "Generates images based on text descriptions" def get_schema(self): return { "type": "object", "properties": { "prompt": {"type": "string", "description": "Image description"}, "style": {"type": "string", "enum": ["realistic", "artistic", "cartoon"]}, "width": {"type": "integer", "default": 512}, "height": {"type": "integer", "default": 512} }, "required": ["prompt"] } async def execute_async(self, request: ToolRequest) -> ToolResponse: # 生成图像逻辑 image_data = await self._generate_image( request.parameters.get("prompt"), request.parameters.get("style", "realistic") ) # 转换为base64返回 buffered = io.BytesIO() image_data.save(buffered, format="PNG") img_str = base64.b64encode(buffered.getvalue()).decode() return ToolResponse( result={ "imageBase64": img_str, "format": "image/png", "generationPrompt": request.parameters.get("prompt") } )class DistributedMcpServer: def __init__(self, node_id=None): self.node_id = node_id or str(uuid.uuid4()) self.redis = None self.server = None async def initialize(self): # 连接Redis进行协调 self.redis = await aioredis.create_redis_pool("redis://redis-master:6379") # 注册节点到集群 await self.redis.sadd("mcp:nodes", self.node_id) await self.redis.hset(f"mcp:node:{self.node_id}", "status", "starting") # 创建MCP服务器 self.server = AsyncMcpServer( name=f"MCP Node {self.node_id[:8]}", version="1.0.0", port=5000, max_concurrent_requests=50 ) # 注册工具 self.register_tools() # 启动心跳机制 asyncio.create_task(self._heartbeat()) await self.server.start() await self.redis.hset(f"mcp:node:{self.node_id}", "status", "running") async def _heartbeat(self): """定期心跳检测""" while True: try: await self.redis.hset( f"mcp:node:{self.node_id}", mapping={ "lastHeartbeat": int(time.time()), "load": len(self.server.active_requests), "maxLoad": self.server.max_concurrent_requests } ) await asyncio.sleep(5) except Exception as e: print(f"Heartbeat error: {e}") await asyncio.sleep(1)- 用户同意与控制
- 用户必须明确同意任何数据访问或操作执行
- 提供直观的用户界面审查和批准活动
2. 数据隐私
- 用户数据仅在明确同意下暴露
- 通过适当的访问控制保护数据
3. 工具安全性
- 调用工具前需要用户明确同意
- 强制执行安全边界防止不安全操作
- 工具权限控制:客户端指定模型允许使用的工具
- 身份验证:服务器要求API密钥、OAuth令牌等认证
- 验证:所有工具调用强制执行参数验证
- 速率限制:防止滥用并确保公平使用资源
MCP基于JSON-RPC 2.0构建,提供标准化的消息格式:
- JSON-RPC消息格式:结构一致的方法调用
- 有状态连接:多请求间保持状态
- 功能协商:连接时交换能力信息
- 配置选项:动态配置会话参数
- 进度跟踪:长时间操作的进度更新
- 请求取消:用户可中断不需要的操作
- 错误报告:标准化的错误消息和代码
- 日志记录:结构化日志用于审计和调试
| 应用场景 | 描述 |
|---|---|
| 企业数据集成 | 连接LLM到数据库、CRM或内部工具 |
| 自主AI系统 | 启用具有工具访问和决策工作流的自主代理 |
| 多模态应用 | 在统一AI应用中结合文本、图像和音频工具 |
| 实时数据集成 | 将实时数据引入AI交互,提供准确的最新输出 |
- 从简单的stdio服务器开始,然后升级到SSE或可流式HTTP
- 为长时间运行的操作实现适当的通知系统
- 使用动态采样配置以获得更好的响应质量
- 实施适当的错误处理和用户反馈机制
- 为生产环境考虑分布式架构和负载均衡
- 使用异步编程处理并发请求
- 实现连接池和资源管理
- 配置适当的超时和重试机制
- 监控和记录系统性能指标
参考资料:
https:// github.com/microsoft/mc p-for-beginners
欢迎关注作者同名微信公众号:AI石头记
版权声明:本文内容由互联网用户自发贡献,该文观点仅代表作者本人。本站仅提供信息存储空间服务,不拥有所有权,不承担相关法律责任。如发现本站有涉嫌侵权/违法违规的内容,请联系我们,一经查实,本站将立刻删除。
如需转载请保留出处:https://51itzy.com/kjqy/222168.html