
1、前言
Apache Atlas 是托管于 Apache 旗下的一款元数据管理和治理的产品,目前在大数据领域应用颇为广泛,可以很好的帮助企业管理数据资产,并对这些资产进行分类和治理,为数据分析,数据治理提供高质量的元数据信息。
随着企业业务量的逐渐膨胀,数据日益增多,不同业务线的数据可能在多种类型的数据库中存储,最终汇集到企业的数据仓库中进行整合分析,这个时候如果想要追踪数据来源,理清数据之间的关系将会是一件异常头疼的事情,倘若某个环节出了问题,追溯的成本将是巨大的,于是 Atlas 在这种背景下应运而生了,通过它,我们可以非常方便的管理元数据,并且可以追溯表级别,列级别之间的关系(血缘关系),为企业的数据资产提供强有力的支撑和保障。Atlas 支持从 HBase 、Hive、Sqoop、Storm、Kafka 中提取和管理元数据,同时也可以通过 Rest Api 的方式自行定义元数据模型,生成元数据。
本文我们着重介绍一下 Atlas 的相关概念,帮助大家更好的理解 Atlas,同时详细讲解如何通过 Rest Api 的方式自定义数据模型,生成血缘关系,以便开发自己的个性化需求。
2、Atlas 原理及相关概念
元数据
元数据其实就是描述数据的数据,比如表,字段,视图等,每个业务系统可能都会自己定义表,字段,视图,这些数据从哪来到往哪去,数据之间是否存在关联,和其他系统的数据是否存在重复和矛盾字段,这些就是元数据管理要解决的问题,也是 Atlas 要解决的问题。
运行原理
Atlas 的原理其实并不难理解,主要是通过内部提供的脚本读取数仓中的数据库结构,生成数据模型,存储到 Atlas的 Hbase 中,同时通过 hook 的方式监听数仓中的数据变化,分析执行的 sql 语句,从而生成表与表,列与列的血缘关系依赖,在前台展示给用户查看。
数仓支持
Atlas 对 Hive 支持最好,我们都知道,Hive 是依赖于 Hadoop 的,数据存储在 HDFS 中,Atlas 有专门的 shell 脚本可以直接运行读取 Hive 的表结构等元数据信息同步到 Atlas 的存储库中,自动生成元数据模型,同时 Atlas 提供的 HiveHook 可以监听 Hive 的数据变化,根据 Hive 执行的 sql 推断出数据与数据之间的关系,生成血缘关系图,如果我们想要分析其他数据存储介质的元数据和血缘关系,Atlas 的支持并不是很理想。但通常情况下,我们会定时把业务库如 mysql,oracle 中的数据定时同步到数仓中整合分析,而数仓我们一般都会采用 Hadoop 的生态体系,所以这一点并不是问题。
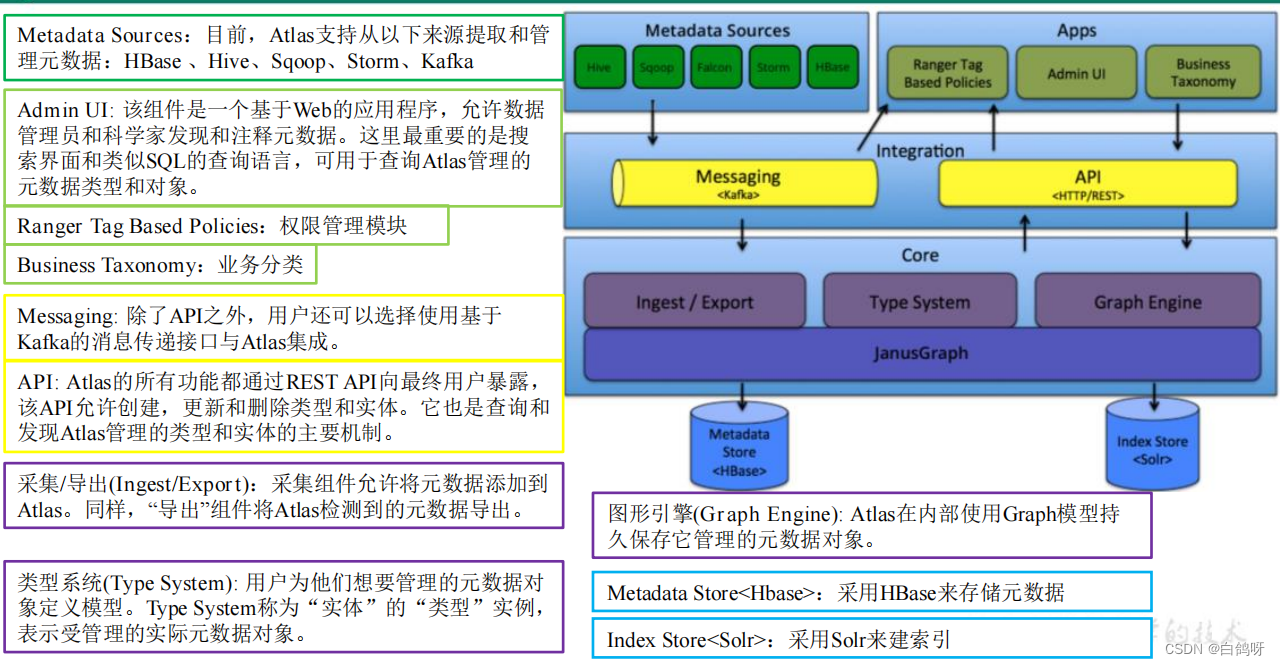
架构图解
以下是 Atlas 的架构图解,可以看出,Atlas 所依赖的生态体系是异常庞大的,这也直接导致了它部署起来十分繁琐,本文不再讲解 Atlas 的部署,网上相关的教程有很多,感兴趣的朋友可以自己搜索尝试。
讯享网
核心组件概念
Atlas 中主要有以下核心组件,这些需要我们着重了解,接下来我们通过 Rest Api 自定义建模其实就是对以下组件的增删查改操作。
1. Type
元数据类型定义,这里可以是数据库,表,列等,还可以细分 mysql 表( mysql_table ),oracle 表( oracle_table )等,atlas自带了很多类型,如 DataSet,Process 等,一般情况下,数据相关的类型在定义类型的时候都会继承 DataSet,而流程相关的类型则会继承 Process,便于生成血缘关系。我们也可以通过调用 api 自定义类型。这是一切的起点,定义完类型之后,才能生成不同类型的元数据实体,生成血缘关系,我个人更喜欢把元数据类型称之为建模。
2. Classification
分类,通俗点就是给元数据打标签,分类是可以传递的,比如 A 视图是基于 A 表生成的,那么如果 A 表打上了 a 这个标签,A 视图也会自动打上 a 标签,这样的好处就是便于数据的追踪。
3. Entity
实体,表示具体的元数据,Atlas 管理的对象就是各种 Type 的 Entity。
4. Lineage
数据血缘,表示数据之间的传递关系,通过 Lineage 我们可以清晰的知道数据的从何而来又流向何处,中间经历了哪些操作,这样一旦数据出现问题,可以迅速追溯,定位是哪个环节出现错误。
3、Altas安装
(参考链接,请结合实际情况使用)
1、https://blog.csdn.net/hshudoudou/article/details/
2、https://blog.csdn.net/javaThanksgiving/article/details/
4、Altas使用
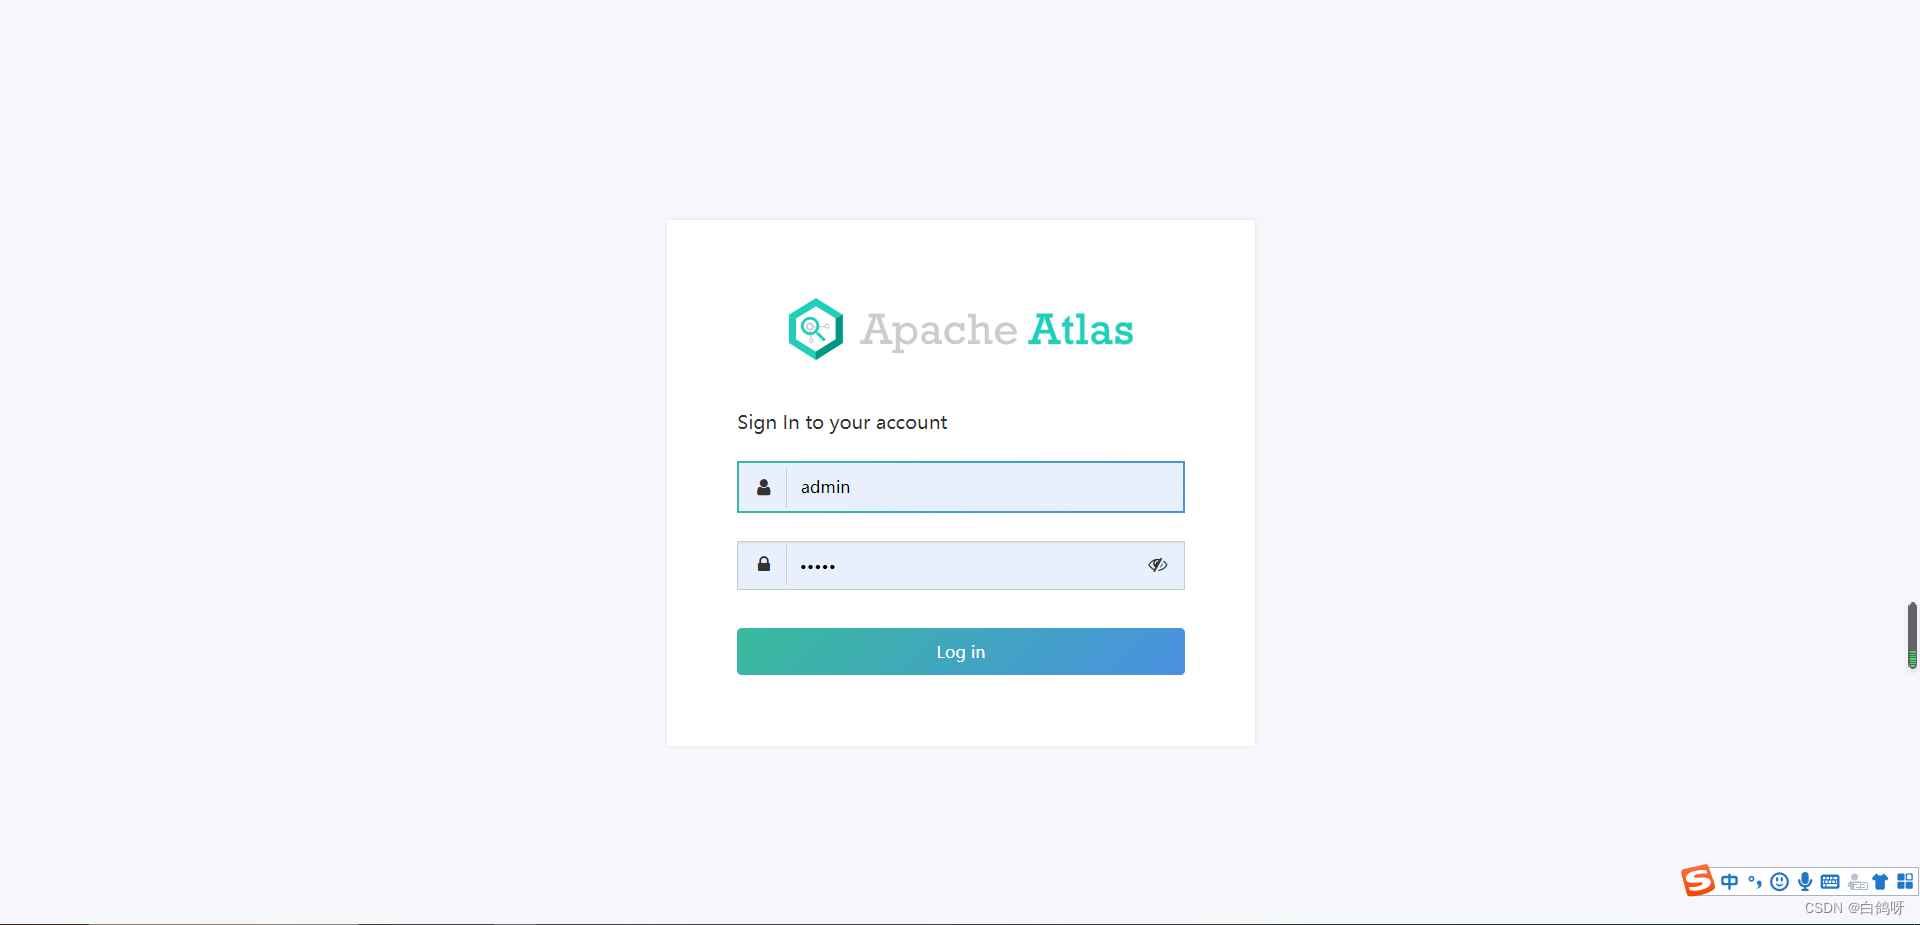
Altas 成功部署之后,使用还是很简单的,这是登录界面,用户名密码默认是 admin,admin:
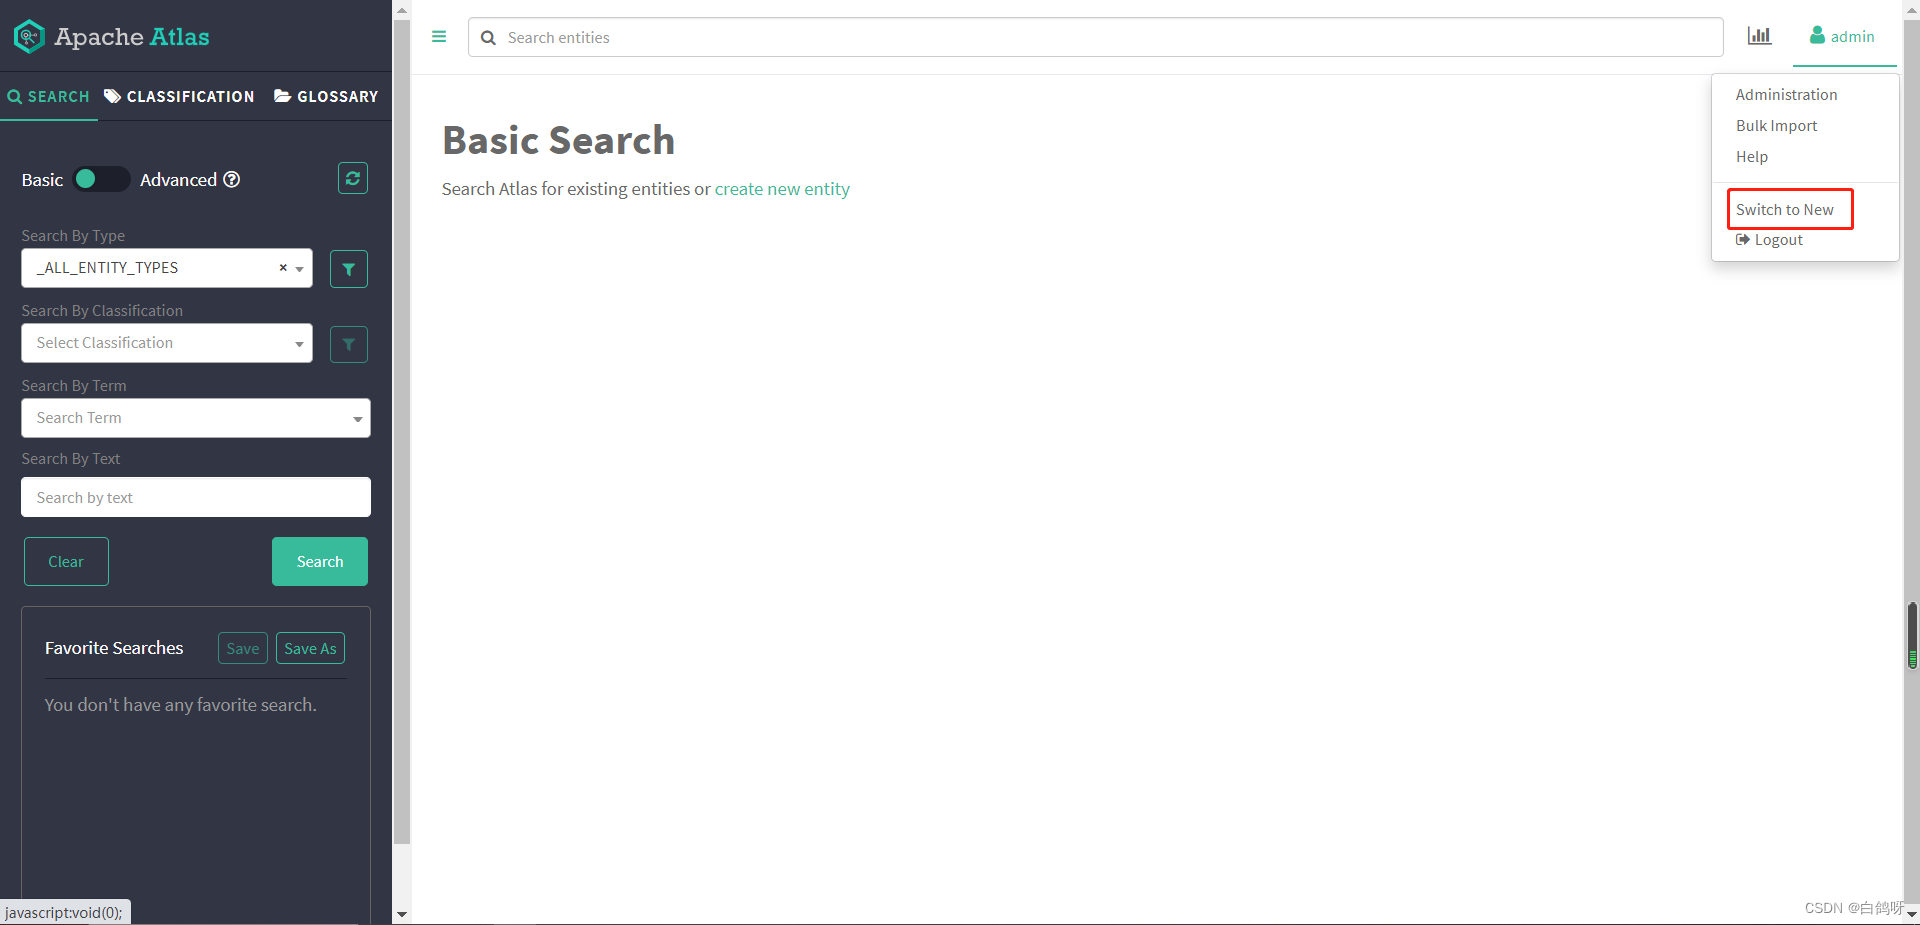
 进入主页,点击右上角 switch to new ,使用新版界面,更直观:
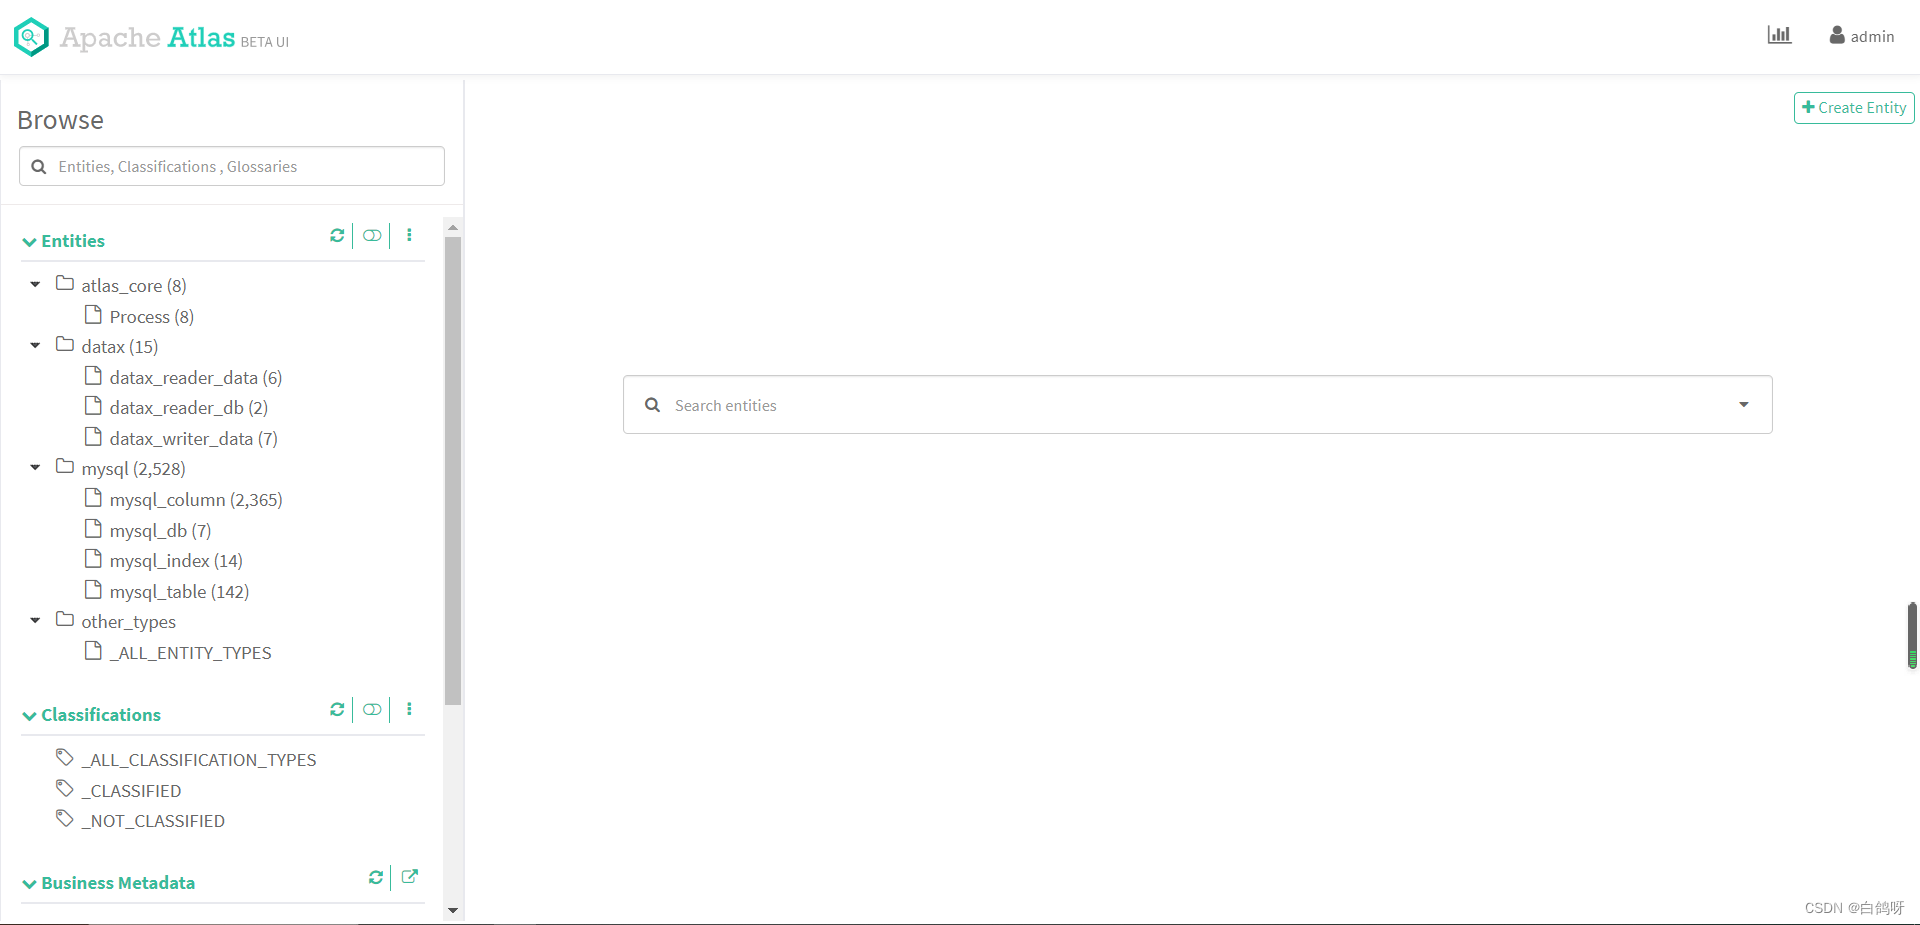
页面左侧便是 Atlas 的类型树,点击树节点的某个类型,可以查看下面的实体,这里我们点击 mysql_table:
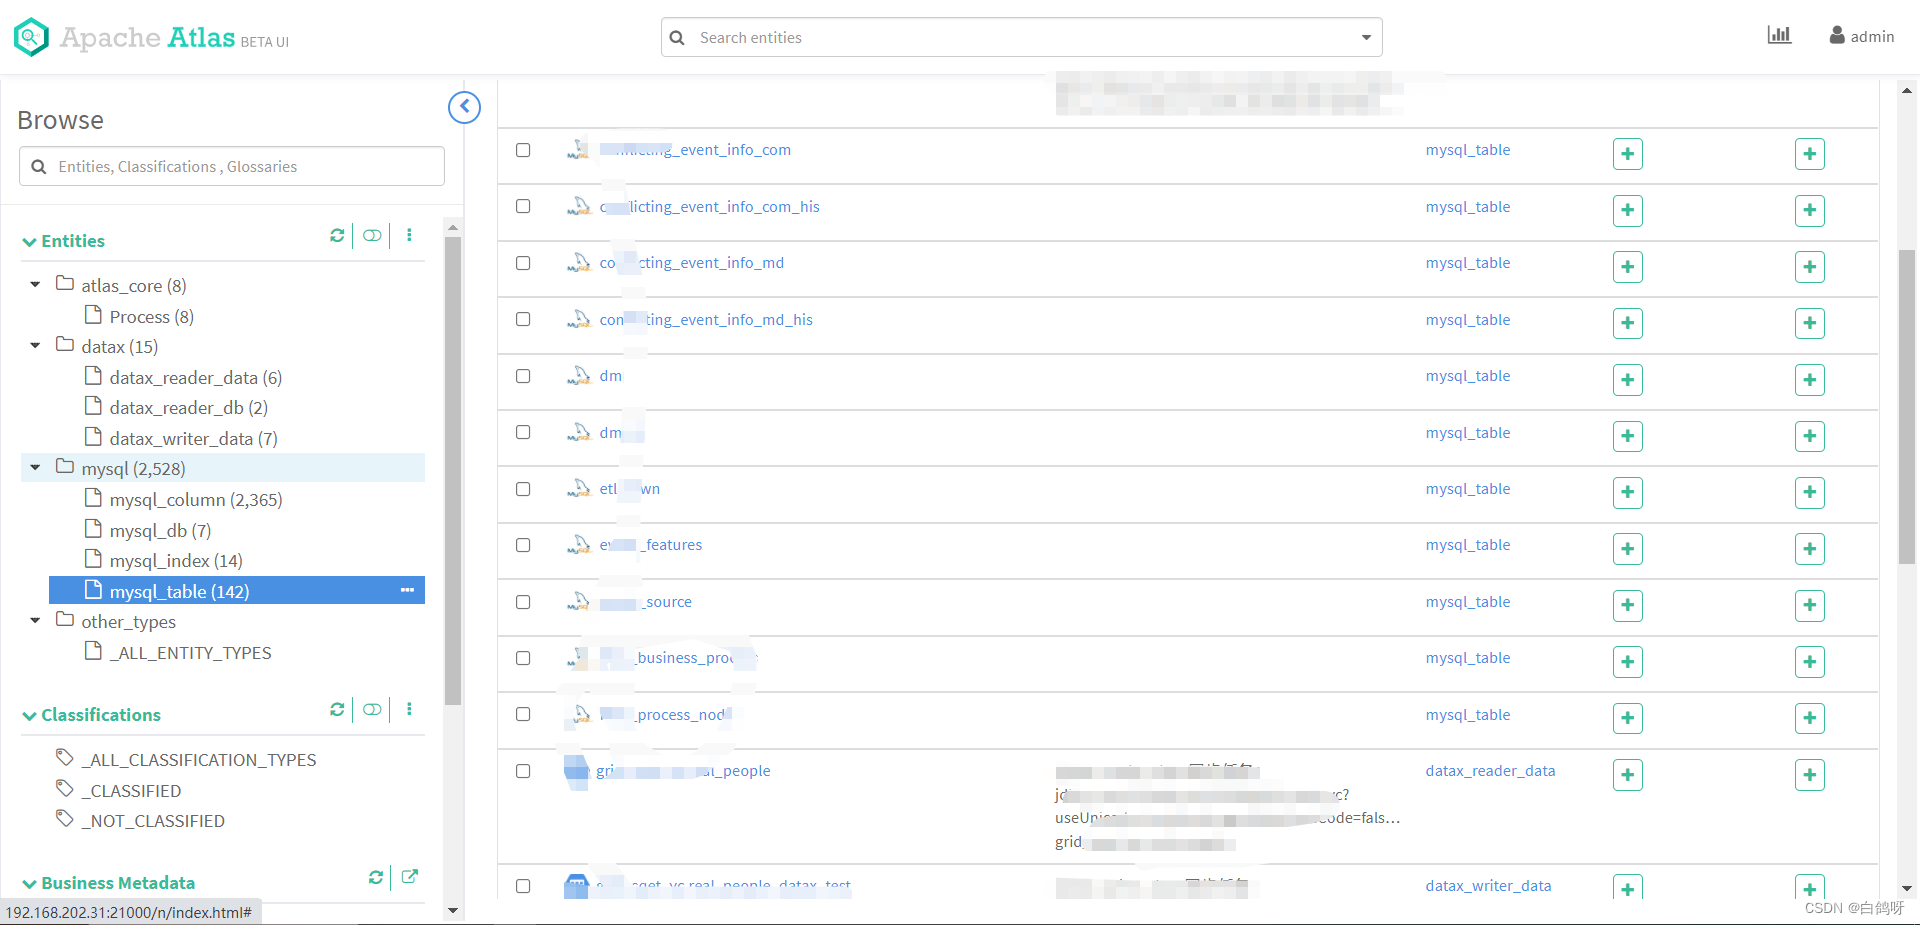 可以看到下面有很多表,这些都是我之前自己利用 Rest Api 上传定义的。
下面我们来讲解一下如何通过 Rest Api 的方式自定义类型,生成实体,创建血缘关系。
5、Atlas Rest Api 详解及示例
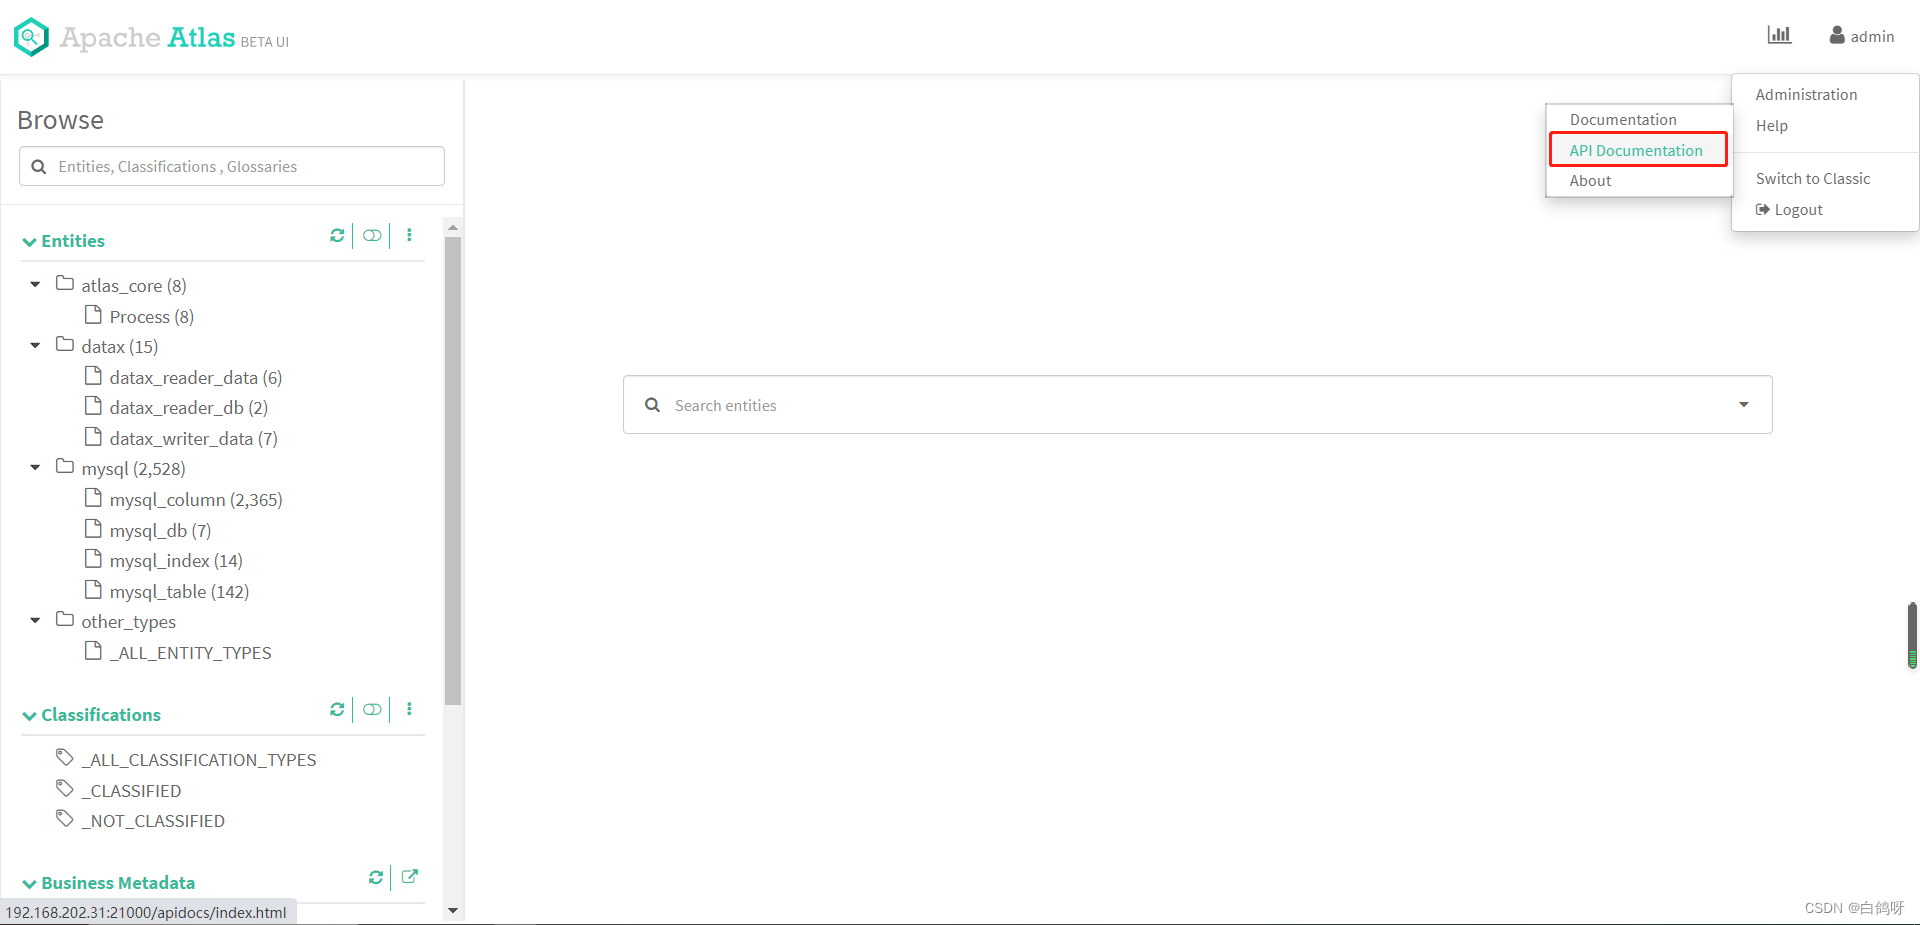
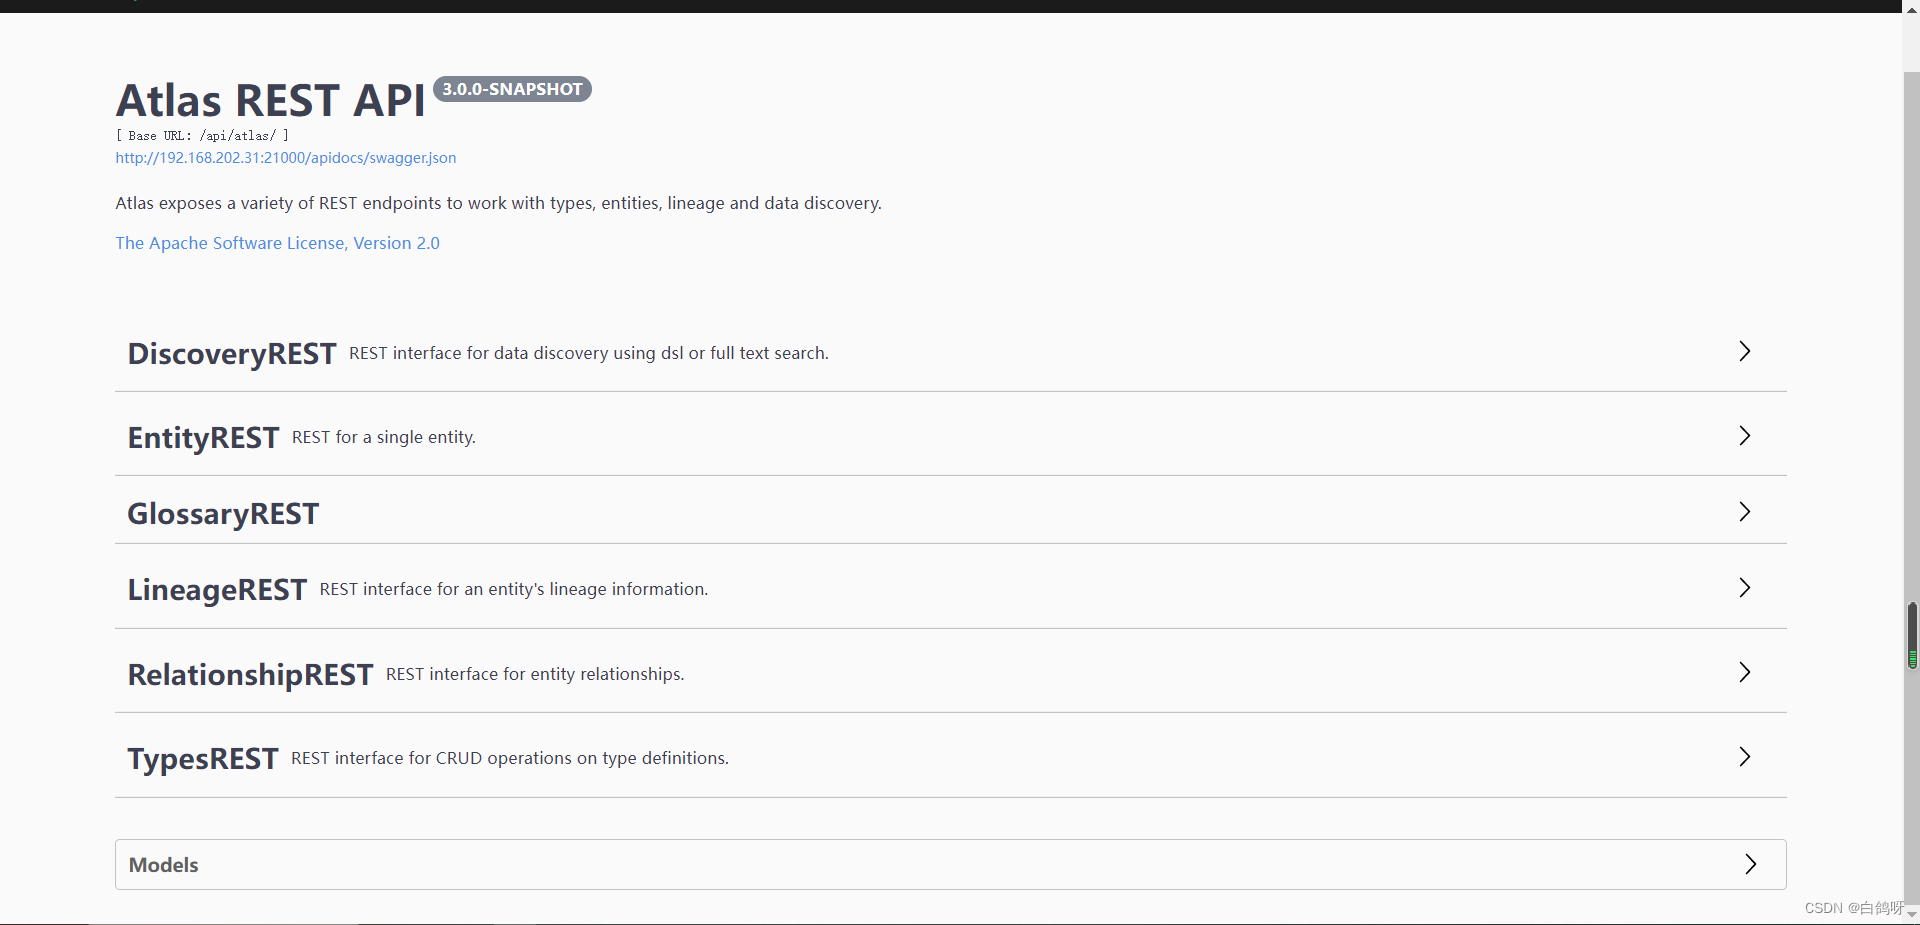
我们点击主页上方的 Help-》API Documentation,便可以查看 Atlas 所有的开放接口:
有一点我们需要注意,Atlas 的接口在使用的时候是需要鉴权的,所以我们构建 http 请求的时候需要带上用户名和密码认证信息,本次示例中我们使用 atlas-client-v2 开源组件来进行 Atlas 的 api 调用。

本次示例我们定义一个 my_db 类型,my_table 类型,并且让 my_db 一对多 my_table,然后创建 test_db 实体到 my_db 下,创建 test_table_source 和 test_table_target 实体到 my_table 下,并且定义 test_table_target 的数据来自 test_table_source,生成两个实体的血缘关系依赖。
自定义 my_db 和 my_table 类型
我们对 my_db 和 my_table 类型进行定义,在 Atlas 的Rest Api 中,允许一个请求定义多种类型,在这里我们先构建 json 请求体,然后再通过编码方式实现,二者对比,更容易理解,json 请求体如下(关键地方有注释):
{
    "enumDefs": [], "structDefs": [], "classificationDefs": [], //类型定义 "entityDefs": [ {
    "name": "my_db", //数据类型的定义,约定俗成,继承Atlas自带的DataSet "superTypes": [ "DataSet" ], //服务类型(便于在界面分组显示类型) "serviceType": "my_type", "typeVersion": "1.1", "attributeDefs": [] }, {
    "name": "my_table", "superTypes": [ "DataSet" ], "serviceType": "my_type", "typeVersion": "1.1", "attributeDefs": [] } ], //定义类型之间的关系 "relationshipDefs": [ {
    "name": "my_table_db", "serviceType": "my_type", "typeVersion": "1.1", //关系类型:ASSOCIATION:关联关系,没有容器存在,1对1  //AGGREGATION:容器关系,1对多,而且彼此可以相互独立存在  //COMPOSITION:容器关系,1对多,但是容器中的实例不能脱离容器存在 "relationshipCategory": "AGGREGATION", //节点一 "endDef1": {
    "type": "my_table", //表中关联的属性名称,对应下面的 my_db "name": "db", //代表这头是不是容器 "isContainer": false, //cardinality: 三种类型SINGLE, LIST, SET "cardinality": "SINGLE" }, // 节点2 "endDef2": {
    "type": "my_db", "name": "tables", "isContainer": true, // db 包含 table,table不能重复,所以类型设置为 SET "cardinality": "SET" }, // 推导tag NONE 不推导 "propagateTags": "NONE" } ] }
讯享网
编码实现:
引入 pom 依赖,注意,如果要集成到自己的业务系统之中,业务系统如果使用了其他的日志框架,需要去除 slf4j-log4j12 依赖,否则日志框架会起冲突,导致启动失败,另外 atlas-client-common 中依赖了 commons-configuration 1.10,如果业务系统中有低版本依赖,记得排除,不然二者会冲突,导致 client 初始化失败。
讯享网<dependencies> <!-- Apache Atlas --> <dependency> <groupId>org.apache.atlas</groupId> <artifactId>atlas-client-common</artifactId> <version>2.1.0</version> <exclusions> <exclusion> <artifactId>slf4j-log4j12</artifactId> <groupId>org.slf4j</groupId> </exclusion> </exclusions> </dependency> <!-- Apache Atlas Client Version2 --> <dependency> <groupId>org.apache.atlas</groupId> <artifactId>atlas-client-v2</artifactId> <version>2.1.0</version> <exclusions> <exclusion> <artifactId>slf4j-log4j12</artifactId> <groupId>org.slf4j</groupId> </exclusion> <exclusion> <artifactId>log4j</artifactId> <groupId>log4j</groupId> </exclusion> </exclusions> </dependency> <dependency> <groupId>com.alibaba</groupId> <artifactId>fastjson</artifactId> <version>${fastjson.version}</version> </dependency> </dependencies>
引入 atlas-application.properties(必须得有,否则会初始化失败):
atlas.rest.address=http://127.0.0.1:21000
代码实现如下(对照json非常容易理解):
AtlasClientV2 atlasClientV2 = new AtlasClientV2(new String[]{
"http://127.0.0.1:21000"}, new String[]{
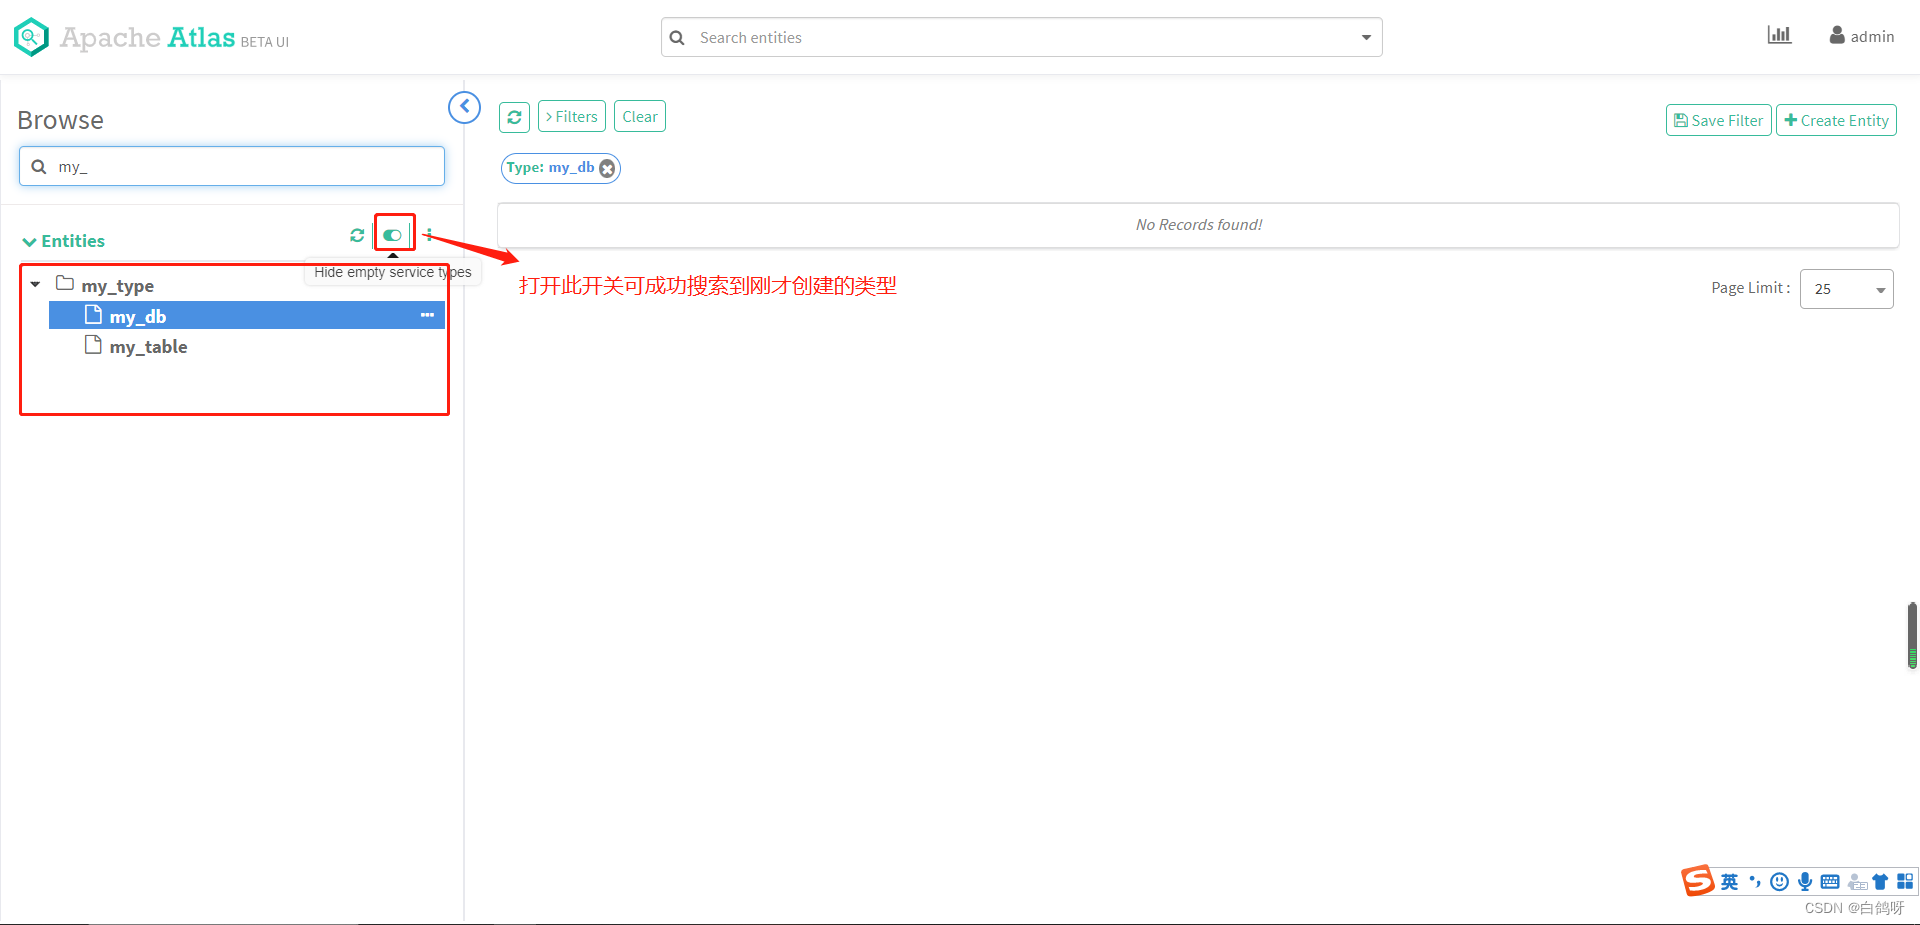
"admin", "admin"}); //父类集合 Set<String> superTypes = new HashSet<>(); superTypes.add(AtlasBaseTypeDef.ATLAS_TYPE_DATASET); //定义myType AtlasTypesDef myType = new AtlasTypesDef(); //定义myDb AtlasEntityDef myDb = new AtlasEntityDef(); myDb.setName("my_db"); myDb.setServiceType("my_type"); myDb.setSuperTypes(superTypes); myDb.setTypeVersion("1.1"); //定义mytable AtlasEntityDef myTable = new AtlasEntityDef(); myTable.setName("my_table"); myTable.setServiceType("my_type"); myTable.setSuperTypes(superTypes); myTable.setTypeVersion("1.1"); //定义relationshipDef AtlasRelationshipDef relationshipDef = new AtlasRelationshipDef(); relationshipDef.setName("my_table_db"); relationshipDef.setServiceType("my_type"); relationshipDef.setTypeVersion("1.1"); relationshipDef.setRelationshipCategory(AtlasRelationshipDef.RelationshipCategory.AGGREGATION); relationshipDef.setPropagateTags(AtlasRelationshipDef.PropagateTags.NONE); //定义endDef1 AtlasRelationshipEndDef endDef1 = new AtlasRelationshipEndDef(); endDef1.setType("my_table"); endDef1.setName("db"); endDef1.setIsContainer(false); endDef1.setCardinality(AtlasStructDef.AtlasAttributeDef.Cardinality.SINGLE); relationshipDef.setEndDef1(endDef1); //定义endDef2 AtlasRelationshipEndDef endDef2 = new AtlasRelationshipEndDef(); endDef2.setType("my_db"); endDef2.setName("tables"); endDef2.setIsContainer(true); endDef2.setCardinality(AtlasStructDef.AtlasAttributeDef.Cardinality.SET); relationshipDef.setEndDef2(endDef2); //entityDefs List<AtlasEntityDef> entityDefs = new ArrayList<>(2); entityDefs.add(myDb); entityDefs.add(myTable); myType.setEntityDefs(entityDefs); //relationshipDefs List<AtlasRelationshipDef> relationshipDefs = new ArrayList<>(1); relationshipDefs.add(relationshipDef); myType.setRelationshipDefs(relationshipDefs); //查询是否已有my_db类型,没有则创建 SearchFilter filter = new SearchFilter(); filter.setParam("name", "my_db"); AtlasTypesDef allTypeDefs = atlasClientV2.getAllTypeDefs(filter); if (allTypeDefs.getEntityDefs().isEmpty()) {
//请求 rest api atlasClientV2.createAtlasTypeDefs(myType); } 执行以上代码,执行完毕后,前往 Atlas 主页查看,类型已成功创建:
 查看类型模型图:
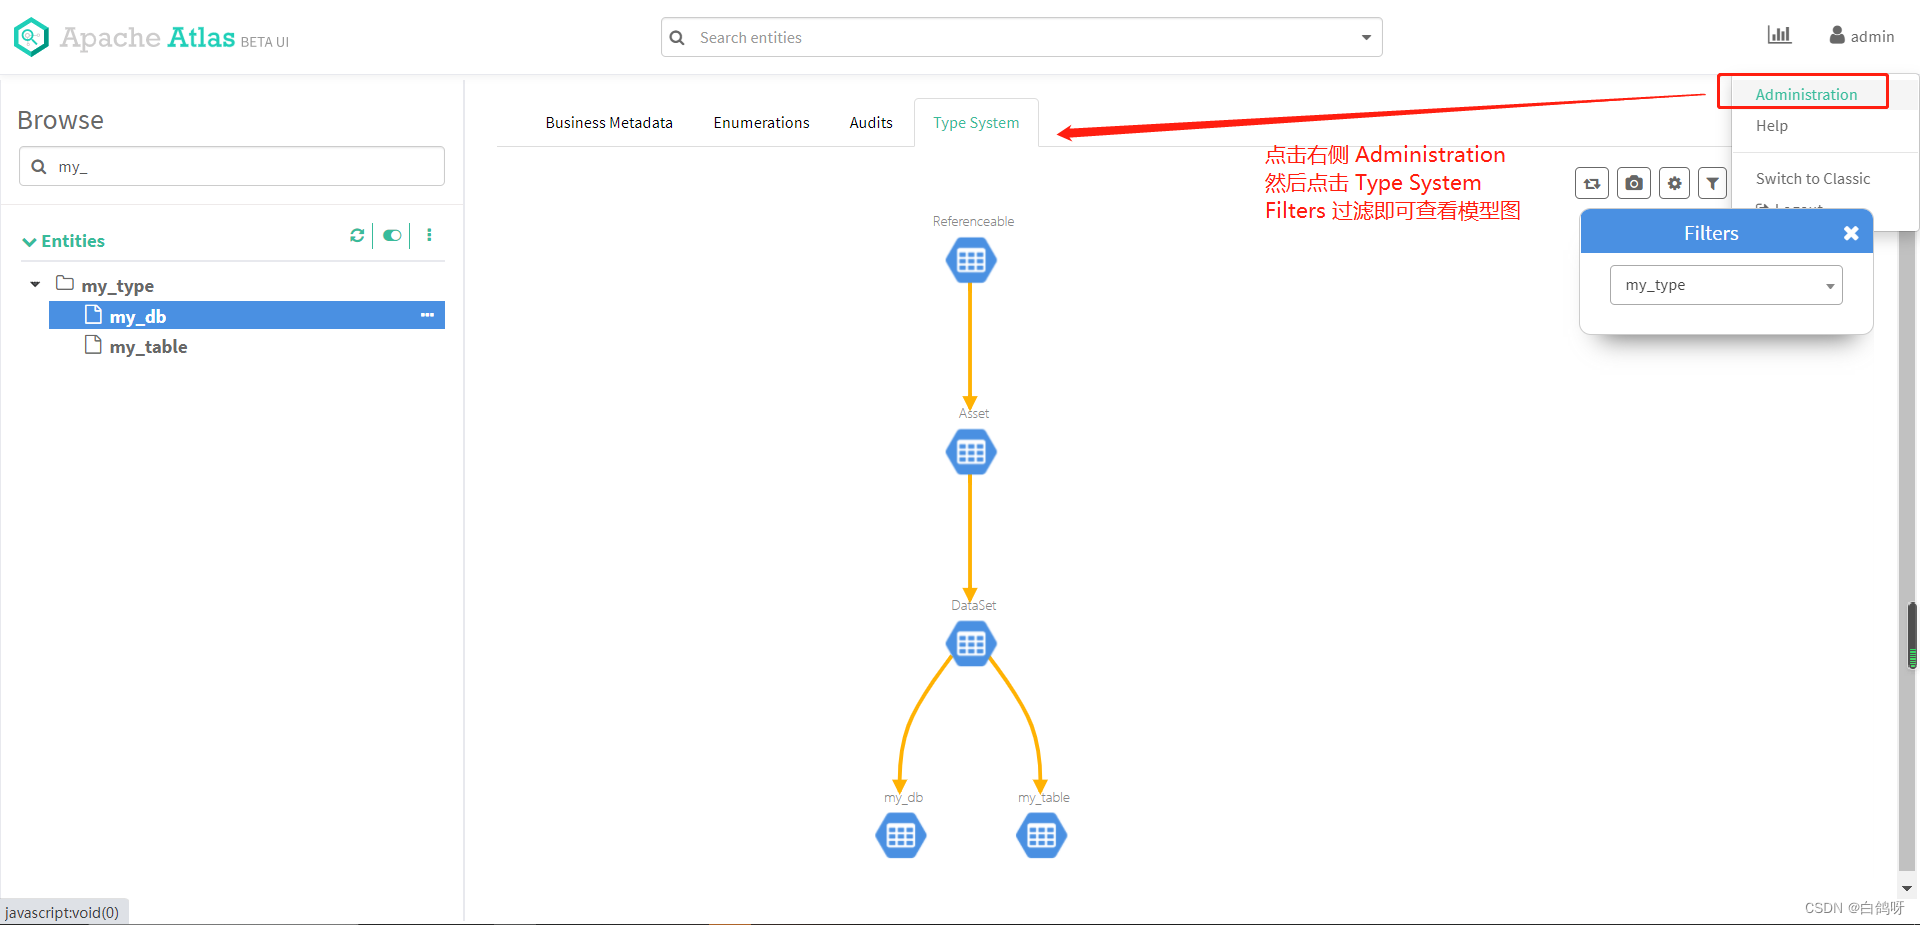 类型创建完毕,接下来我们进行实体的创建。
创建实体 test_db,test_table_source 和 test_table_target
json 如下:
讯享网//my_db 实体 {
    "typeName": "my_db", "attributes": {
    "qualifiedName": "test_db", "name": "test_db", "description": "测试创建db" } } //test_table_source 实体 {
    "typeName": "my_table", "attributes": {
    "qualifiedName": "test_table_source", "name": "test_table_source", "description": "测试创建test_table_source" }, "relationshipAttributes": {
    "db": {
    "typeName": "my_db", //my_db的guid(创建完my_db后会返回) "guid": "xxxx" } } } //test_table_target 实体 {
    "typeName": "my_table", "attributes": {
    "qualifiedName": "test_table_target", "name": "test_table_target", "description": "测试创建test_table_target" }, "relationshipAttributes": {
    "db": {
    "typeName": "my_db", "guid": "xxx" } } }
代码实现如下:
 //创建实体 test_db AtlasEntity testDb = new AtlasEntity(); testDb.setTypeName("my_db"); Map<String, Object> attributes = new HashMap<>(); attributes.put("qualifiedName", "test_db"); attributes.put("name", "test_db"); attributes.put("description", "测试创建db"); testDb.setAttributes(attributes); Map<String, String> queryAttributes = new HashMap<>(); queryAttributes.put("qualifiedName", "test_db"); String myDbGuid = null; try {
    //查询不到会报错 AtlasEntity.AtlasEntityWithExtInfo extInfo = atlasClientV2.getEntityByAttribute("my_db", queryAttributes); myDbGuid = extInfo.getEntity().getGuid(); } catch (AtlasServiceException e) {
    if (ClientResponse.Status.NOT_FOUND.equals(e.getStatus())) {
    AtlasEntity.AtlasEntityWithExtInfo extInfo = new AtlasEntity.AtlasEntityWithExtInfo(testDb); //请求 EntityMutationResponse response = atlasClientV2.createEntity(extInfo); myDbGuid = response.getGuidAssignments().values().toArray(new String[]{
   })[0]; } } //创建与db的关系 Map<String, Object> relationShipAttr = new HashMap<>(); Map<String, String> dbMap = new HashMap<>(); dbMap.put("guid", myDbGuid); dbMap.put("typeName", "my_db"); relationShipAttr.put("db", dbMap); //创建实体 test_table_source AtlasEntity testTableSource = new AtlasEntity(); testTableSource.setTypeName("my_table"); attributes.put("qualifiedName", "test_table_source"); attributes.put("name", "test_table_source"); attributes.put("description", "测试创建test_table_source"); testTableSource.setAttributes(attributes); testTableSource.setRelationshipAttributes(relationShipAttr); queryAttributes.put("qualifiedName", "test_table_source"); try {
    //atlasClientV2.updateEntity(new AtlasEntity.AtlasEntityWithExtInfo(testTableSource)); AtlasEntity.AtlasEntityWithExtInfo extInfo = atlasClientV2.getEntityByAttribute("my_table", queryAttributes); testTableSource = extInfo.getEntity(); } catch (AtlasServiceException e) {
    if (ClientResponse.Status.NOT_FOUND.equals(e.getStatus())) {
    AtlasEntity.AtlasEntityWithExtInfo extInfo = new AtlasEntity.AtlasEntityWithExtInfo(testTableSource); //请求 EntityMutationResponse response = atlasClientV2.createEntity(extInfo); testTableSource.setGuid(response.getGuidAssignments().values().toArray(new String[]{
   })[0]); } } //创建实体 test_table_target AtlasEntity testTableTarget = new AtlasEntity(); testTableTarget.setTypeName("my_table"); attributes.put("qualifiedName", "test_table_target"); attributes.put("name", "test_table_target"); attributes.put("description", "测试创建test_table_target"); testTableTarget.setAttributes(attributes); testTableTarget.setRelationshipAttributes(relationShipAttr); queryAttributes.put("qualifiedName", "test_table_target"); try {
    //atlasClientV2.updateEntity(new AtlasEntity.AtlasEntityWithExtInfo(testTableTarget)); AtlasEntity.AtlasEntityWithExtInfo extInfo = atlasClientV2.getEntityByAttribute("my_table", queryAttributes); testTableTarget = extInfo.getEntity(); } catch (AtlasServiceException e) {
    if (ClientResponse.Status.NOT_FOUND.equals(e.getStatus())) {
    AtlasEntity.AtlasEntityWithExtInfo extInfo = new AtlasEntity.AtlasEntityWithExtInfo(testTableTarget); //请求 EntityMutationResponse response = atlasClientV2.createEntity(extInfo); testTableTarget.setGuid(response.getGuidAssignments().values().toArray(new String[]{
   })[0]); } }
执行代码完毕后,查看类的树形图,发现已经产生了实体:
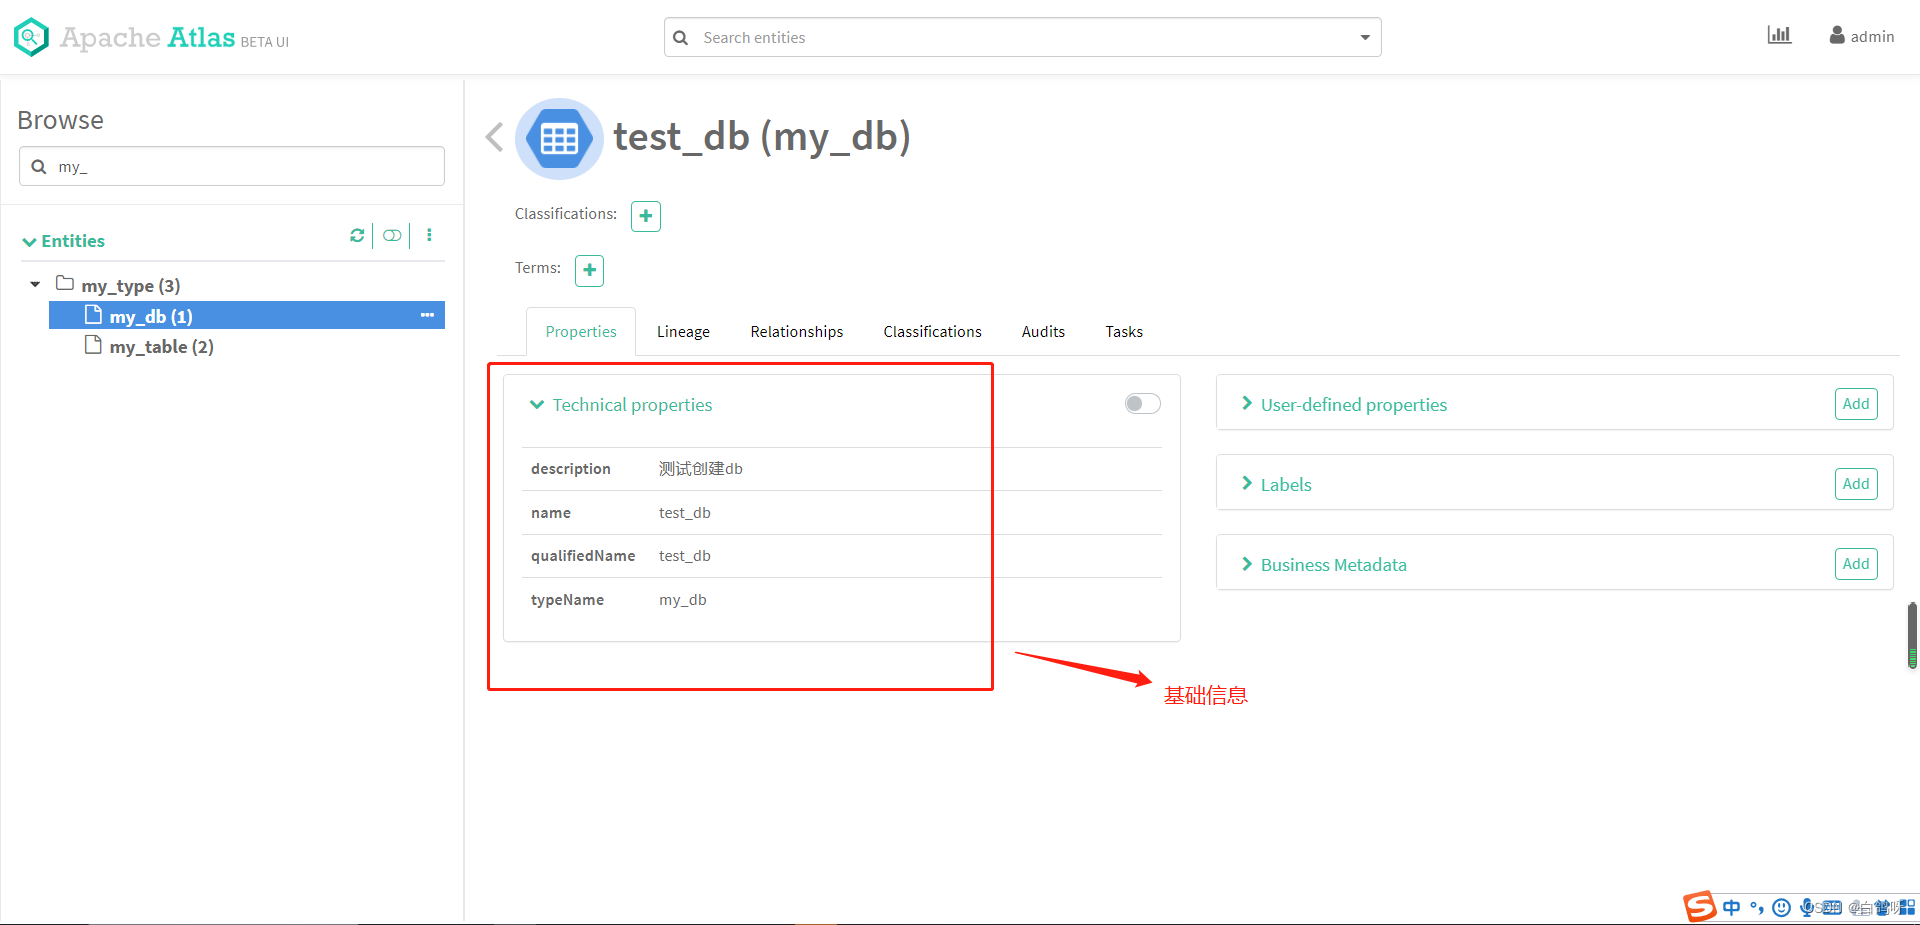
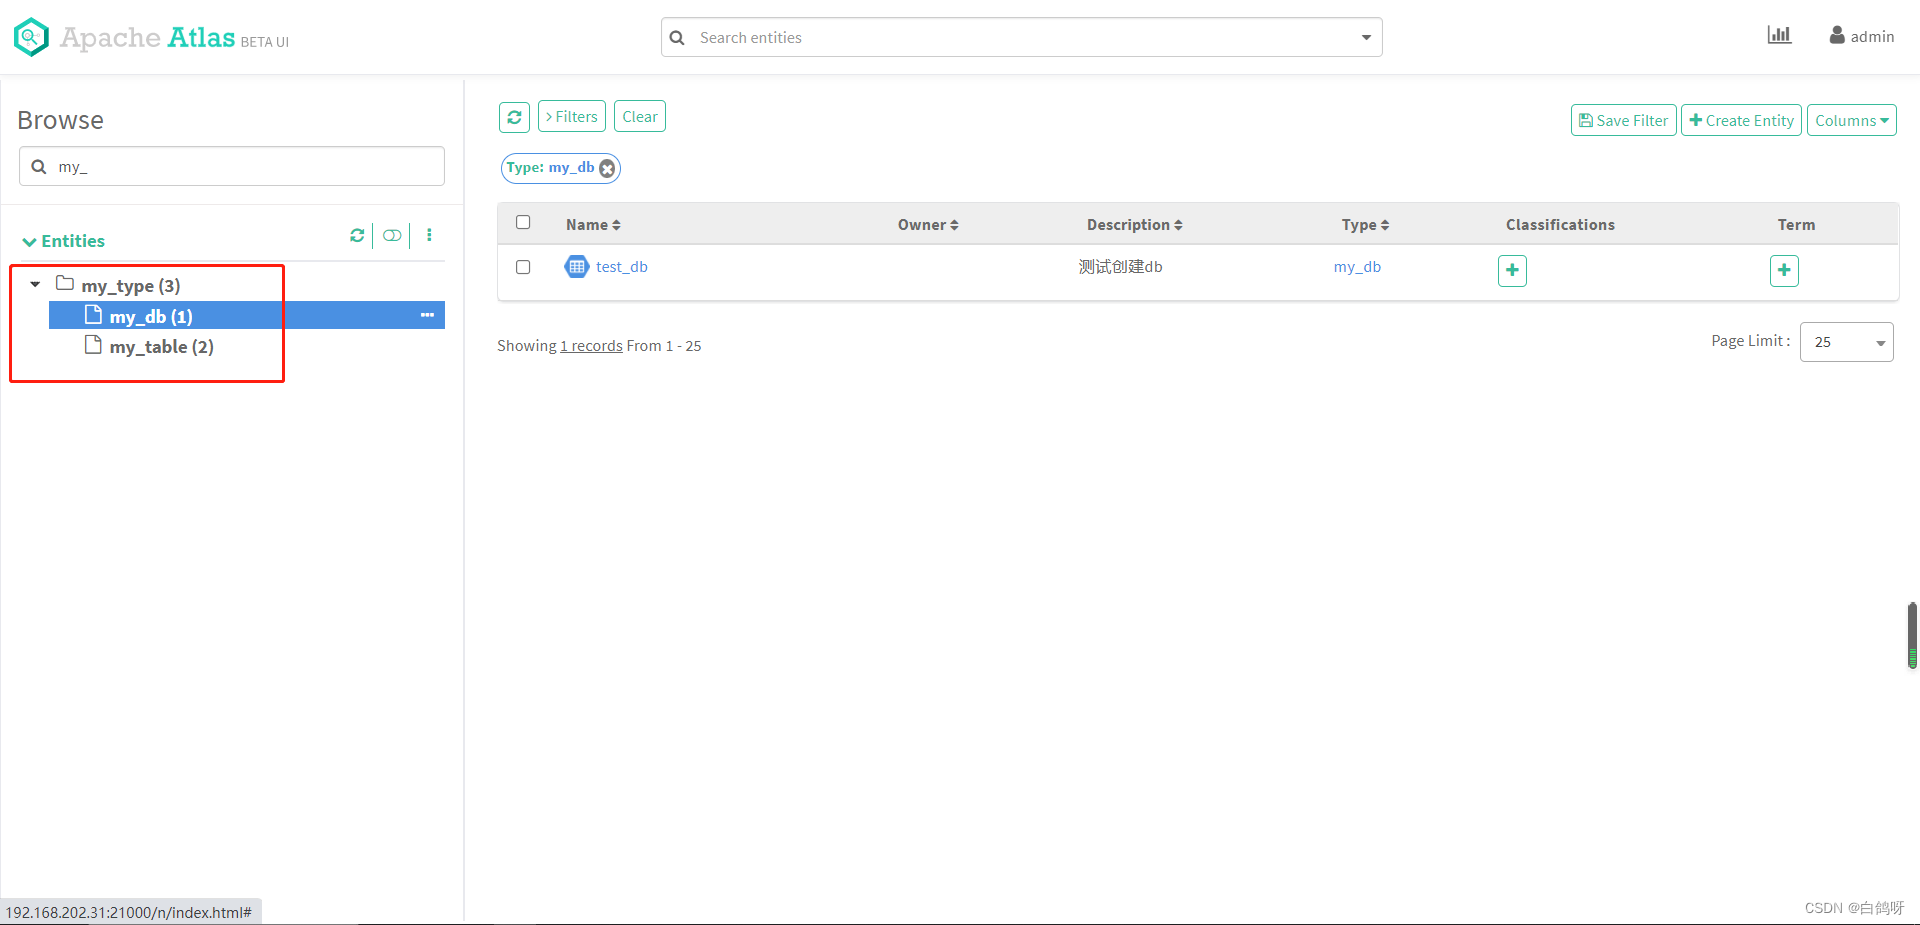 我们点击右侧的 test_db 实体,可以看到它的基本信息,也可以看到它的 relationship 信息,包含了 test_table_source 和 test_table_target 两个实体:
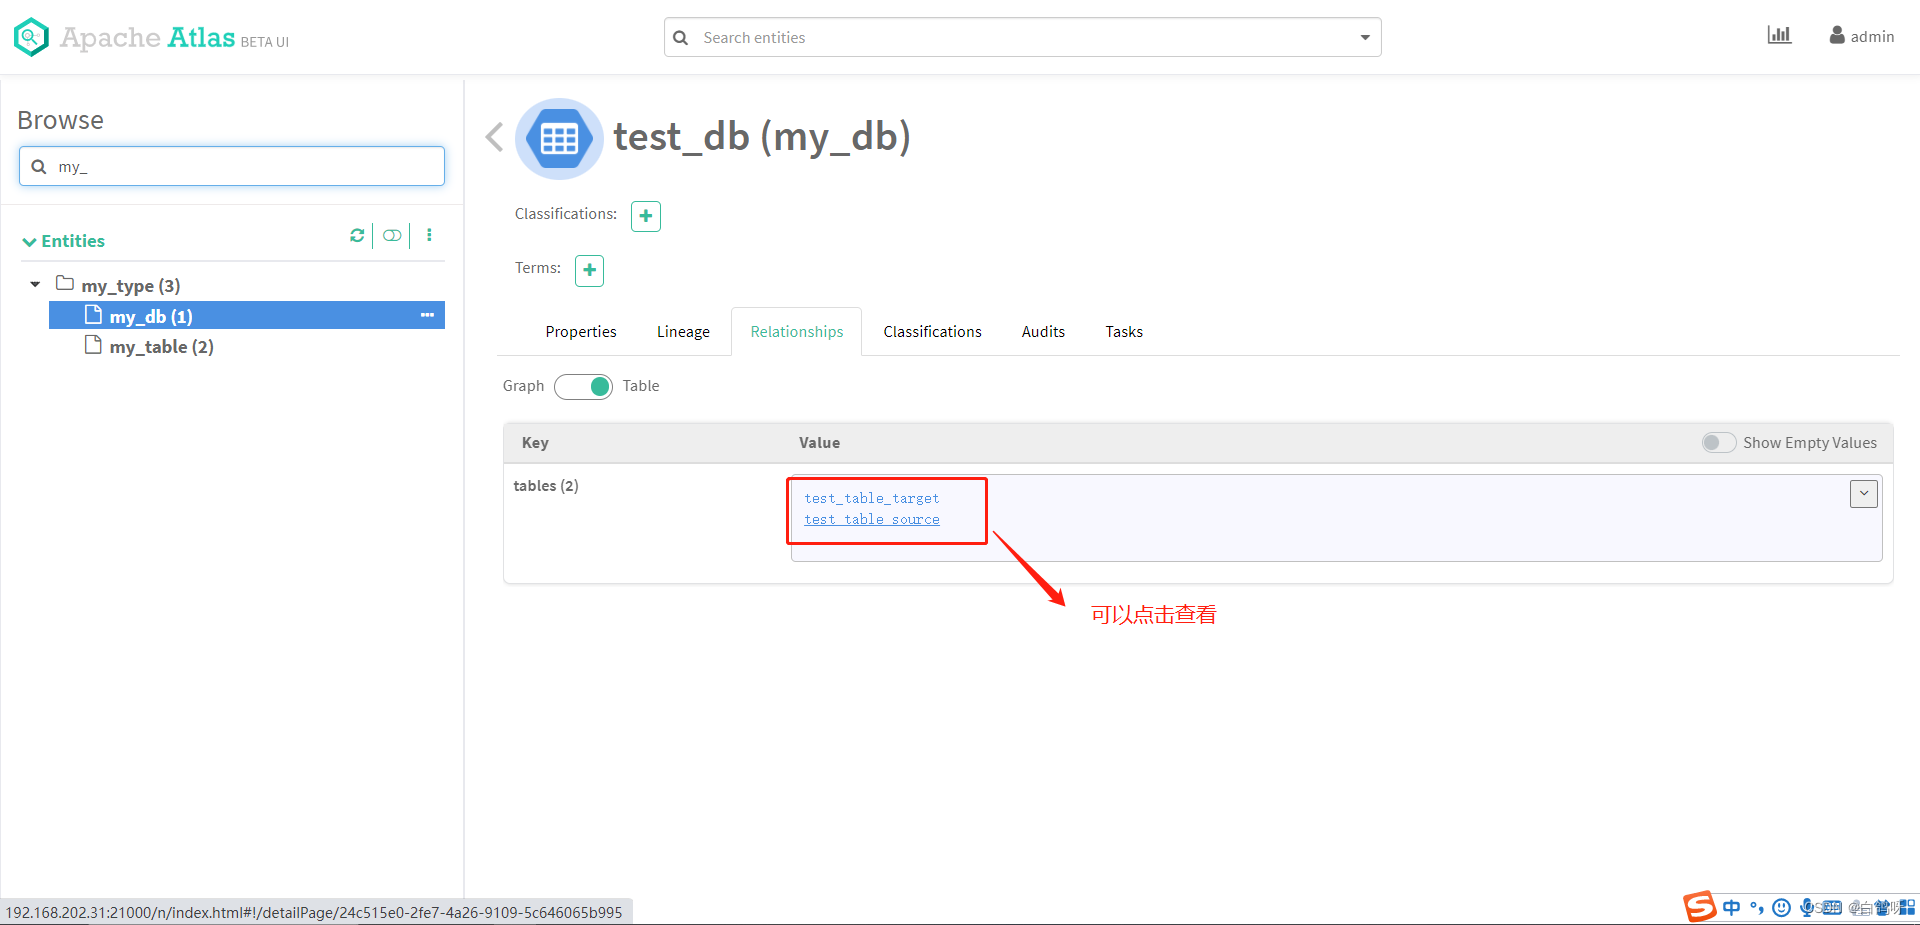
 查看 relationship 信息,包含 test_table_source 和 test_table_target:
 创建 test_table_source 和 test_table_target 的血缘关系依赖
前面我们提到,定义 test_table_target 的数据来自 test_table_source,血缘关系依赖在 Atlas 中其实也是作为实体 Entity 存在,只不过继承的父类是 Process,这样可以定义 inputs 和 outputs 属性,构建血缘关系,json 如下:
讯享网{
    "typeName": "Process", "attributes": {
    "name": "test_process", "qualifiedName": "test_process", "description": "test_table_target 的数据来自 test_table_source", "inputs": [{
    "typeName": "my_table", //test_table_source的guid,创建实体从返回的信息中获取 "guid": "xxx" }], "outputs": [{
    "typeName": "my_table", test_table_target的guid,创建实体从返回的信息中获取 "guid": "xxx" }] } }
代码实现如下:
 AtlasEntity lineage = new AtlasEntity(); //设置为process类型构建血缘 lineage.setTypeName(AtlasBaseTypeDef.ATLAS_TYPE_PROCESS); attributes.put("qualifiedName", "test_process"); attributes.put("name", "test_process"); attributes.put("description", "test_table_target 的数据来自 test_table_source"); attributes.put("inputs", getLineAgeInfo(testTableSource)); attributes.put("outputs", getLineAgeInfo(testTableTarget)); lineage.setAttributes(attributes); queryAttributes.put("qualifiedName", "test_process"); System.out.println(SingletonObject.OBJECT_MAPPER.writeValueAsString(lineage)); try {
    //查询是否存在 atlasClientV2.getEntityByAttribute(AtlasBaseTypeDef.ATLAS_TYPE_PROCESS, queryAttributes); } catch (AtlasServiceException e) {
    if (ClientResponse.Status.NOT_FOUND.equals(e.getStatus())) {
    //创建 AtlasEntity.AtlasEntityWithExtInfo extInfo = new AtlasEntity.AtlasEntityWithExtInfo(lineage); atlasClientV2.createEntity(extInfo); } } //构建inputs和outputs private static List<Map<String, String>> getLineAgeInfo(AtlasEntity entity) {
    List<Map<String, String>> list = new ArrayList<>(); Map<String, String> map = new HashMap<>(); map.put("guid", entity.getGuid()); map.put("typeName", entity.getTypeName()); list.add(map); return list; }
执行以上代码,然后打开主页,点击 my_table 中的 test_table_source,查看 lineage 标签,血缘关系已成功构建:
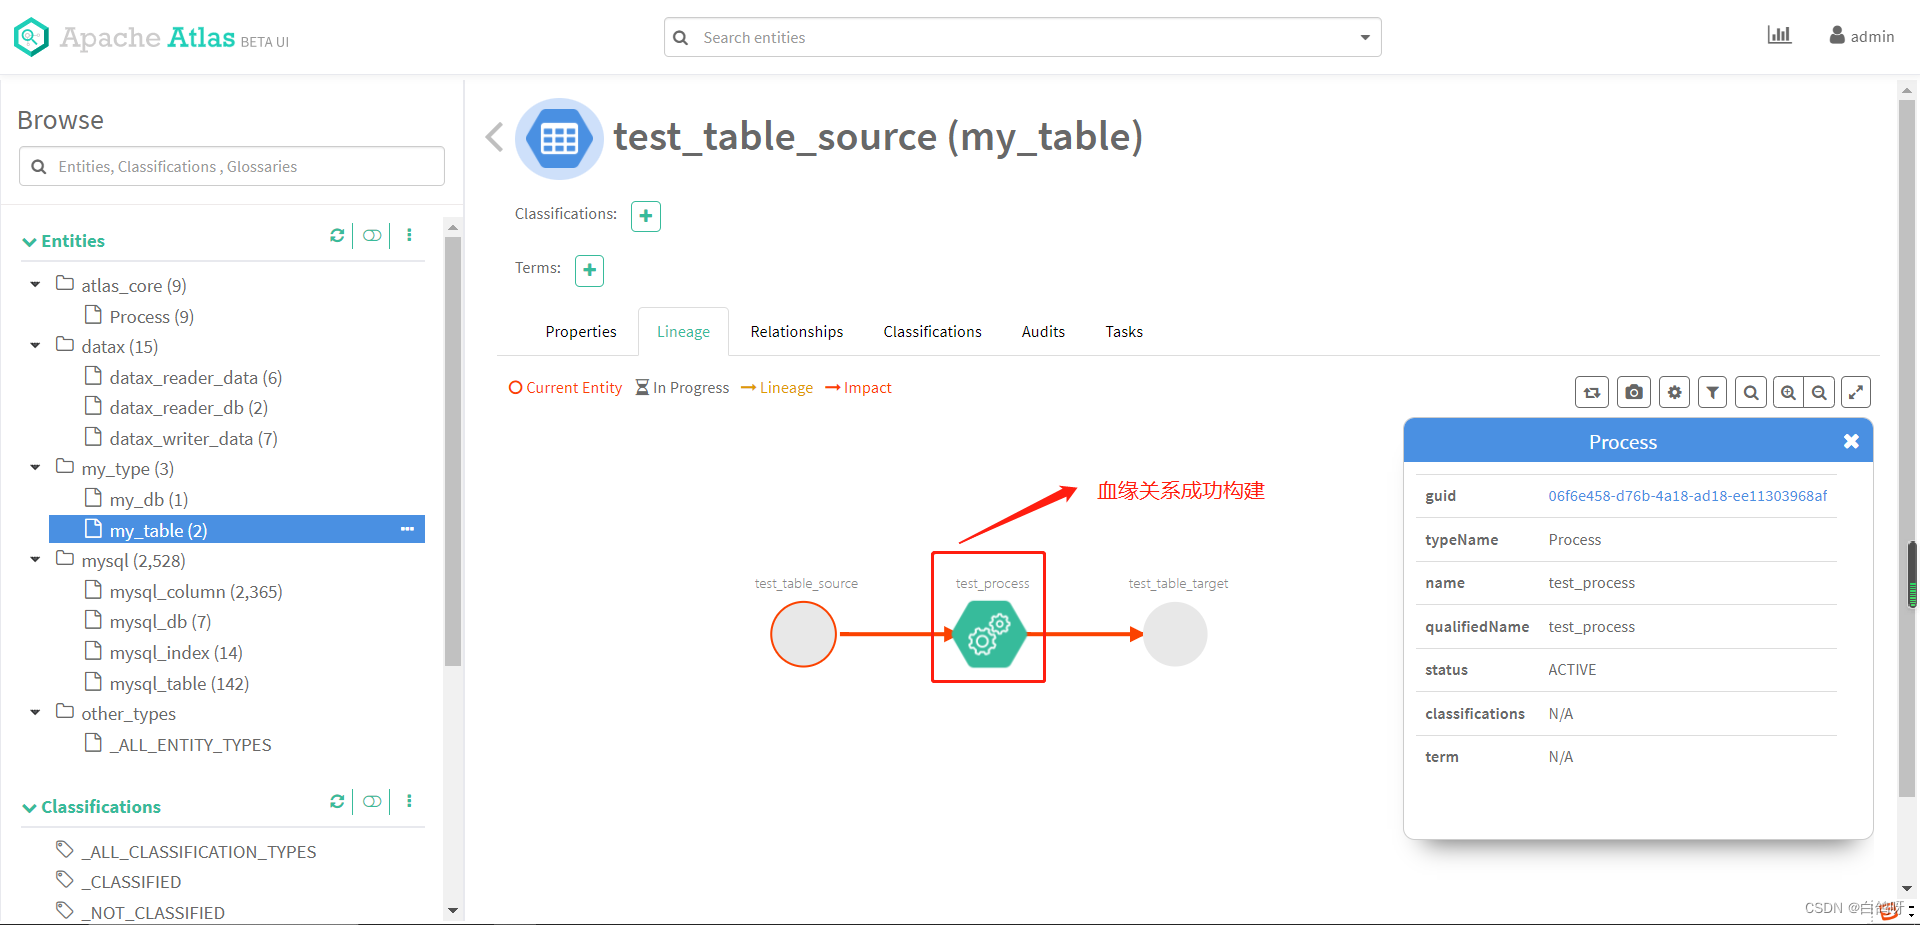 至此,我们通过 Atlas Rest Api 的方式自行建模,创建实体,构建血缘关系就完成了。
元数据管理,数据治理,在当下仍然是一个热门的话题,同时,它也可以帮助我们更好的支撑企业的数据资产,更好的分析数据,为企业的发展决策提供有效的帮助。
引用链接:
1、https://blog.csdn.net/hshudoudou/article/details/
2、https://blog.csdn.net/javaThanksgiving/article/details/
3、原文 https://blog.csdn.net/m0_/article/details/
版权声明:本文内容由互联网用户自发贡献,该文观点仅代表作者本人。本站仅提供信息存储空间服务,不拥有所有权,不承担相关法律责任。如发现本站有涉嫌侵权/违法违规的内容,请联系我们,一经查实,本站将立刻删除。
如需转载请保留出处:https://51itzy.com/kjqy/22203.html