
/ 今日科技快讯 /
当地时间10月29日美股盘后,谷歌母公司Alphabet发布了截至9月30日的2024年第三季度财报。财报显示,Alphabet第三季度实现营收882.68亿美元,同比增长15%,高于分析师预期的864.4亿美元;非美国通用会计准则下(Non-GAAP)净利润为263.01亿美元,同比增长34%;摊薄后每股收益为2.12美元,同比增长37%,高于市场预期的1.83美元。
/ 作者简介 /
本篇文章转自沉默王贰的博客,文章主要分享了 Android BLE 开发的相关内容,相信会对大家有所帮助!
https://juejin.cn/post/
/ 简介 /
JetPack 出了 Bluetooth 的新库, 包含了对经典蓝牙和低功耗蓝牙的支持。

目前最新的版本为 1.0.0-alpha02。
这个库主要是使用了 Kotlin 和协程,封装了对蓝牙的操作,简化开发者对蓝牙的使用。
/ 集成 /
dependencies {
    implementation “androidx.bluetooth:bluetooth:1.0.0-alpha02”
}
讯享网
申请需要的权限:
讯享网    <!–建立蓝牙连接和传输权限–>
    <uses-permission android:name=“android.permission.BLUETOOTH”/>
    <!–扫描蓝牙设备或修改蓝牙设置权限–>
    <uses-permission android:name=“android.permission.BLUETOOTH_ADMIN”/>
    <!–Android 6.0及后续版本扫描蓝牙,需要定位权限(进入GPS设置,可以看到蓝牙定位)–>
    <uses-permission android:name=“android.permission.ACCESS_COARSE_LOCATION”/>
    <uses-permission android:name=“android.permission.ACCESS_FINE_LOCATION”/>
    <uses-permission android:name=“android.permission.BLUETOOTH_CONNECT”/>
可以看出大部分由 Kotlin 进行了重写。
/ 扫描 /
首先开始扫描操作:
// 初始化 BluetoothLe
val bluetoothLe = BluetoothLe(context)
// 根据serviceUuid和deviceName 过滤条件进行扫描
val scanFlow = bluetoothLe.scan(listOf(ScanFilter(
serviceDataUuid = UUID.fromString(“XXX”),
deviceName = “XXX”
)))
// 扫描到的结果
scanFlow.collect {
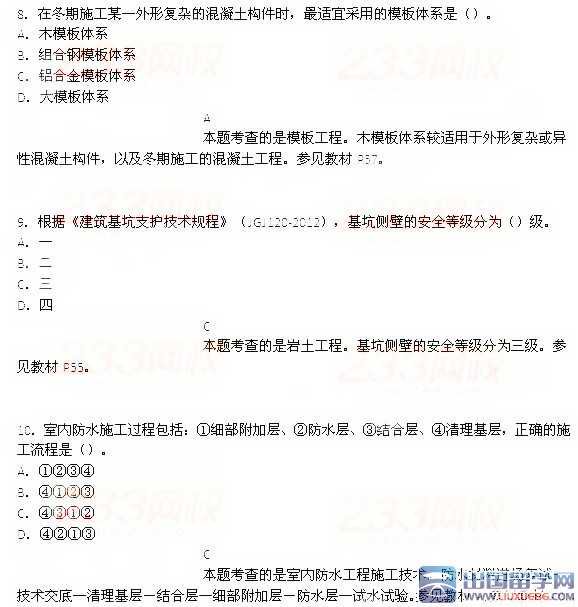
Log.d(“MainActivity”, “scan result: \(it</span> <span style="color: #e06c75;line-height: 26px;">\){it.device.name} \({it.rssi}</span>"</span>)<br /> }<br /></code></pre></section><p style="margin: 0px 8px;line-height: 1.75em;"><span style="color: rgb(37, 41, 51);font-family: -apple-system, system-ui, "Segoe UI", Roboto, Ubuntu, Cantarell, "Noto Sans", sans-serif, BlinkMacSystemFont, "Helvetica Neue", "PingFang SC", "Hiragino Sans GB", "Microsoft YaHei", Arial;text-align: start;background-color: rgb(255, 255, 255);font-size: 15px;letter-spacing: 1px;"></span></p><p style="margin: 0px 8px;line-height: 1.75em;"><span style="font-size: 15px;letter-spacing: 1px;">可以看出通过调用 bluetoothLe.scan 返回了一个Kotlin协程的 Flow<ScanResult> 对象。</span></p><p style="margin: 0px 8px;line-height: 1.75em;"><span style="font-size: 15px;letter-spacing: 1px;"><br /></span></p><p style="margin: 0px 8px;line-height: 1.75em;"><span style="font-size: 15px;letter-spacing: 1px;">和之前的 BLE API 一样,支持对设备扫描的条件进行配置,可以配置 serviceId,deviceName,MAC 地址等信息。</span></p><p style="margin: 0px 8px;line-height: 1.75em;"><span style="font-size: 15px;letter-spacing: 1px;"><br /></span></p><p style="margin: 0px 8px;line-height: 1.75em;text-align: center;"><img src="https://mmbiz.qpic.cn/mmbiz_jpg/v1LbPPWiaSt6HtPDFSEl74soytboDqocxgcUYoAgp2LVLJ7j31cpnU3HnEqyrn7RWAGN8Z6MzibpeeZOV1BQGPUA/640?wx_fmt=other&from=appmsg" class="rich_pages wxw-img" data-backh="521" data-backw="578" data-imgfileid="" data-ratio="0.86259" data-src="https://mmbiz.qpic.cn/mmbiz_jpg/v1LbPPWiaSt6HtPDFSEl74soytboDqocxgcUYoAgp2LVLJ7j31cpnU3HnEqyrn7RWAGN8Z6MzibpeeZOV1BQGPUA/640?wx_fmt=other&from=appmsg" data-type="other" data-w="1048" style="width: 100%;height: auto;"></p><p style="margin: 0px 8px;line-height: 1.75em;"><span style="font-size: 15px;letter-spacing: 1px;"><br /></span></p><p style="margin: 0px 8px;line-height: 1.75em;"><span style="font-size: 15px;letter-spacing: 1px;">然后通过扫描的 ScanResult 结果可以拿到设备信息,如支持的服务 serviceUuids,信号强度 rssi 等信息。</span></p><p style="margin: 0px 8px;line-height: 1.75em;"><span style="font-size: 15px;letter-spacing: 1px;"><br /></span></p><p style="margin: 0px 8px;line-height: 1.75em;text-align: center;"><img src="https://mmbiz.qpic.cn/mmbiz_jpg/v1LbPPWiaSt6HtPDFSEl74soytboDqocxZXoyjcdwicw6MXR0sJe1YJxHLYpibqnwEEepnomHumEYojSMOsqfEyaQ/640?wx_fmt=other&from=appmsg" class="rich_pages wxw-img" data-backh="538" data-backw="578" data-imgfileid="" data-ratio="0.36641" data-src="https://mmbiz.qpic.cn/mmbiz_jpg/v1LbPPWiaSt6HtPDFSEl74soytboDqocxZXoyjcdwicw6MXR0sJe1YJxHLYpibqnwEEepnomHumEYojSMOsqfEyaQ/640?wx_fmt=other&from=appmsg" data-type="other" data-w="1048" style="width: 100%;height: auto;"></p><p style="margin: 0px 8px;line-height: 1.75em;"><span style="font-size: 15px;letter-spacing: 1px;"><br /></span></p><p style="margin: 0px 8px;line-height: 1.75em;"><span style="font-size: 15px;letter-spacing: 1px;">扫描到结果后,不需要我们手动去关闭扫描。会自动关闭扫描。</span></p><p style="margin: 0px 8px;line-height: 1.75em;"><span style="font-size: 15px;letter-spacing: 1px;"><br /></span></p><p style="margin: 0px 8px;line-height: 1.75em;text-align: center;"><img src="https://mmbiz.qpic.cn/mmbiz_jpg/v1LbPPWiaSt6HtPDFSEl74soytboDqocxnJPVibMrFfWpibviaumjjCuYBjYL3eMcJdwubH4xt06wDACOsOOQ7kWxg/640?wx_fmt=other&from=appmsg" class="rich_pages wxw-img" data-backh="290" data-backw="578" data-imgfileid="" data-ratio="0.18519" data-src="https://mmbiz.qpic.cn/mmbiz_jpg/v1LbPPWiaSt6HtPDFSEl74soytboDqocxnJPVibMrFfWpibviaumjjCuYBjYL3eMcJdwubH4xt06wDACOsOOQ7kWxg/640?wx_fmt=other&from=appmsg" data-type="other" data-w="1080" style="width: 100%;height: auto;"></p><p style="margin: 0px 8px;line-height: 1.75em;"><span style="font-size: 15px;letter-spacing: 1px;"><br /></span></p><p style="margin: 0px 8px;line-height: 1.75em;"><span style="font-size: 15px;letter-spacing: 1px;">可以看出新出的这个蓝牙库,比之前的扫描操作代码少了很多,也简洁了很多。</span></p><p style="margin: 0px 8px;line-height: 1.75em;"><br /></p><p style="margin: 0px 8px;text-align: center;line-height: 1.75em;"><span style="color: rgb(140, 178, 90);font-family: -apple-system-font, system-ui, "Helvetica Neue", "PingFang SC", "Hiragino Sans GB", "Microsoft YaHei UI", "Microsoft YaHei", Arial, sans-serif;background-color: rgb(255, 255, 255);letter-spacing: 1px;">/ 连接 /</span></p><p style="margin: 0px 8px;line-height: 1.75em;"><br /></p><p style="margin: 0px 8px;line-height: 1.75em;"><span style="color: rgb(37, 41, 51);font-family: -apple-system, system-ui, "Segoe UI", Roboto, Ubuntu, Cantarell, "Noto Sans", sans-serif, BlinkMacSystemFont, "Helvetica Neue", "PingFang SC", "Hiragino Sans GB", "Microsoft YaHei", Arial;text-align: start;background-color: rgb(255, 255, 255);font-size: 15px;letter-spacing: 1px;">扫描到设备后,对设备进行发起连接操作。</span></p><p style="margin: 0px 8px;line-height: 1.75em;"><span style="color: rgb(37, 41, 51);font-family: -apple-system, system-ui, "Segoe UI", Roboto, Ubuntu, Cantarell, "Noto Sans", sans-serif, BlinkMacSystemFont, "Helvetica Neue", "PingFang SC", "Hiragino Sans GB", "Microsoft YaHei", Arial;text-align: start;background-color: rgb(255, 255, 255);font-size: 15px;letter-spacing: 1px;"><br /></span></p><section data-tool="mdnice编辑器" data-website="https://www.mdnice.com" style="margin-bottom: 0px;padding-left: 10px;padding-right: 10px;background-attachment: scroll;background-clip: border-box;background-image: none;background-origin: padding-box;background-position: 0% 0%;background-repeat: no-repeat;background-size: auto;width: auto;font-family: Optima, PingFangSC-light, serif;font-size: 16px;color: rgb(0, 0, 0);line-height: 1.5em;word-spacing: 0em;letter-spacing: 0em;word-break: break-word;text-align: left;"><pre data-tool="mdnice编辑器" style="border-radius: 5px;box-shadow: rgba(0, 0, 0, 0.55) 0px 2px 10px;margin-top: 10px;margin-bottom: 10px;"><span style="display: block;background: url("https://mmbiz.qpic.cn/mmbiz_svg/dx4Y70y9Xcvwd1jggKYfQEWKk5FpSR7elH96QKAvWXnaBTaqRr30wTQCQbmT42wW3IcMDE6qFgmib4ElyUqVcCSVSiaWRrw2z7/640?wx_fmt=svg&from=appmsg") 10px 10px / 40px no-repeat rgb(40, 44, 52);height: 30px;width: 100%;margin-bottom: -7px;border-radius: 5px;"></span><code style="overflow-x: auto;padding: 16px;color: #abb2bf;padding-top: 15px;background: #282c34;border-radius: 5px;display: -webkit-box;font-family: Consolas, Monaco, Menlo, monospace;font-size: 12px;"> <span style="color: #c678dd;line-height: 26px;">val</span> bluetoothLe = BluetoothLe(context)<br /> <span style="color: #5c6370;font-style: italic;line-height: 26px;">// 连接设备, device是刚才扫描到的设备</span><br /> bluetoothLe.connectGatt(device) {<br /> <span style="color: #5c6370;font-style: italic;line-height: 26px;">// 获取服务</span><br /> getService(UUID.fromString(<span style="color: #98c379;line-height: 26px;">"XXX"</span>))<br /><br /><br /><br /> <span style="color: #5c6370;font-style: italic;line-height: 26px;">// 订阅</span><br /> getService(UUID.fromString(<span style="color: #98c379;line-height: 26px;">"XXX"</span>))?.getCharacteristic(UUID.fromString(<span style="color: #98c379;line-height: 26px;">"XXX"</span>))?.let {<br /> subscribeToCharacteristic(it).collect {<br /> <span style="color: #5c6370;font-style: italic;line-height: 26px;">// 收到数据</span><br /> Log.d(<span style="color: #98c379;line-height: 26px;">"MainActivity"</span>, <span style="color: #98c379;line-height: 26px;">"subscribe result: <span style="color: #d19a66;line-height: 26px;">\)it”)
}
}
// 读取数据
getService(UUID.fromString(“XXX”))?.getCharacteristic(UUID.fromString(“XXX”))?.let {
readCharacteristic(it)
}
// 写入数据
getService(UUID.fromString(“XXX”))?.getCharacteristic(UUID.fromString(“XXX”))?.let {
writeCharacteristic(it, “XXX”.toByteArray())
}
}
调用 BluetoothLe 的 connectGatt 方法,发起连接。在连接的回调中,可以进行获取服务,订阅,读取数据,写入数据等操作。
可以看出相比之前在 BluetoothGattCallback 回调中进行操作,简洁了很多。
/ 增大MTU /
在这个库中,在连接成功时,自动帮我们增大了MTU为,512 + 3。
没有发现提供给开发者增大 MTU 的 API,也没有返回 GATT 对象的接口,需要动态改变合适的 MTU 还是需要使用之前的 API,这个库要支持的话,估计要等官方后续更新完善了。
/ 源码探索 /
BluetoothLe 是操作的核心类,主要提供了扫描和连接的 API 接口。
可以看到 scan 方法调用了 ScanImpl 的scan 方法,connectGatt 方法调用了GattClient 的 connect 方法。
底层还是使用 BluetoothLeScanner 进行扫描操作,将过滤条件放进 BluetoothLeScanner中,扫描到设备后发送数据,collect处理之后关闭扫描。
本质上还是调用了之前的 API,BluetoothDevice 的 connectGatt,并结合携程和 flow 包装返回一个 GattClientScope 的作用域,在这个作用域中可以进行 writeCharacteristic、readCharacteristic 等操作。
本质是并没有引入新的底层 BLE API 操作,还是使用了之前的那一套 BLE API 操作,在此基础上,使用了 Kotlin,协程,Flow 等对其进行了封装,是开发者用起来更加简洁,关注于业务。
欢迎关注我的公众号
学习技术或投稿

长按上图,识别图中二维码即可关注
版权声明:本文内容由互联网用户自发贡献,该文观点仅代表作者本人。本站仅提供信息存储空间服务,不拥有所有权,不承担相关法律责任。如发现本站有涉嫌侵权/违法违规的内容,请联系我们,一经查实,本站将立刻删除。
如需转载请保留出处:https://51itzy.com/kjqy/205357.html