

yum -y install rsyncd
uid = rsync
gid = rsync
port = 873
fake super = yes
use chroot = no
max connections = 200
timeout = 300
pid file = /var/run/rsyncd.pid
lock file = /var/run/rsync.lock
log file = /var/log/rsyncd.log
ignore errors
read only = false
list = false
hosts allow = 172.16.1.0/24
hosts deny = 0.0.0.0/32
auth users = rsync_backup
secrets file = /etc/rsync.password
[backup]
comment = "backup dir by oldboy"
path = /backup
[root@backup ~] # useradd -s /sbin/nologin -M rsync
echo "rsync_backup:oldboy123" > /etc/rsync.password && chmod 600 /etc/rsync.password
mkdir -p /backup && chown -R rsync. /backup
systemctl restart rsyncd && systemctl enable rsyncd
yum -y install nfs-utils
[root@nfs01 ~] # vim /etc/exports
/data 172.16.1.0/24(rw,sync)
mkdir -p /data &&chown -R nfsnobody. /data
[root@nfs01 ~] # systemctl restart rpcbind.socket && systemctl enable rpcbind.socket
[root@nfs01 ~] # systemctl restart nfs && systemctl enable nfs
yum -y install rsync
echo " oldboy123" > /etc/rsync.password && chmod 600 /etc/rsync.password
yum -y install inotify-tools
[root@nfs01 ~] # cd /usr/local/
[root@nfs01 local] # unzip sersync_installdir_64bit.zip
[root@nfs01 local] # mv sersync_installdir_64bit/* https://www.cnblogs.com/liangyuxing/p/
[root@nfs01 ~] # cd /usr/local/
[root@nfs01 local] # cd sersync/conf
[root@nfs01 conf] # vim confxml.xml
………………………………………………
<sersync>
<localpath watch="/data">
<remote ip="172.16.1.41" name="/backup"/>
<!--<remote ip="192.168.8.39" name="tongbu"/>-->
<!--<remote ip="192.168.8.40" name="tongbu"/>-->
</localpath>
<rsync>
<commonParams params="-az"/>
<auth start="true" users="rsync_backup" passwordfile="/etc/rsync.password"/>
[root@nfs01 bin] # chmod +x sersync && sersync -dro /usr/local/sersync/conf/confxml.xml
export PATH=/usr/local/sbin:/usr/local/bin:/usr/sbin:/usr/bin:/root/bin:/usr/local/sersync/bin/:/usr/local/sersync/bin/
5.2.5.1 ERROR: The remote path must start with a module name not a /
<sersync>
<localpath watch=“/data”>
<remote ip=“172.16.1.41” name=“backup”/> 这里是模块不是备份目录
5.2.5.2 测试成功
添加
cd /data && rsync -az -R “https://www.cnblogs.com/liangyuxing/p/11.txt” rsync_backup@172.16.1.41::backup –password-file=/etc/rsync.password
删除
cd /data && rsync -az -R –delete https://www.cnblogs.com/liangyuxing/p/ –include=“11.txt” –exclude=* rsync_backup@172.16.1.41::backup –password-file=/etc/rsync.password
服务器172.16.1.41
备份目录:/backup
服务器 172.16.1.31
本地存储目录:/backup/172.16.1.31
/etc/password
/etc/shadow
/etc/rc.d/rc.local
/usr/local
/var/log/messages
#!/bin/bash
DIR_INFO="/backup"
IP_INFO=$(hostname -i)
mkdir -p $DIR_INFO/$IP_INFO
#开始压缩备份目录
tar -zcPhf $DIR_INFO/$IP_INFO/backup_nfs01_$(date +%F_'week'%w)_data.tar.gz /etc/passwd /etc/shadow /etc/rc.d/rc.local /usr/local /var/log/messages
#开始创建指纹文件
find $DIR_INFO -name "*.tar.gz" -type f -mmin -20 | xargs md5sum > $DIR_INFO/$IP_INFO/finger.txt
#开始发送数据
rsync -azL $DIR_INFO/$IP_INFO/ rsync_backup@172.16.1.41::backup/$IP_INFO --password-file=/etc/rsync.password
#查找出大于7天的数据包删除
find $DIR_INFO -type f -name "*.tar.gz" -mtime +7 -delete
6.3.2.1 编写脚本
[root@backup scripts] # vim backup_server.sh
#!/bin/bash
DIR_INFO=“/backup”
.纹验证
find $DIR_INFO -name “finger.txt” -type f | xargs md5sum -c > /tmp/finger.txt
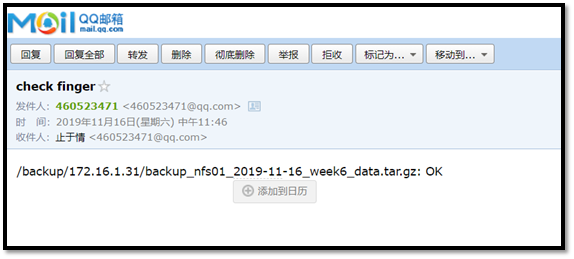
#给管理发送
mail -s “check finger” @.com < /tmp/finger.txt
6.3.2.2 编写邮件信息
set from=@.com
set smtp=smtp..com
set smtp-auth-user=@.com
set smtp-auth-password=enoncgdkvjhlbjbd
set smtp-auth=login
(http://nginx.org/en/linux_packages.html)
vim /etc/yum.repos.d/nginx.repo
[nginx-stable]
name=nginx stable repo
baseurl=http://nginx.org/packages/centos/$releasever/$basearch/
gpgcheck=1
enabled=1
gpgkey=https://nginx.org/keys/nginx_signing.key
module_hotfixes=true
yum -y install nginx
useradd -M -s /sbin/nologin www
user www; 修改www
worker_processes 1;
error_log /var/log/nginx/error.log warn;
pid /var/run/nginx.pid;
events {
worker_connections 1024;
}
http {
include /etc/nginx/mime.types;
default_type application/octet-stream;
log_format main '$remote_addr - $remote_user [$time_local] "$request" '
'$status $body_bytes_sent "$http_referer" '
'"$http_user_agent" "$http_x_forwarded_for"';
access_log /var/log/nginx/access.log main;
sendfile on;
#tcp_nopush on;
keepalive_timeout 65;
#gzip on;
include /etc/nginx/conf.d/*.conf;
}
systemctl restart nginx && systemctl enable nginx
yum remove php-mysql php php-fpm php-common
rpm -Uvh https://dl.fedoraproject.org/pub/epel/epel-release-latest-7.noarch.rpm
rpm -Uvh https://mirror.webtatic.com/yum/el7/webtatic-release.rpm
yum install -y php71w php71w-cli php71w-common php71w-devel php71w-embedded php71w-gd php71w-mcrypt php71w-mbstring php71w-pdo php71w-xml php71w-fpm php71w-mysqlnd php71w-opcache php71w-pecl-memcached php71w-pecl-redis php71w-pecl-mongodb
[root@web01 yum.repos.d] # vim /etc/php-fpm.d/www.conf
; Start a new pool named 'www'.
[www]
; Unix user/group of processes
; Note: The user is mandatory. If the group is not set, the default user's group
; will be used.
; RPM: apache Choosed to be able to access some dir as httpd
user = www 修改属主
; RPM: Keep a group allowed to write in log dir.
group = www 修改属组
vim /etc/php.ini
779 upload_max_filesize = 10M 指定最大上传文件大小限制
656 post_max_size = 10M 请求主体最大尺寸
802 max_execution_time = 300 执行上传数据操作最大执行时间
[root@web02 yum.repos.d] # systemctl restart php-fpm.service
[root@web02 yum.repos.d] #
yum install mariadb-server mariadb -y
[root@db ~] # systemctl start mariadb.service && systemctl enable mariadb.service
Created symlink from /etc/systemd/system/multi-user.target.wants/mariadb.service to /usr/lib/systemd/system/mariadb.service.
[root@db ~] #
MariaDB [(none)]> create database wordpress_7;
Query OK, 1 row affected (0.01 sec)
MariaDB [(none)]> grant all on dwordpress_7.* to 'wordpress_7'@'172.16.1.%' identified by 'oldboy123';
Query OK, 0 rows affected (0.00 sec)
MariaDB [(none)]> create database discuz_7;
Query OK, 1 row affected (0.01 sec)
MariaDB [(none)]> grant all on discuz_7.* to 'discuz_7'@'172.16.1.%' identified by 'oldboy123';
Query OK, 0 rows affected (0.00 sec)
MariaDB [(none)]> create database wecenter_7;
Query OK, 1 row affected (0.01 sec)
MariaDB [(none)]> grant all on wecenter_7.* to 'wecenter_7'@'172.16.1.%' identified by 'oldboy123';
Query OK, 0 rows affected (0.00 sec)
MariaDB [(none)]> create database wordpress_8;
Query OK, 1 row affected (0.01 sec)
MariaDB [(none)]> grant all on dwordpress_8.* to 'wordpress_8'@'172.16.1.%' identified by 'oldboy123';
Query OK, 0 rows affected (0.00 sec)
MariaDB [(none)]> create database discuz_8;
Query OK, 1 row affected (0.01 sec)
MariaDB [(none)]> grant all on discuz_8.* to 'discuz_8'@'172.16.1.%' identified by 'oldboy123';
Query OK, 0 rows affected (0.00 sec)
MariaDB [(none)]> create database wecenter_8;
Query OK, 1 row affected (0.01 sec)
MariaDB [(none)]> grant all on wecenter_8.* to 'wecenter_8'@'172.16.1.%' identified by 'oldboy123';
Query OK, 0 rows affected (0.00 sec)
[root@web01 conf.d] # vim blog.conf
server {
listen 80;
server_name blog.oldboy.com;
client_max_body_size 10m;
location / {
root /html/blog;
index index.php index.html index.htm;
}
location ~ .php$ {
root /html/blog;
fastcgi_pass 127.0.0.1:9000;
fastcgi_index index.php;
fastcgi_param SCRIPT_FILENAME $document_root$fastcgi_script_name;
include fastcgi_params;
}
}
mkdir -p /html/blog && chown -R www. /html/*

server {
listen 80;
server_name bbs.oldboy.com;
client_max_body_size 10m;
location / {
root /html/bbs;
index index.php index.html index.htm;
}
location ~ .php$ {
root /html/bbs;
fastcgi_pass 127.0.0.1:9000;
fastcgi_index index.php;
fastcgi_param SCRIPT_FILENAME $document_root$fastcgi_script_name;
include fastcgi_params;
}
}
mkdir -p /html/bbs && chown -R www. /html/*

server {
listen 80;
server_name zhihu.oldboy.com;
client_max_body_size 10m;
location / {
root /html/zhihu;
index index.php index.html index.htm;
}
location ~ .php$ {
root /html/zhihu;
fastcgi_pass 127.0.0.1:9000;
fastcgi_index index.php;
fastcgi_param SCRIPT_FILENAME $document_root$fastcgi_script_name;
include fastcgi_params;
}
}
mkdir -p /html/zhihu && chown -R www. /html/*


yum -y install nginx
[root@lb01 conf.d] # pwd
/etc/nginx/conf.d
[root@lb01 conf.d] # cat www.conf
upstream oldboy {
server 10.0.0.7:80;
server 10.0.0.8:80;
}
server {
listen 80;
server_name localhost;
location / {
proxy_pass http://oldboy;
proxy_set_header X-Forwarded-For $remote_addr;
}
}
[root@lb01 conf.d] #
成功
yum -y install keepalived
[root@lb01 ~] # vim /etc/keepalived/keepalived.conf
! Configuration File for keepalived
global_defs {
notification_email {
}
notification_email_from
smtp_server 192.168.200.1
smtp_connect_timeout 30
router_id lb01
}
vrrp_instance oldboy {
state MASTER
interface eth0
virtual_router_id 66
priority 150
advert_int 1
authentication {
auth_type PASS
auth_pass 1234
}
virtual_ipaddress {
10.0.0.3
}
}
[root@lb02 ~] #
[root@lb02 ~] # vim /etc/keepalived/keepalived.conf
! Configuration File for keepalived
global_defs {
notification_email {
}
notification_email_from
smtp_server 192.168.200.1
smtp_connect_timeout 30
router_id lb02
}
vrrp_instance oldboy {
state BACKUP
interface eth0
virtual_router_id 66
priority 100
advert_int 1
authentication {
auth_type PASS
auth_pass 1234
}
virtual_ipaddress {
10.0.0.3
}
}
systemctl restart keepalived.service && systemctl enable keepalived.service
[root@lb01 conf.d] # vim /etc/keepalived/keepalived.conf
! Configuration File for keepalived
global_defs {
notification_email {
router_id lb01
}
}
vrrp_instance oldboy {
state MASTER
interface eth0
virtual_router_id 66
priority 150
advert_int 1
authentication {
auth_type PASS
auth_pass 1234
}
virtual_ipaddress {
10.0.0.3
}
}
vrrp_instance girl {
state BACKUP
interface eth0
virtual_router_id 67
priority 100
advert_int 1
authentication {
auth_type PASS
auth_pass 1234
}
virtual_ipaddress {
10.0.0.4
}
}
[root@lb02 conf.d] # vim /etc/keepalived/keepalived.conf
! Configuration File for keepalived
global_defs {
notification_email {
router_id lb02
}
}
vrrp_instance oldboy {
state BACKUP
interface eth0
virtual_router_id 66
priority 100
advert_int 1
authentication {
auth_type PASS
auth_pass 1234
}
virtual_ipaddress {
10.0.0.3
}
}
vrrp_instance oldgirl {
state MASTER
interface eth0
virtual_router_id 67
priority 150
advert_int 1
authentication {
auth_type PASS
auth_pass 1234
}
virtual_ipaddress {
10.0.0.4
}
}
[root@lb02 conf.d] # vim www.conf
upstream oldboy {
ip_hash;
server 172.16.1.7:80;
server 172.16.1.8:80;
}
server {
listen 80;
server_name localhost;
location / {
proxy_pass http://oldboy;
proxy_set_header Host $host;
proxy_set_header X-Forwarded-For $remote_addr;
}
}
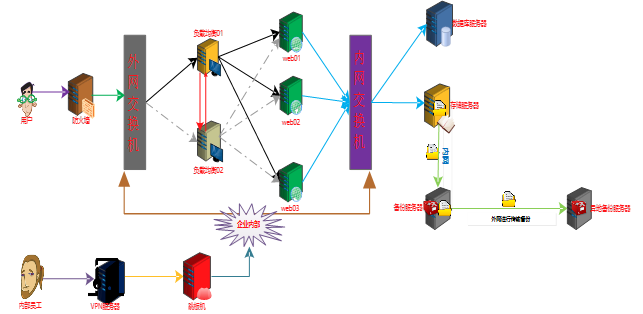
服务器
外网
内网
web01
10.0.0.7
172.16.1.7
- 保证了数据的机密性(使用的数据对称加密算法来进行的)
- 保证了数据的完整性(使用了指纹验证的方法来进行的)
- 数据机密性利用了私钥和公钥加密的对称算法,发送方和接收方都有相同的钥匙和锁,当数据发送过来,接收方只有相同的钥匙才可以打开
- 数据完整性利用的是指纹验证信息同样指纹也会用对称加密将指纹保护起来,以防被人截取


[root@web01 yum.repos.d] # yum -y install nginx

[root@web01 yum.repos.d] # openssl genrsa -idea -out /etc/nginx/server.key 2048
Generating RSA private key, 2048 bit long modulus
..................................................................................+++
....................................................+++
e is 65537 (0x10001)
Enter pass phrase for /etc/nginx/server.key:
Verifying - Enter pass phrase for /etc/nginx/server.key:
[root@web01 yum.repos.d] #
- genrsa 创建私钥文件的类型
- idea 需要设置密码
- out 指定创建私钥的文件
- 2048 创建的私钥文件密码个数
[root@web01 yum.repos.d] # cd /etc/nginx/
[root@web01 nginx] # openssl req -days 36500 -x509 -sha256 -nodes -newkey rsa:2048 -keyout server.key -out server.crt
Generating a 2048 bit RSA private key
.....................+++
You have new mail in /var/spool/mail/root
[root@web01 yum.repos.d] #
- req 创建一个证书
- days 指定证书的有效期(天)
- x509 指定生成的证书格式类型
- sha256 指定生成证书的加密算法
- nodes 去除私钥的密码
- keyout 指定私钥文件
- out 指定生成的公钥文件
13.3.3.1 http的实现
13.3.3.1.1 环境的准备
[root@web01 html] # vim /etc/nginx/conf.d/www.conf
1 server{
2 listen 80;
3 server_name www.oldboy.com;
4 root /html/www/;
5 autoindex on;
6 }
[root@web01 ~] # tree /html/www/
/html/www/
├── 10.txt
├── 1.txt
├── 2.txt
├── 3.txt
├── 4.txt
├── 5.txt
├── 6.txt
├── 7.txt
├── 8.txt
└── 9.txt
0 directories, 10 files
[root@web01 ~] #
13.3.3.1.2 查看是否正常
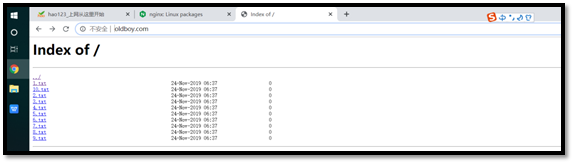
13.3.3.2 https实现
13.3.3.2.1 环境的准备
[root@web01 conf.d] # vim www.conf
server{
listen 80;
server_name www.oldboy.com;
rewrite /(.*)$ https://$host/$1;
}
server{
listen 443 ssl;
server_name www.oldboy.com;
ssl_certificate server.crt;
ssl_certificate_key server.key;
root /html/www/;
autoindex on;
}
13.3.3.2.2 查看是否正常

服务器
外网
内网
m01
10.0.0.61
172.16.1.61
nfs01
10.0.0.31
172.16.1.31
NTP(Network Time Protocol, 网络时间协议)是由RFC 1305定义的时间同步协议,用来在分布式时间服务器和客户端之间进行时间同步,NTP基于UDP保温进行传输,使用UDP端口号为123。
使用NTP的目的是对网络内所有具有时钟的设备进行时钟同步,使网络内所有设备的时钟保持一致,从而使设备能够提供基于统一时间的多种应用。
对于运行NTP的本地系统,既可以接受来自其他时钟源的同步,又可以作为时钟源同步其他的时钟,并且可以喝其他设备互相同步。
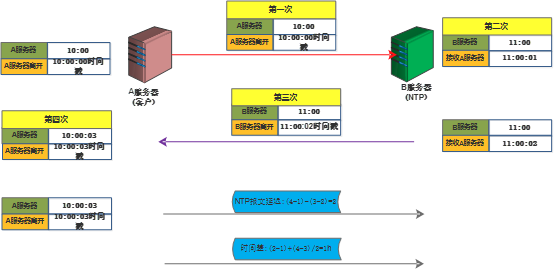
- 首先A服务器将带有时间戳的信息(10:00:00)发送给B服务器,B服务器接收时间是11:00:01
- B服务器将带有时间戳(11:00:02)的信息发送给A服务器,A服务器接收到是10:00:03
- NTP报文的延迟时间是(4-1)-(3-2)=2
- 时间差是(4-3)+(2-1)/2=1小时
[root@m01 ~] # yum -y install ntpdate
Loaded plugins: fastestmirror, langpacks
Loading mirror speeds from cached hostfile
restrict default nomodify notrap nopeer noquery ignore
允许内网其他机器同步时间
restrict 172.16.1.0 mask 255.255.255.0 nomodify notrap noquery

server ntp1.aliyun.com
server time1.aliyun.com
允许上层时间服务器修改本机时间
restrict time1.aliyun.com nomodify notrap noquery
restrict ntp1.aliyun.com nomodify notrap noquery
外部时间服务器不可用的时候,以本地的时间作为同步时间
server 127.127.1.0
server 127.127.1.0 stratum 10

[root@m01 ~] # systemctl restart ntpd
[root@m01 ~] #
[root@m01 ~] # date
Fri Nov 22 08:43:16 CST 2019
[root@m01 ~] # date -s "" 修改时间为
Tue Oct 1 00:00:00 CST 2019
[root@m01 ~] #
[root@nfs01 ~] # ping baidu.com
ping: baidu.com: Name or service not known 域名解析失败
[root@nfs01 ~] # ping 114.114.114.114
connect: Network is unreachable 外网不通畅
[root@nfs01 ~] # date
Fri Nov 22 08:45:11 CST 2019
root@nfs01 ~] # ntpdate 172.16.1.61 内网同步服务端时间
1 Oct 00:02:51 ntpdate[2837]: step time server 172.16.1.61 offset -. sec
[root@nfs01 ~] # date
Tue Oct 1 00:02:56 CST 2019 查看时间
[root@nfs01 ~] #
[root@m01 ~] # date
Tue Oct 1 00:07:48 CST 2019 服务端现在的时间
[root@m01 ~] #
[root@nfs01 ~] # date
Tue Oct 1 00:07:53 CST 2019 客户端现在的时间
[root@nfs01 ~] #
服务器
外网
内网
m01
10.0.0.61
172.16.1.61
- yum是一个rpm包的管理工具,在rpm包已经建立成功的前提下,他能够自动查找相互依赖的rpm包来进行下载
- yum本地仓库的搭建可以减少对外网带宽的消耗
- yum本地仓库可以提高运维的工作效率
- yum本地仓库搭建方便,易用
- yum本地仓库可以解决一些外国网站上面的包下载的问题
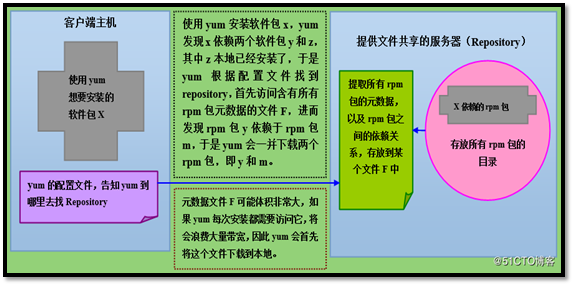
- 客户端想要下载软件X,yum配置文件会告诉yum你去哪里找仓库
- yum找到仓库F,提取所有关于X的rpm包以及他依赖的rpm包
- 由于RPM包比较大,所以每次先下载到本地在安装
链接: https://www.cnblogs.com/flytor/p/11415049.html
[root@m01 ~] # mkdir -p /mnt/cdrom
[root@m01 ~] #
[root@m01 ~] # mount /dev/cdrom /mnt/cdrom
[root@m01 ~] #
[root@m01 ~] # vim /etc/yum.repos.d/liangyuxing.repo
[liangyuxing]
name=liangyuxing
baseurl=file:///mnt/cdrom
gpgcheck=0
[root@m01 yum.repos.d] #
[root@m01 ~] # yum -y install httpd
Loaded plugins: fastestmirror, langpacks
Loading mirror speeds from cached hostfile
* base: mirrors.aliyun.com
* extras: mirrors.aliyun.com
* updates: mirrors.aliyun.com
[root@m01 ~] # systemctl restart httpd && systemctl enable httpd
[root@m01 ~] #

[root@m01 ~] # mkdir -p /var/www/html/centos/7/os/x86_64
[root@m01 ~] #
[root@m01 ~] #
[root@m01 ~] # #mount /dev/sdb1 /var/www/html/centos/7/os/x86_64/
[root@m01 ~] #

-
createrepo -dpo /var/www/html/centos/7/os/x86_64 /var/www/html/centos/7/os/x86_64 初始化过程
-
createrepo --update /var/www/html/centos/7/os/x86_64 每加入一个rpm包就更新下
-
yum clean all 清空yum仓库的缓存
-
yum install --downloadonly --downloaddir=/home/ lrzsz yum只下载不安装
[root@m01 ~] # cat /etc/yum.repos.d/liangyuxing.repo
[liangyuxing]
name=liangyuxing
baseurl=file:///http://10.0.0.61/centos/7/os/x86_64/
gpgcheck=0
[root@m01 ~] # cat /etc/yum.repos.d/liangyuxing01.repo
[liangyuxing]
name=liangyuxing
baseurl=http://10.0.0.61/centos/7/os/x86_64/
gpgcheck=0
- vpn介绍网址链接: https://haokan.baidu.com/v?vid=&pd=bjh&fr=bjhauthor&type=video
- vpn是一个虚拟专用网络(virtual private network),就是在数据传输的时候会专门建立一条专有的虚拟通道将数据进行加密传输,数据安全性高
- vpn叫虚拟通道是因为他还是建立在公网基础上的,不是独立的一个网络
公司员工在外面出差需要
数据安全性高的公司需要
网址链接:https://haokan.baidu.com/v?pd=wisenatural&vid=

- 电脑生成一个vpn虚拟地址,用户在请求的时候,会在本身请求的地址上面加一层包装,包装的信息是电脑的虚拟地址和vpn服务器地址
- 防火墙看见则不会进行阻挡
- 到达vpn服务器进行解封
- vpn服务器在将数据发送到指定的服务器上
- 服务器接收到将数据发送到vpn,vpn在进行封装,包装成vpn服务器地址和虚拟IP地址
- 防火墙看见返回的信息不会进行阻拦
- 到达了电脑在进行解封就看见你要请求的地址信息了
[root@m01 ~] # cat /dev/ppp
cat: /dev/ppp: No such device or address 可以出现这个证明支持vpn
[root@m01 ~] #
[root@m01 ~] # grep forw /etc/sysctl.conf 查看转发是否开启
net.ipv4.ip_forward = 1
[root@m01 ~] #
sed -i 's#net.ipv4.ip_forward = 0#net.ipv4.ip_forward = 1#g' /etc/sysctl.conf
sysctl -p 设置内核转发
16.4.3.1 安装需要的PPTP源
[root@m01 ~] # wget -O /etc/yum.repos.d/epel.repo http://mirrors.aliyun.com/repo/epel-6.repo
16.4.3.2 安装pptp
[root@m01 ~] # yum -y install pptp
localip 10.0.0.61 添加本级公网IP
remoteip 192.168.0.1-10,192.168.0.20 分配给vpn的内网网段

[root@m01 ~] # vim /etc/ppp/chap-secrets
# Secrets for authentication using CHAP
# client server secret IP addresses
oldboy pptpd *
- client 登录vpn用户
- server 登录的vpn类型
- secret 登录vpn的密码
- IP address 允许那些服务器的地址登录vpn

[root@m01 ~] # systemctl restart pptpd
[root@m01 ~] # netstat -anptu | grep pptpd
tcp 0 0 0.0.0.0:1723 0.0.0.0:* LISTEN 4789/pptpd
[root@m01 ~] #

服务器
外网
内网
jumpserver
10.0.0.91
172.16.1.91
- jumpserver是全球首款开源的堡垒机,使用的是GNU,GPL的开源协议.
- jumpserver是用python和go语言进行开发的,使用的是web界面进行使用的,方便,简单
- jumpserver现在支持ssh,telnet,vnc协议资产
- jumpserver可以拦截非法访问和恶意攻击,对不符合法的命令进行阻断
- jumpserver建立了完善的用户权限管理制度,可以更加的精确的指定用户所特有的服务器,最大的程度导致越权造成的问题,提高运维的安全性
- jumpserver可以集中账号的管理,提高管理效率
- 硬件:ssh协议的硬件设备
- 软件:centos,redhat,fedora,linux,Debian,SUSE,Ubuntu,FreeBSD
- 完全开源,GPL授权
- python开发,容易再次开发
- 实现了跳板机的基本功能.认证,授权,审计
- 支持web界面,界面美观
- 录像回放
- 监控管理
- 批量上传下载
[root@jumpserver ~] # systemctl status firewalld 关闭
● firewalld.service - firewalld - dynamic firewall daemon
Loaded: loaded (/usr/lib/systemd/system/firewalld.service; disabled; vendor preset: enabled)
Active: inactive (dead)
Docs: man:firewalld(1)
[root@jumpserver ~] # getenforce
Disabled 关闭
[root@jumpserver ~] #
yum -y install git python-pip mysql-devel mariadb-server gcc automake autoconf python-devel vim sshpass lrzsz readline-devel
[root@jumpserver opt] # cd /opt/
[root@jumpserver opt] # git clone https://git.coding.net/jumpserver/jumpserver.git
Cloning into 'jumpserver'...
Receiving objects: 100% (11559/11559), 13.56 MiB | 218.00 KiB/s, done.
Resolving deltas: 100% (7897/7897), done.
You have new mail in /var/spool/mail/root
[root@jumpserver opt] #
17.5.4.1 更新pip源
[root@jumpserver opt] # mkdir ~/.pip/
You have new mail in /var/spool/mail/root
[root@jumpserver opt] # vim ~/.pip/pip.conf
[global]
index-url = https://mirrors.aliyun.com/pypi/simple/
[install]
trusted-host=mirrors.aliyun.com
17.5.4.2 安装的python的依赖软件
[root@jumpserver opt] # cd /opt/jumpserver/install/
[root@jumpserver install] # pip install -r requirements.txt
17.5.4.3 重启数据库
[root@jumpserver install] # systemctl restart mariadb
[root@jumpserver install] #
[root@jumpserver install] # python /opt/jumpserver/install/install.py
请务必先查看wiki https://github.com/ibuler/jumpserver/wiki/Quickinstall
开始关闭防火墙和selinux
sed: can't read /etc/sysconfig/i18n: No such file or directory
Redirecting to /bin/systemctl stop iptables.service
Failed to stop iptables.service: Unit iptables.service not loaded.
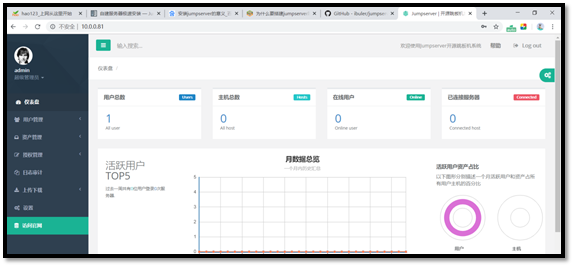
请输入您服务器的IP地址,用户浏览器可以访问 [10.0.0.81]: 10.0.0.81
是否安装新的MySQL服务器? (y/n) [y]: y
请输入SMTP地址: smtp..com
请输入SMTP端口 [25]:
请输入账户: @.com
请输入密码: enoncgdkvjhlbjbd
请登陆邮箱查收邮件, 然后确认是否继续安装
是否继续? (y/n) [y]: y
开始写入配置文件
请输入管理员用户名 [admin]: admin
请输入管理员密码: [5Lov@wife]: admin
请再次输入管理员密码: [5Lov@wife]: admin
Starting jumpsever service:manage.py not running
run_websocket.py not running
[SUCCESS]

安装成功,请访问web, 祝你使用愉快。
请访问 https://github.com/ibuler/jumpserver 查看文档
You have new mail in /var/spool/mail/root
[root@jumpserver install] #
17.5.1.1 出现启动失败的处理情况
[root@jumpserver install] # cd /opt/jumpserver/
You have new mail in /var/spool/mail/root
root@jumpserver jumpserver] # https://www.cnblogs.com/liangyuxing/p/service.sh start
Starting jumpsever service: [ OK ]
[root@jumpserver jumpserver] #
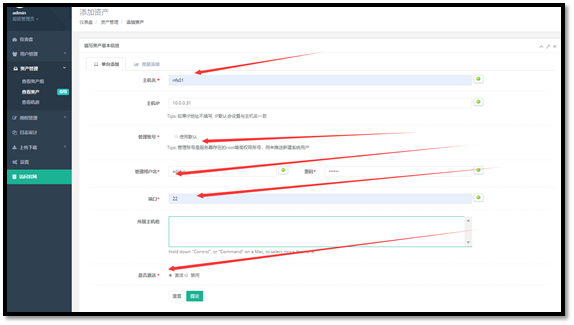


17.6.9.1 登录普通用户oldboy,并且连接成功服务器nfs01

</p> 讯享网
17.6.9.2 查看日志信息

讯享网</p>

17.6.9.3 登录历史

服务器
外网
内网
m01
10.0.0.5
172.16.1.5
web01
10.0.0.7
172.16.1.7
- 降低网络上外网造成的服务器造成的攻击
- 节省外网的带宽
- 实现网络的安全
将网络上的不安全流量进行隔离,iptables是用表,链,规则来进行设置隔离的
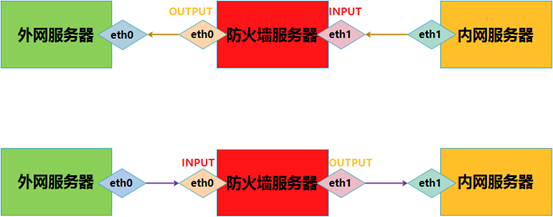
使用-A POSTROUTING来进行内网向外网的转换,内网地址段172.16.1.0/24的进行NAT地址转换,从eth0口出去的时候转换,转换成10.0.0.6
如果不行的我情况下,就查看是不是地址跳转失败造成的
- 查看内网向防火墙发送请求信息到的网口eth1 -i eth1
- 查看防火墙向外网转换的网口 -o eth0
- 查看外网向防火墙转换的网口 -I eth0
- 查看防火墙向内网转换的网口 -o eth1
-t 指定需要那张表来实现
-A 指定使用什么链
-s 指定源IP地址
-o 指定流出流量的网卡
-i 指定出去的网卡流量
--doprt 指定目标端口号
[root@lb01 ~] # yum -y install iptables
[root@web01 ~] # cat /etc/sysconfig/network-scripts/ifcfg-eth1
TYPE=Ethernet
PROXY_METHOD=none
BROWSER_ONLY=no
BOOTPROTO=none
IPADDR=172.16.1.7
PREFIX=24
DEFROUTE=yes
GATEWAY=172.16.1.5
DNS1=223.5.5.5
DNS2=223.6.6.6
[root@lb01 ~] # iptables -A INPUT -s 172.16.1.7 -j ACCEPT
[root@lb01 ~] #
[root@lb01 ~] # cat /etc/sysctl.conf
# sysctl settings are defined through files in
# /usr/lib/sysctl.d/, /run/sysctl.d/, and /etc/sysctl.d/.
net.ipv4.ip_forward=1 开启路由转发的功能
[root@lb01 ~] #
[root@lb01 ~] # sysctl -p /etc/sysctl.conf
net.ipv4.ip_forward = 1 重新加载路由转发配置文件
[root@lb01 ~] #
[root@lb01 ~] # iptables -t nat -A POSTROUTING -s 172.16.1.0/24 -j SNAT -o eth0 --to-source 10.0.0.5
[root@lb01 ~] # iptables -A FORWARD -i eth1 -s 172.16.1.0/24 -j ACCEPT
[root@lb01 ~] # iptables -A FORWARD -o eth0 -s 172.16.1.0/24 -j ACCEPT
[root@lb01 ~] # iptables -A FORWARD -i eth0 -s 172.16.1.0/24 -j ACCEPT
[root@lb01 ~] # iptables -A FORWARD -o eth1 -s 172.16.1.0/24 -j ACCEPT
[root@lb01 ~] #
Zabbix是一个web界面的分布式的监控网络的一个软件,它分为zabbix-server和zabbix-agent
服务器性能的监控,网络设备的监控,数据库性能的监控
[root@zabbix ~] # yum -y install wget net-snmp-devel OpenIPMI-devel httpd openssl-devel java lrzsz fping-devel libcurl-devel perl-DBI pcre-devel libxml2 libxml2-devel mysql-devel gcc php php-bcmath php-gd php-xml php-mbstring php-ldap php-mysql.x86_64 php-pear php-xmlrpc net-tools wget vim-enhanced
[root@zabbix ~] # systemctl status firewalld
firewalld.service - firewalld - dynamic firewall daemon
Loaded: loaded (/usr/lib/systemd/system/firewalld.service; disabled; vendor preset: enabled)
Active: inactive (dead)
Docs: man:firewalld(1)
[root@zabbix ~] # getenforce
Disabled
[root@zabbix ~] #
[root@zabbix ~] # wget -P /etc/yum.repos.d http://mirrors.aliyun.com/repo/Centos-7.repo
[root@zabbix ~] # yum search mysql | tac
[root@zabbix ~] # yum -y install mariadb mariadb-server php php-mysql httpd
[root@zabbix ~] # systemctl restart mariadb.service
[root@zabbix ~] # systemctl enable mariadb.service
Created symlink from /etc/systemd/system/multi-user.target.wants/mariadb.service to /usr/lib/systemd/system/mariadb.service.
[root@zabbix ~] #
[root@zabbix ~] # mysql_secure_installation
Enter current password for root (enter for none):
OK, successfully used password, moving on...
Set root password? [Y/n] y
New password:
Re-enter new password:
Password updated successfully!
Reloading privilege tables..
... Success!
Remove anonymous users? [Y/n] y 删除匿名用户
... Success!
Disallow root login remotely? [Y/n] y 禁止root远程登陆
... Success!
Remove test database and access to it? [Y/n] y 删除测试数据库并且访问它
... Success!
Reload privilege tables now? [Y/n] y 重新载入特权表
[root@zabbix ~] # mysql -uroot -p -e "create database zabbix default character set utf8 collate utf8_bin;"
You have new mail in /var/spool/mail/root
[root@zabbix ~] #
[root@zabbix ~] # mysql -uroot -p -e 'grant all on zabbix.* to "zabbix"@"%" identified by "zabbix";'
[root@zabbix ~] #
[root@zabbix ~] # mysql -uzabbix -pzabbix
Welcome to the MariaDB monitor. Commands end with ; or g.
Your MariaDB connection id is 14
MariaDB [(none)]> show databases;
+--------------------+
| Database |
+--------------------+
| information_schema |
| zabbix |
+--------------------+
2 rows in set (0.00 sec)
MariaDB [(none)]>
[root@zabbix ~] # systemctl restart nginx
[root@zabbix ~] # netstat -anptu | grep nginx
tcp 0 0 0.0.0.0:80 0.0.0.0:* LISTEN 4778/nginx: master
tcp6 0 0 :::80 :::* LISTEN 4778/nginx: master

[root@zabbix ~] # rpm -ivh https://mirrors.aliyun.com/epel/7/x86_64/Packages/e/epel-release-7-12.noarch.rpm
[root@zabbix ~] # rpm -ivh http://repo.zabbix.com/zabbix/3.0/rhel/7/x86_64/zabbix-release-3.0-1.el7.noarch.rpm
[root@zabbix ~] #
yum -y install zabbix-server-mysql zabbix-web-mysql zabbix-get
[root@zabbix ~] # cd /usr/share/doc/zabbix-server-mysql-3.0.28/
[root@zabbix zabbix-server-mysql-3.0.28] # ll
[root@zabbix zabbix-server-mysql-3.0.28] # zcat create.sql.gz | mysql -uroot -p zabbix
[root@zabbix zabbix-server-mysql-3.0.28] #
[root@zabbix zabbix-server-mysql-3.0.28] # vi /etc/zabbix/zabbix_server.conf
Option: TLSKeyFile
# Full pathname of a file containing the server private key.
#
# Mandatory: no
# Default:
# TLSKeyFile=
DBHost=localhost
DBName=zabbix
DBUser=zabbix
DBPassword=Zabbix
[root@zabbix zabbix-server-mysql-3.0.28] # vi /etc/httpd/conf.d/zabbix.conf
<IfModule mod_php5.c>
php_value max_execution_time 300
php_value memory_limit 128M
php_value post_max_size 16M
php_value upload_max_filesize 2M
php_value max_input_time 300
php_value max_input_vars 10000
php_value always_populate_raw_post_data -1
php_value date.timezone Asia/Shanghai
[root@zabbix zabbix-server-mysql-3.0.28] # systemctl start zabbix-server.service && systemctl enable zabbix-server.service
Created symlink from /etc/systemd/system/multi-user.target.wants/zabbix-server.service to /usr/lib/systemd/system/zabbix-server.service.
[root@zabbix zabbix-server-mysql-3.0.28] # systemctl restart httpd &&systemctl enable httpd
Created symlink from /etc/systemd/system/multi-user.target.wants/httpd.service to /usr/lib/systemd/system/httpd.service.
[root@zabbix zabbix-server-mysql-3.0.28] #


[root@zabbix zabbix-server-mysql-3.0.28] # yum clean all
Loaded plugins: fastestmirror, langpacks
Repository base is listed more than once in the configuration
You have new mail in /var/spool/mail/root
[root@zabbix zabbix-server-mysql-3.0.28] # yum -y install zabbix zabbix-agent

解决办法:
在安装时如出现如上图所示错误,原因是软件这两个版本不一致,仔细观察发现这两个软件包使用了不同的仓库,把epel的关闭(enabled=0,位于/etc/yum.repos.d/epel.repo)再重装

再次安装:
[root@zabbix zabbix-server-mysql-3.0.28] # yum -y install zabbix zabbix-agent
Loaded plugins: fastestmirror, langpacks
Repository base is listed more than once in the configuration
Repository updates is listed more than once in the configuration
Installed:
zabbix-agent.x86_64 0:3.0.28-1.el7

Complete!

- 解决办法:更新yum源
[root@zabbix ~] # rpm -ivh https://mirrors.aliyun.com/epel/7/x86_64/Packages/e/epel-release-7-12.noarch.rpm
[root@zabbix ~] # rpm -ivh http://repo.zabbix.com/zabbix/3.0/rhel/7/x86_64/zabbix-release-3.0-1.el7.noarch.rpm

Server=127.0.0.1 该ip为zabbix_server的IP
ServerActive=127.0.0.1 该ip为zabbix_server的IP(主动检测相关的配置:agent主动向server发送数据)
Hostname=127.0.0.1 hostname可以为字符串,但是要保证zabbix_server能够解析.再web页面添加主机时需要和这个一致不然没数据
[root@zabbix zabbix] # zabbix_agentd -c /etc/zabbix/zabbix_agentd.conf
[root@zabbix zabbix] #
[root@zabbix ~] # systemctl restart zabbix-agent
[root@zabbix ~] #
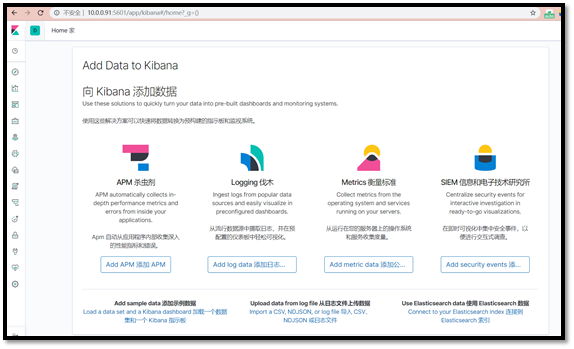
- elk是一套完整的日志收集与展示的软件,是三个产品的首字母缩写,分别是ElasticSearch、Logstash 和 Kibana。
- 问题排查。我们常说,运维和开发这一辈子无非就是和问题在战斗,所以这个说起来很朴实的四个字,其实是沉甸甸的。很多公司其实不缺钱,就要稳定,而要稳定,就要运维和开发能够快速的定位问题,甚至防微杜渐,把问题杀死在摇篮里。日志分析技术显然问题排查的基石。基于日志做问题排查,还有一个很帅的技术,叫全链路追踪,比如阿里的eagleeye 或者Google的dapper,也算是日志分析技术里的一种。
- 监控和预警。 日志,监控,预警是相辅相成的。基于日志的监控,预警使得运维有自己的机械战队,大大节省人力以及延长运维的寿命。
- 关联事件。多个数据源产生的日志进行联动分析,通过某种分析算法,就能够解决生活中各个问题。比如金融里的风险欺诈等。这个可以可以应用到无数领域了,取决于你的想象力。
- 数据分析。 这个对于数据分析师,还有算法工程师都是有所裨益的。


[root@zabbix ~] # useradd elk && echo | passwd --stdin lyx
Changing password for user lyx.
passwd: all authentication tokens updated successfully.
[root@zabbix ~] #
[root@zabbix ~] # su - lyx
Last login: Tue Nov 26 16:48:54 CST 2019 on pts/1
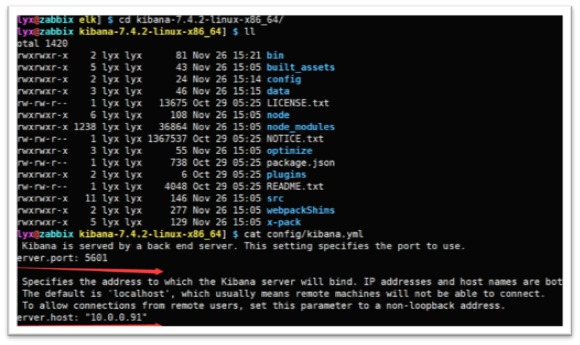
[lyx@zabbix ~] $ cd elk/elasticsearch-7.4.2/bin/
[lyx@zabbix bin] $ https://www.cnblogs.com/liangyuxing/p/elasticsearch -d
OpenJDK 64-Bit Server VM warning: Option UseConcMarkSweepGC was deprecated in version 9.0 and will likely be removed in a future release.
[lyx@zabbix bin] $


链接: https://www.cnblogs.com/webforward/p/6182786.html
服务器
内网
外网
nfs (主)
172.16.1.31
10.0.031
mysql(副)
172.16.1.51
10.0.0.51
web
172.16.1.7
10.0.0.7
nfs高可用为了解决挂载单点故障造成的前端无法访问后端的数据而产生的
- 利用VIP地址漂移的技术解决了存储服务器单点的故障
- 使网络架构更加的稳定

- 用户存入数据,会先访问负载均衡,负载均衡将数据分配给web端,web端通过挂载将数据放入存储服务器,存储服务器数据发生更新的时候,会实时额将数据传输到备份服务器
- 存储服务器出现问题就会导致没有办法将数据传入到存储服务器上面
- 这会使用高可用则可以解决这个问题
[root@nfs01 ~] # yum -y install nfs-utils keepalived
[root@db ~] # yum -y install nfs keepalived
[root@nfs01 ~] # mkdir -p /home/shares/ &
[root@nfs01 ~] # cat /etc/exports
/home/shares 10.0.0.0/24(rw,sync,no_root_squash)
[root@nfs01 ~] #
[root@nfs01 ~] # cd /home/shares/
[root@nfs01 shares] # ll
total 4
-rw-r--r-- 1 root root 4 Nov 19 17:08 aa.txt
-rw-r--r-- 1 root root 0 Nov 19 17:08 files1
-rw-r--r-- 1 root root 0 Nov 19 17:08 files10
-rw-r--r-- 1 root root 0 Nov 19 17:08 files2
-rw-r--r-- 1 root root 0 Nov 19 17:08 files3
-rw-r--r-- 1 root root 0 Nov 19 17:08 files4
-rw-r--r-- 1 root root 0 Nov 19 17:08 files5
-rw-r--r-- 1 root root 0 Nov 19 17:08 files6
-rw-r--r-- 1 root root 0 Nov 19 17:08 files7
-rw-r--r-- 1 root root 0 Nov 19 17:08 files8
-rw-r--r-- 1 root root 0 Nov 19 17:08 files9
[root@nfs01 shares] #
21.4.4.1 主配置
[root@nfs01 shares] # vim /etc/keepalived/keepalived.conf
! Configuration File for keepalived
global_defs {
router_id lb01 集群的名称
}
vrrp_instance oldboy66 { 配置实例((家族信息)
state MASTER 家族的身份
interface eth0 指定VIP出现在哪个网卡上
virtual_router_id 66 家族的编号
priority 100 指定服务的优先级
advert_int 1
authentication {
auth_type PASS
auth_pass 1111
}
virtual_ipaddress {
10.0.0.10 VIP地址的指定
}
}
21.4.4.2 副配置文件
[root@nfs01 shares] # vim /etc/keepalived/keepalived.conf
! Configuration File for keepalived
global_defs {
router_id lb02 集群的名称
}
vrrp_instance oldboy66 { 配置实例((家族信息)
state BACKUP 家族的身份
interface eth0 指定VIP出现在哪个网卡上
virtual_router_id 66 家族的编号
priority 50 指定服务的优先级
advert_int 1
authentication {
auth_type PASS
auth_pass 1111
}
virtual_ipaddress {
10.0.0.10 VIP地址的指定
}
}
[root@nfs01] # systemctl restart keepalived.service
You have new mail in /var/spool/mail/root
[root@nfs01] #
[root@db] # systemctl restart keepalived.service
You have new mail in /var/spool/mail/root
[root@db] #
[root@nfs01] # systemctl restart nfs
You have new mail in /var/spool/mail/root
[root@nfs01] #
[root@db] # systemctl restart nfs
You have new mail in /var/spool/mail/root
[root@db] #
[root@web01 ~] # mount -t nfs 10.0.0.10:/home/shares /shares
[root@web01 ~] #
10.0.0.10:/home/shares 99G 5.8G 93G 6% /shares
[root@nfs01 keepalived] # vim notify_master.sh
#!/bin/bash
num=`ps -ef|grep [n]fsd | wc -l`
if [ "$num" != 0 ];then
exit 0
else
exit 1
fi
vrrp_script check_web {
script "/etc/keepalived/notify_master.sh"
weight -70
interval 2
}
track_script {
check_web
}
[root@db01 keepalived] # vim 1.sh
#!/bin/bash
VIP_ADDR=`ssh 172.16.1.31 ip a s | grep -o "10.0.0.10" | wc -l`
WEB_DATA=`ssh 172.16.1.7 df -h | grep "10.0.0.31" | wc -l`
while true
do
if [ "$WEB_DATA" == 1 ] && [ "$VIP_ADDR" == 1 ]
then
ssh 172.16.1.7 umount -lf /shares &>/dev/null
ssh 172.16.1.7 mount -t nfs 10.0.0.31:/home/shares /shares & > /dev/null
else
ssh 172.16.1.7 umount -lf /shares &>/dev/null
ssh 172.16.1.7 mount -t nfs 10.0.0.10:/home/shares /shares &>/dev/null
fi
sleep 2;
done
服务器
内网
外网
mysql(主)
172.16.1.51
10.0.0.51
mysql(副)
172.16.1.31
10.0.0.31
- 读写分离,支持更大的并发,提高用户的体验度
- 拥有数据库的冗余机制,提高数据的安全性

- 主服务器开启big-log日志(记录数据的增删改查)
- 从服务器开启I/O线程响应请求想将big-log的日志内容给我
- 从服务器会将数据放到relay-info中,生成master.info,(记录master的一些信息)
- 从服务器会一直监控relay日志的更新,一旦有更新,将信息解析成sql内容.添加数据库中
- 保持2个服务器的数据库内容一致
- 并发量大的时候
- 数据需要备份
- 大型公司或者一些国家级的单位需要使用
22.4.1.1 数据库开始安装
[root@db ~] # yum install mariadb mariadb-server -y
22.4.1.2 数据库启动
[root@db ~] # systemctl start mariadb.service
22.4.1.3 安装数据库
[root@db ~] # mysql_secure_installation
Enter current password for root (enter for none):
OK, successfully used password, moving on…
Set root password? [Y/n] y
</span></p> New password:
Re-enter new password:
Password updated successfully!
Reloading privilege tables..
... Success!
Remove anonymous users? [Y/n] y
... Success!
Disallow root login remotely? [Y/n] n
Remove test database and access to it? [Y/n] y
- Dropping test database...
... Success!
- Removing privileges on test database...
... Success!
Reload privilege tables now? [Y/n] y
... Success!
Thanks for using MariaDB!
22.4.1.4 登录数据库创建数据库并且添加测试数据
[root@db ~] # mysql -uroot -p
MariaDB [(none)]> create database DB1; 创建数据库DB1
Query OK, 1 row affected (0.00 sec)
MariaDB [(none)]> show databases; 显示数据库
+--------------------+
| Database |
+--------------------+
| information_schema |
| DB1 |
| mysql |
| performance_schema |
+--------------------+
4 rows in set (0.00 sec)
MariaDB [(none)]> grant all privileges on *.* to root@'%' identified by '' with grant option; 进行数据库授权和密码的修改
Query OK, 0 rows affected (0.00 sec)
MariaDB [(none)]> use DB1; 使用数据库
Database changed
MariaDB [DB1]> create table test (name VARCHAR(20), sex CHAR(1), birth DATE, birthaddr VARCHAR(20)); 创建表
Query OK, 0 rows affected (0.02 sec)
MariaDB [DB1]> insert into test values ('abccs','f','1995-10-22','china'); 插入数据
Query OK, 1 row affected (0.00 sec)
MariaDB [DB1]> select * from test; 查看数据
+-------+------+------------+-----------+
| name | sex | birth | birthaddr |
+-------+------+------------+-----------+
| abccs | f | 1995-10-22 | china |
+-------+------+------------+-----------+
1 row in set (0.00 sec)
MariaDB [DB1]>
22.4.1.5 将数据进行备份,并且发送到从服务器上
[root@db ~] # mysqldump -h localhost -u root -p DB1 > /tmp/1.sql
Enter password:
[root@db ~] #
[root@db ~] # scp -r /tmp/1.sql 172.16.1.31:/tmp/
root@172.16.1.31's password:
1.sql 100% 1926 1.2MB/s 00:00
[root@db ~] #
22.4.1.6 主服务器配置文件进行配置
#设置服务器ID,为1的表示为主服务器;如果服务器没有以下配置,添加,如果有就跳过。
server-id=1
启动MySQ二进制日志系统,注意:如果原来的配置文件中已经有这一行,就不用再添加了。
log_bin=mysql-bin?
需要同步的数据库名,如果有多个数据库,可重复此参数,每个数据库一行
binlog-do-db=DB1
不同步mysql系统数据库
binlog-ignore-db=mysql
22.4.1.7 重启服务
[root@db ~] # systemctl restart mariadb.service
[root@db ~] #
[root@db ~] # mysql -uroot -p
MariaDB [(none)]> show master status;
+-------------------+----------+--------------+------------------+
| File | Position | Binlog_Do_DB | Binlog_Ignore_DB |
+-------------------+----------+--------------+------------------+
| mysql-bin?.000001 | 245 | DB1 | mysql |
+-------------------+----------+--------------+------------------+
1 row in set (0.00 sec)
MariaDB [(none)]>
-
查看主服务器,出现以上类似信息;如果看不见以下结果或者为空的话,说明my.cnf配置文件配置的有问题,请检查即可。
-
这里记住File的值:mysql-bin.000001和Position的值:245,后面会用到。
22.4.2.1 数据库开始安装
[root@db ~] # yum install mariadb mariadb-server -y
22.4.2.2 数据库启动
[root@db ~] # systemctl start mariadb.service
22.4.2.3 安装数据库
[root@db ~] # mysql_secure_installation
Enter current password for root (enter for none):
OK, successfully used password, moving on…
Set root password? [Y/n] y
讯享网 </span></p>
New password:
Re-enter new password:
Password updated successfully!
Reloading privilege tables..
… Success!
Remove anonymous users? [Y/n] y
</span></p> … Success!
Disallow root login remotely? [Y/n] n
讯享网 </span></p>
Remove test database and access to it? [Y/n] y
</span></p> - Dropping test database…
… Success!
- Removing privileges on test database…
… Success!
Reload privilege tables now? [Y/n] y
讯享网 </span></p>
… Success!
Thanks for using MariaDB!
22.4.2.4 登录数据库创建数据库并且添加测试数据
[root@db ~] # mysql -uroot -p
MariaDB [(none)]> create database DB1; 创建数据库DB1
Query OK, 1 row affected (0.00 sec)
MariaDB [(none)]> show databases; 显示数据库
+——————–+
| Database |
+——————–+
| information_schema |
| DB1 |
| mysql |
| performance_schema |
+——————–+
4 rows in set (0.00 sec)
22.4.2.5 导入数据库
[root@nfs01 ~] # mysql -h localhost -u root -p DB1 < /tmp/1.sql
Enter password:
[root@nfs01 ~] #
22.4.2.6 更新master信息
[root@nfs01 ~] # mysql -uroot -p
Enter password:
MariaDB [(none)]> slave stop;
</span></p> Query OK, 0 rows affected, 1 warning (0.00 sec)
MariaDB [(none)]> use DB1;
Database changed
MariaDB [DB1]> change master to master_host=‘172.16.1.51’,master_user=‘root’,master_password=‘’,master_log_file=‘mysql-bin?.000001’,master_log_pos=245;
MariaDB [DB1]>
- change master to master_host=‘主服务器’,master_user=‘mysql用户名’,master_password=‘mysql服务密码’,master_log_file=‘File值’,master_log_pos=Postion值;
22.4.2.7 添加配置文件(/etc/my.cnf)
[mysqld]
datadir=/var/lib/mysql
socket=/var/lib/mysql/mysql.sock
#设置服务器ID,为1的表示为主服务器;如果服务器没有以下配置,添加,如果有就跳过。
server-id=2
启动MySQ二进制日志系统,注意:如果原来的配置文件中已经有这一行,就不用再添加了。
log_bin=mysql-bin?
需要同步的数据库名,如果有多个数据库,可重复此参数,每个数据库一行
binlog-do-db=DB1
不同步mysql系统数据库
binlog-ignore-db=mysql
22.4.2.8 重启数据库
讯享网</h4> [root@nfs01 ~] # systemctl restart mariadb
[root@nfs01 ~] #
22.4.2.8 查看主从同步是否正常
[root@nfs01 ~] # mysql -uroot -p
Enter password:
Welcome to the MariaDB monitor. Commands end with ; or g.
Your MariaDB connection id is 4
Server version: 5.5.64-MariaDB MariaDB Server
Copyright © 2000, 2018, Oracle, MariaDB Corporation Ab and others.
Type ‘help;’ or ‘h’ for help. Type ‘c’ to clear the current input statement.
MariaDB [(none)]> show master status; 查看状态
+——————-+———-+————–+——————+
| File | Position | Binlog_Do_DB | Binlog_Ignore_DB |
+——————-+———-+————–+——————+
| mysql-bin?.000001 | 245 | DB1 | mysql |
+——————-+———-+————–+——————+
1 row in set (0.00 sec)
MariaDB [(none)]> slave start; 启动slave
Query OK, 0 rows affected, 1 warning (0.00 sec)
MariaDB [(none)]> show master statusG; 查看主从同步是否正常
* 1. row *
File: mysql-bin?.000001
Position: 245
Binlog_Do_DB: DB1
Binlog_Ignore_DB: mysql
1 row in set (0.00 sec)
ERROR: No query specified
MariaDB [(none)]> show slave statusG;
* 1. row *
Slave_IO_State: Waiting for master to send event
Master_Host: 172.16.1.51
Master_User: root
Master_Port: 3306
Connect_Retry: 60
Master_Log_File: mysql-bin?.000001
Read_Master_Log_Pos: 245
Relay_Log_File: mariadb-relay-bin.000005
Relay_Log_Pos: 530
Relay_Master_Log_File: mysql-bin?.000001
<span style="background-color: rgba(255, 255, 0, 1)">Slave_IO_Running: Yes
Slave_SQL_Running: Yes
讯享网 </strong></span></p> Replicate_Do_DB:
Replicate_Ignore_DB:
Replicate_Do_Table:
Replicate_Ignore_Table:
Replicate_Wild_Do_Table:
Replicate_Wild_Ignore_Table:
Last_Errno: 0
Last_Error:
Skip_Counter: 0
Exec_Master_Log_Pos: 245
Relay_Log_Space: 826
Until_Condition: None
Until_Log_File:
Until_Log_Pos: 0
Master_SSL_Allowed: No
Master_SSL_CA_File:
Master_SSL_CA_Path:
Master_SSL_Cert:
Master_SSL_Cipher:
Master_SSL_Key:
Seconds_Behind_Master: 0
Master_SSL_Verify_Server_Cert: No
Last_IO_Errno: 0
Last_IO_Error:
Last_SQL_Errno: 0
Last_SQL_Error:
Replicate_Ignore_Server_Ids:
Master_Server_Id: 1
1 row in set (0.00 sec)
ERROR: No query specified
MariaDB [(none)]>
版权声明:本文内容由互联网用户自发贡献,该文观点仅代表作者本人。本站仅提供信息存储空间服务,不拥有所有权,不承担相关法律责任。如发现本站有涉嫌侵权/违法违规的内容,请联系我们,一经查实,本站将立刻删除。
如需转载请保留出处:https://51itzy.com/kjqy/189921.html