
点击查看SpringBoot缓存demo:LearnSpringBoot09Cache-Redis
技术摘要
- 注解版的 mybatis
- @CacheConfig
- @Cacheable
- @CachePut:既调用方法,又更新缓存数据;同步更新缓存
- @CacheEvict:缓存清除
- @Caching:定义复杂的缓存规则
- CacheManager管理多个Cache组件的,对缓存的真正CRUD操作在Cache组件中,每一个缓存组件有自己唯一一个名字;
- 搭建Redis缓存环境及测试
- RedisTemplate
- 自定义CacheManager
一、缓存抽象
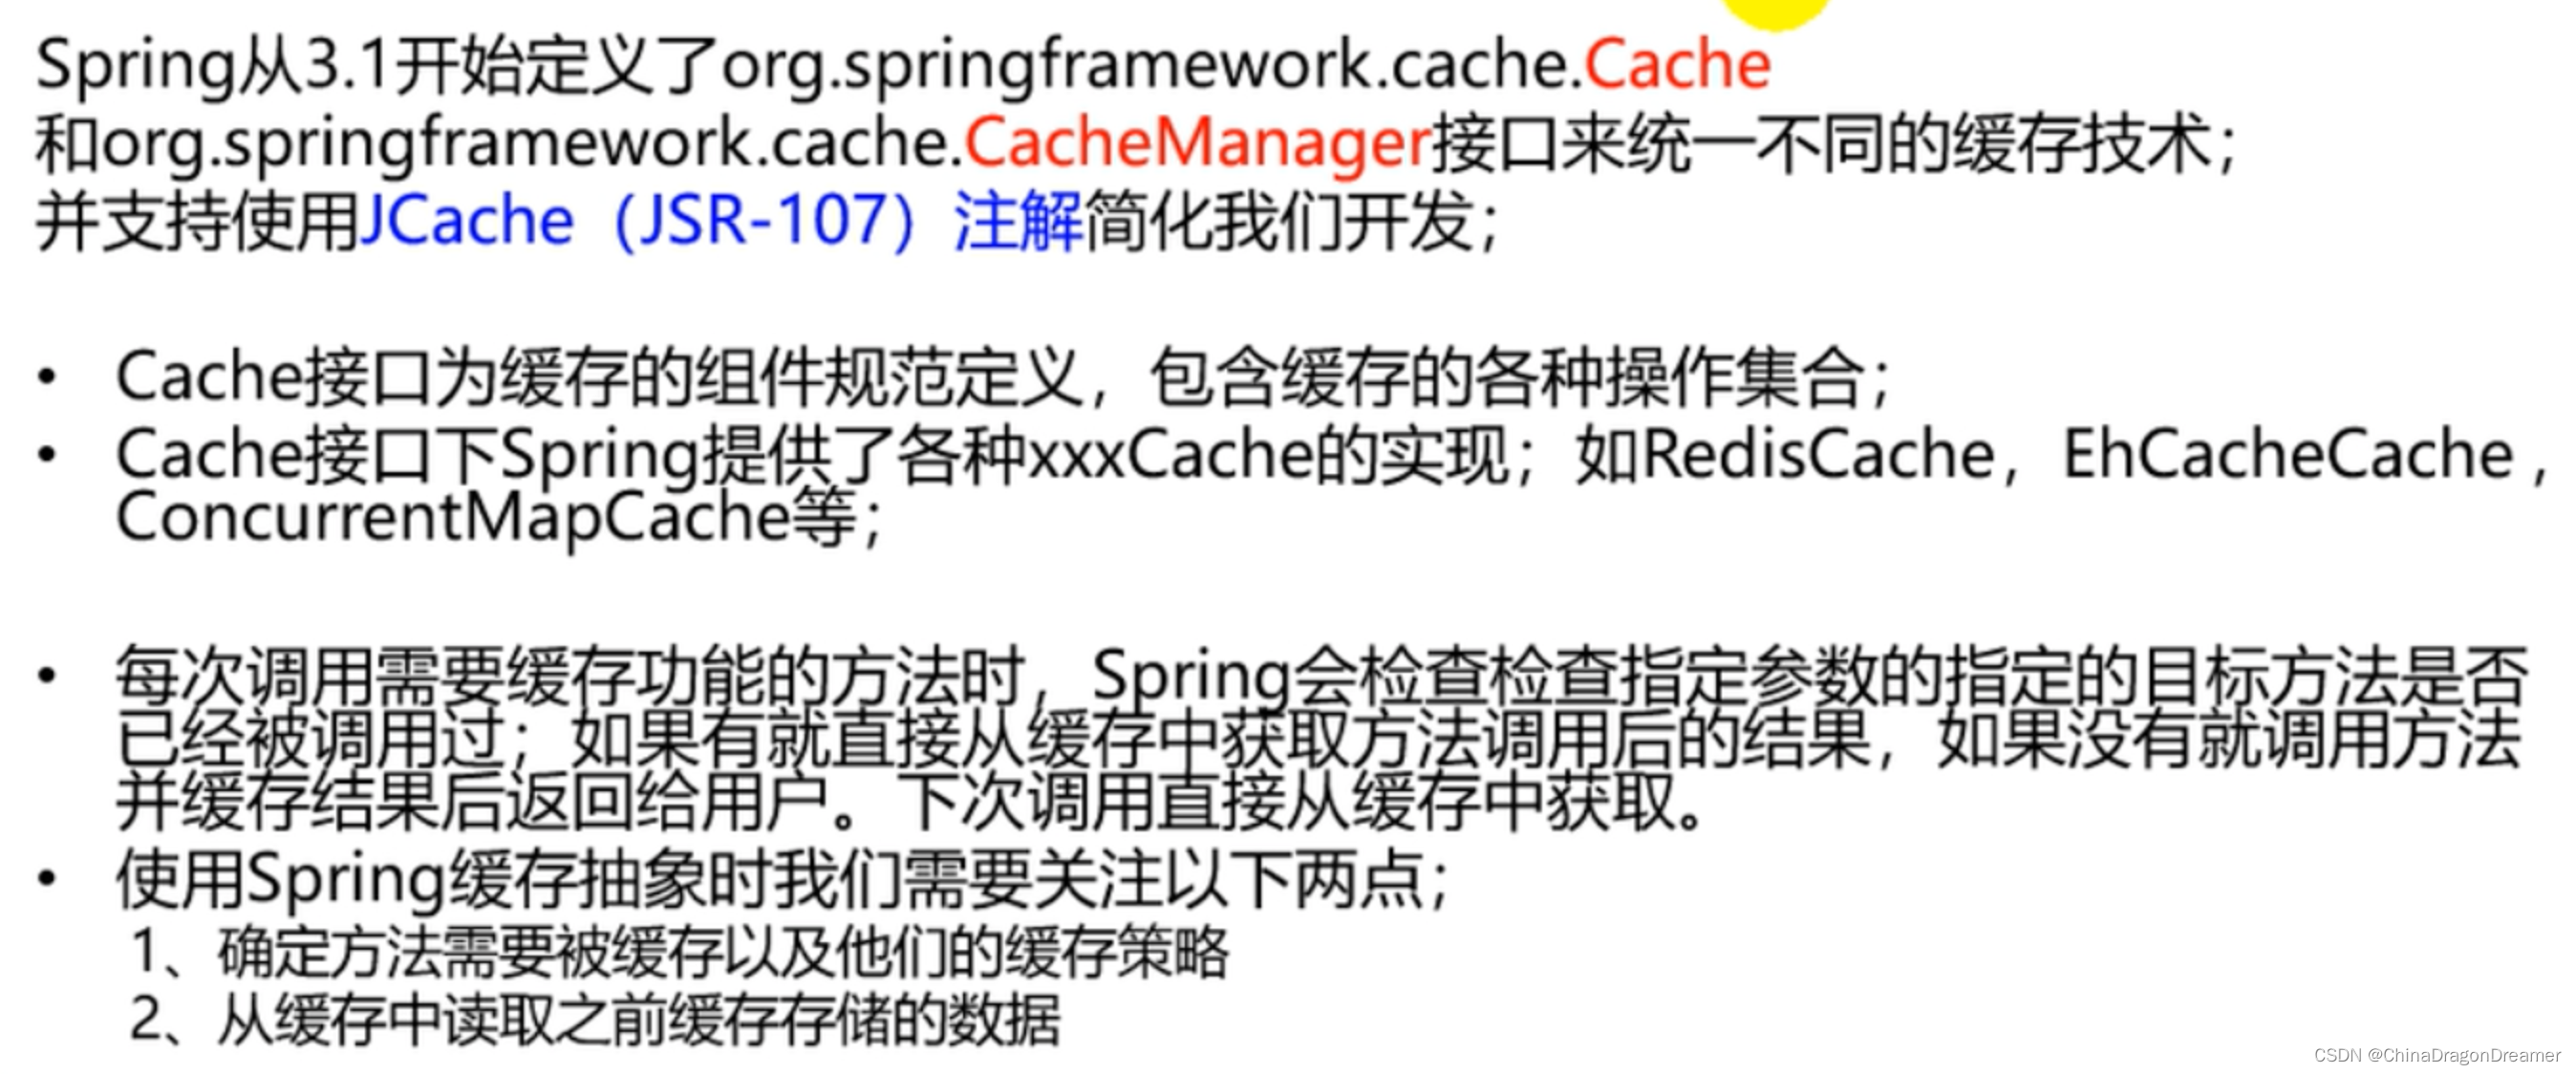
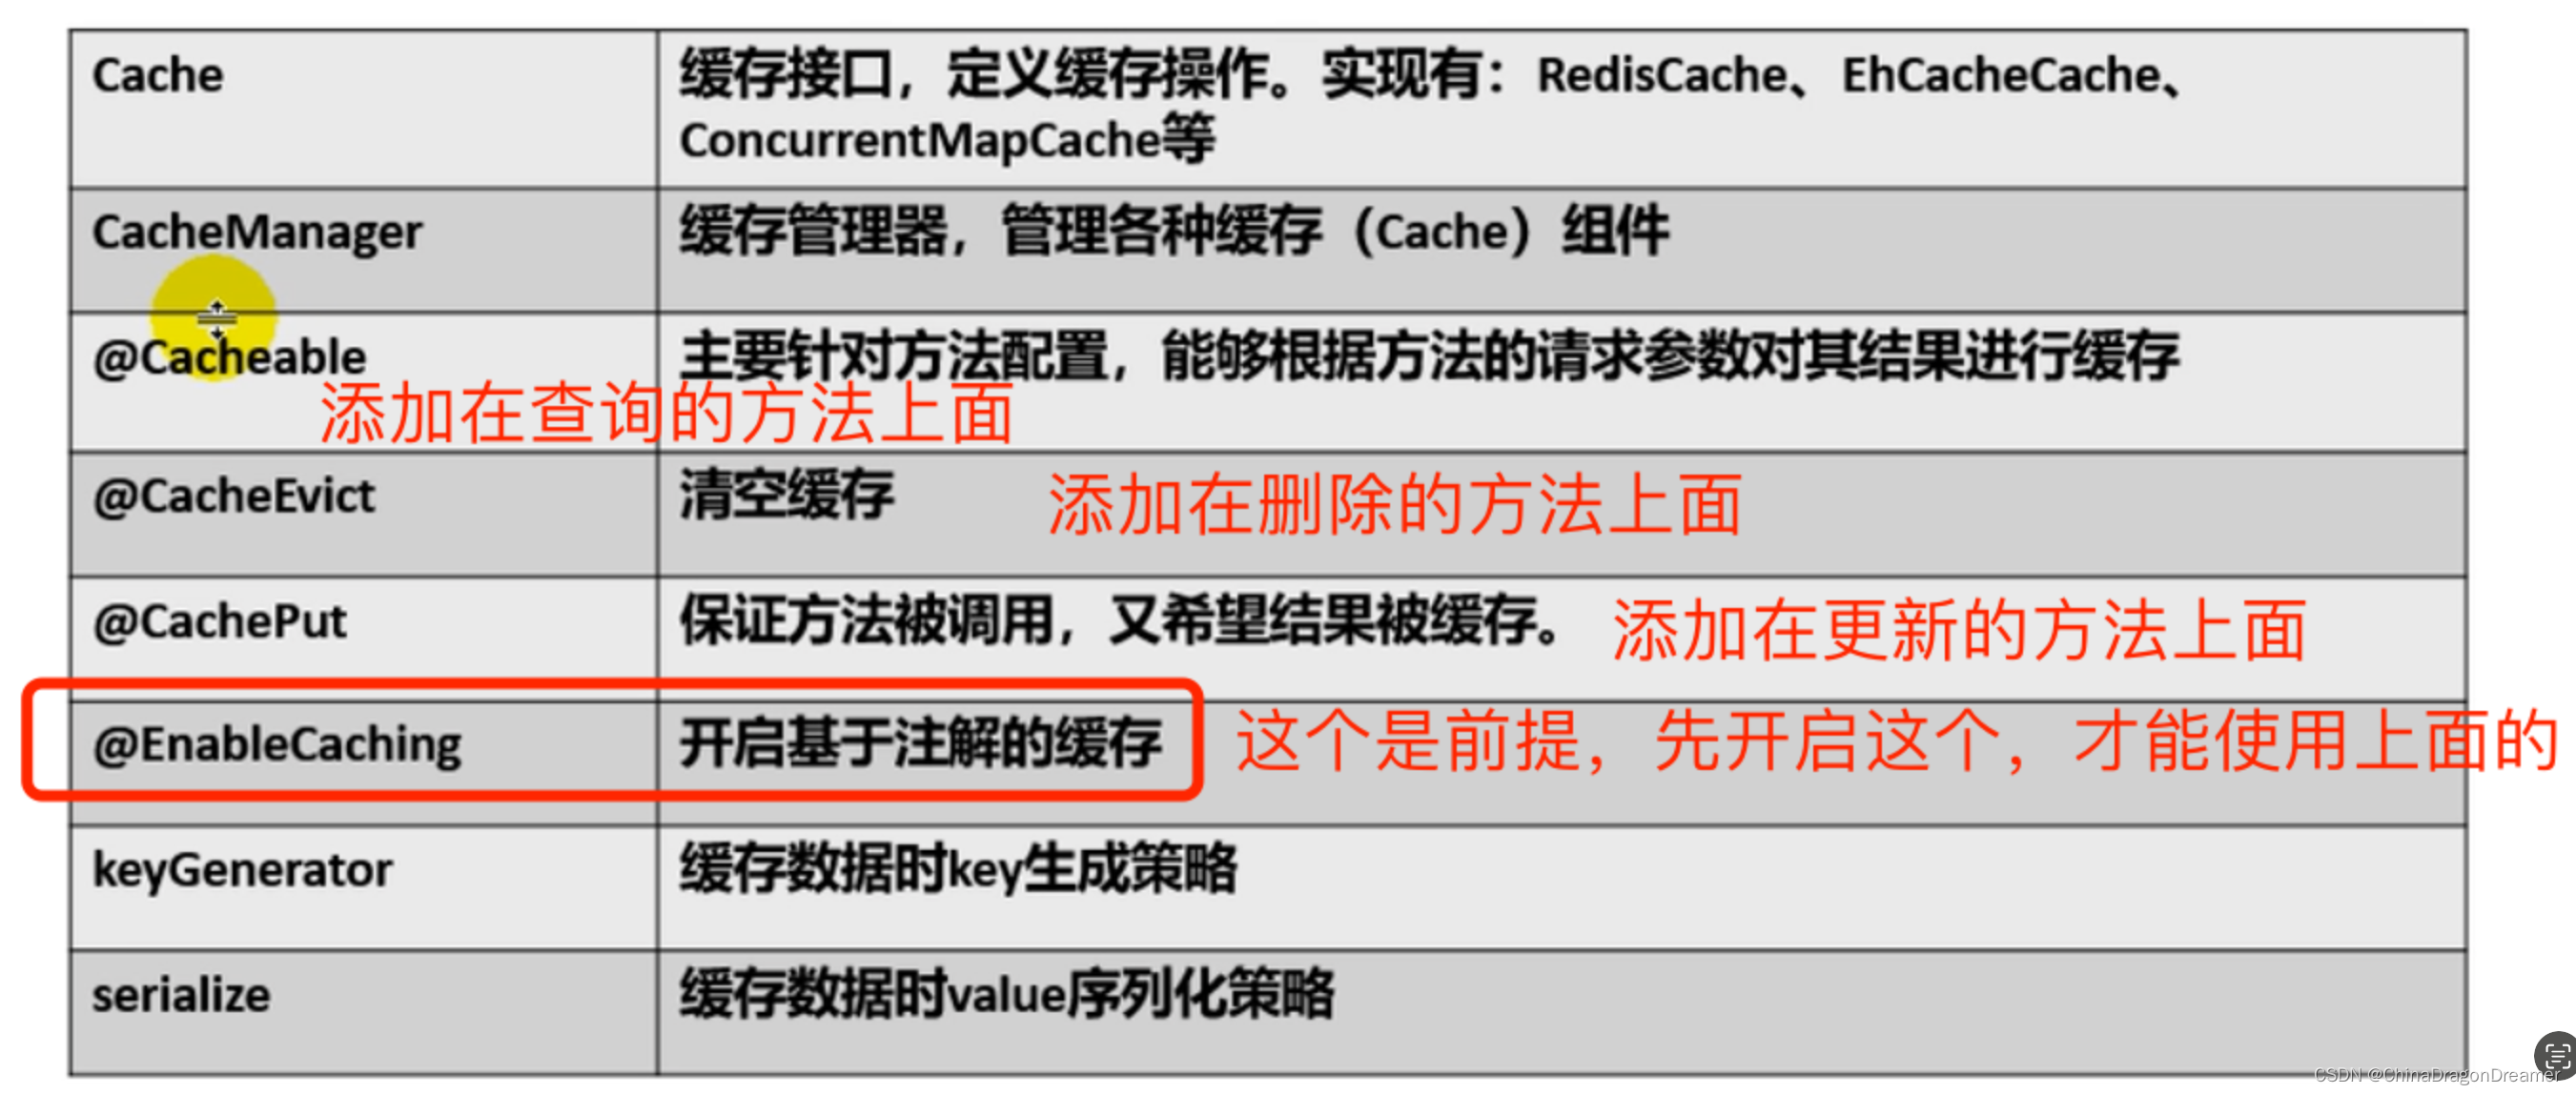
二、重要的概念和缓存注解
三、搭建基本环境
pom.xml代码
<?xml version="1.0" encoding="UTF-8"?> <project xmlns="http://maven.apache.org/POM/4.0.0" xmlns:xsi="http://www.w3.org/2001/XMLSchema-instance" xsi:schemaLocation="http://maven.apache.org/POM/4.0.0 https://maven.apache.org/xsd/maven-4.0.0.xsd"> <modelVersion>4.0.0</modelVersion> <parent> <groupId>org.springframework.boot</groupId> <artifactId>spring-boot-starter-parent</artifactId> <version>3.1.1</version> <relativePath/> <!-- lookup parent from repository --> </parent> <groupId>com.example</groupId> <artifactId>LearnSpringBoot09Cache</artifactId> <version>0.0.1-SNAPSHOT</version> <name>LearnSpringBoot09Cache</name> <description>LearnSpringBoot09Cache</description> <properties> <java.version>17</java.version> </properties> <dependencies> <!-- https://docs.spring.io/spring-boot/docs/current/reference/htmlsingle/#using.build-systems.starters --> <dependency> <groupId>org.springframework.boot</groupId> <artifactId>spring-boot-starter-cache</artifactId> </dependency> <dependency> <groupId>org.springframework.boot</groupId> <artifactId>spring-boot-starter-data-redis</artifactId> </dependency> <!-- <dependency>--> <!-- <groupId>org.springframework.boot</groupId>--> <!-- <artifactId>spring-boot-starter-jdbc</artifactId>--> <!-- </dependency>--> <dependency> <groupId>org.springframework.boot</groupId> <artifactId>spring-boot-starter-web</artifactId> </dependency> <dependency> <groupId>org.mybatis.spring.boot</groupId> <artifactId>mybatis-spring-boot-starter</artifactId> <version>3.0.2</version> </dependency> <dependency> <groupId>com.mysql</groupId> <artifactId>mysql-connector-j</artifactId> <scope>runtime</scope> </dependency> <dependency> <groupId>org.springframework.boot</groupId> <artifactId>spring-boot-starter-test</artifactId> <scope>test</scope> </dependency> <!-- <dependency>--> <!-- <groupId>org.mybatis.spring.boot</groupId>--> <!-- <artifactId>mybatis-spring-boot-starter</artifactId>--> <!-- <version>3.0.2</version>--> <!-- <scope>test</scope>--> <!-- </dependency>--> </dependencies> <build> <plugins> <plugin> <groupId>org.springframework.boot</groupId> <artifactId>spring-boot-maven-plugin</artifactId> </plugin> </plugins> </build> </project> 讯享网
3.1 创建出department和employee表
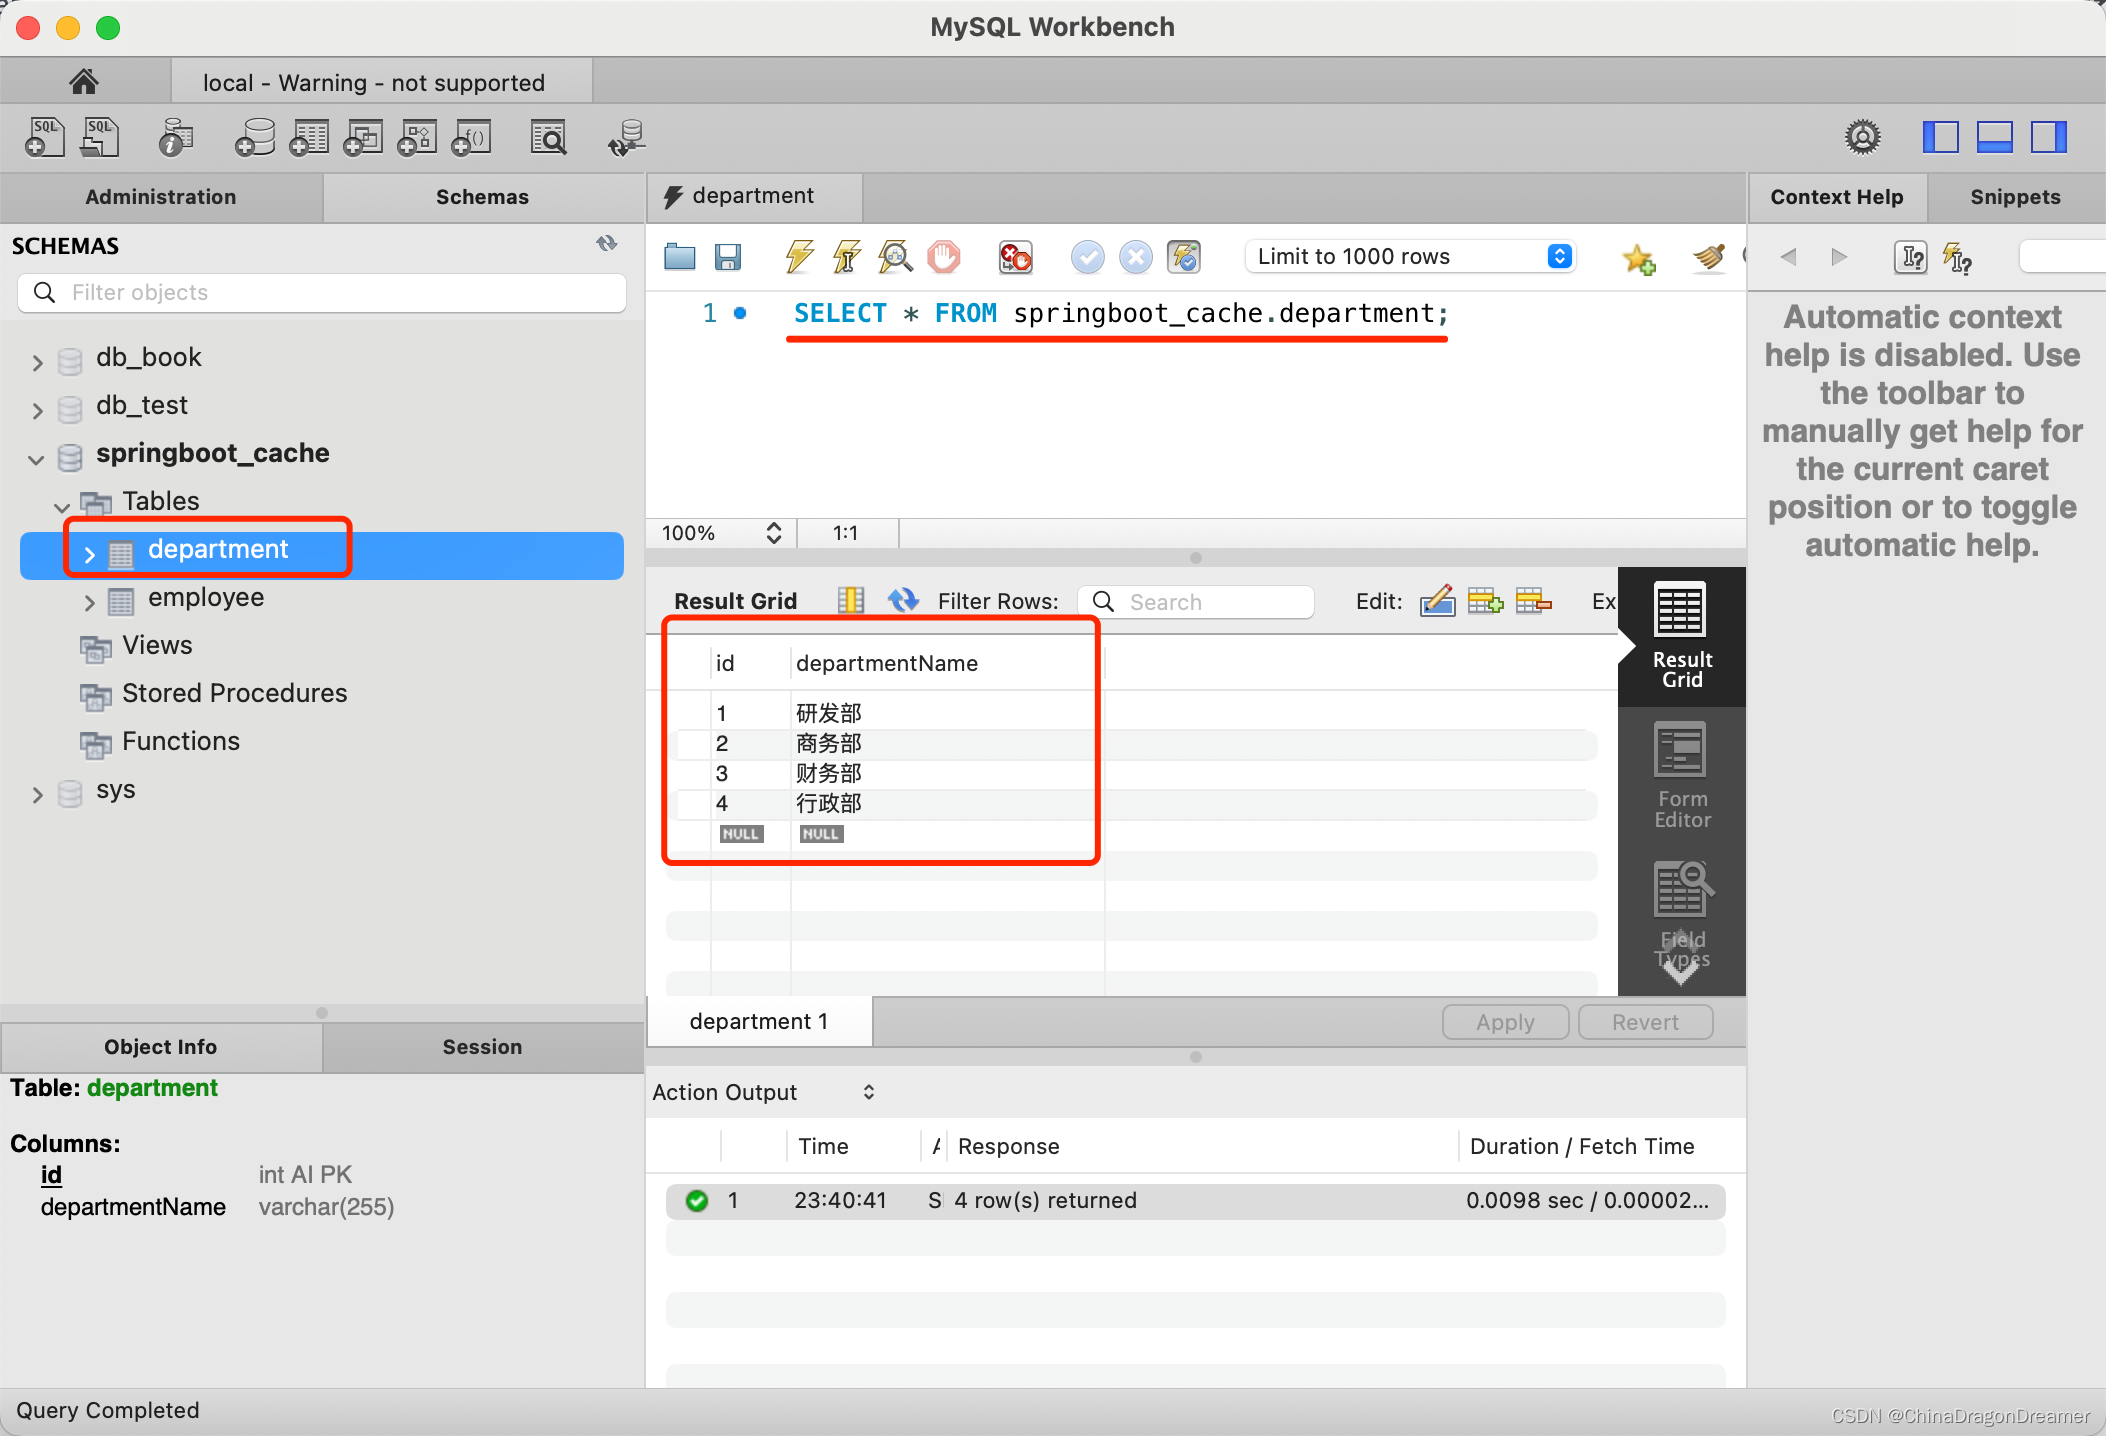
department表数据
employee表数据

3.2 创建javaBean封装数据
Department.java代码
讯享网package com.example.learnspringboot09cache.bean; import java.io.Serializable; public class Department implements Serializable {
    private Integer id; private String departmentName; public void setId(Integer id) {
    this.id = id; } public void setDepartmentName(String departmentName) {
    this.departmentName = departmentName; } public Integer getId() {
    return id; } public String getDepartmentName() {
    return departmentName; } }
Employee.java代码
package com.example.learnspringboot09cache.bean; import java.io.Serializable; /* https://blog.csdn.net/_/article/details/ */ public class Employee implements Serializable {
    private Integer id; private String lastName; private Integer gender; private String email; private Integer dId; public void setId(Integer id) {
    this.id = id; } public void setLastName(String lastName) {
    this.lastName = lastName; } public void setGender(Integer gender) {
    this.gender = gender; } public void setEmail(String email) {
    this.email = email; } public void setdId(Integer dId) {
    this.dId = dId; } public Integer getId() {
    return id; } public String getLastName() {
    return lastName; } public Integer getGender() {
    return gender; } public String getEmail() {
    return email; } public Integer getdId() {
    return dId; } @Override public String toString() {
    return "Employee{" + "id=" + id + ", lastName='" + lastName + '\'' + ", gender=" + gender + ", email='" + email + '\'' + ", dId=" + dId + '}'; } }
3.3 整合MyBatis操作数据库
3.3.1 配置数据源信息
application.properties配置
讯享网spring.datasource.username=root spring.datasource.password= spring.datasource.url=jdbc:mysql://192.168.0.103:3307/dbjdbc #spring.datasource.url=jdbc:mysql://localhost:3306/springboot_cache #spring.datasource.driver-class-name=com.mysql.cj.jdbc.Driver 可以不写,springboot自动识别驱动 # 开启驼峰命名匹配规则 mybatis.configuration.map-underscore-to-camel-case=true #打印 mapper sql 语句 logging.level.com.example.learnspringboot09cache.mapper=debug spring.data.redis.host=192.168.0.103 spring.data.redis.port=6379 #spring.data.redis.password= # 查看控制台日志 打印自动配置相关信息,这里主页看缓存配置类 debug=true
3.3.2 使用注解版的MyBatis
@MapperScan指定需要扫描的mapper接口所在的包
LearnSpringBoot09CacheApplication.java代码
@MapperScan(value = "com.example.learnspringboot09cache.mapper") @SpringBootApplication @EnableCaching public class LearnSpringBoot09CacheApplication {
    public static void main(String[] args) {
    SpringApplication.run(LearnSpringBoot09CacheApplication.class, args); } }
3.3.3 创建Mapper接口,并使用@Mapper注解
DepartmentMapper.java代码
讯享网package com.example.learnspringboot09cache.mapper; import com.example.learnspringboot09cache.bean.Department; import org.apache.ibatis.annotations.Mapper; import org.apache.ibatis.annotations.Select; @Mapper public interface DepartmentMapper {
    @Select("SELECT * FROM department WHERE id = #{id}") Department getDeptById(Integer id); }
EmployeeMapper.java代码
package com.example.learnspringboot09cache.mapper; import com.example.learnspringboot09cache.bean.Employee; import org.apache.ibatis.annotations.*; /* 注解版的 mybatis */ @Mapper public interface EmployeeMapper {
    @Select("SELECT * FROM employee WHERE id = #{id}") public Employee getEmpById(Integer id); @Update("UPDATE employee SET lastName=#{lastName},email=#{email},gender=#{gender},d_id=#{dId} WHERE id=#{id}") public void updateEmp(Employee employee); @Delete("DELETE FROM employee WHERE id=#{id}") public void deleteEmpById(Integer id); @Insert("INSERT INTO employee(lastName,email,gender,d_id) VALUES(#{lastName},#{email},#{gender},#{dId})") public void insertEmployee(Employee employee); @Select("SELECT * FROM employee WHERE lastName = #{lastName}") Employee getEmpByLastName(String lastName); }
3.3.4 测试Mapper接口
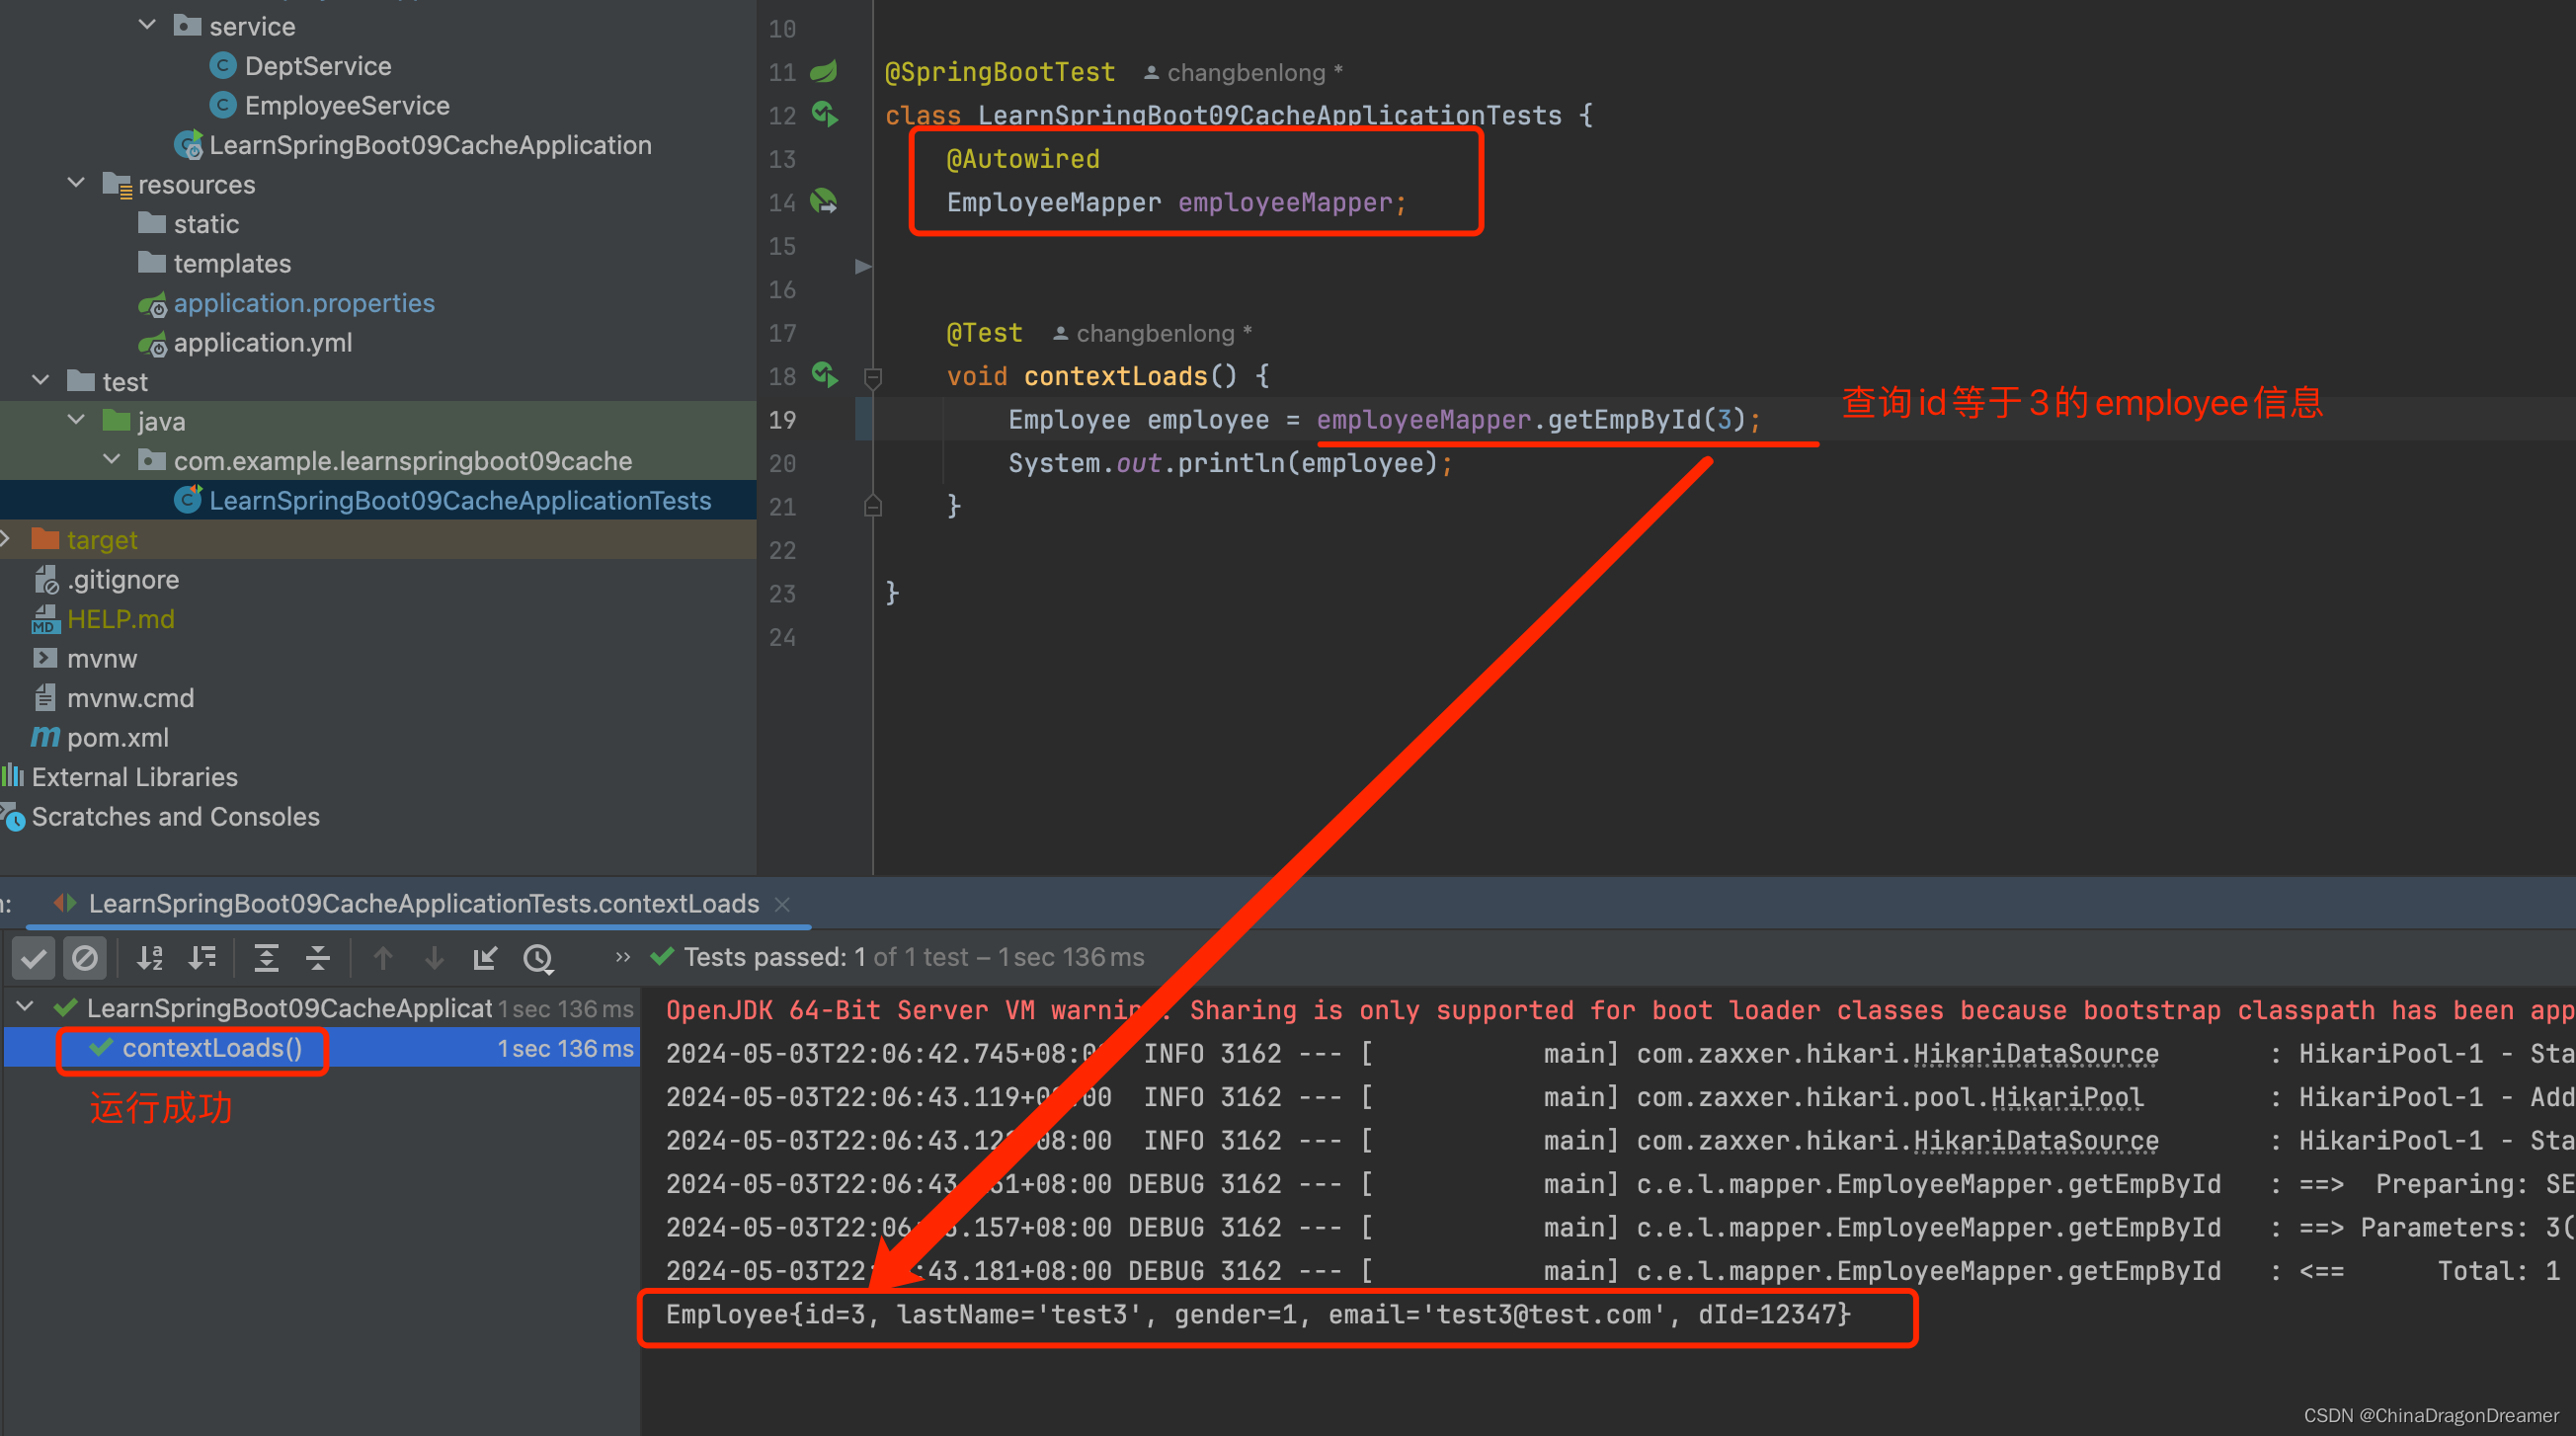
LearnSpringBoot09CacheApplicationTests.java代码
讯享网@SpringBootTest class LearnSpringBoot09CacheApplicationTests {
    @Autowired EmployeeMapper employeeMapper; @Test void contextLoads() {
    Employee employee = employeeMapper.getEmpById(1); System.out.println(employee); } }
测试结果
从打印结果可以看出与数据库里的employee表数据一致,说明mapper接口可用
3.3.5 在网页上测试mapper接口
创建Service
EmployeeService.java
@Service public class EmployeeService {
    @Autowired EmployeeMapper employeeMapper; public Employee getEmpById(Integer id){
    System.out.println("员工 编号:"+id); Employee employee = employeeMapper.getEmpById(id); return employee; } }
创建Controller
EmployeeController.java
讯享网package com.example.learnspringboot09cache.controller; import com.example.learnspringboot09cache.bean.Employee; import com.example.learnspringboot09cache.service.EmployeeService; import org.springframework.beans.factory.annotation.Autowired; import org.springframework.web.bind.annotation.GetMapping; import org.springframework.web.bind.annotation.PathVariable; import org.springframework.web.bind.annotation.RestController; @RestController public class EmployeeController {
    @Autowired EmployeeService employeeService; @GetMapping("/emp/{id}") public Employee getEmployee(@PathVariable(value = "id") Integer id){
    return employeeService.getEmpById(id); } @GetMapping("/emp") public Employee update(Employee employee){
    Employee emp = employeeService.updateEmp(employee); return emp; } @GetMapping("/delemp") public String deleteEmp(Integer id){
    employeeService.deleteEmp(id); return "success"; } @GetMapping("/emp/lastname/{lastName}") public Employee getEmpByLastName(@PathVariable("lastName") String lastName){
    return employeeService.getEmpByLastName(lastName); } }
使用@PathVariable取路径变量
测试结果
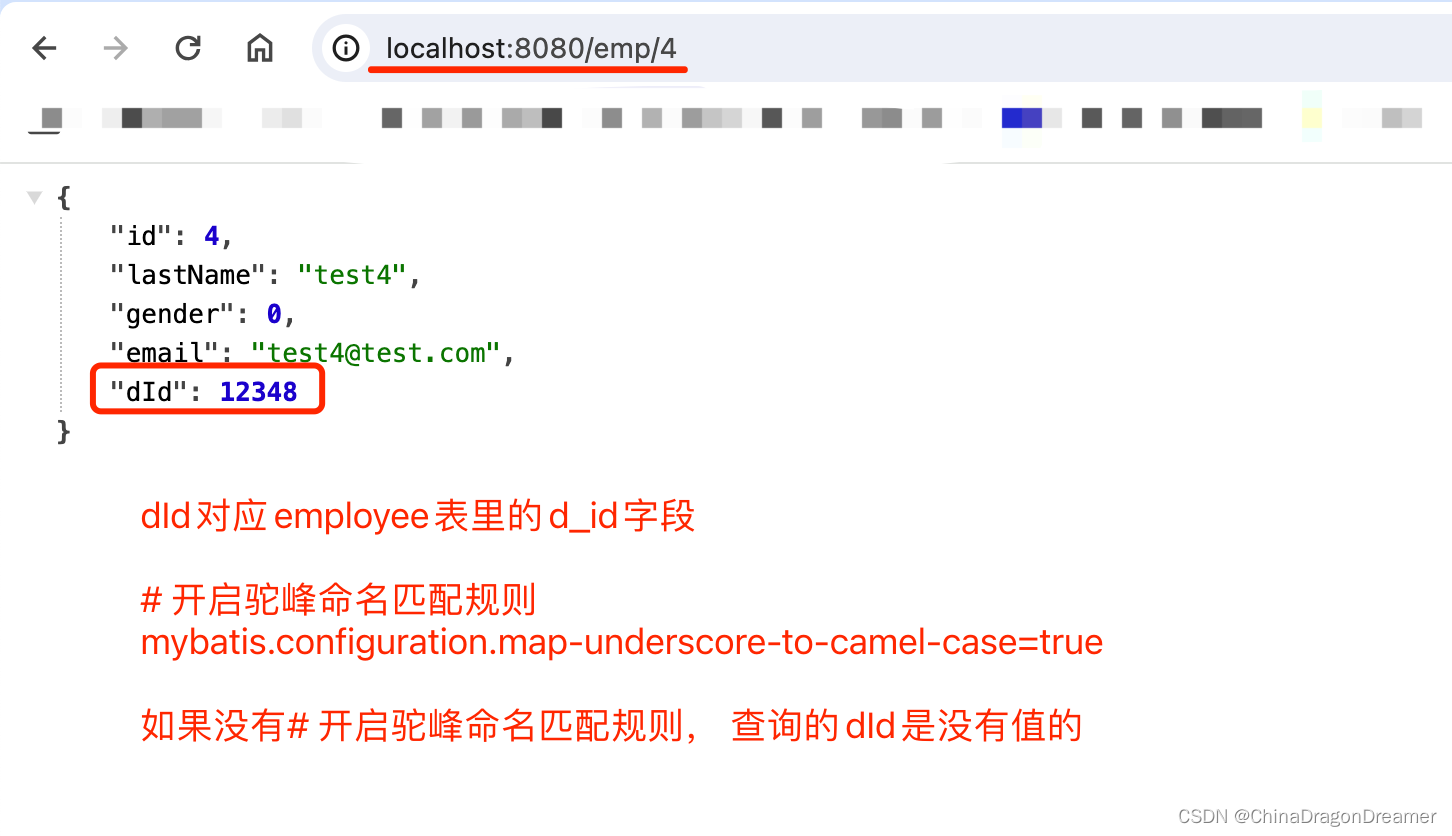
在application.properties配置文件里,开启驼峰命名匹配规则
mybatis.configuration.map-underscore-to-camel-case=true
四、快速体验缓存
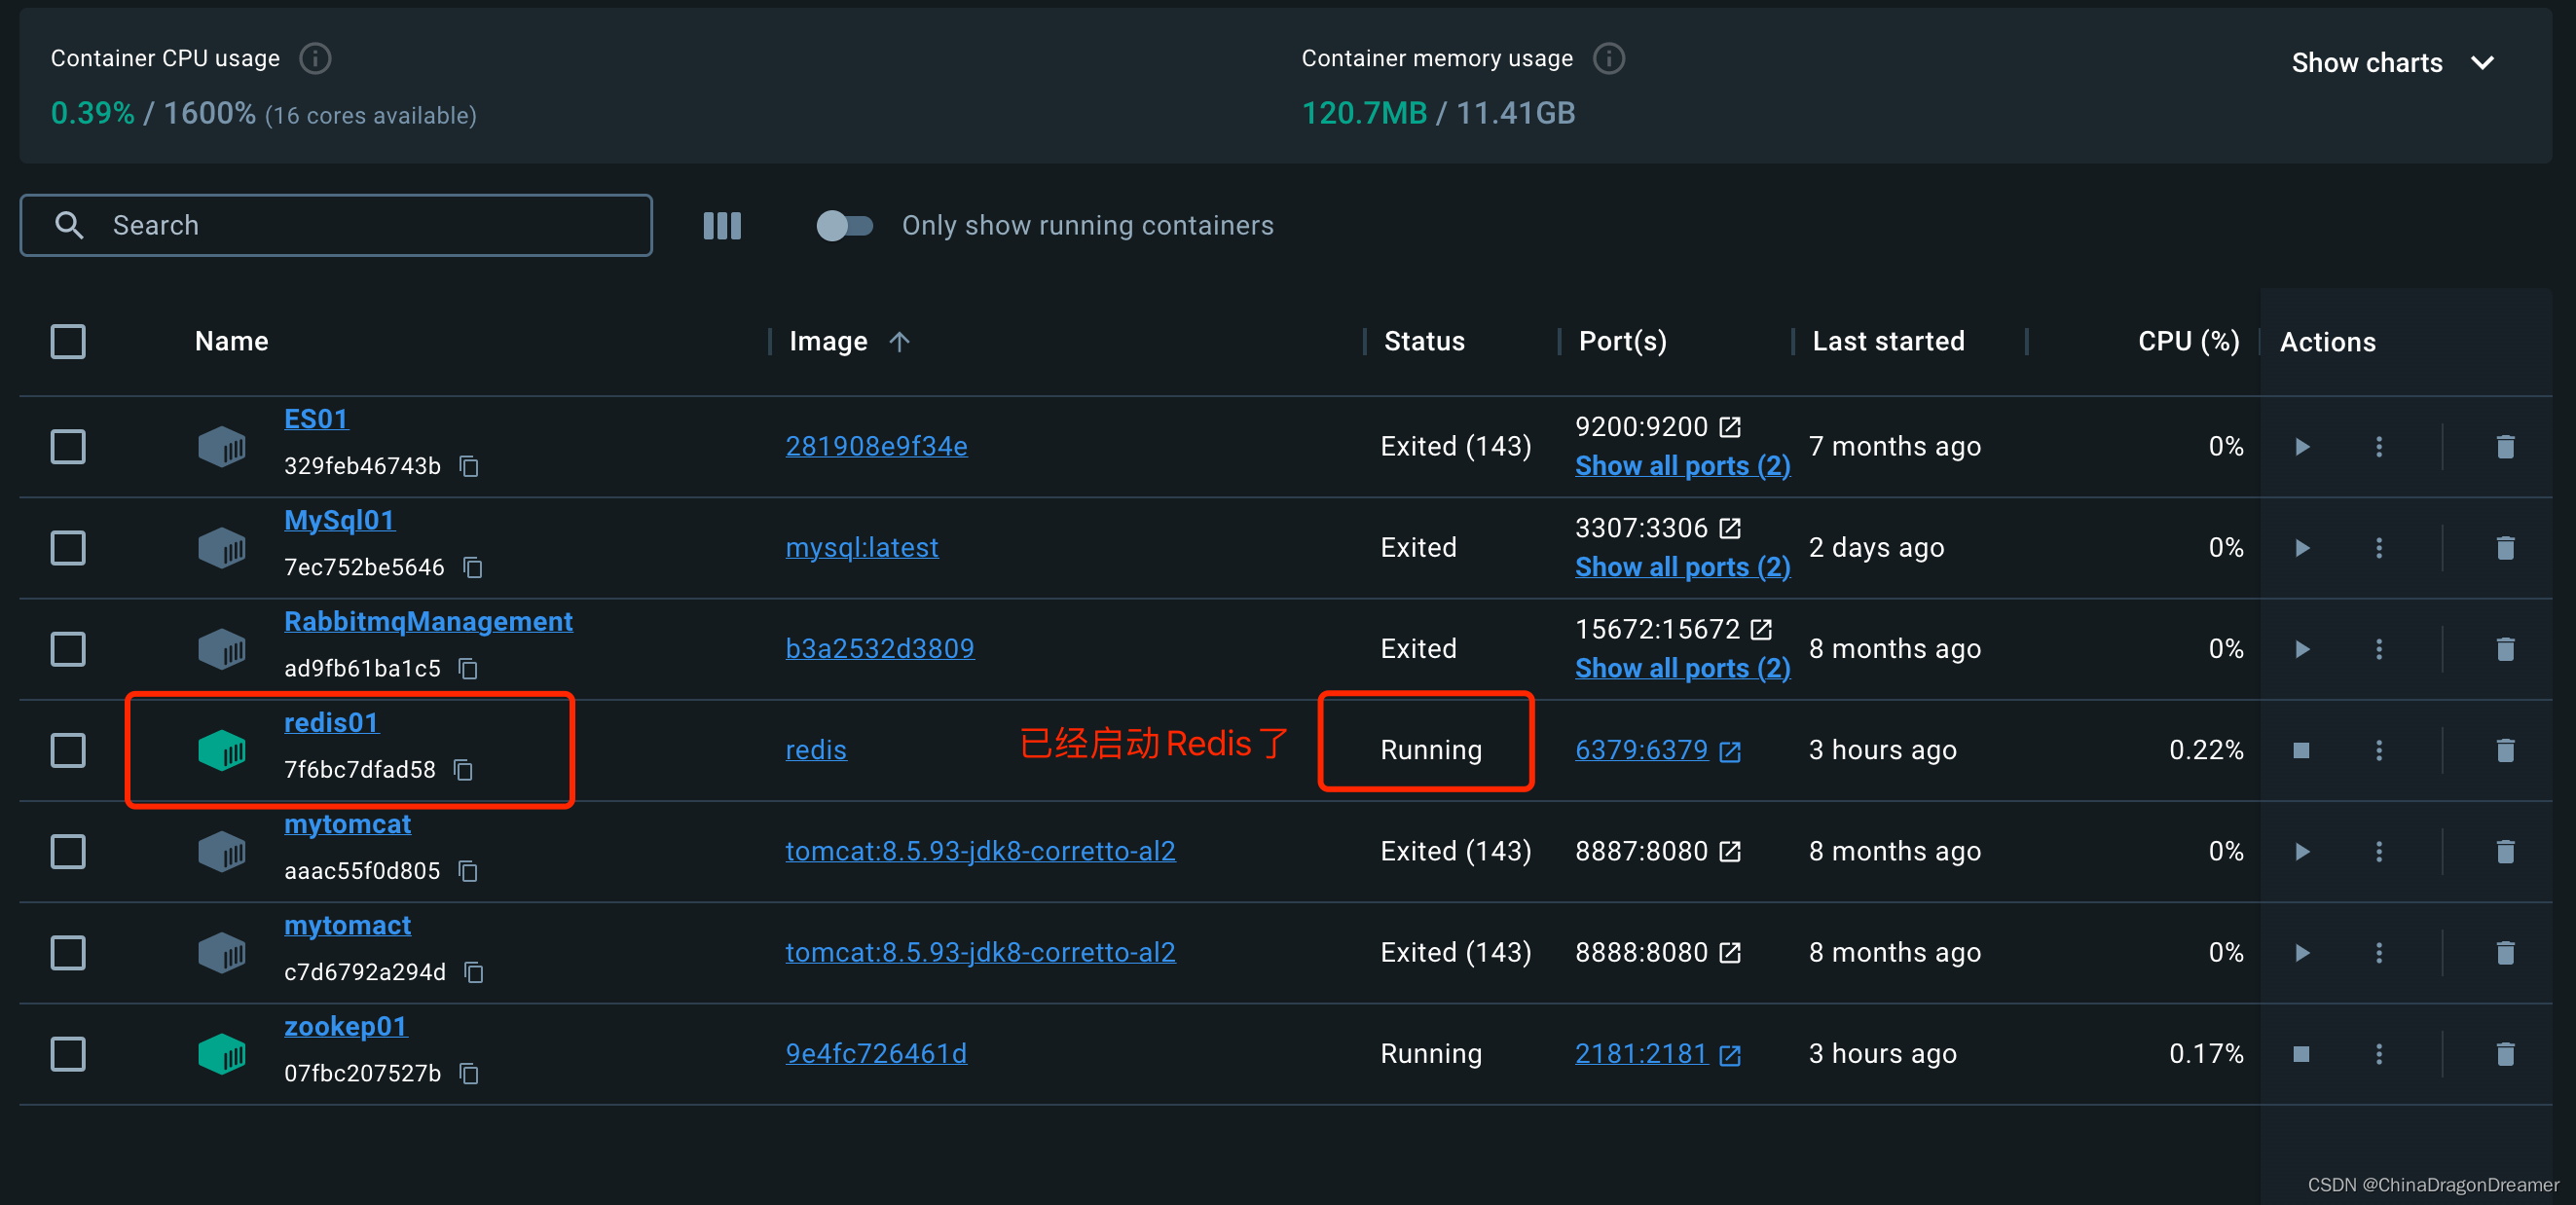
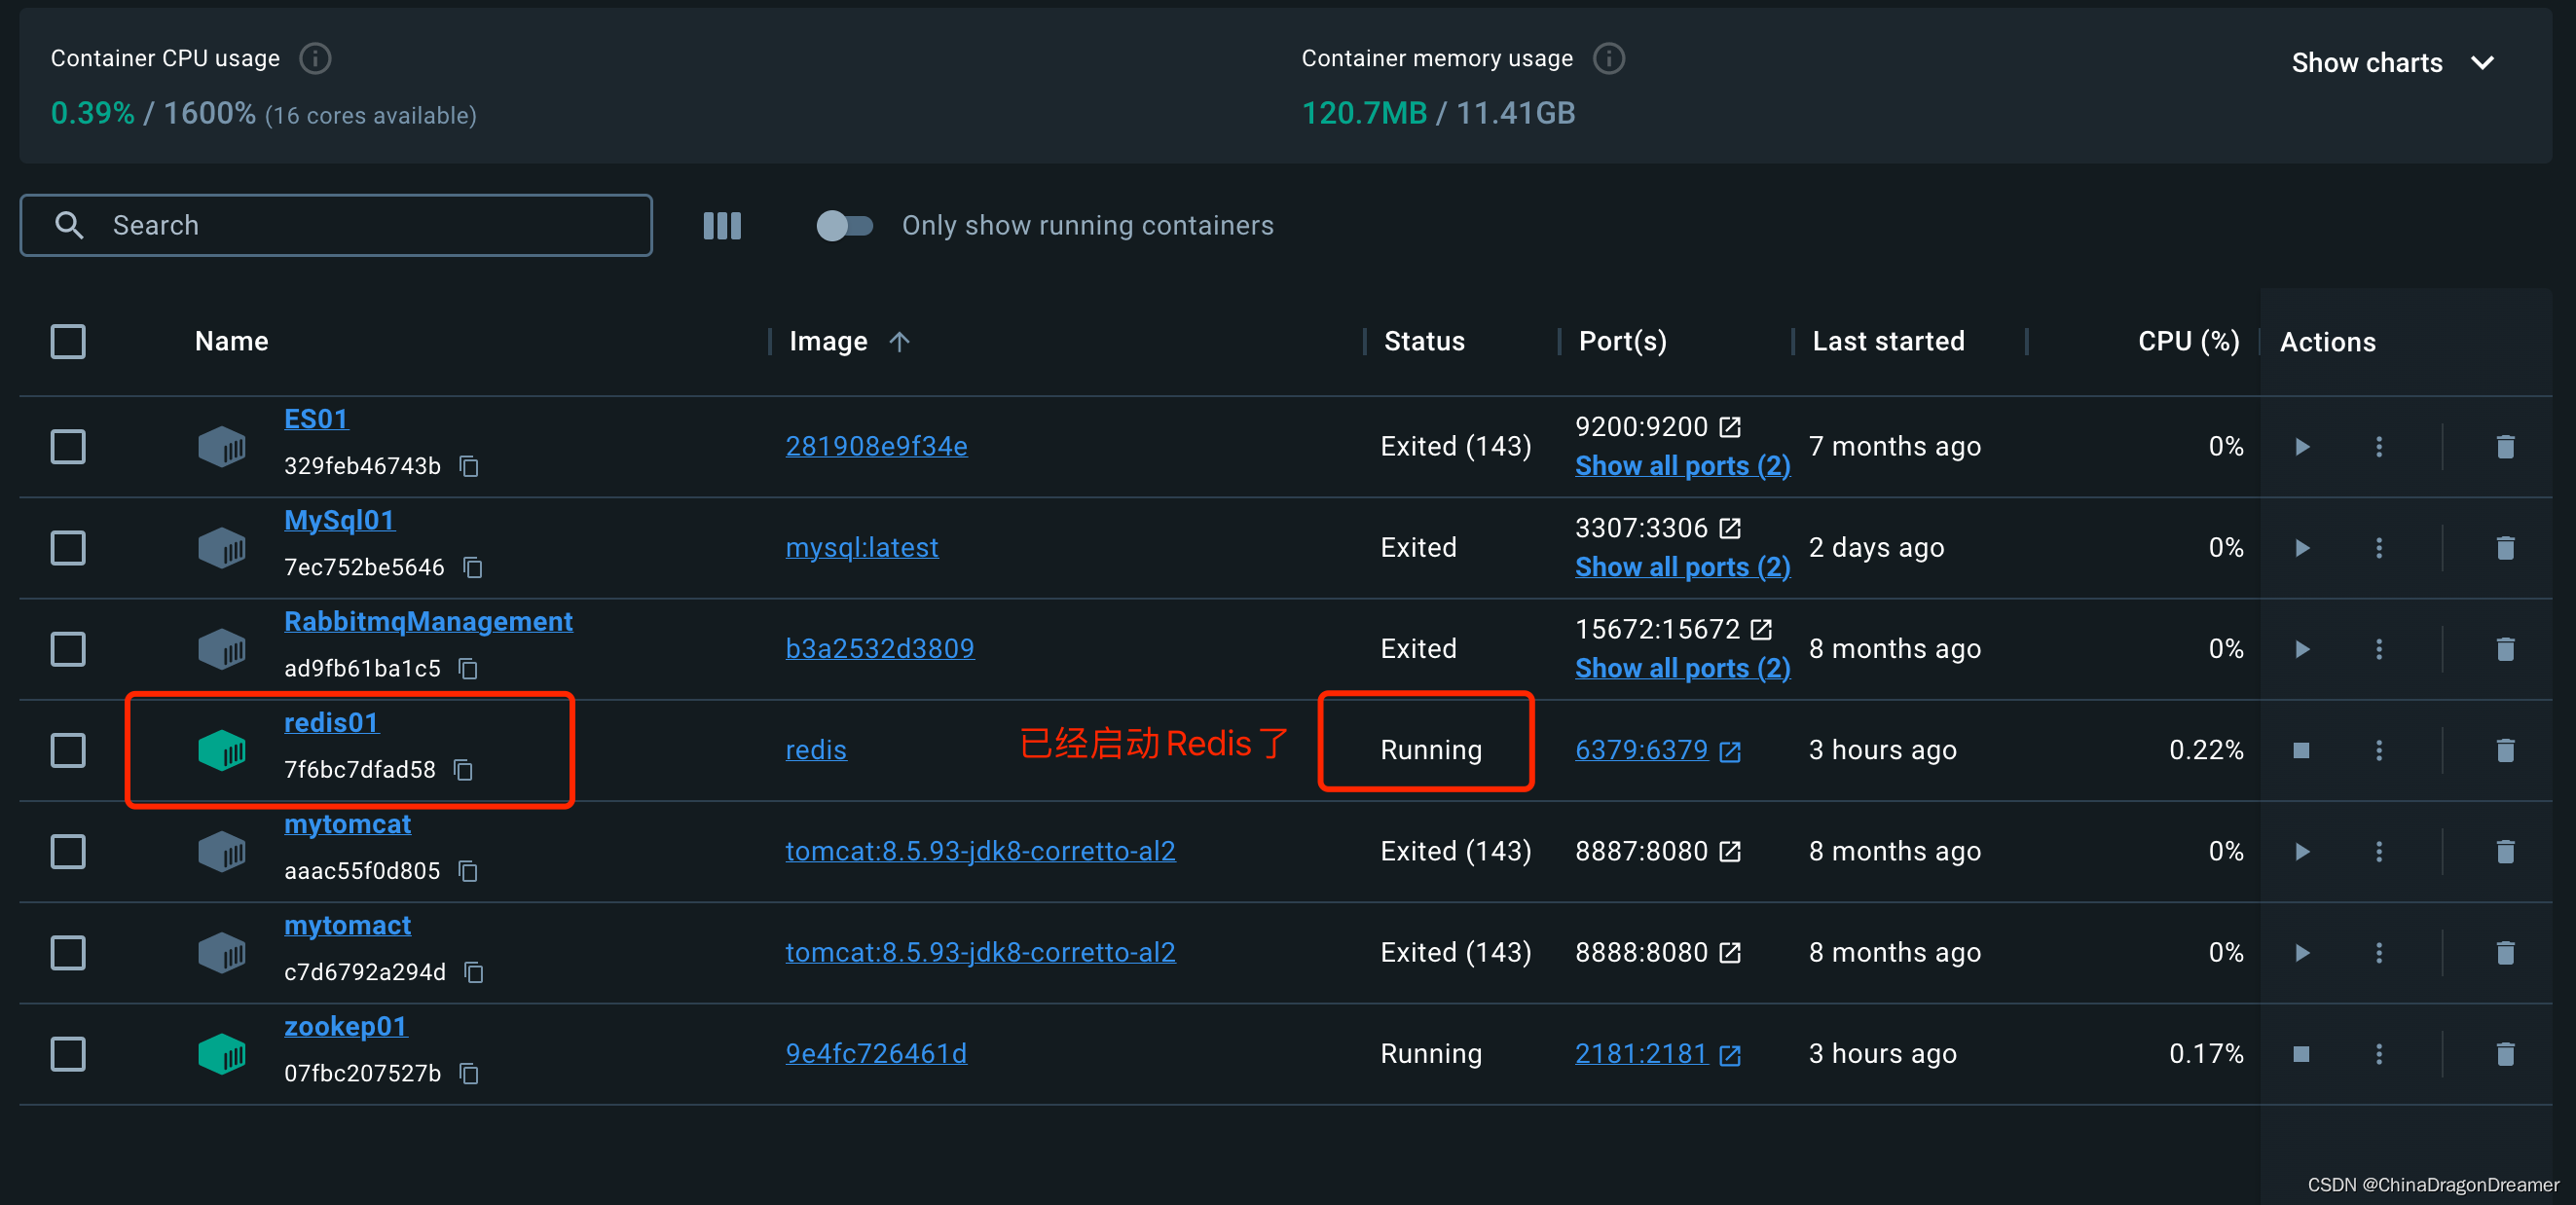
提醒:先安装Redis,示例使用docker安装Redis,如果下图
- 开启基于注解的缓存 @EnableCaching
- 标注缓存注解即可
@Cacheable
@CacheEvict
@CachePut
4.1.1未开启缓存时,每次查询数据都需要访问数据库
验证
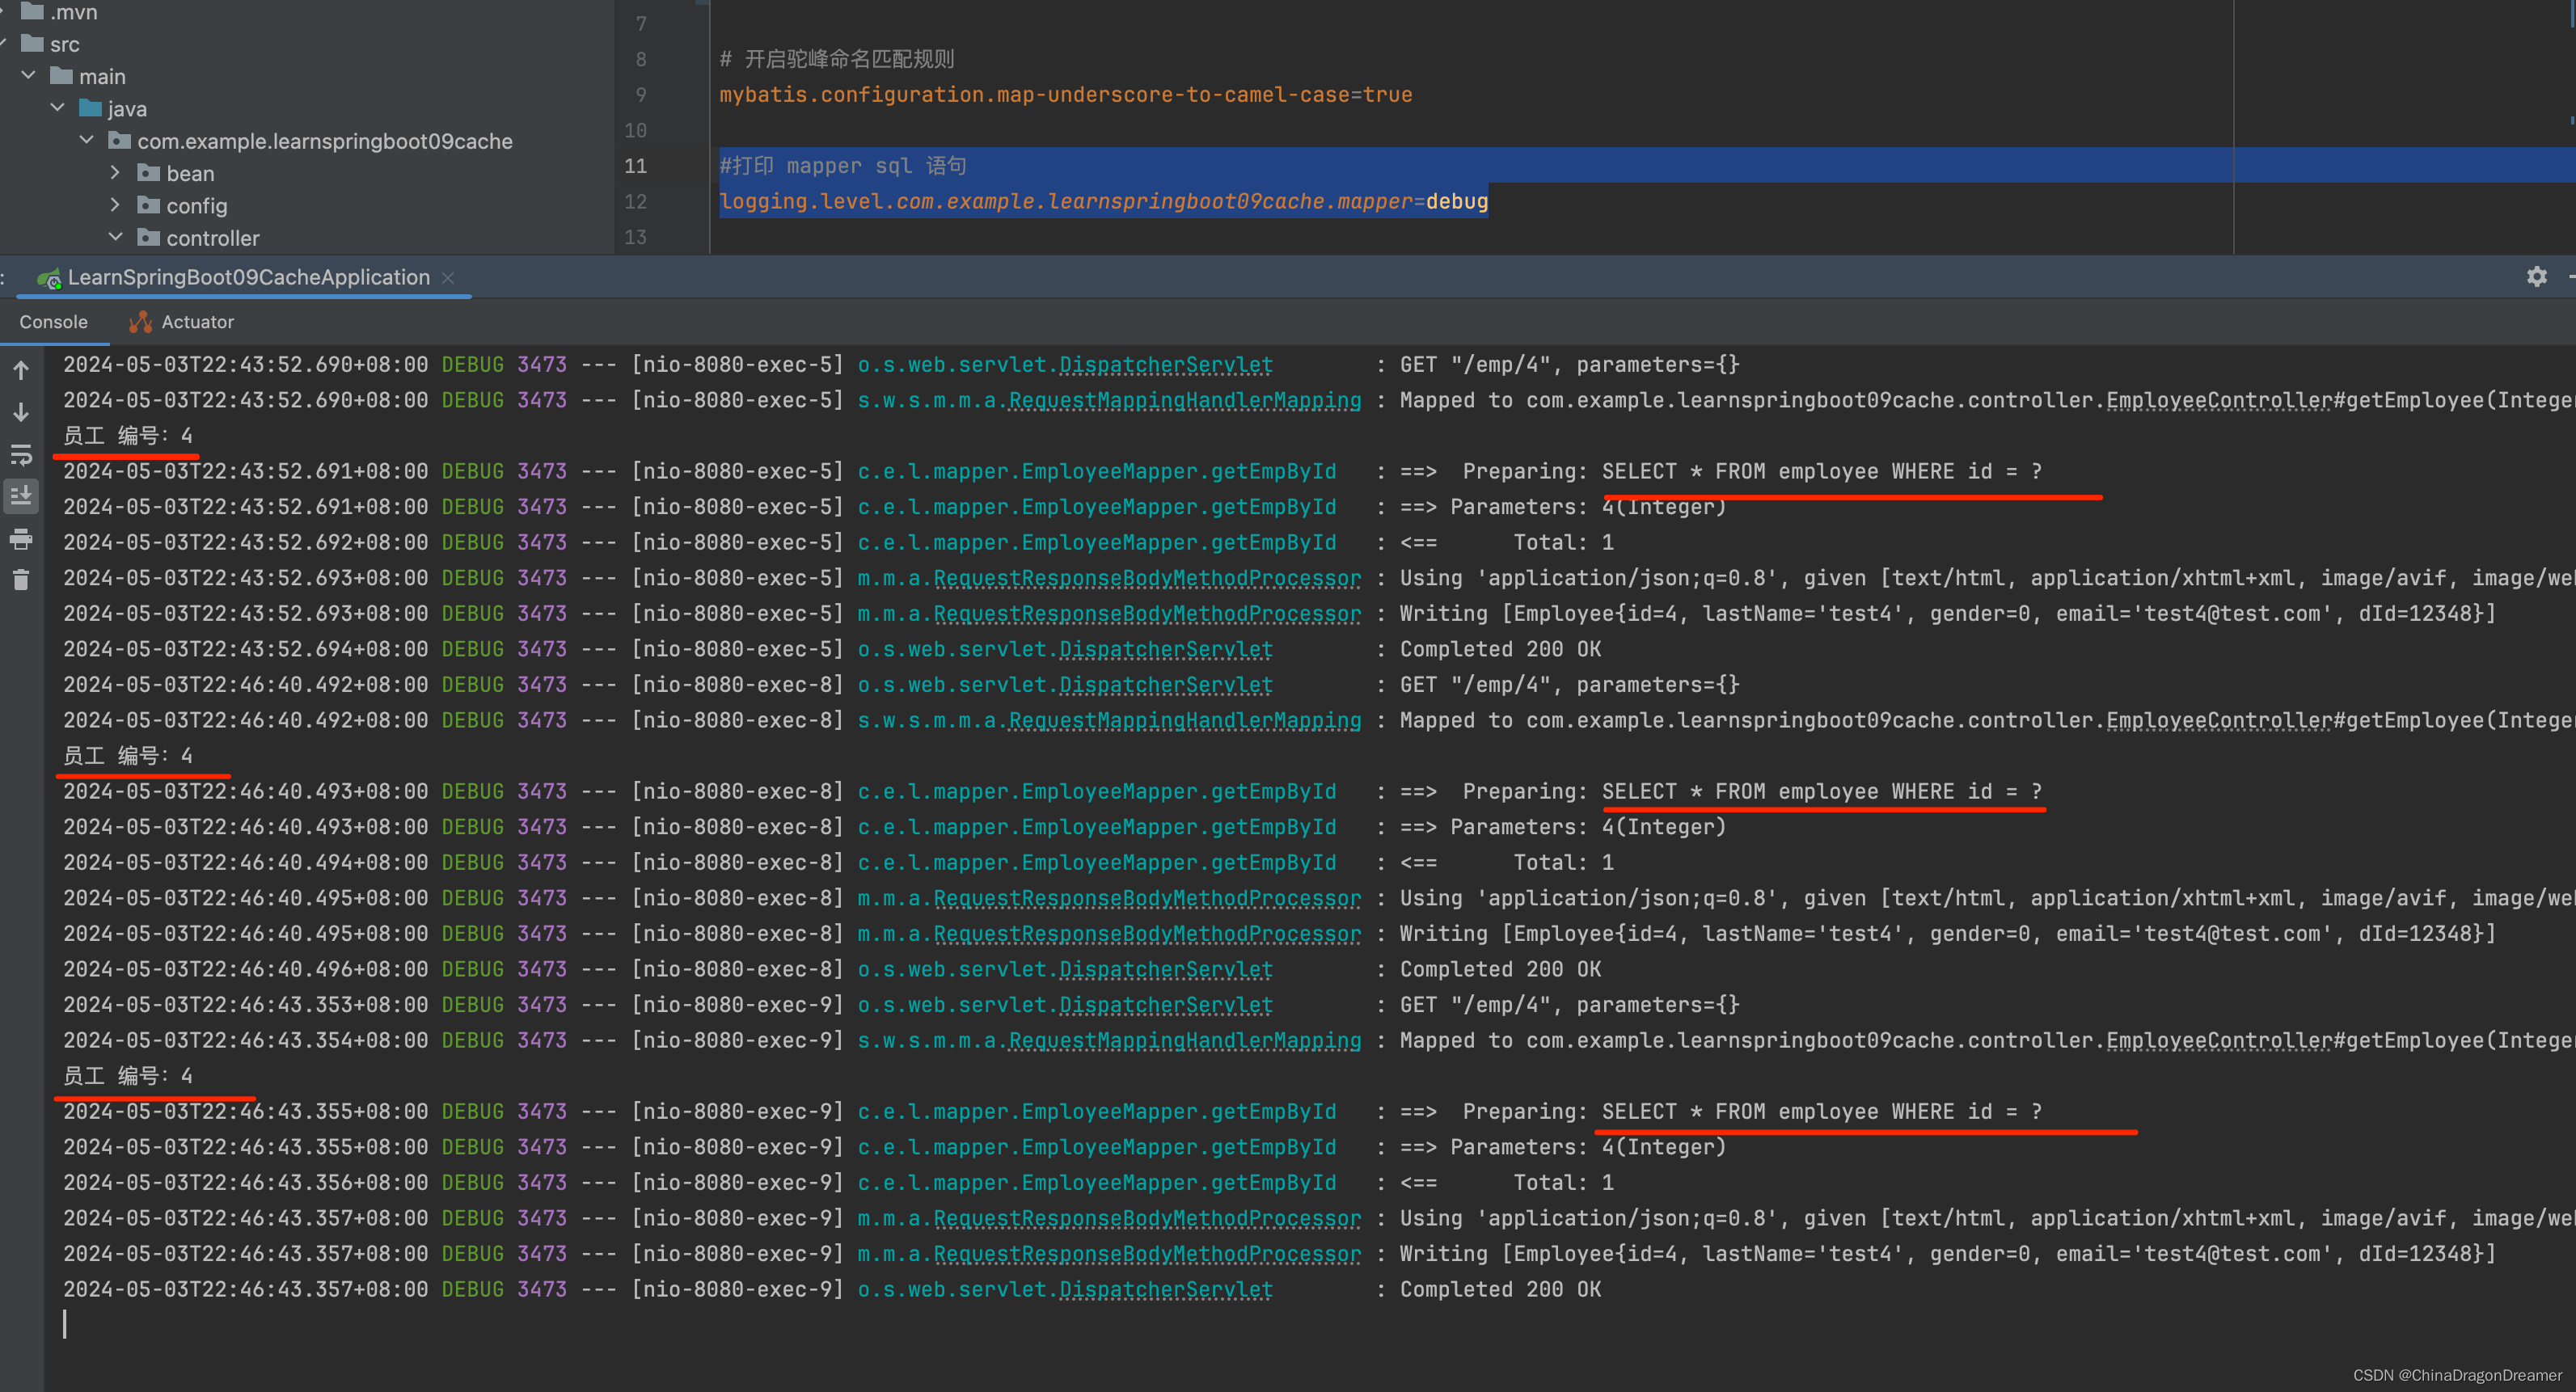
在application.properties配置文件里添加打印 mapper sql 语句
#打印 mapper sql 语句 logging.level.com.example.learnspringboot09cache.mapper=debug 在浏览器里访问http://localhost:8080/emp/4
看控制台查询结果已经打印的SQL日志
从控制台打印的日志可以看到,每次请求都发送了SQL语句,即每次都从数据库里查询

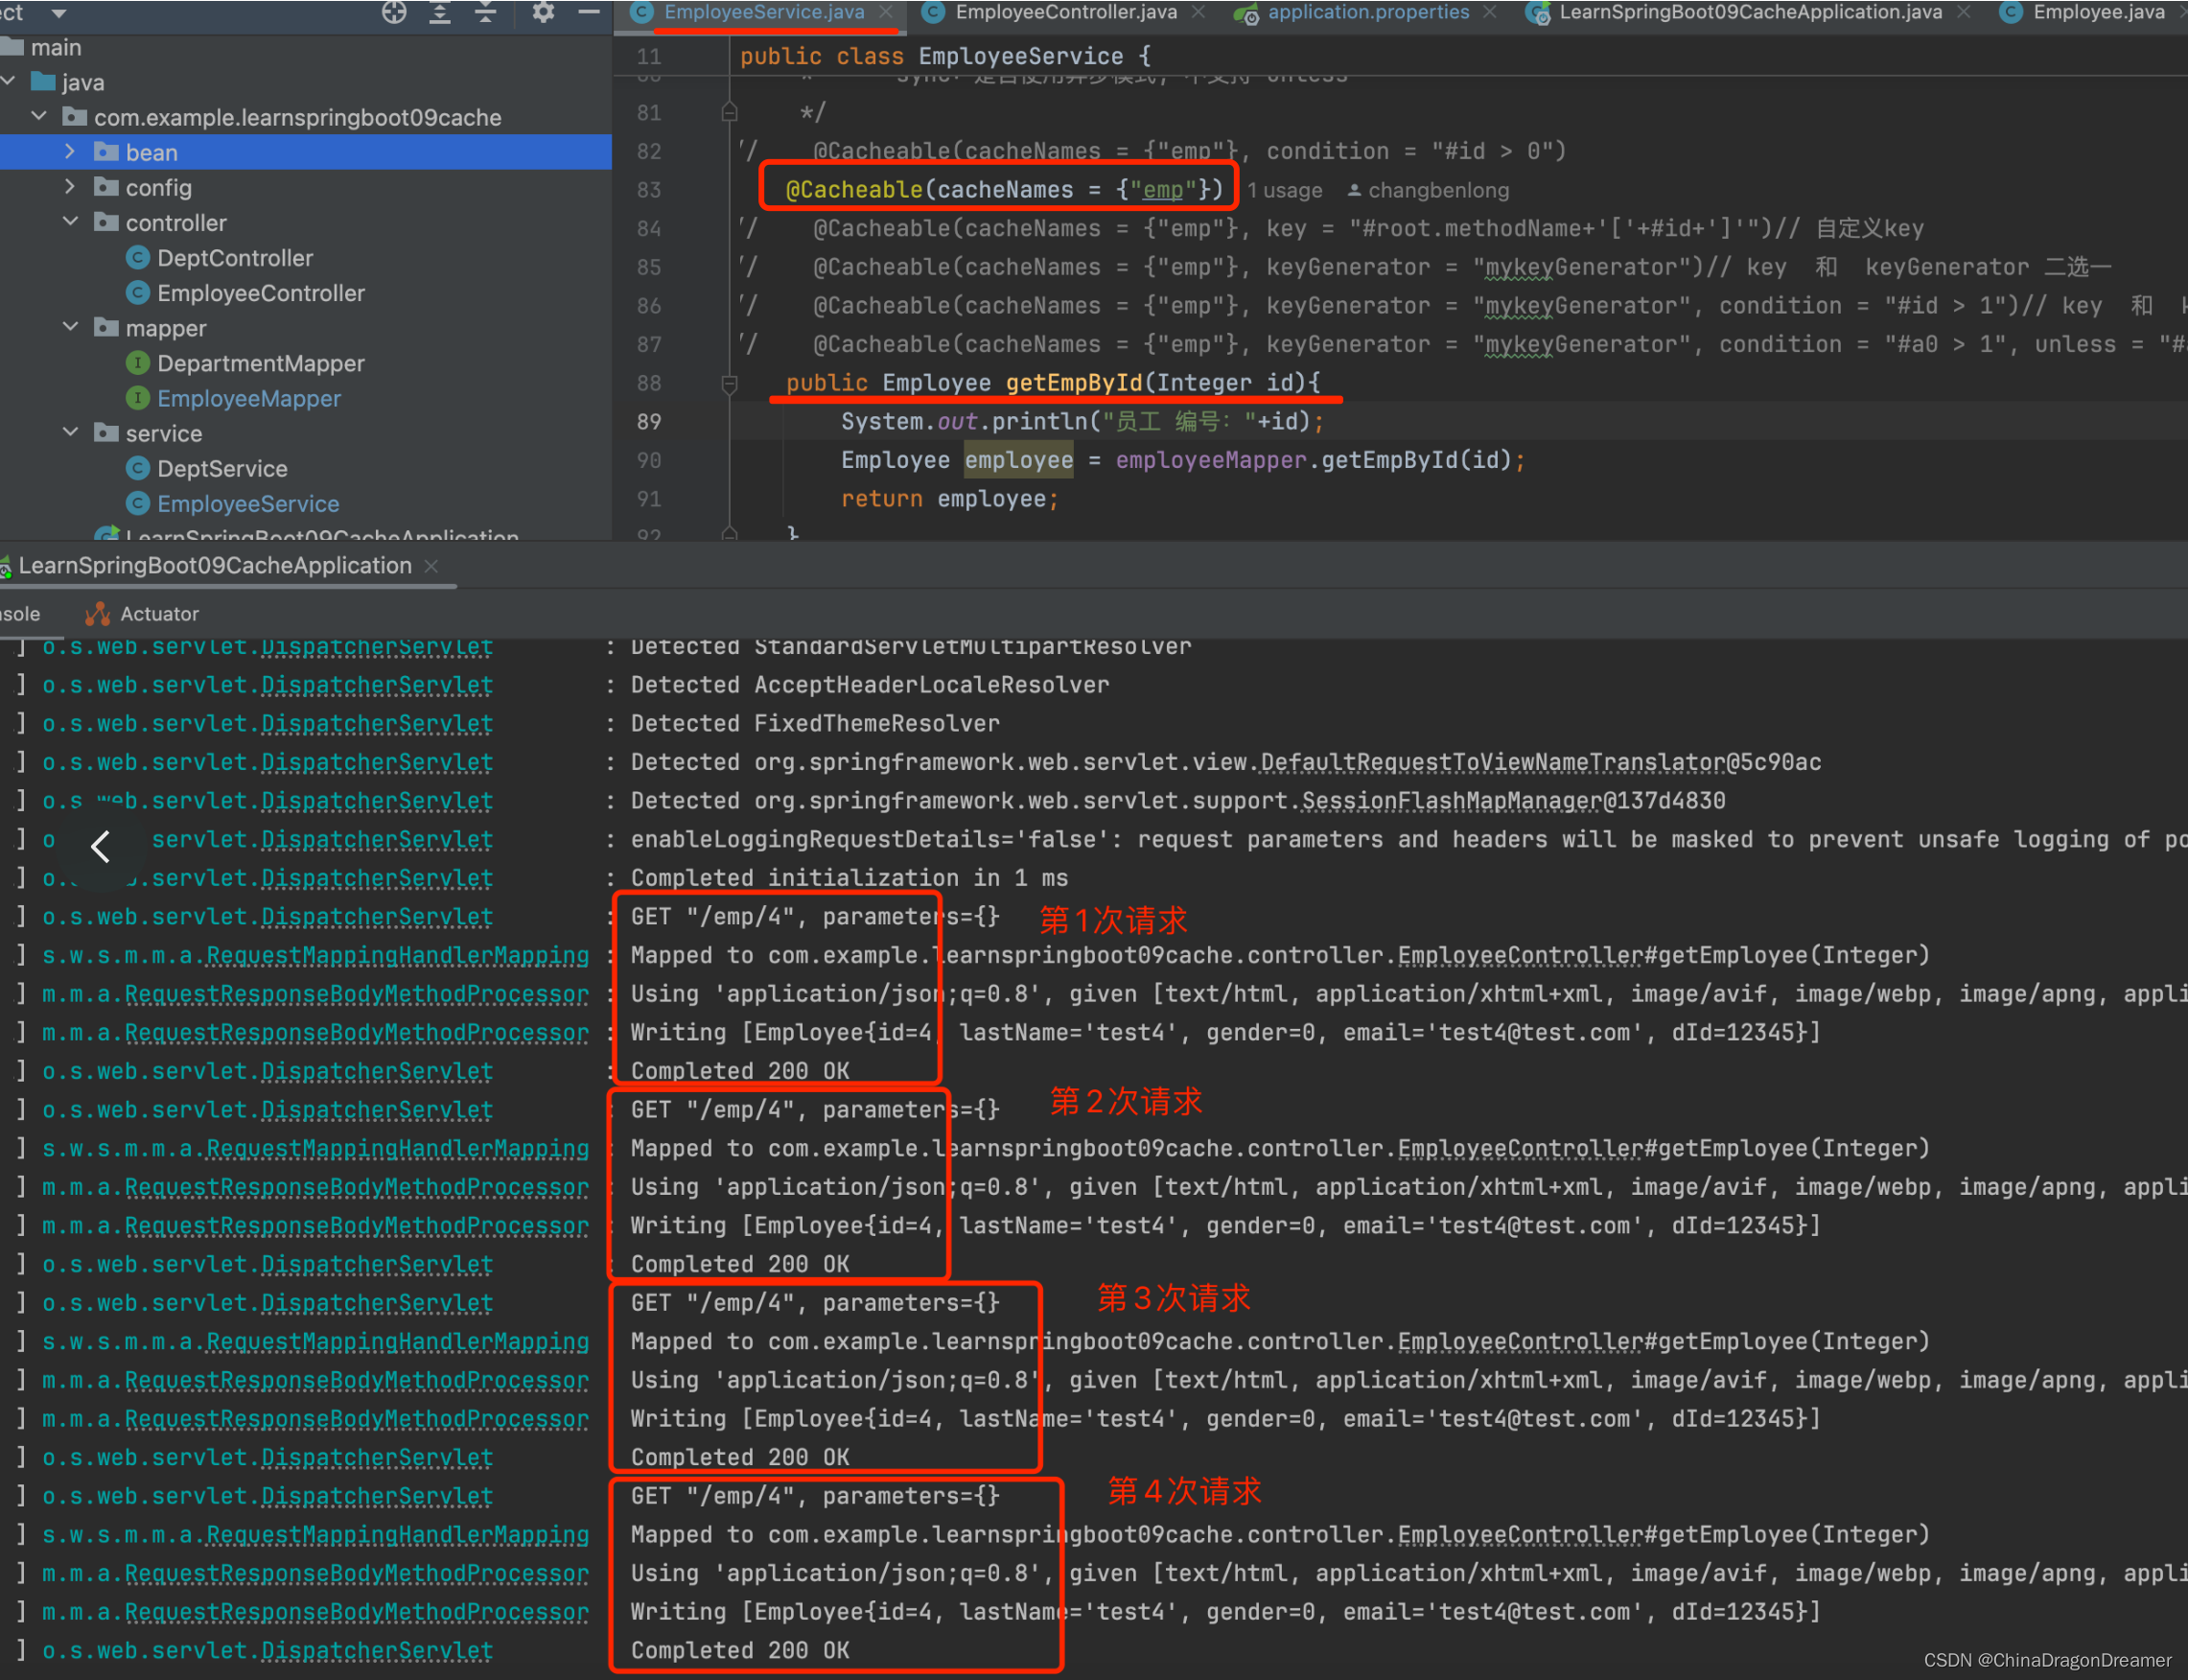
4.1.2 使用@Cacheable开启缓存
提醒:需要先启动Redis,否则运行项目后查询失败,因为连接redis失败
EmployeeService.java代码
讯享网@Service public class EmployeeService {
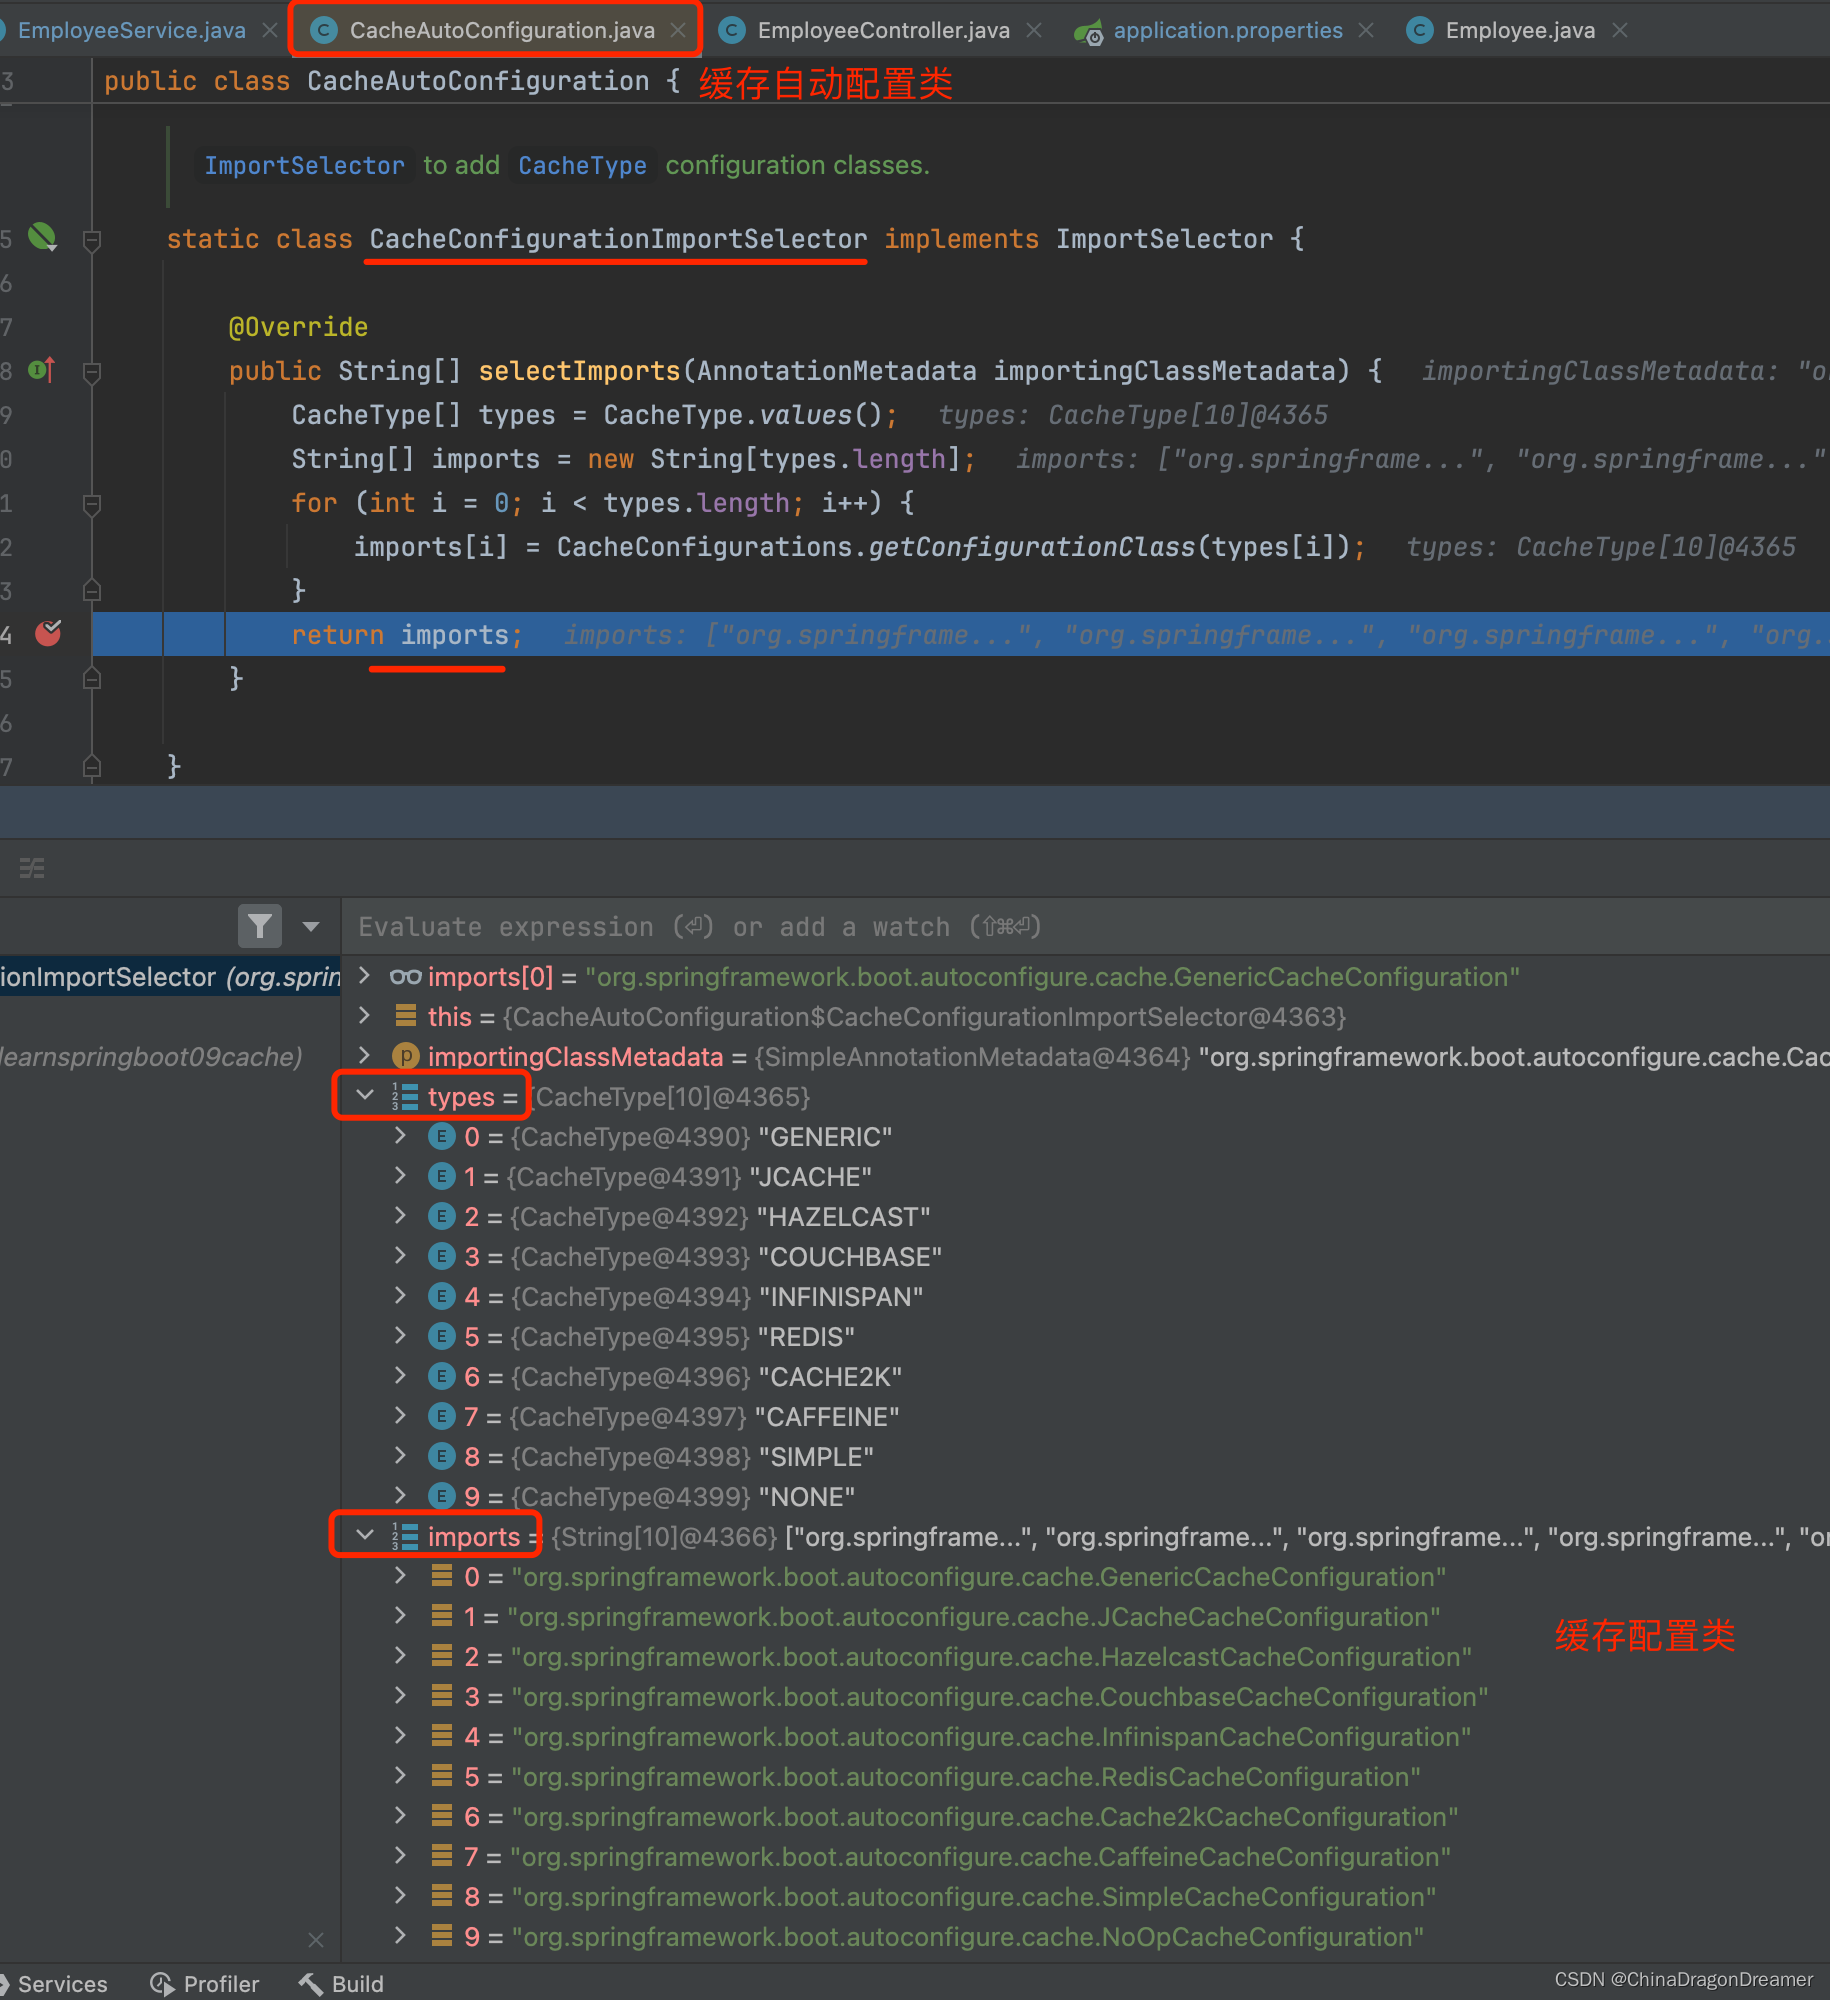
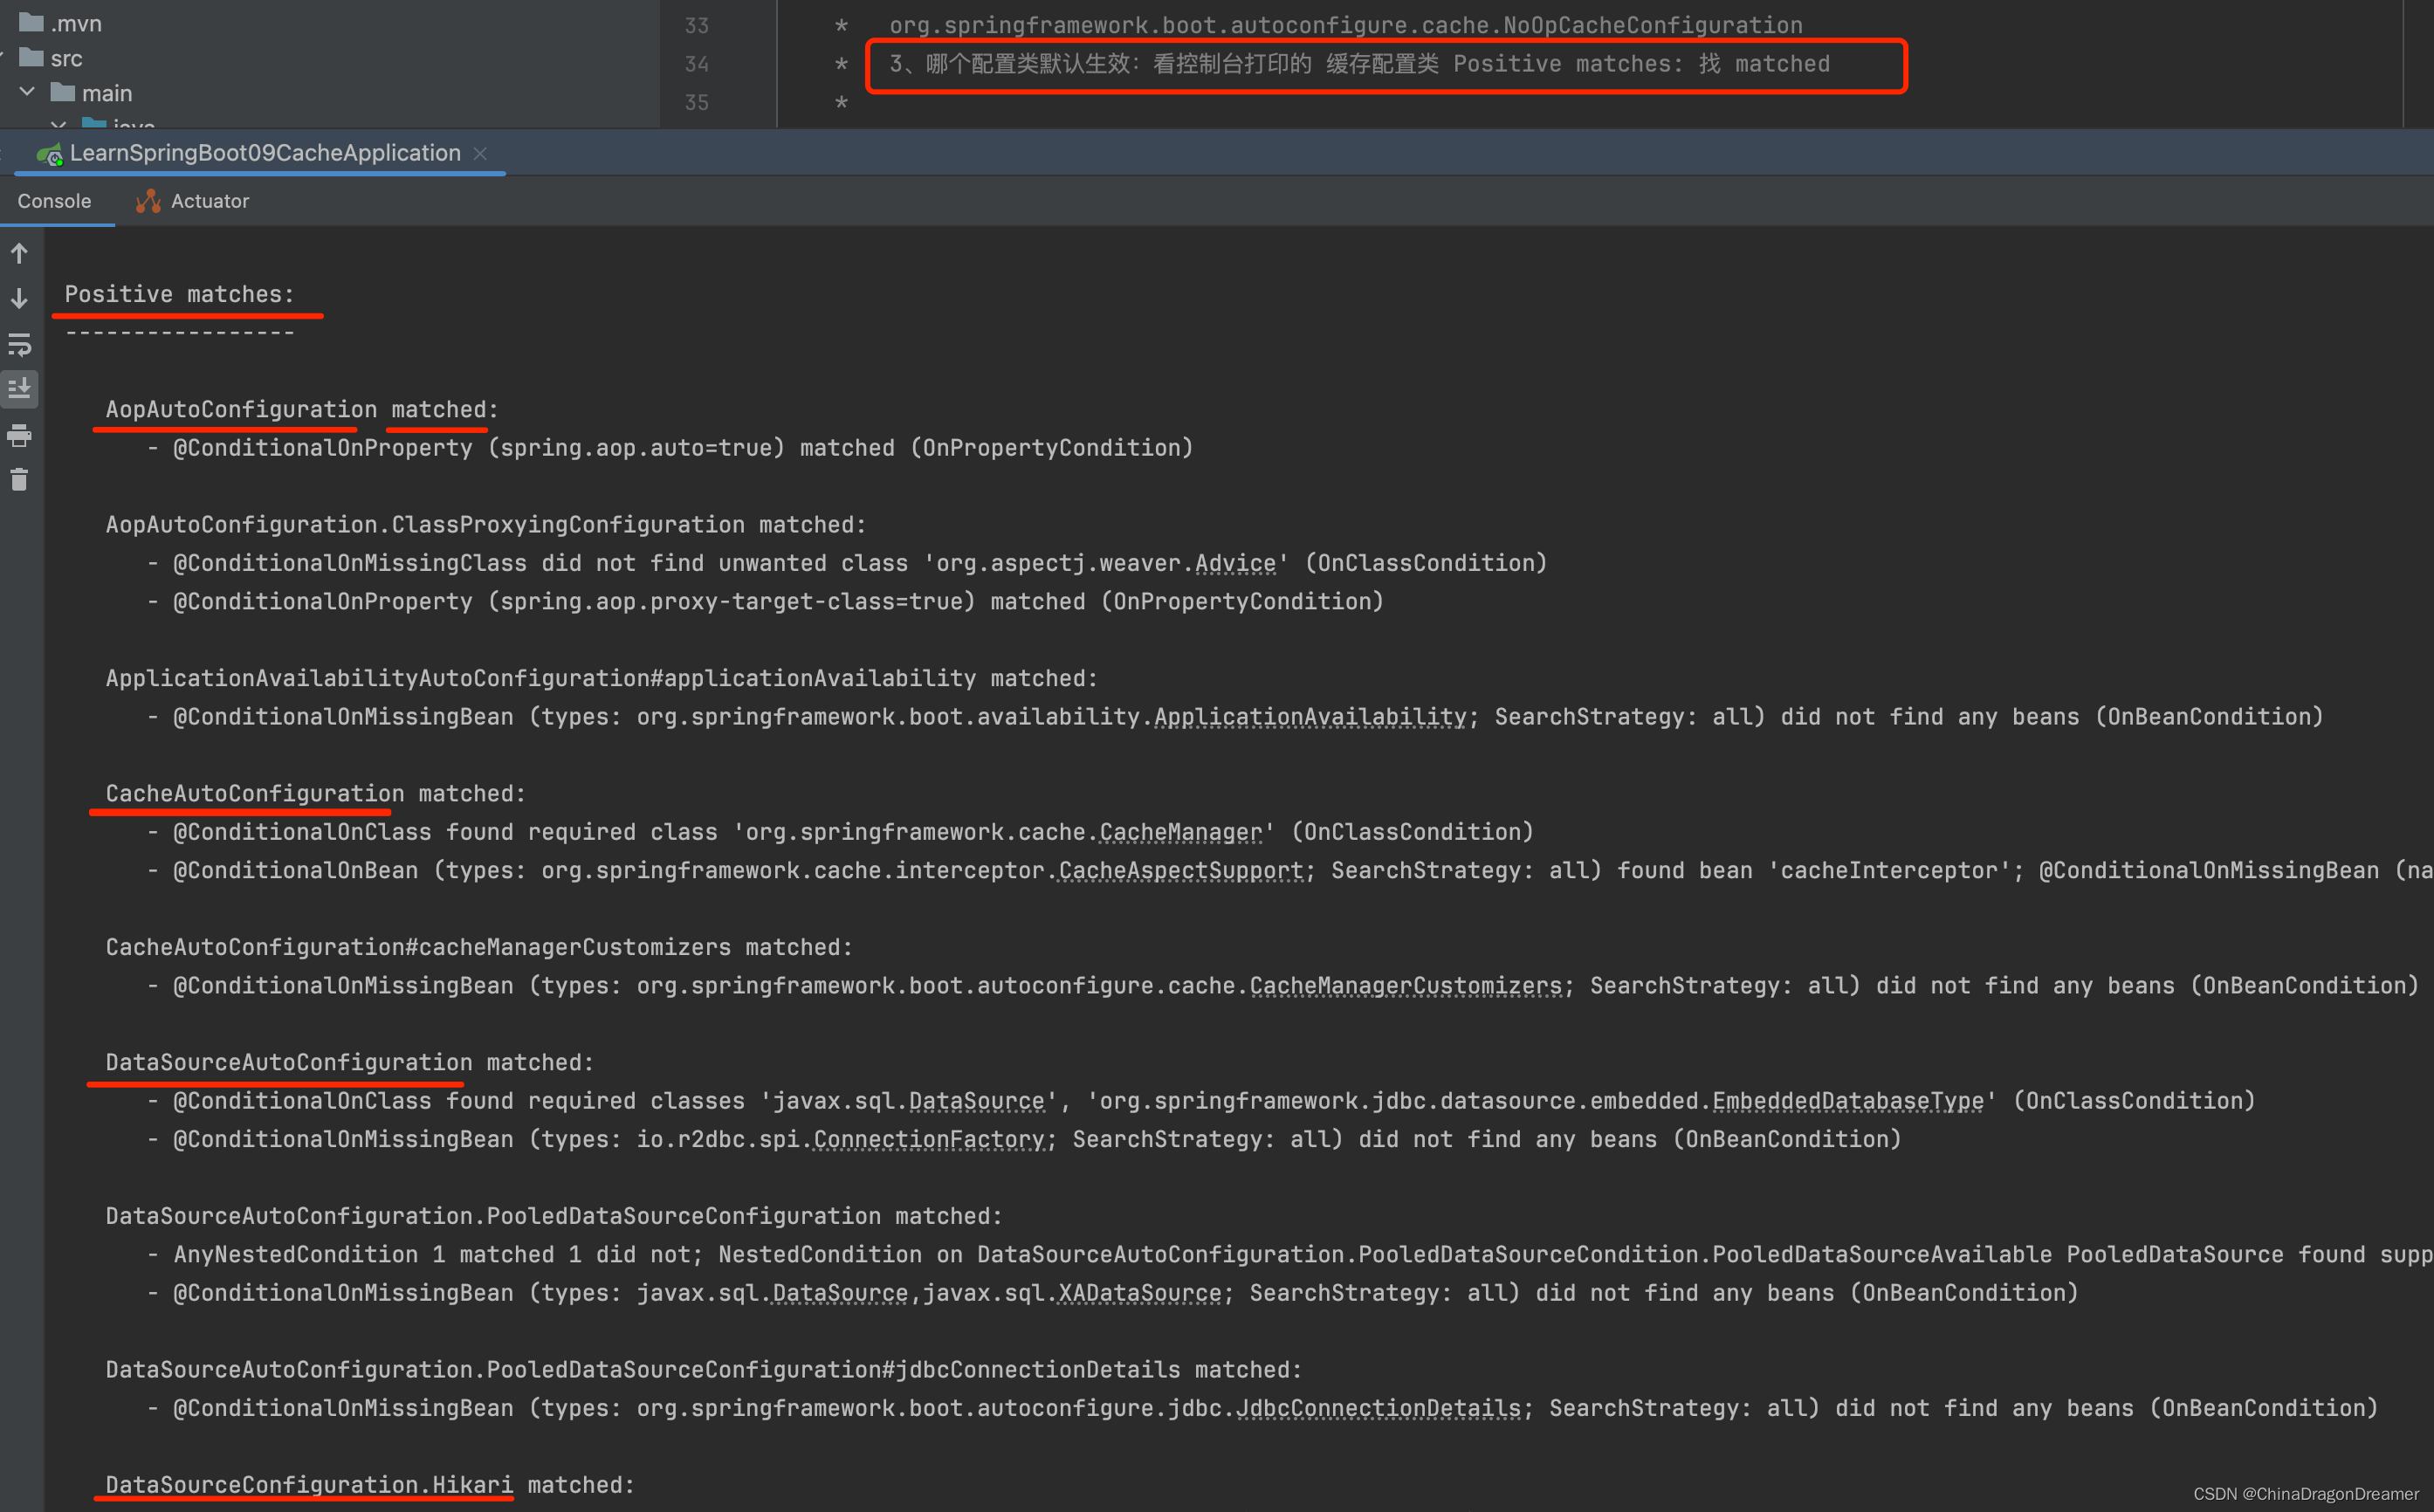
@Autowired EmployeeMapper employeeMapper; /* * 将方法的运行结果进行缓存;以后再要相同的数据,直接从缓存中获取,不用调用方法; * CacheManager管理多个Cache组件的,对缓存的真正CRUD操作在Cache组件中,每一个缓存组件有自己唯一一个名字; * * * 原理: * 1、自动配置类;CacheAutoConfiguration * CacheConfigurationImportSelector selectImports 方法返回的配置类如下 * 2、缓存的配置类 * org.springframework.boot.autoconfigure.cache.GenericCacheConfiguration * org.springframework.boot.autoconfigure.cache.JCacheCacheConfiguration * org.springframework.boot.autoconfigure.cache.EhCacheCacheConfiguration * org.springframework.boot.autoconfigure.cache.HazelcastCacheConfiguration * org.springframework.boot.autoconfigure.cache.InfinispanCacheConfiguration * org.springframework.boot.autoconfigure.cache.CouchbaseCacheConfiguration * org.springframework.boot.autoconfigure.cache.RedisCacheConfiguration * org.springframework.boot.autoconfigure.cache.CaffeineCacheConfiguration * org.springframework.boot.autoconfigure.cache.GuavaCacheConfiguration * org.springframework.boot.autoconfigure.cache.SimpleCacheConfiguration * org.springframework.boot.autoconfigure.cache.NoOpCacheConfiguration * 3、哪个配置类默认生效:看控制台打印的 缓存配置类 Positive matches: 找 matched * * 4、给容器中注册了一个CacheManager:ConcurrentMapCacheManager * 5、可以获取和创建ConcurrentMapCache类型的缓存组件;他的作用将数据保存在ConcurrentMap中; * * 运行流程: * @Cacheable: * 1、方法运行之前,先去查询Cache(缓存组件),按照cacheNames指定的名字获取; * (CacheManager先获取相应的缓存),第一次获取缓存如果没有Cache组件会自动创建。 * 2、去Cache中查找缓存的内容,使用一个key,默认就是方法的参数; * key是按照某种策略生成的;默认是使用keyGenerator生成的,默认使用SimpleKeyGenerator生成key; * SimpleKeyGenerator生成key的默认策略; * 如果没有参数;key=new SimpleKey(); * 如果有一个参数:key=参数的值 * 如果有多个参数:key=new SimpleKey(params); * 3、没有查到缓存就调用目标方法; * 4、将目标方法返回的结果,放进缓存中 * * @Cacheable标注的方法执行之前先来检查缓存中有没有这个数据,默认按照参数的值作为key去查询缓存, * 如果没有就运行方法并将结果放入缓存;以后再来调用就可以直接使用缓存中的数据; * * 核心: * 1)、使用CacheManager【ConcurrentMapCacheManager】按照名字得到Cache【ConcurrentMapCache】组件 * 2)、key使用keyGenerator生成的,默认是SimpleKeyGenerator * * * 几个属性: * cacheNames/value:指定缓存组件的名字;将方法的返回结果放在哪个缓存中,是数组的方式,可以指定多个缓存; * * key:缓存数据使用的key;可以用它来指定。默认是使用方法参数的值 1-方法的返回值 * 编写SpEL; #i d;参数id的值 #a0 #p0 #root.args[0] * getEmp[2] * * keyGenerator:key的生成器;可以自己指定key的生成器的组件id * key/keyGenerator:二选一使用; * * * cacheManager:指定缓存管理器;或者cacheResolver指定获取解析器 * * condition:指定符合条件的情况下才缓存; * ,condition = "#id>0" * condition = "#a0>1":第一个参数的值》1的时候才进行缓存 * * unless:否定缓存;当unless指定的条件为true,方法的返回值就不会被缓存;可以获取到结果进行判断 * unless = "#result == null" * unless = "#a0==2":如果第一个参数的值是2,结果不缓存; * sync:是否使用异步模式, 不支持 unless */ // @Cacheable(cacheNames = {
"emp"}, condition = "#id > 0") @Cacheable(cacheNames = {
"emp"}) // @Cacheable(cacheNames = {
"emp"}, key = "#root.methodName+'['+#id+']'")// 自定义key // @Cacheable(cacheNames = {
"emp"}, keyGenerator = "mykeyGenerator")// key 和 keyGenerator 二选一 // @Cacheable(cacheNames = {
"emp"}, keyGenerator = "mykeyGenerator", condition = "#id > 1")// key 和 keyGenerator 二选一 // @Cacheable(cacheNames = {
"emp"}, keyGenerator = "mykeyGenerator", condition = "#a0 > 1", unless = "#a0 == 2")// key 和 keyGenerator 二选一 public Employee getEmpById(Integer id){
System.out.println("员工 编号:"+id); Employee employee = employeeMapper.getEmpById(id); return employee; } }
控制台日志
从控制台打印的日志可以看到,每次请求不再发送SQL语句了,即不再查询数据库了,说明缓存生效了
4.1.3 原理
- 自动配置类;CacheAutoConfiguration
查看内部类CacheConfigurationImportSelector,里面有 selectImports 方法返回的配置类如下:2 缓存的配置类
- 缓存的配置类
org.springframework.boot.autoconfigure.cache.GenericCacheConfiguration
org.springframework.boot.autoconfigure.cache.JCacheCacheConfiguration
org.springframework.boot.autoconfigure.cache.EhCacheCacheConfiguration
org.springframework.boot.autoconfigure.cache.HazelcastCacheConfiguration
org.springframework.boot.autoconfigure.cache.InfinispanCacheConfiguration
org.springframework.boot.autoconfigure.cache.CouchbaseCacheConfiguration
org.springframework.boot.autoconfigure.cache.RedisCacheConfiguration
org.springframework.boot.autoconfigure.cache.CaffeineCacheConfiguration
org.springframework.boot.autoconfigure.cache.GuavaCacheConfiguration
org.springframework.boot.autoconfigure.cache.SimpleCacheConfiguration
org.springframework.boot.autoconfigure.cache.NoOpCacheConfiguration
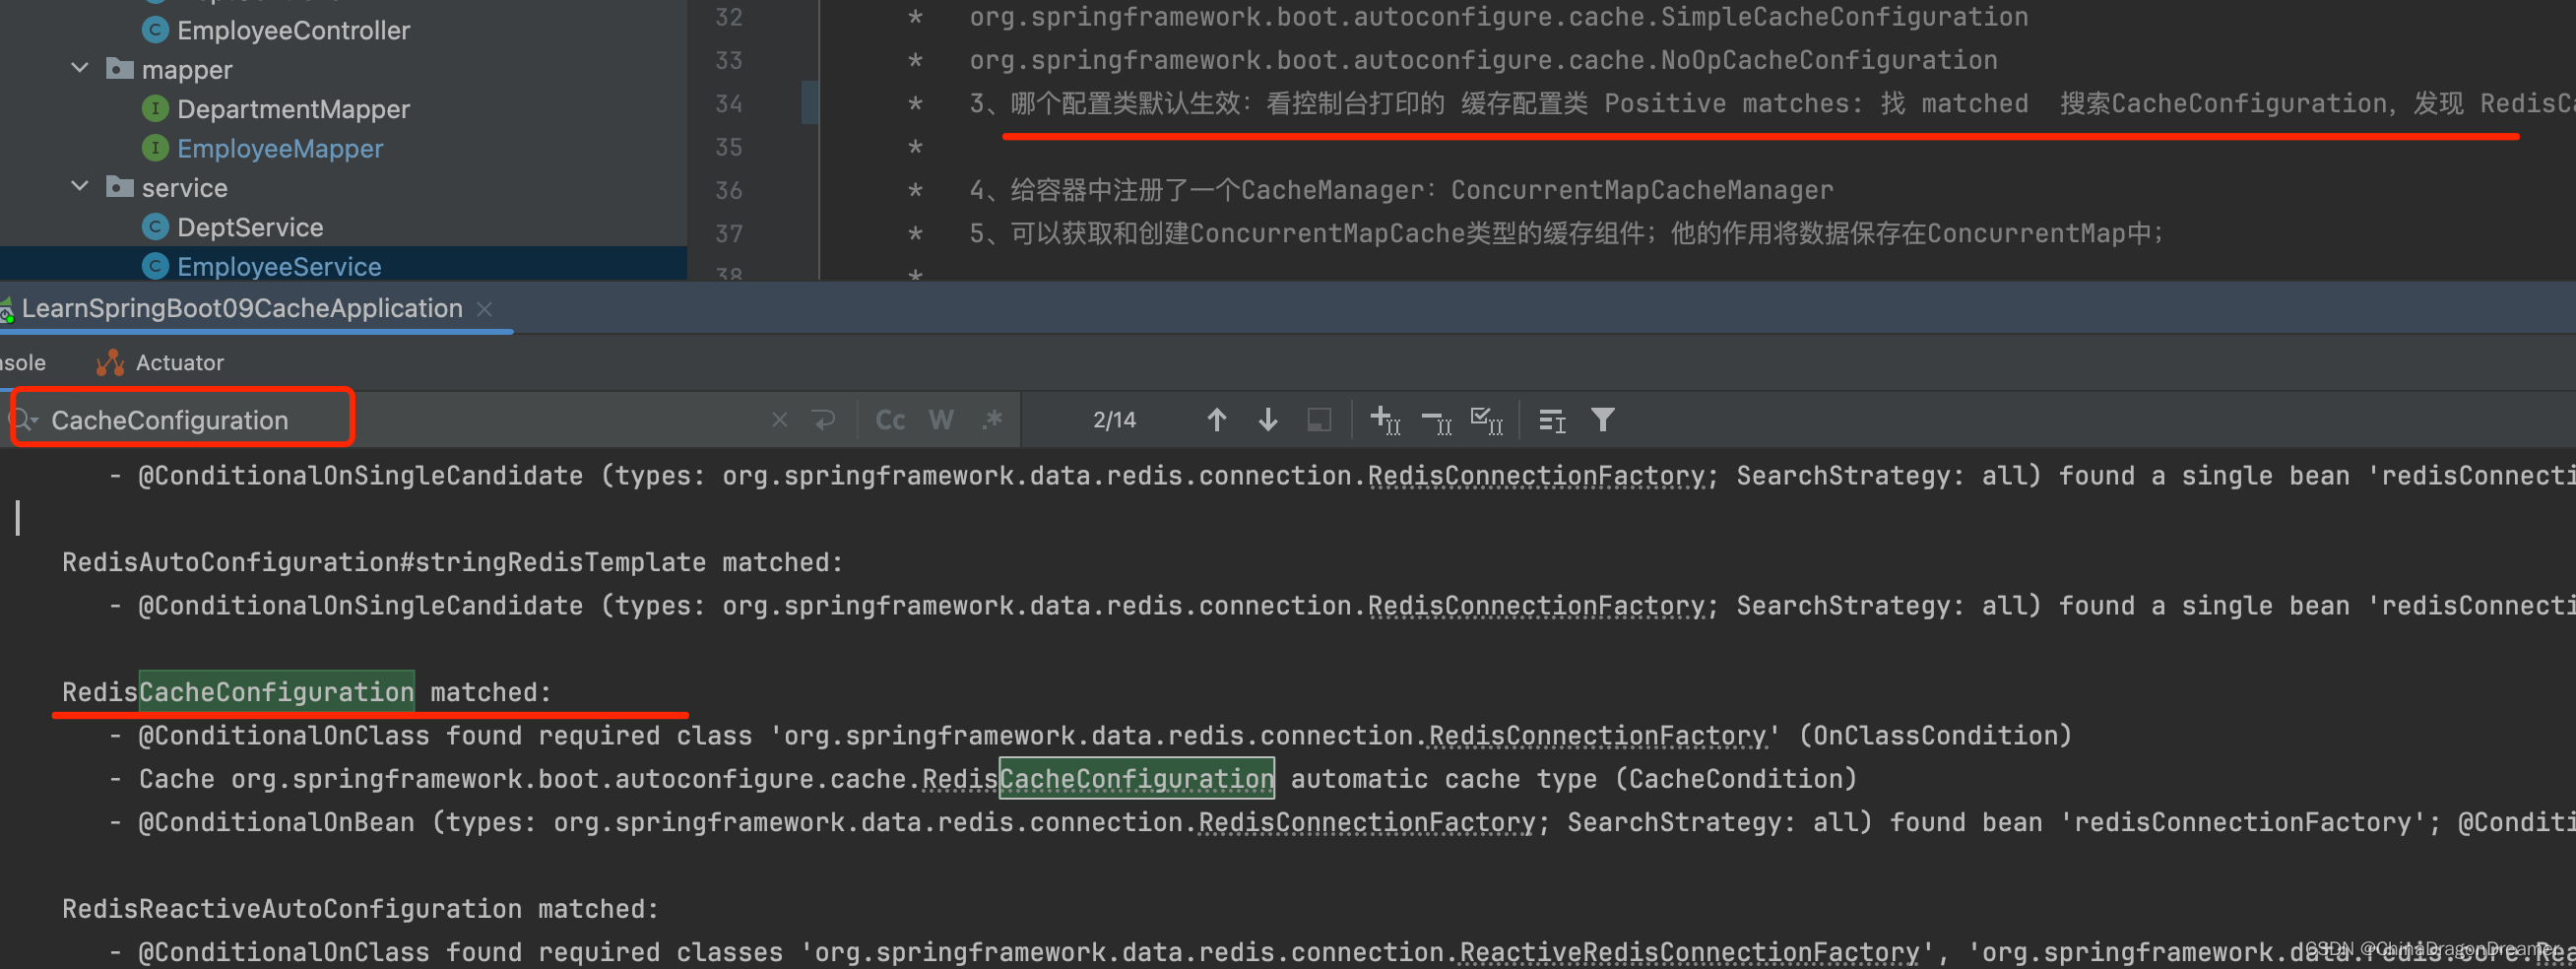
- 哪个配置类默认生效:看控制台打印的 缓存配置类 Positive matches: 找 matched,搜索CacheConfiguration,发现 RedisCacheConfiguration 在matched里
注意:pom.xml里引入Redis之后 ,RedisCacheConfiguration, 默认的是 SimpleCacheConfiguration
提醒:在application.properties配置文件里添加 debug=true

- 给容器中注册了一个CacheManager:ConcurrentMapCacheManager
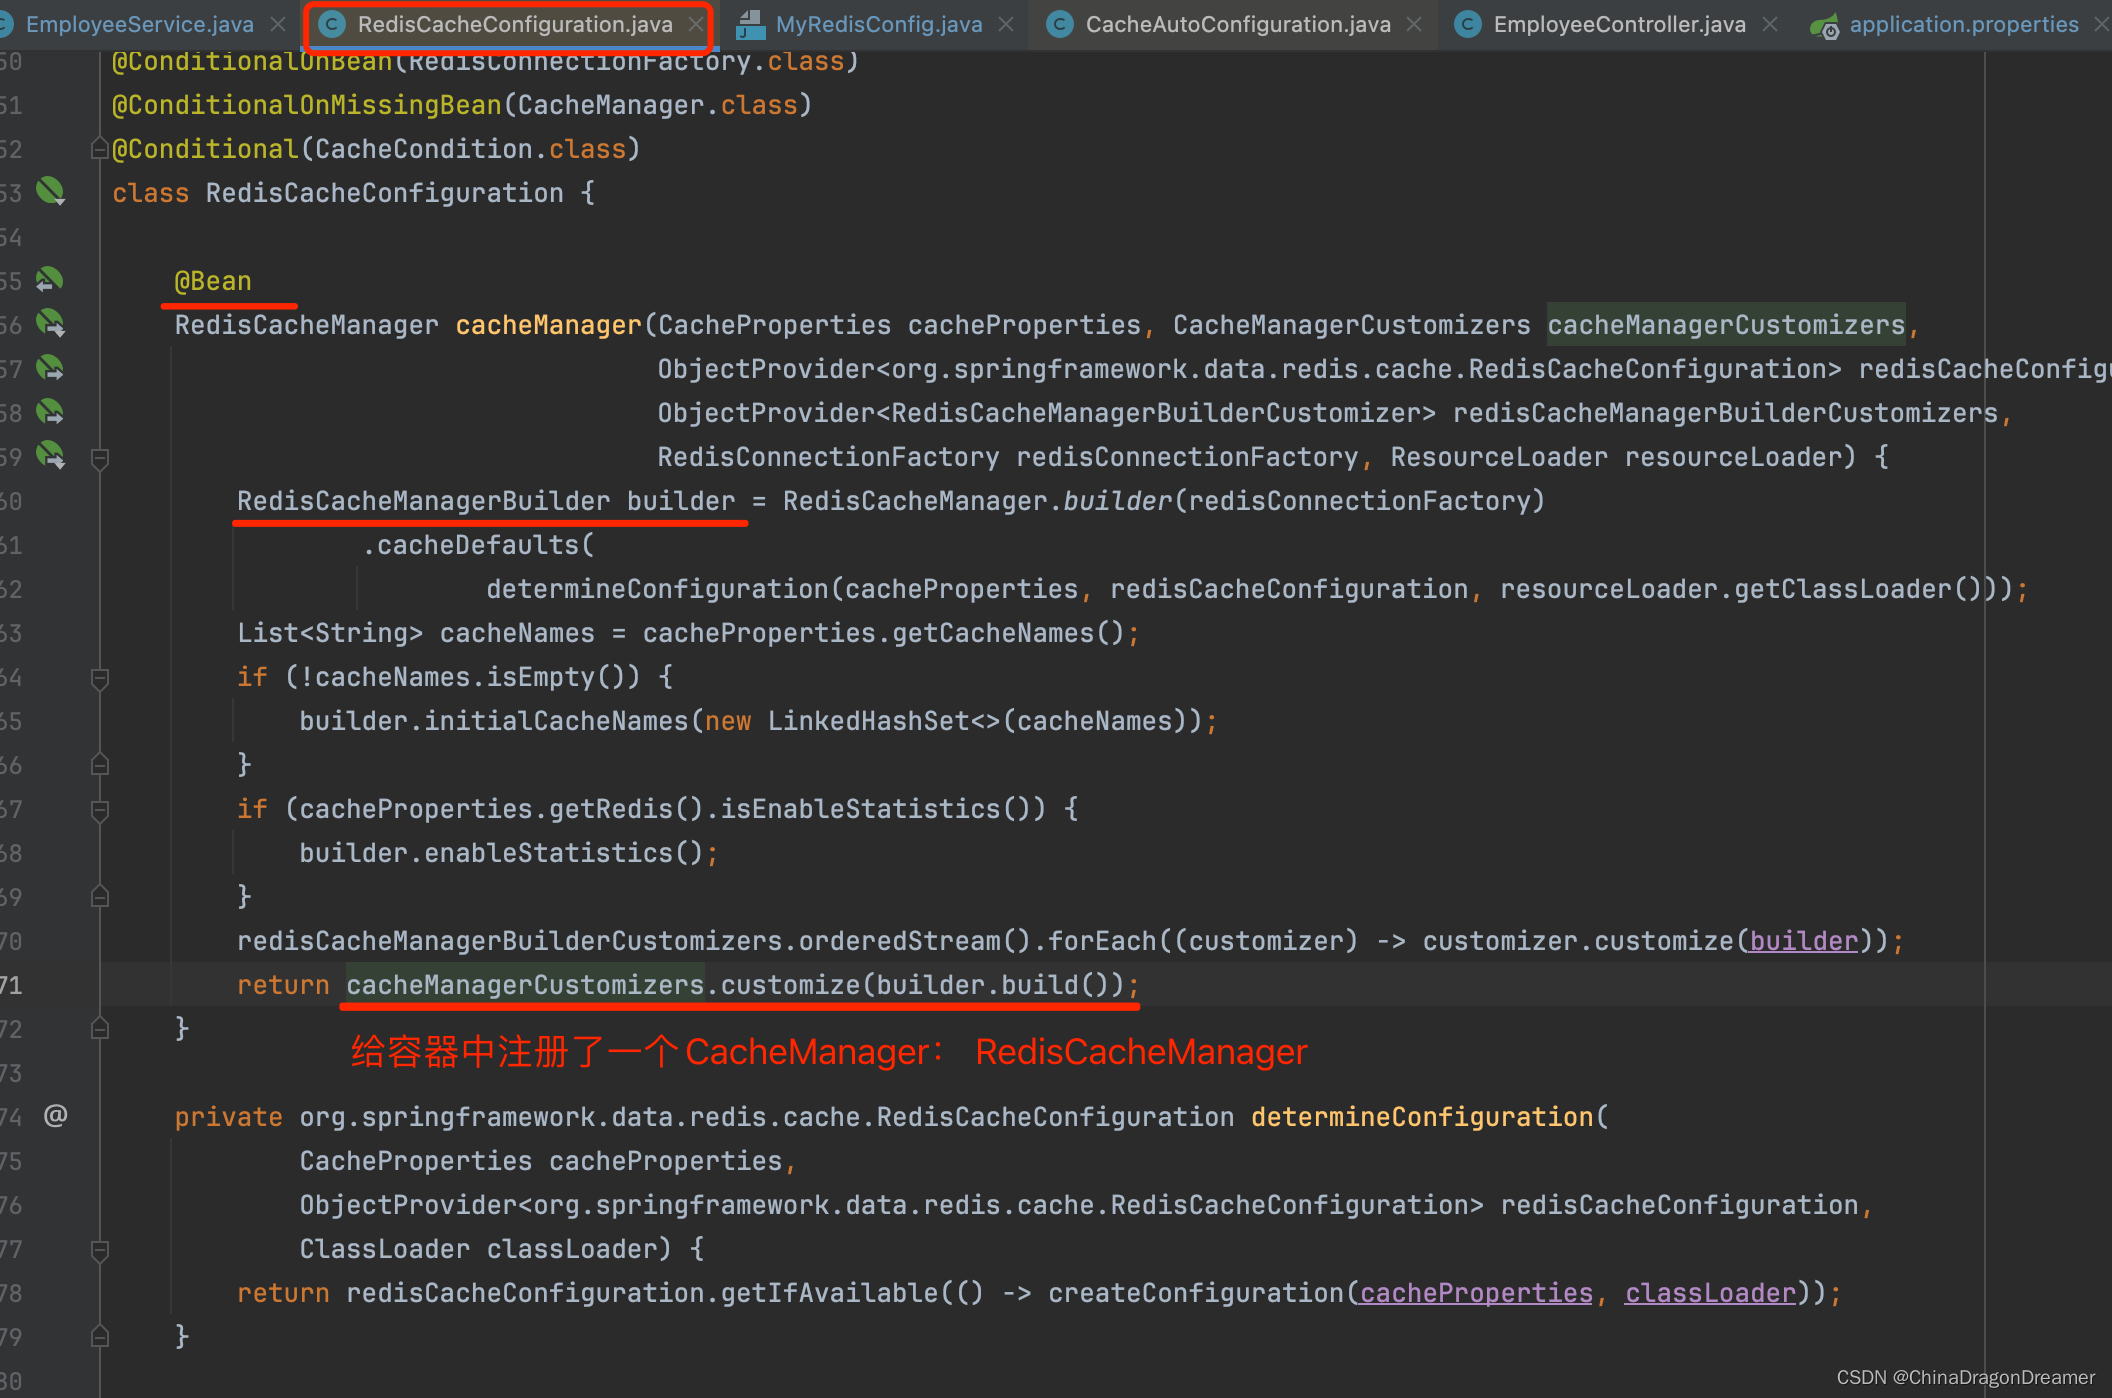
注意:引入Redis之后,注册的是 RedisCacheManager
- 可以获取和创建CacheNames类型的缓存组件;他的作用将数据保存在ConcurrentMap中;

4.1.4 运行流程
运行流程:
@Cacheable:
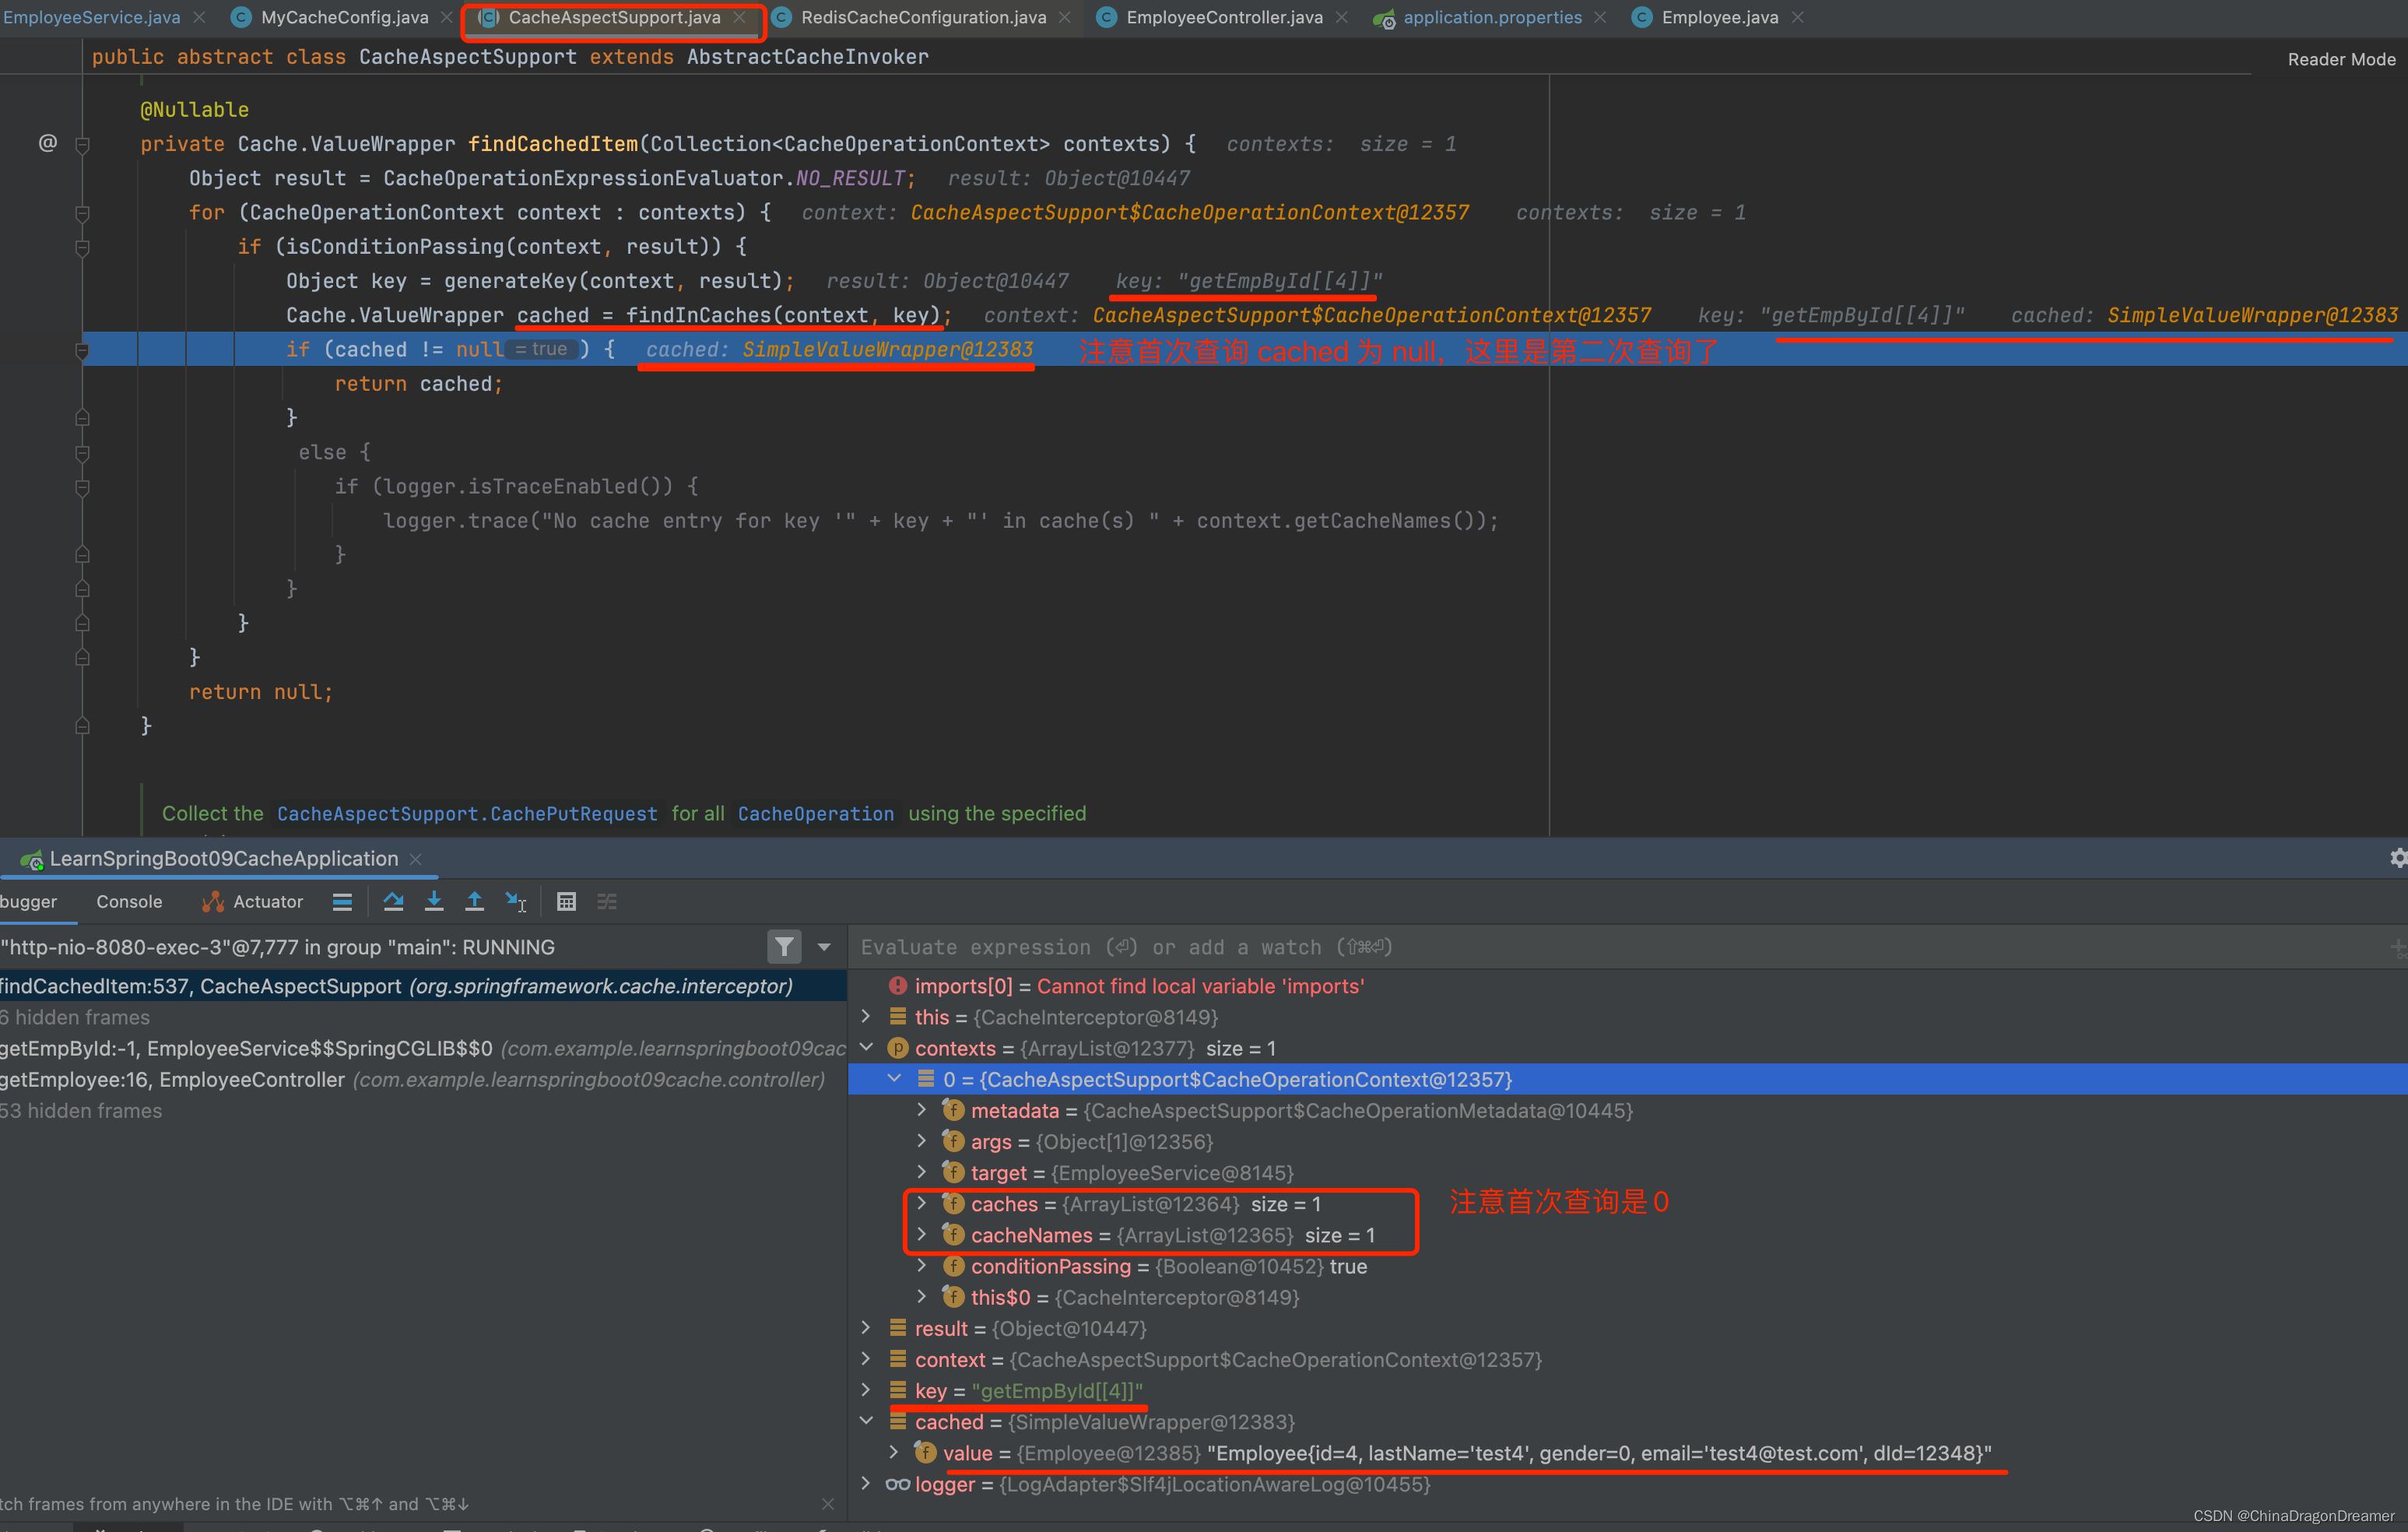
- 方法运行之前,先去查询Cache(缓存组件),按照cacheNames指定的名字获取;
CacheManager先获取相应的缓存),第一次获取缓存如果没有Cache组件会自动创建。- 去Cache中查找缓存的内容,使用一个key,默认就是方法的参数;
key是按照某种策略生成的;默认是使用keyGenerator生成的,默认使用SimpleKeyGenerator生成key;
SimpleKeyGenerator生成key的默认策略;
如果没有参数;key=new SimpleKey();
如果有一个参数:key=参数的值
如果有多个参数:key=new SimpleKey(params);- 没有查到缓存就调用目标方法;
- 将目标方法返回的结果,放进缓存中
@Cacheable标注的方法执行之前先来检查缓存中有没有这个数据,默认按照参数的值作为key去查询缓存,
如果没有就运行方法并将结果放入缓存;以后再来调用就可以直接使用缓存中的数据;
核心:
- 使用CacheManager【ConcurrentMapCacheManager】按照名字得到Cache【ConcurrentMapCache】组件
- key使用keyGenerator生成的,默认是SimpleKeyGenerator
4.1.5 几个属性
cacheNames/value:指定缓存组件的名字;将方法的返回结果放在哪个缓存中,是数组的方式,可以指定多个缓存;
key:缓存数据使用的key;可以用它来指定。默认是使用方法参数的值 1-方法的返回值
编写SpEL; #i d;参数id的值 #a0 #p0 #root.args[0]
getEmp[2]
keyGenerator:key的生成器;可以自己指定key的生成器的组件id
key/keyGenerator:二选一使用;
cacheManager:指定缓存管理器;或者cacheResolver指定获取解析器
condition:指定符合条件的情况下才缓存;
condition = “#id>0”
condition = “#a0>1”:第一个参数的值 大于1的时候才进行缓存
unless:否定缓存;当unless指定的条件为true,方法的返回值就不会被缓存;可以获取到结果进行判断
unless = “#result == null”
unless = “#a0==2”:如果第一个参数的值是2,结果不缓存;
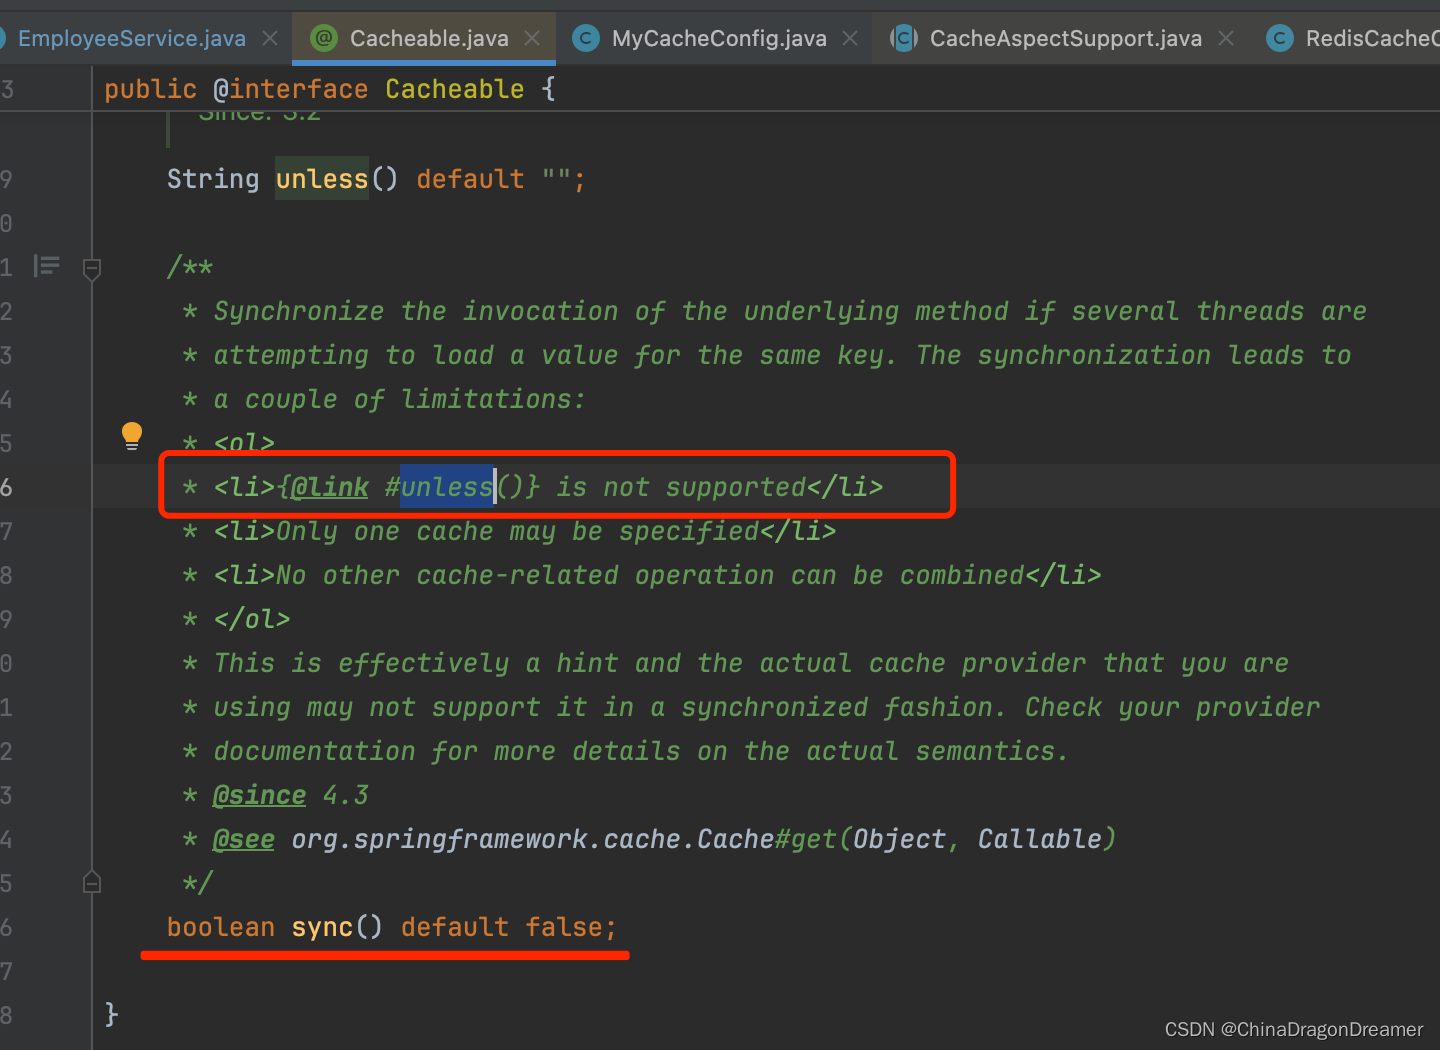
sync:是否使用异步模式, 不支持 unless
1. 自定义key
 @Cacheable(cacheNames = {
   "emp"}, key = "#root.methodName+'['+#id+']'") public Employee getEmpById(Integer id){
    System.out.println("员工 编号:"+id); Employee employee = employeeMapper.getEmpById(id); return employee; }
2. 使用keyGenerator
注意:key 和 keyGenerator 是二选一,不同同时使用

讯享网 @Cacheable(cacheNames = {
   "emp"}, keyGenerator = "mykeyGenerator")// key 和 keyGenerator 二选一 public Employee getEmpById(Integer id){
    System.out.println("员工 编号:"+id); Employee employee = employeeMapper.getEmpById(id); return employee; }
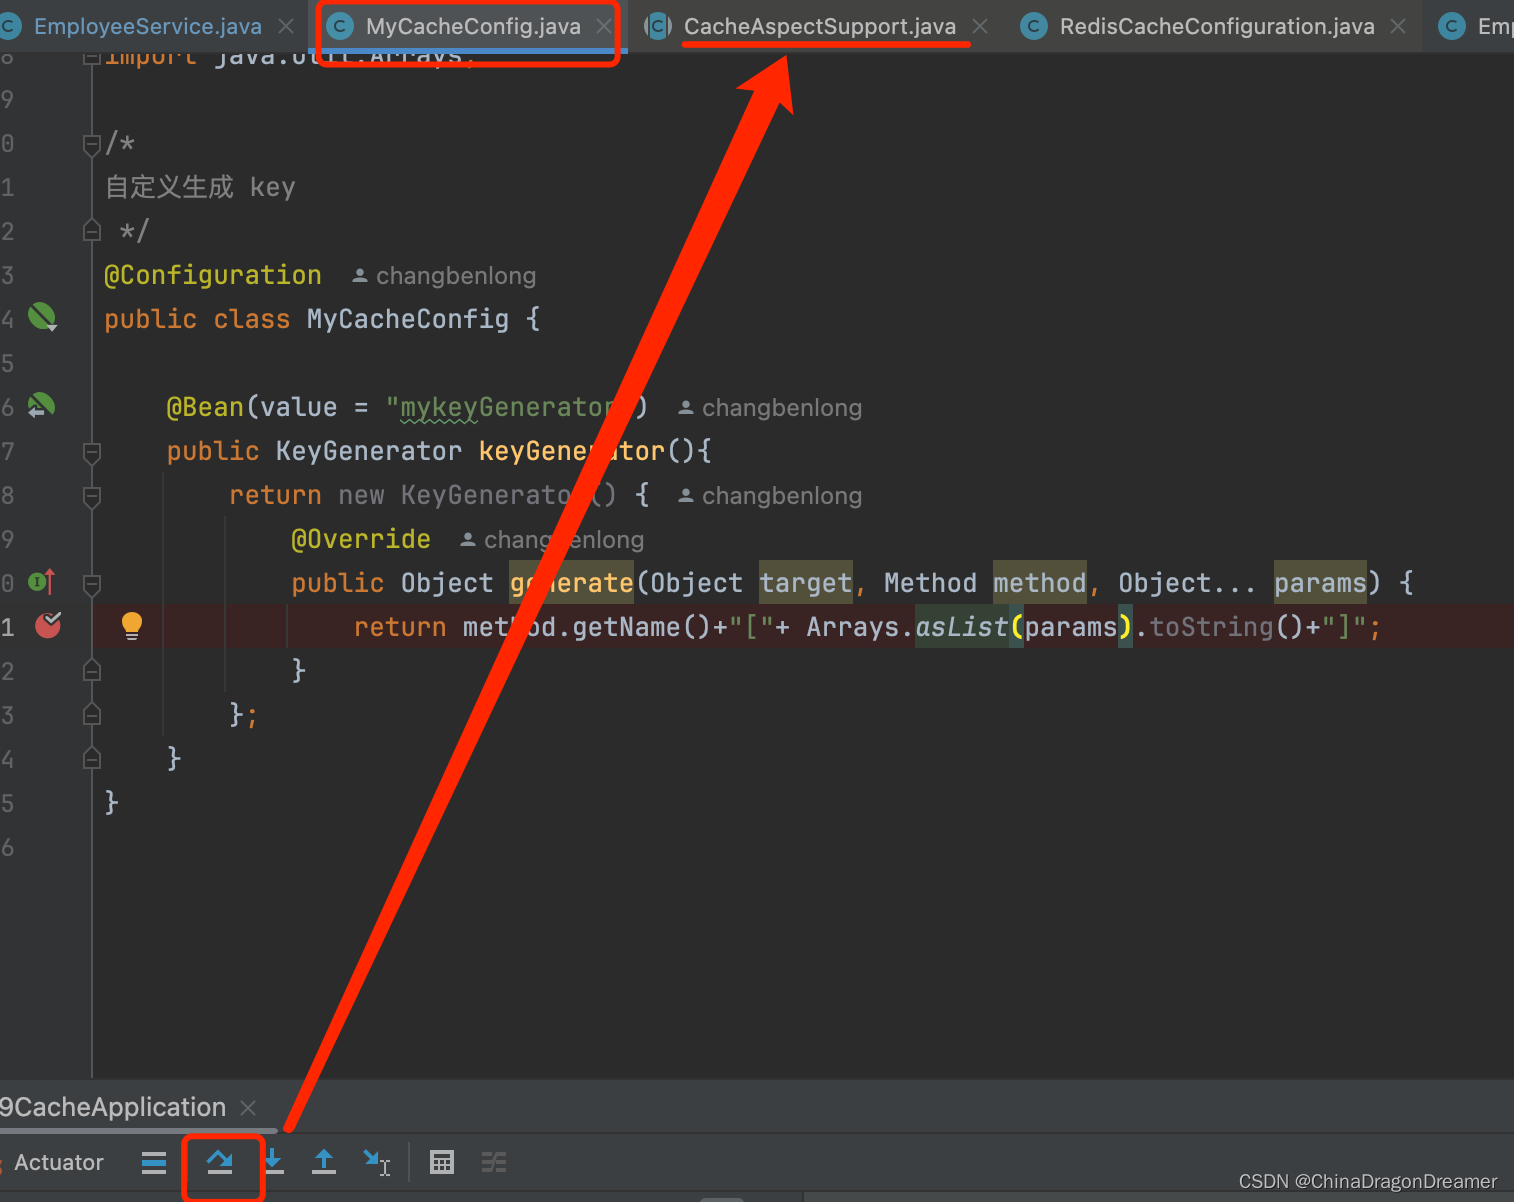
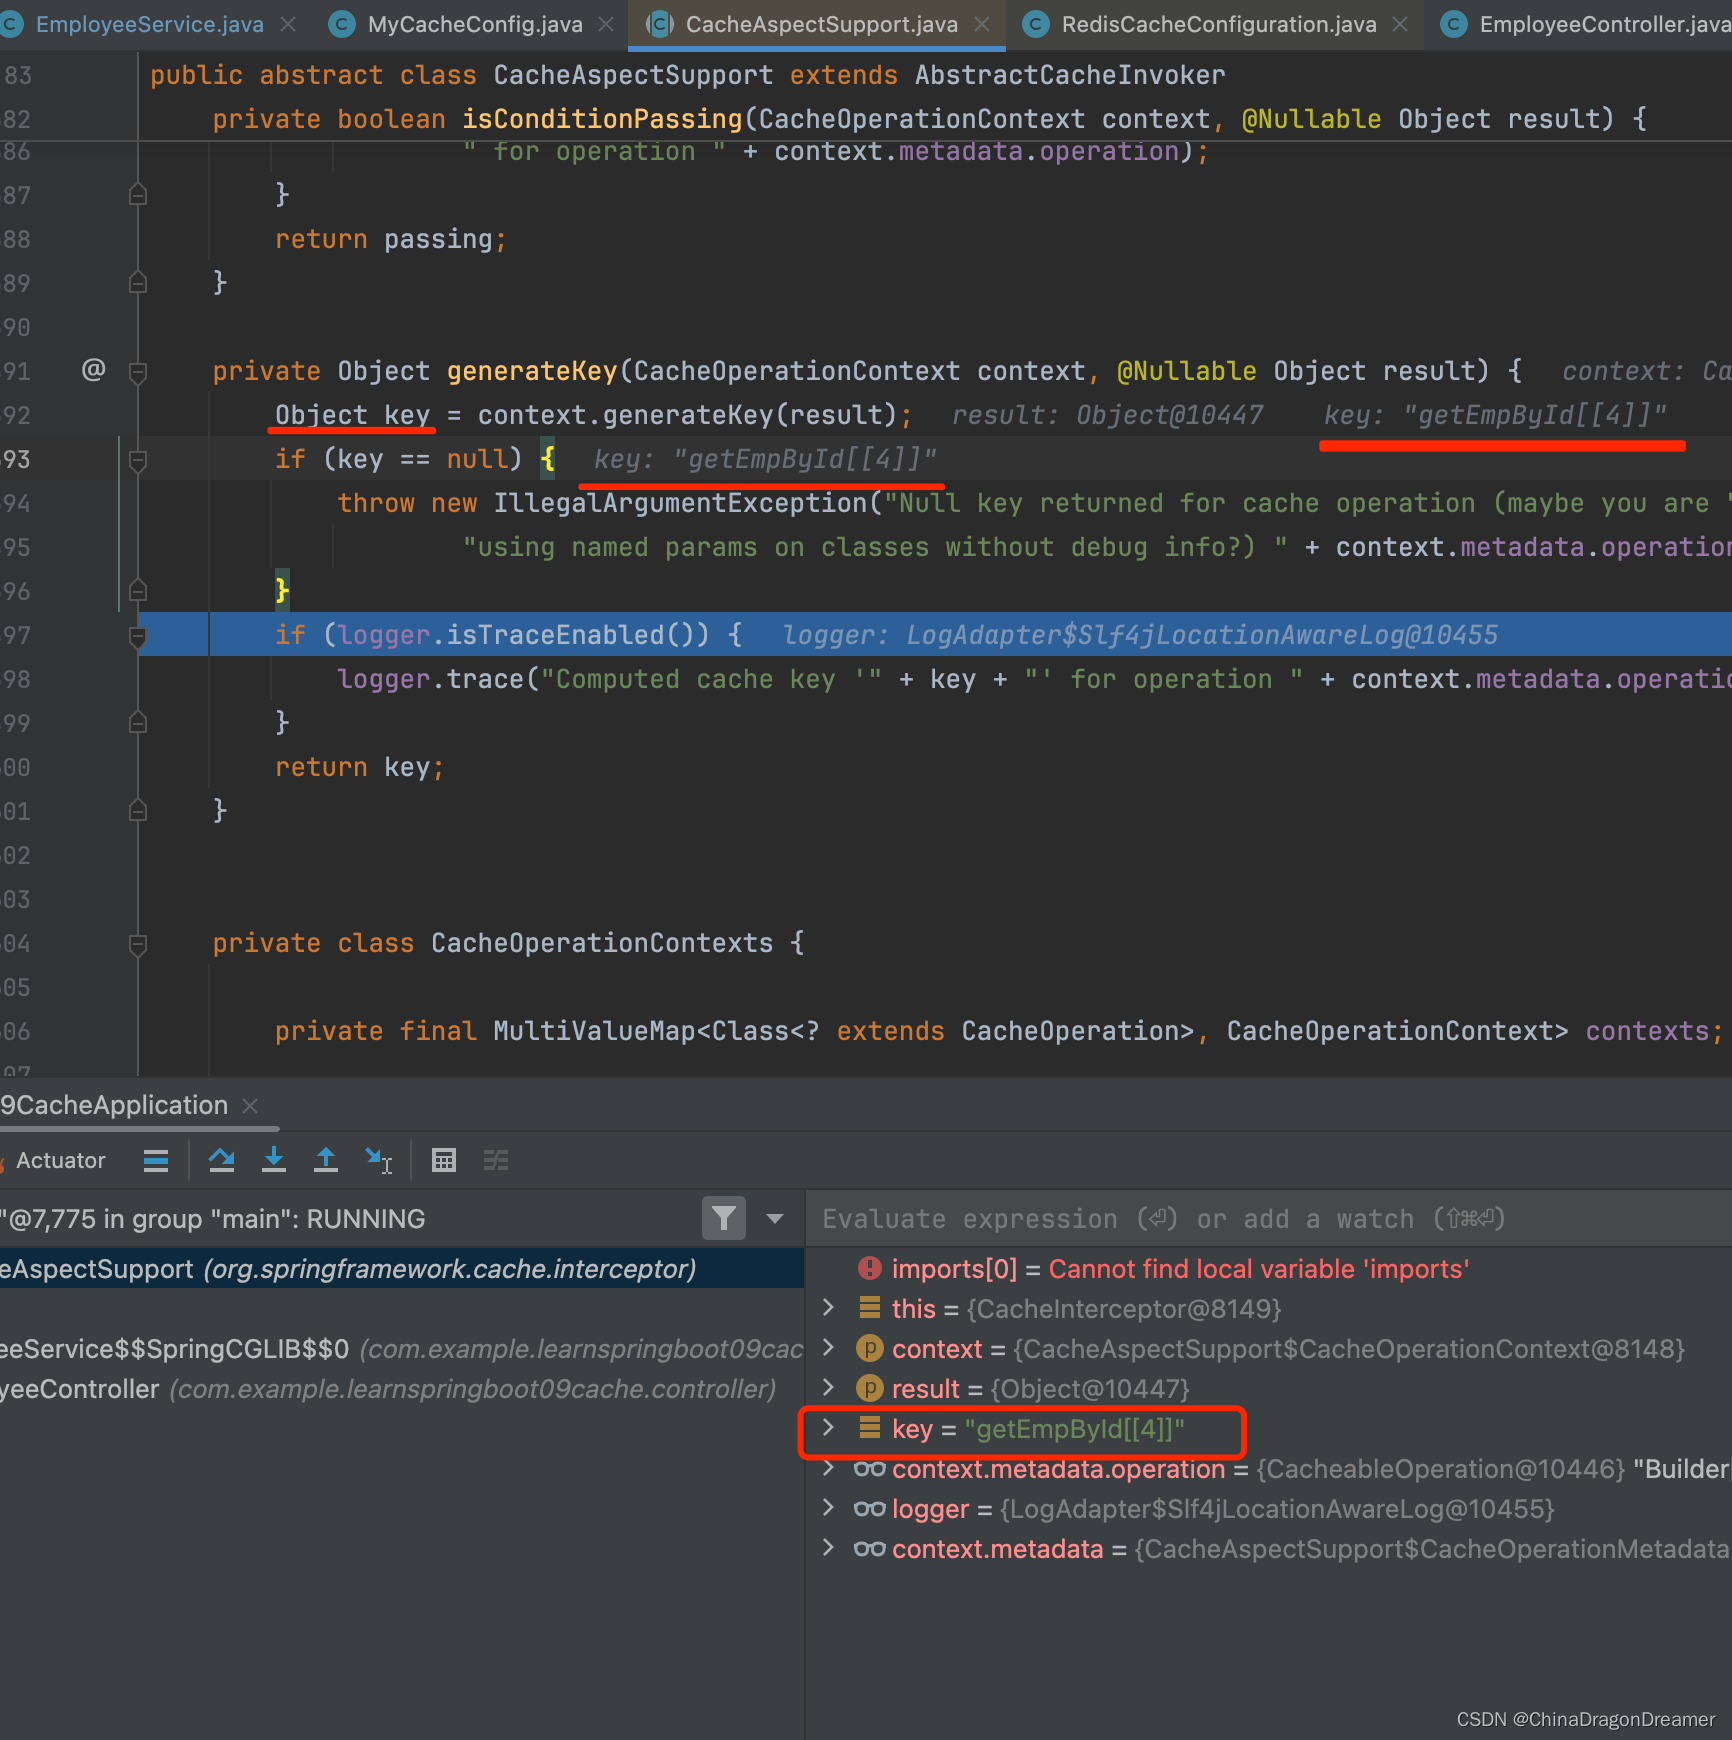
自定义生成 key
MyCacheConfig.java代码
package com.example.learnspringboot09cache.config; import org.springframework.cache.interceptor.KeyGenerator; import org.springframework.context.annotation.Bean; import org.springframework.context.annotation.Configuration; import java.lang.reflect.Method; import java.util.Arrays; /* 自定义生成 key */ @Configuration public class MyCacheConfig {
    @Bean(value = "mykeyGenerator") public KeyGenerator keyGenerator(){
    return new KeyGenerator() {
    @Override public Object generate(Object target, Method method, Object... params) {
    return method.getName()+"["+ Arrays.asList(params).toString()+"]"; } }; } }
Debug运行项目
3. condition:指定符合条件的情况下才缓存;
讯享网@Cacheable(cacheNames = {
   "emp"}, keyGenerator = "mykeyGenerator", condition = "#id > 1") public Employee getEmpById(Integer id){
    System.out.println("员工 编号:"+id); Employee employee = employeeMapper.getEmpById(id); return employee; }
上面意味着 查询id小于等于1的员工信息始终不会缓存,只有id大于1才会缓存
4. condition和 unless条件
 @Cacheable(cacheNames = {
   "emp"}, keyGenerator = "mykeyGenerator", condition = "#a0 > 1", unless = "#a0 == 2")// 如果id 为1和2 都不会缓存 public Employee getEmpById(Integer id){
    System.out.println("员工 编号:"+id); Employee employee = employeeMapper.getEmpById(id); return employee; }
上面意味着:如果id 为1、2 都不会缓存,因为1不满足condition条件, 2 不满足unless条件
5. sync:是否使用异步模式
注意:sync 默认是false,如果开启了,则不支持unless
看源码
开启异步
讯享网@Cacheable(cacheNames = {
   "emp"}, keyGenerator = "mykeyGenerator", condition = "#id > 1", sync = true)// 上面意味着 查询id小于等于1的员工信息始终不会缓存,只有id大于1才会缓存 public Employee getEmpById(Integer id){
    System.out.println("员工 编号:"+id); Employee employee = employeeMapper.getEmpById(id); return employee; }
4.1.6 @CachePut
@CachePut:既调用方法,又更新缓存数据;同步更新缓存
修改了数据库的某个数据,同时更新缓存;
运行时机:
1、先调用目标方法
2、将目标方法的结果缓存起来
在EmployeeService.java新增下面的updateEmp方法
 @CachePut(value = "emp",key = "#result.id") public Employee updateEmp(Employee employee){
    System.out.println("updateEmp:"+employee); employeeMapper.updateEmp(employee); return employee; }
测试步骤:
- 查询1号员工;查到的结果会放在缓存中;
key:1 value:lastName:张三- 以后查询还是之前的结果
- 更新1号员工;【lastName:zhangsan;gender:0】
将方法的返回值也放进缓存了;- 查询1号员工?
应该是更新后的员工;
key = “#employee.id”:使用传入的参数的员工id;
key = “#result.id”:使用返回后的id
@Cacheable的key是不能用#result为什么是没更新前的?【1号员工没有在缓存中更新】
4.1.7 @CacheEvict
@CacheEvict:缓存清除
key:指定要清除的数据
allEntries = true:指定清除这个缓存中所有的数据
beforeInvocation = false:缓存的清除是否在方法之前执行
默认代表缓存清除操作是在方法执行之后执行;如果出现异常缓存就不会清除
beforeInvocation = true:
代表清除缓存操作是在方法运行之前执行,无论方法是否出现异常,缓存都清除
在EmployeeService.java新增下面的deleteEmp方法
讯享网//删除指定的id数据 @CacheEvict(value="emp", key = "#id") public void deleteEmp(Integer id){
    System.out.println("deleteEmp:"+id) ; employeeMapper.deleteEmpById(id); //int i = 10/0; } //清除缓存中所有数据 @CacheEvict(value="emp", allEntries = true) public void deleteEmp(Integer id){
    System.out.println("deleteEmp:"+id) ; employeeMapper.deleteEmpById(id); //int i = 10/0; } //模拟方法出错情况下,清空缓存 @CacheEvict(value="emp", beforeInvocation = true) public void deleteEmp(Integer id){
    System.out.println("deleteEmp:"+id) ; //employeeMapper.deleteEmpById(id); int i = 10/0;// 模拟出错 }
4.1.8 @Caching
@Caching:定义复杂的缓存规则
在EmployeeService.java新增下面的getEmpByLastName方法
 @Caching( cacheable = {
    @Cacheable(value="emp", key = "#lastName") }, put = {
    @CachePut(value="emp", key = "#result.id"), @CachePut(value="emp", key = "#result.email") } ) public Employee getEmpByLastName(String lastName){
    return employeeMapper.getEmpByLastName(lastName); }
4.1.9 @CacheConfig
@CacheConfig(cacheNames=“emp”,cacheManager = “employeeCacheManager”) //抽取缓存的公共配置
讯享网//前面写的value="emp"都可以去掉了,统一使用下面的cacheNames="emp" @CacheConfig(cacheNames="emp",cacheManager = "employeeCacheManager") //抽取缓存的公共配置 @Service public class EmployeeService {
    @Autowired EmployeeMapper employeeMapper; }
默认使用的是ConcurrentMapCacheManager==ConcurrentMapCache;将数据保存在 ConcurrentMap<Object, Object>中
五、整合redis作为缓存
Redis英文官网
Redis中文官网
Redis命令中文官网
Redis桌面管理工具-Mac电脑
步骤如下
5.1. 安装redis
示例在docker里安装redis;
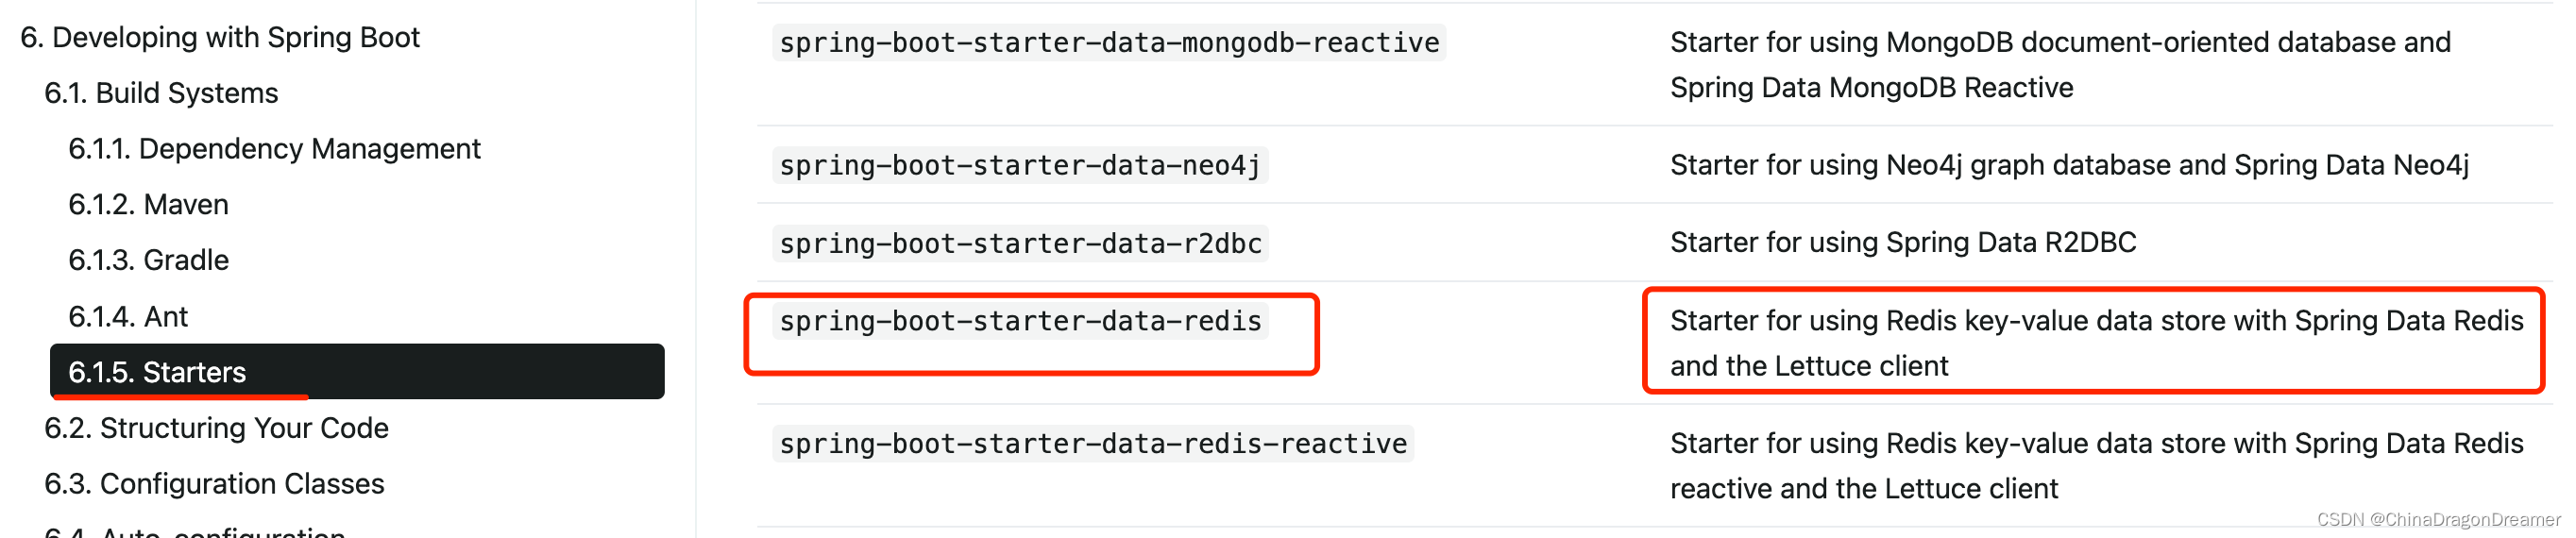
5.2. 引入redis的starter
点击查看Spring官网里starters
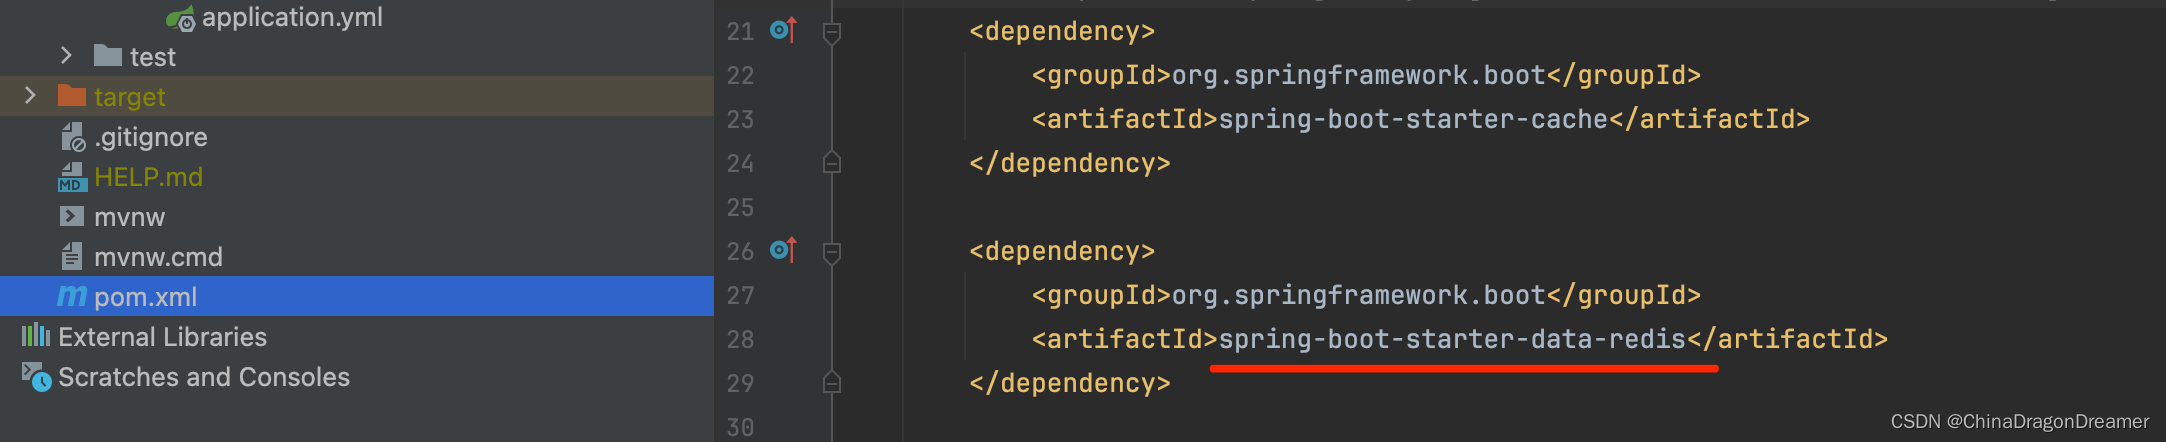
在pom.xml添加spring-boot-starter-data-redis依赖
5.3. 配置redis
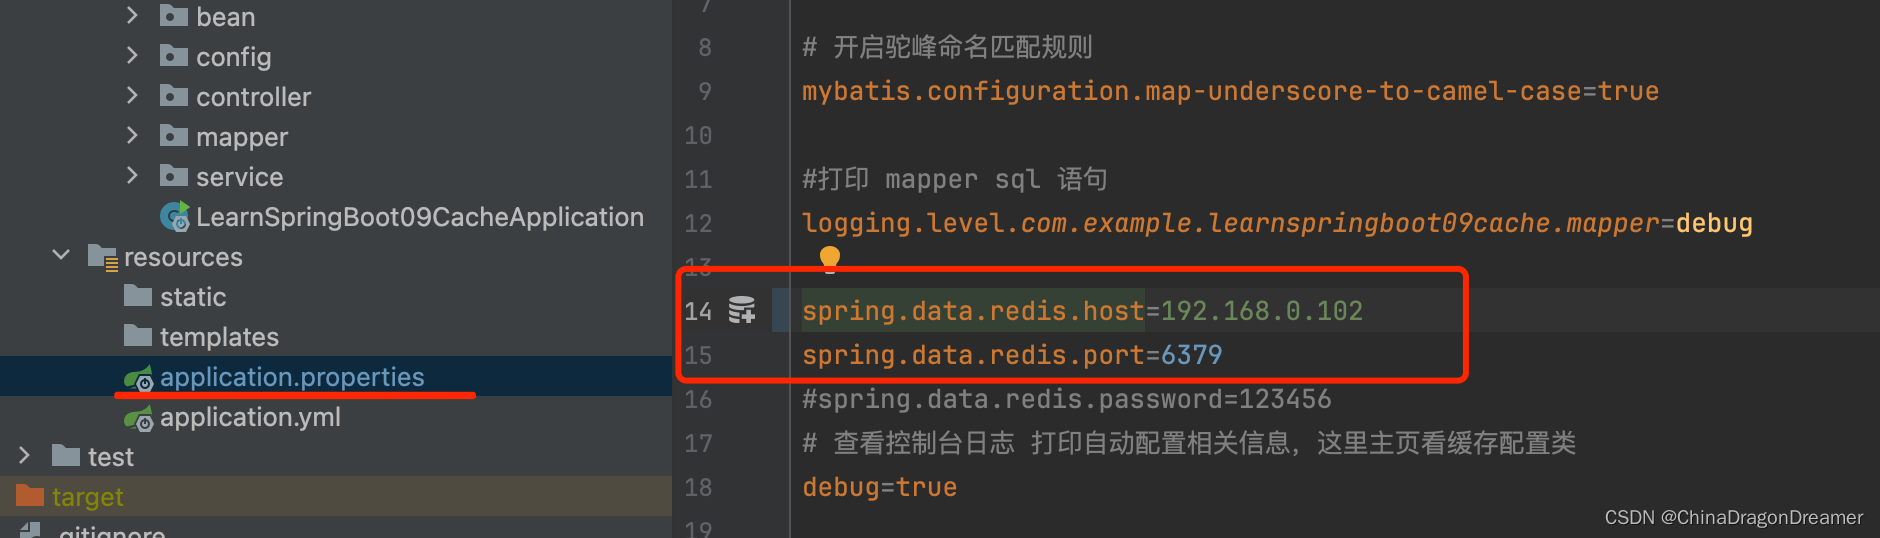
spring.data.redis.host=192.168.0.102 spring.data.redis.port=6379
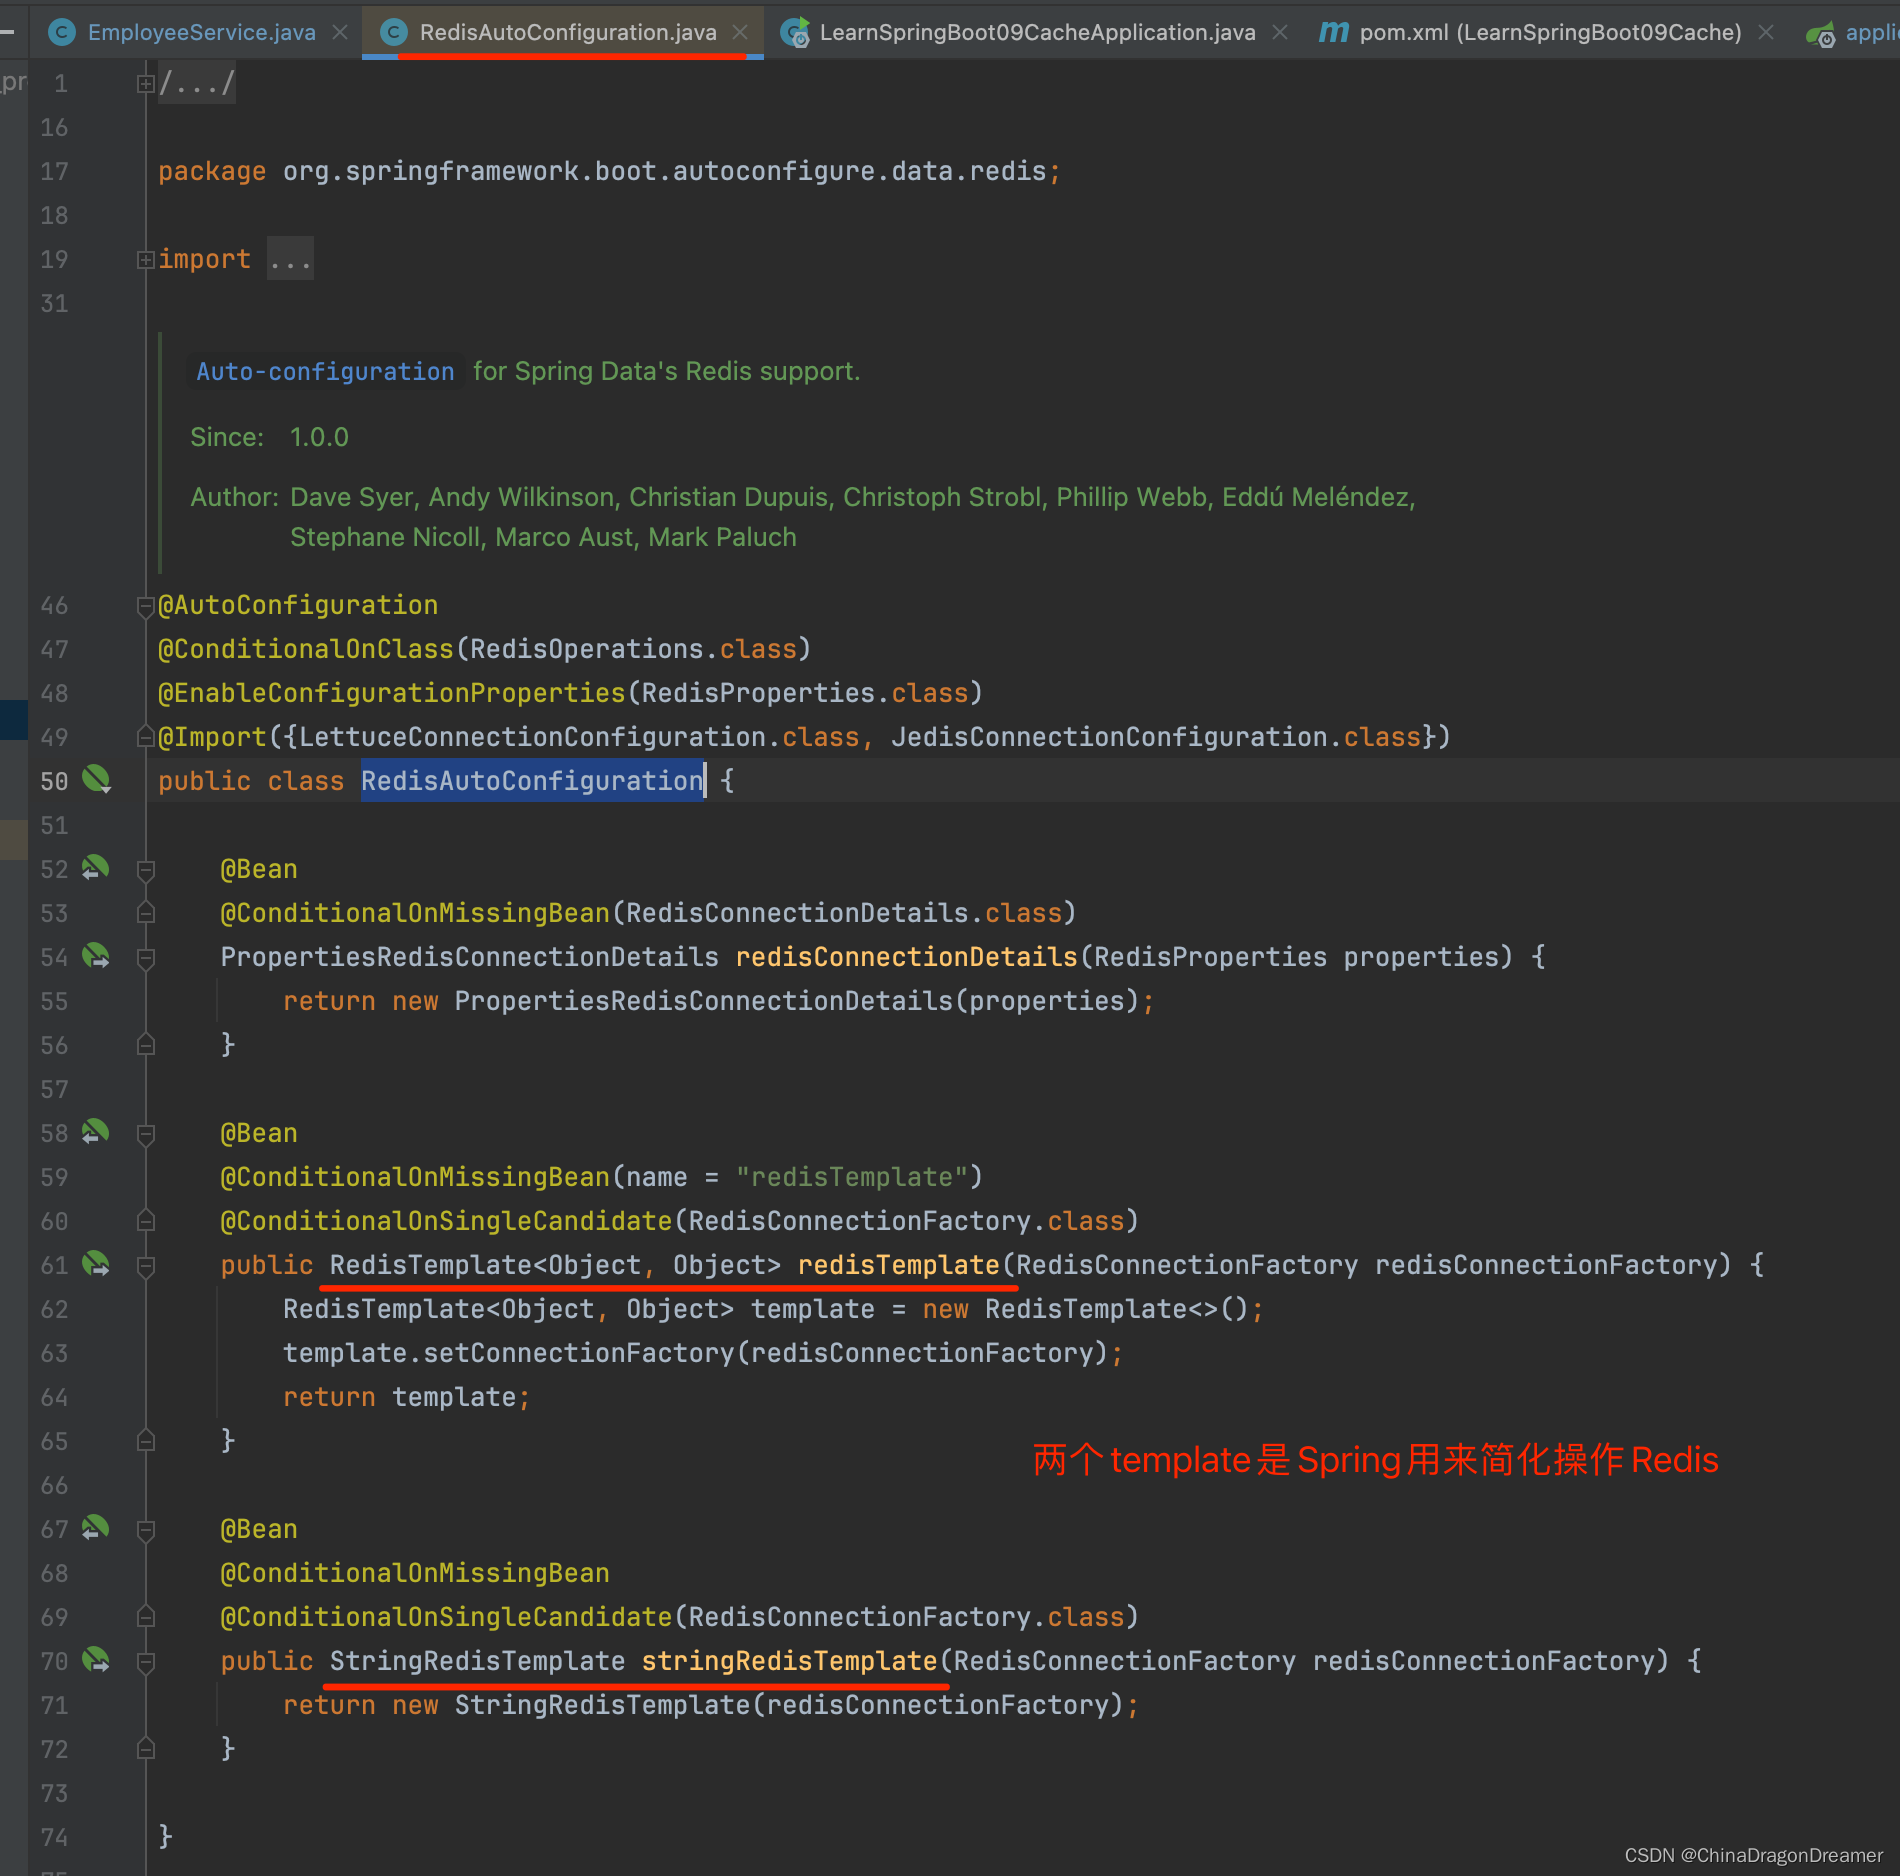
引入redis之后,RedisAutoConfiguration就开始生效了
RedisAutoConfiguration类里的RedisTemplate和StringRedisTemplate是Spring用来简化操作Redis
5.4 测试Template
自定义Template
MyRedisConfig.java类里的方法
讯享网@Configuration public class MyRedisConfig {
    @Bean public RedisTemplate<Object, Employee> empRedisTemplate(RedisConnectionFactory redisConnectionFactory) throws UnknownHostException {
    RedisTemplate<Object, Employee> template = new RedisTemplate<Object, Employee>(); template.setConnectionFactory(redisConnectionFactory); Jackson2JsonRedisSerializer<Employee> ser = new Jackson2JsonRedisSerializer<Employee>(Employee.class); template.setDefaultSerializer(ser); return template; } @Bean public RedisTemplate<Object, Department> deptRedisTemplate( RedisConnectionFactory redisConnectionFactory) throws UnknownHostException {
    RedisTemplate<Object, Department> template = new RedisTemplate<Object, Department>(); template.setConnectionFactory(redisConnectionFactory); Jackson2JsonRedisSerializer<Department> ser = new Jackson2JsonRedisSerializer<Department>(Department.class); template.setDefaultSerializer(ser); return template; } }
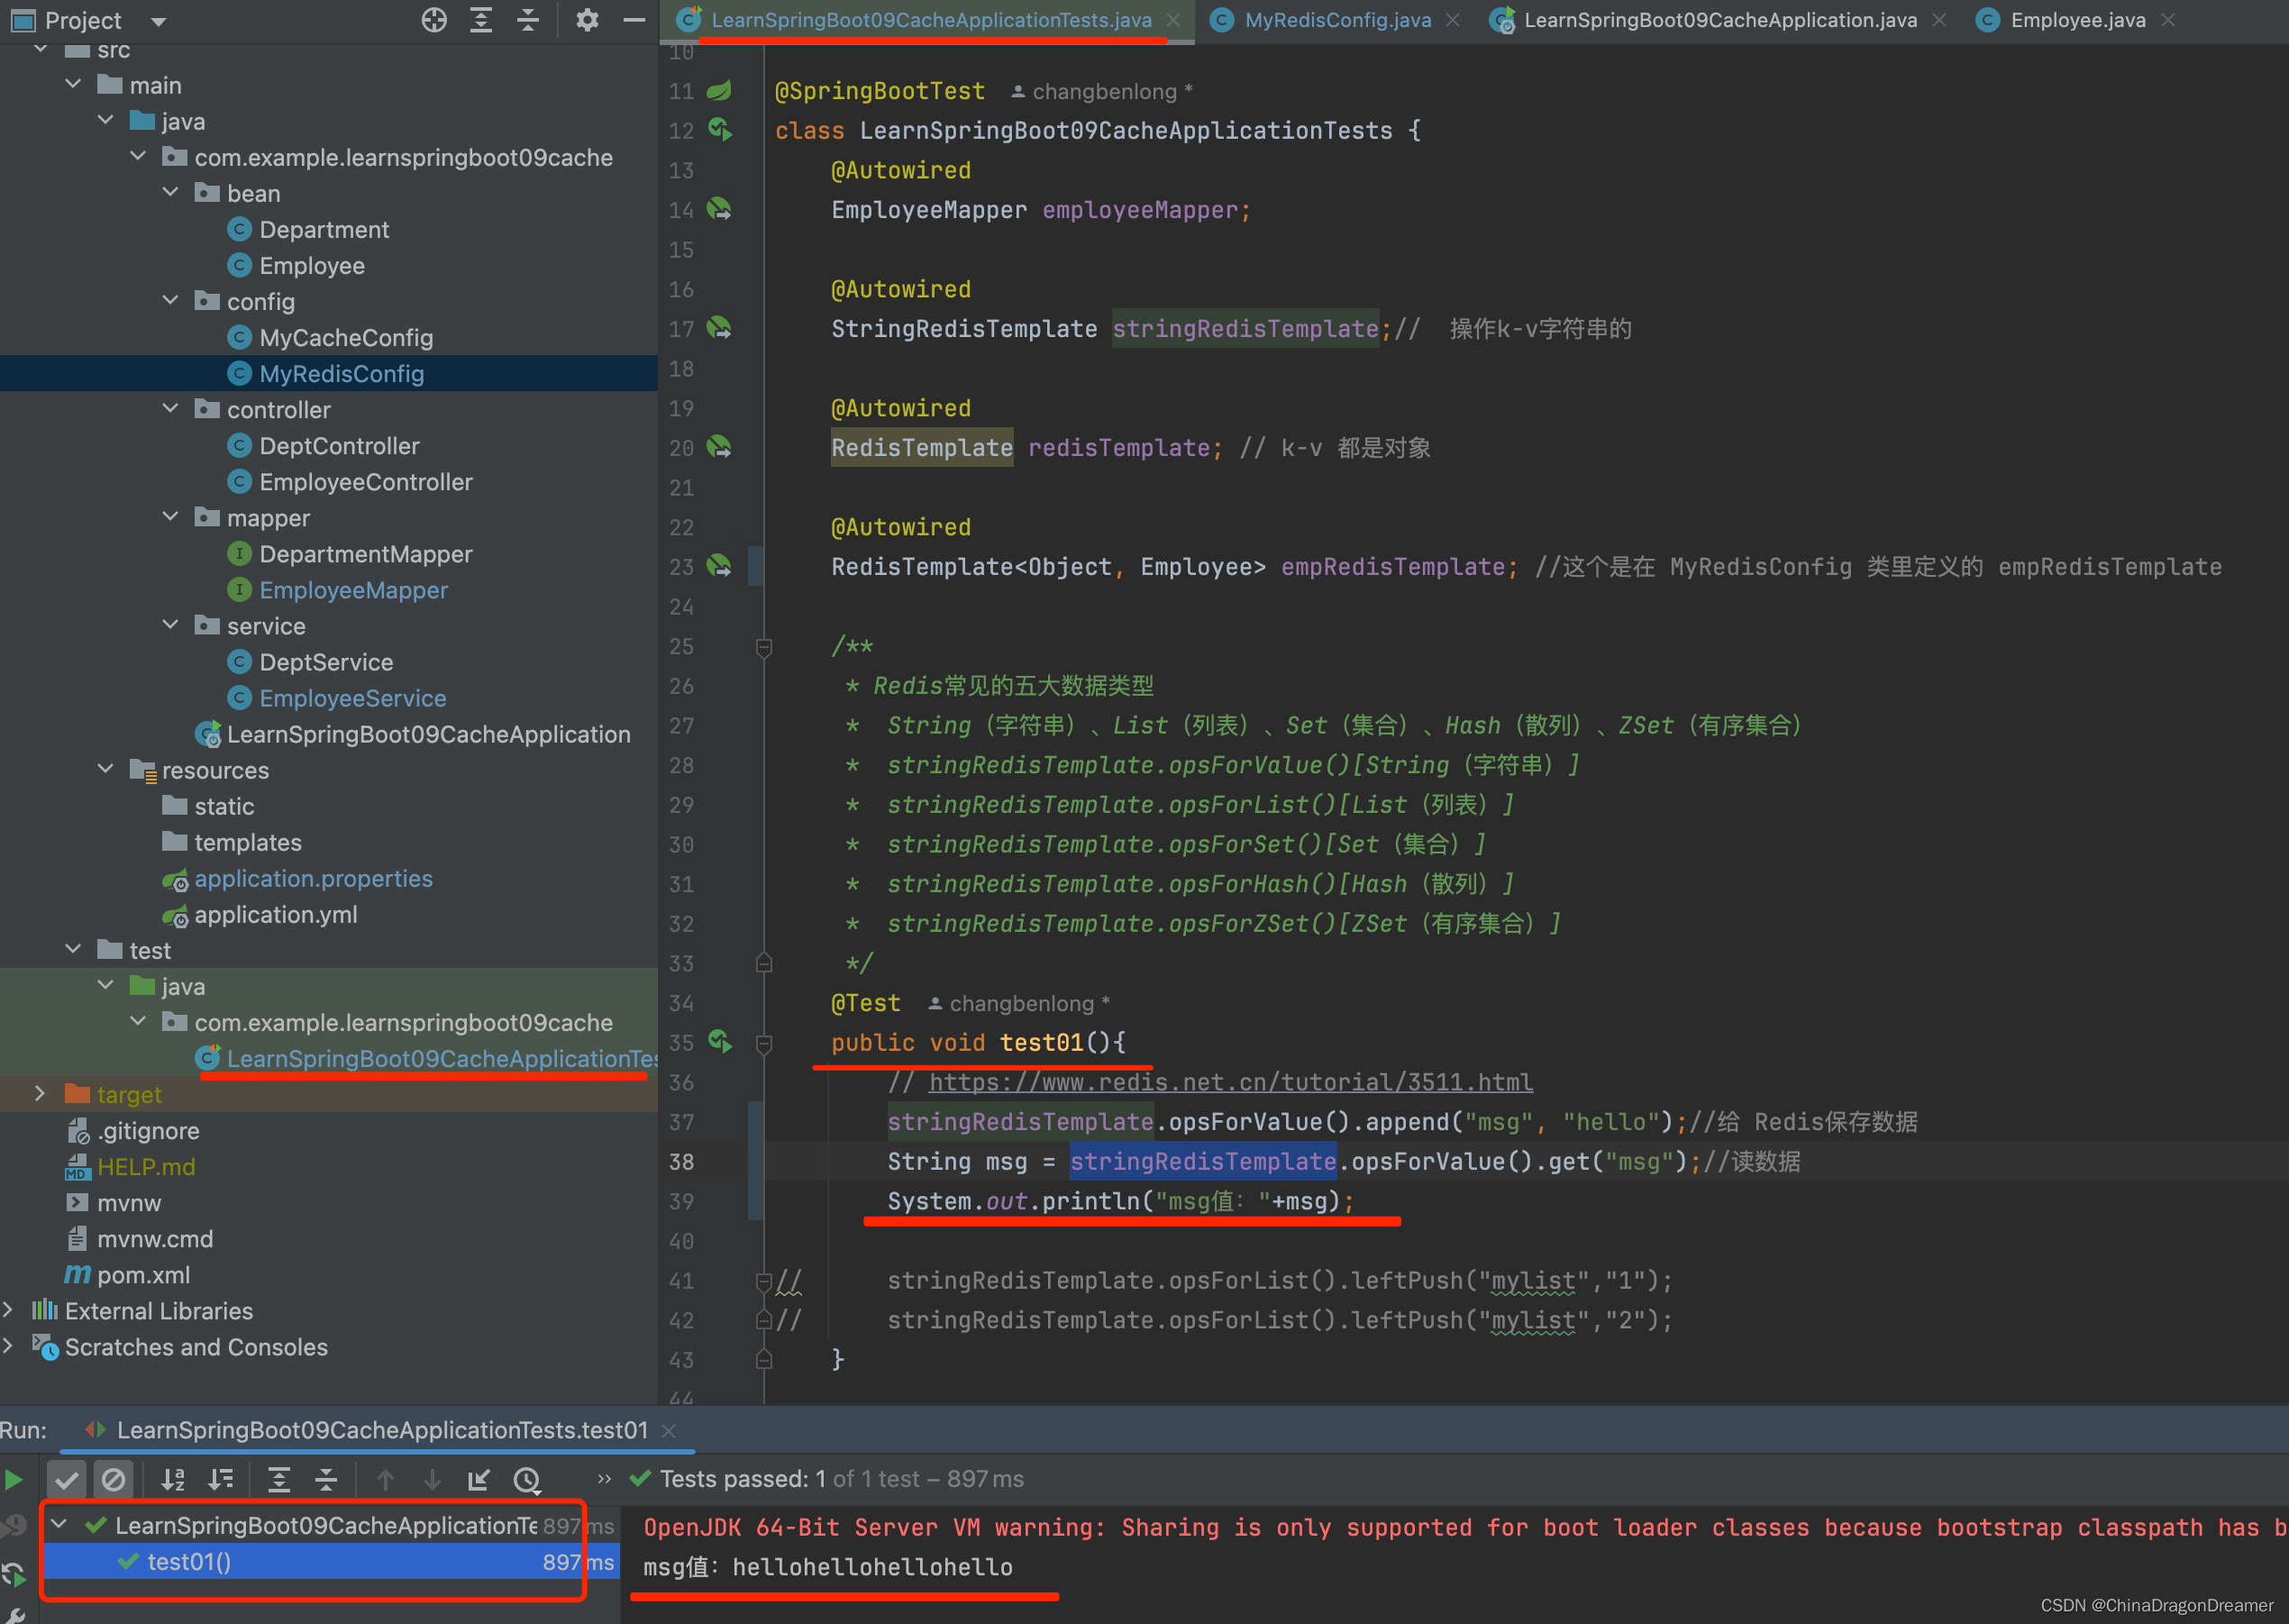
LearnSpringBoot09CacheApplicationTests.java代码
package com.example.learnspringboot09cache; import com.example.learnspringboot09cache.bean.Employee; import com.example.learnspringboot09cache.mapper.EmployeeMapper; import org.junit.jupiter.api.Test; import org.springframework.beans.factory.annotation.Autowired; import org.springframework.boot.test.context.SpringBootTest; import org.springframework.data.redis.core.RedisTemplate; import org.springframework.data.redis.core.StringRedisTemplate; @SpringBootTest class LearnSpringBoot09CacheApplicationTests {
@Autowired EmployeeMapper employeeMapper; @Autowired StringRedisTemplate stringRedisTemplate;// 操作k-v字符串的 @Autowired RedisTemplate redisTemplate; // k-v 都是对象 @Autowired RedisTemplate<Object, Employee> empRedisTemplate;//这个是在 MyRedisConfig 类里定义的 empRedisTemplate / * Redis常见的五大数据类型 * String(字符串)、List(列表)、Set(集合)、Hash(散列)、ZSet(有序集合) * stringRedisTemplate.opsForValue()[String(字符串)] * stringRedisTemplate.opsForList()[List(列表)] * stringRedisTemplate.opsForSet()[Set(集合)] * stringRedisTemplate.opsForHash()[Hash(散列)] * stringRedisTemplate.opsForZSet()[ZSet(有序集合)] */ @Test public void test01(){
// https://www.redis.net.cn/tutorial/3511.html
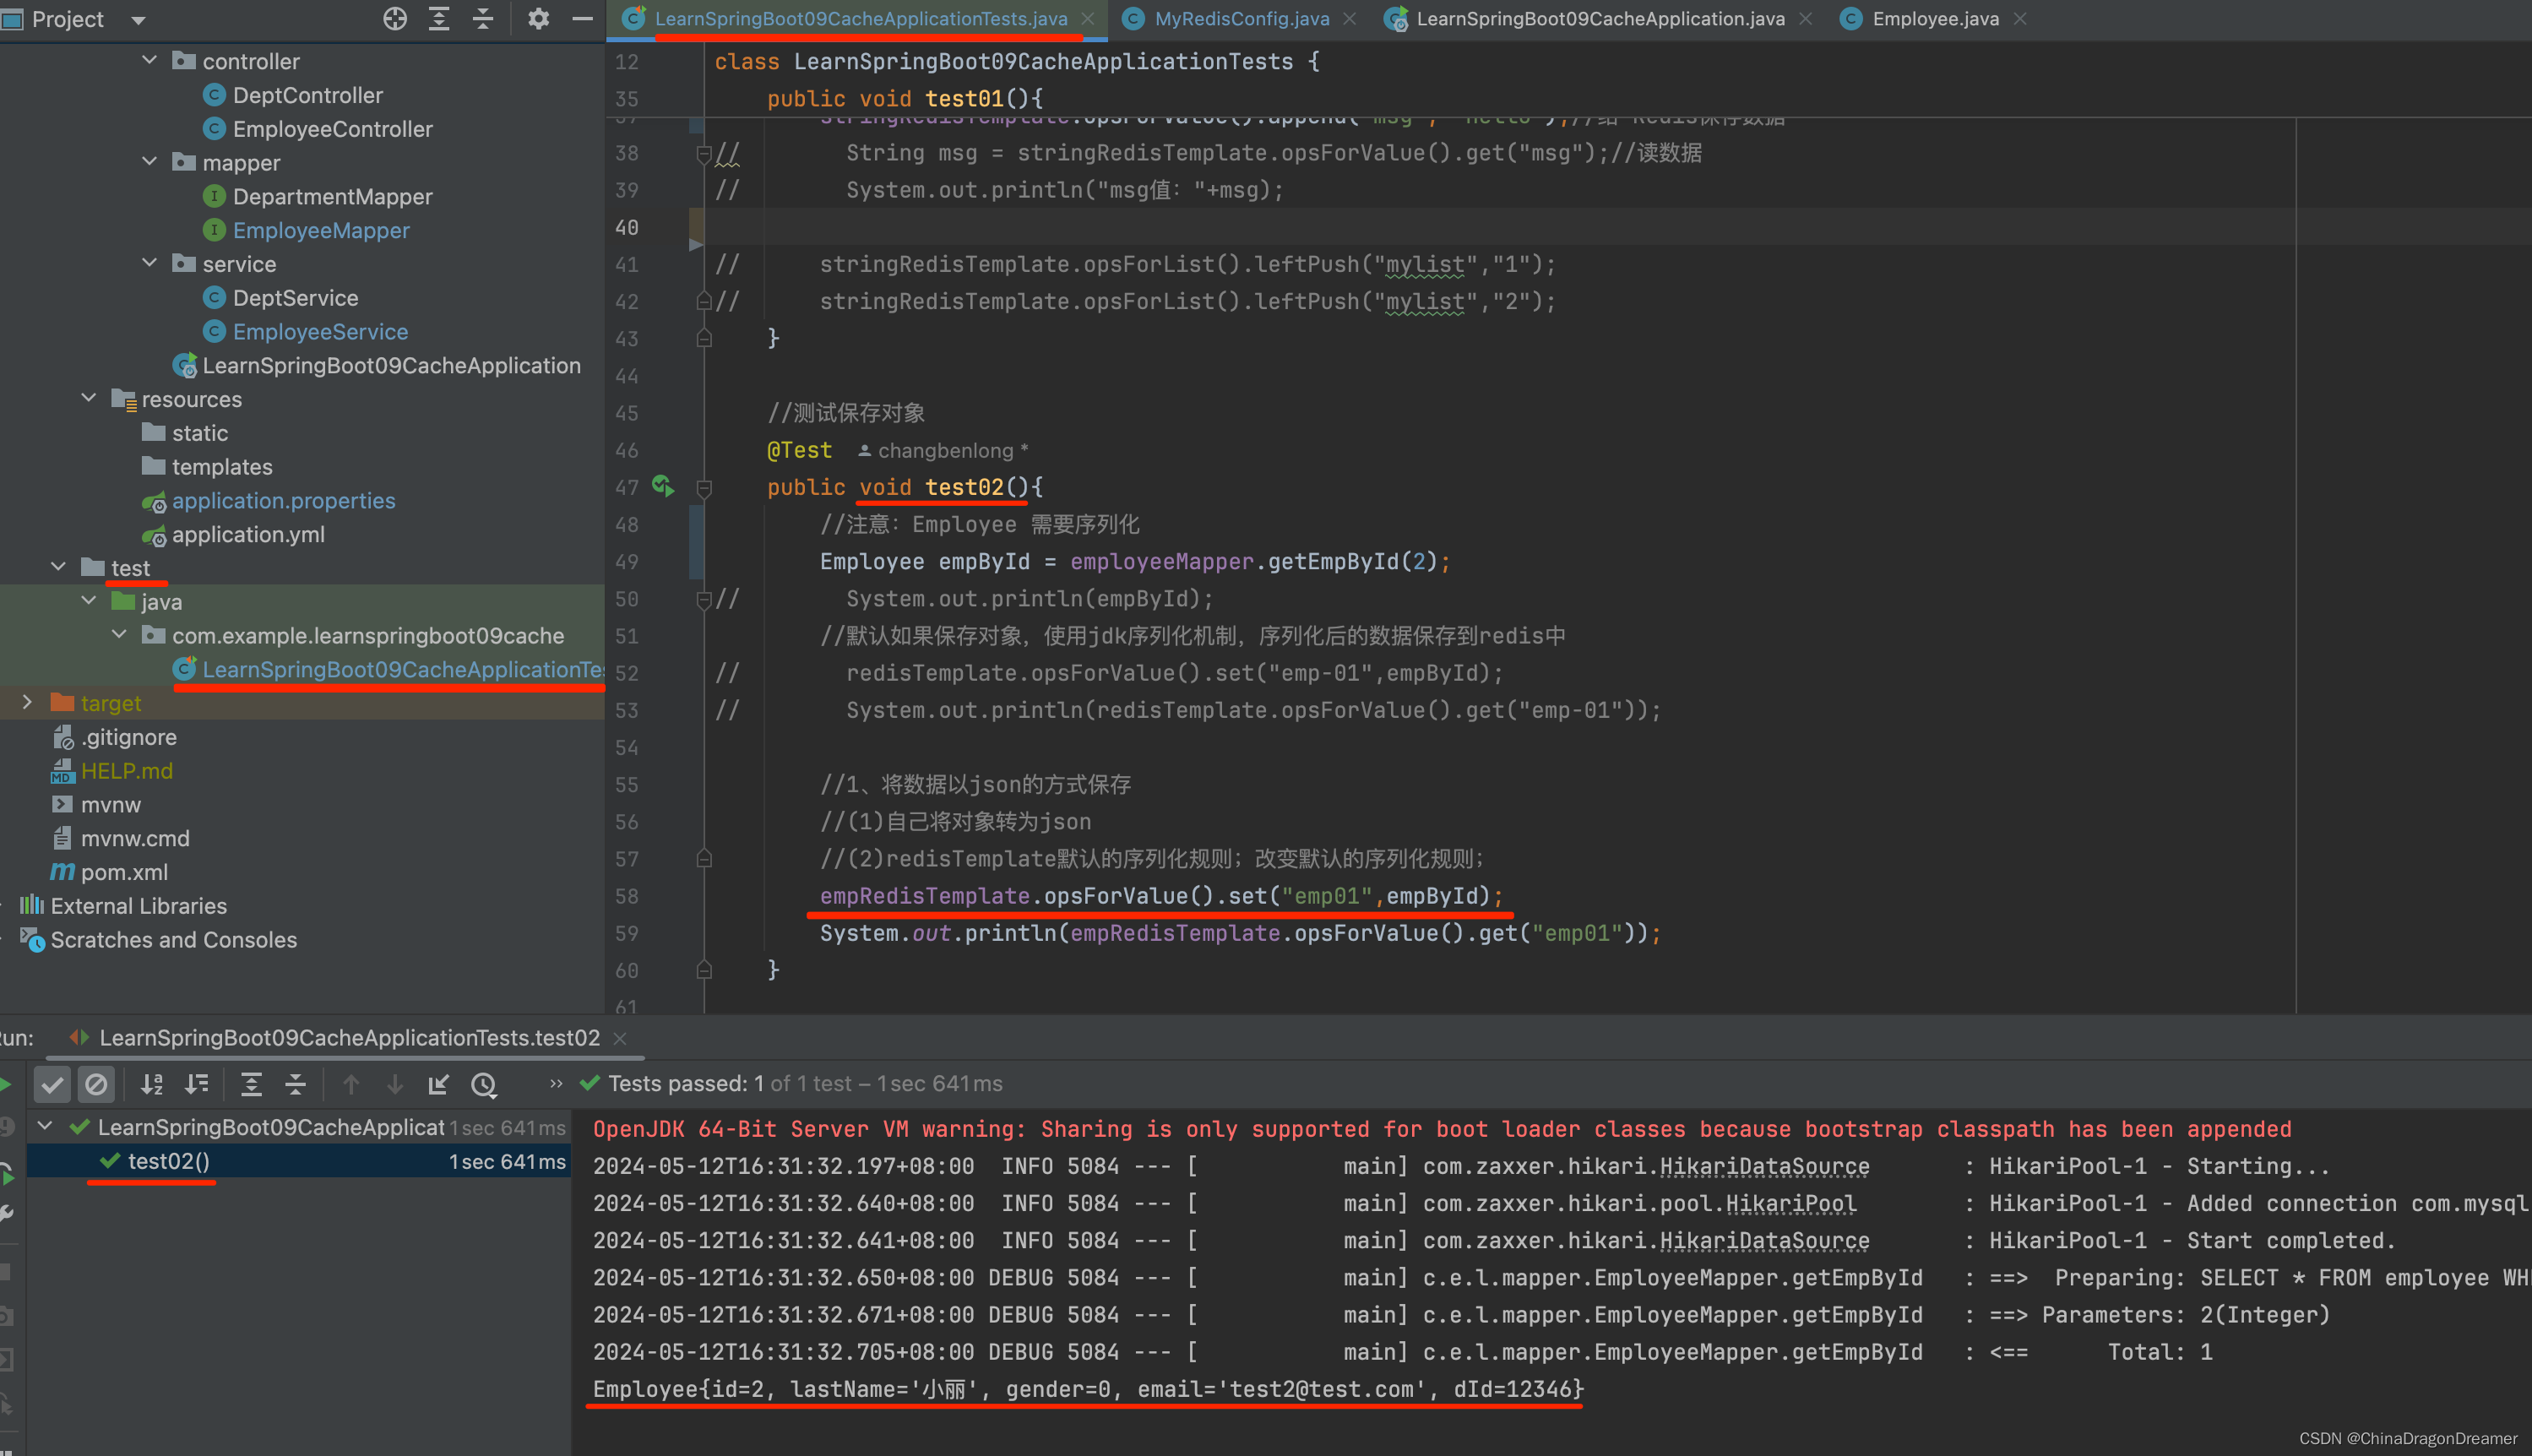
// stringRedisTemplate.opsForValue().append("msg", "hello");//给 Redis保存数据 // String msg = stringRedisTemplate.opsForValue().get("msg");//读数据 // System.out.println("msg值:"+msg); // stringRedisTemplate.opsForList().leftPush("mylist","1"); // stringRedisTemplate.opsForList().leftPush("mylist","2"); } //测试保存对象 @Test public void test02(){
//注意:Employee 需要序列化 Employee empById = employeeMapper.getEmpById(2); // System.out.println(empById); //默认如果保存对象,使用jdk序列化机制,序列化后的数据保存到redis中 // redisTemplate.opsForValue().set("emp-01",empById); // System.out.println(redisTemplate.opsForValue().get("emp-01")); //1、将数据以json的方式保存 //(1)自己将对象转为json //(2)redisTemplate默认的序列化规则;改变默认的序列化规则; empRedisTemplate.opsForValue().set("emp01",empById); System.out.println(empRedisTemplate.opsForValue().get("emp01")); } @Test void contextLoads() {
Employee employee = employeeMapper.getEmpById(1); System.out.println(employee); } } 测试stringRedisTemplate结果
测试自定义 empRedisTemplate结果
提醒:这个是在 MyRedisConfig 类里定义的 empRedisTemplate
六、测试缓存
原理:CacheManager===Cache 缓存组件来实际给缓存中存取数据
- 引入redis的starter,容器中保存的是 RedisCacheManager;
- RedisCacheManager 帮我们创建 RedisCache 来作为缓存组件;RedisCache通过操作redis缓存数据的
- 默认保存数据 k-v 都是Object;利用序列化保存;如何保存为json
1、引入了redis的starter,cacheManager变为 RedisCacheManager;
2、默认创建的 RedisCacheManager 操作redis的时候使用的是 RedisTemplate<Object, Object>;
3、RedisTemplate<Object, Object> 是 默认使用jdk的序列化机制;- 自定义CacheManager;
6.1 自定义CacheManager
提醒:@Primary 作用是将某个缓存管理器作为默认的
注意:存在在多个CacheManager时,必须指定一个作为默认的
注意:实际开发中还是使用 RedisTemplate<Object, Object>
DepartmentMapper.java代码
讯享网@Mapper public interface DepartmentMapper {
    @Select("SELECT * FROM department WHERE id = #{id}") Department getDeptById(Integer id); }
DeptService.java代码
package com.example.learnspringboot09cache.service; import com.example.learnspringboot09cache.bean.Department; import com.example.learnspringboot09cache.mapper.DepartmentMapper; import org.springframework.beans.factory.annotation.Autowired; import org.springframework.beans.factory.annotation.Qualifier; import org.springframework.cache.Cache; import org.springframework.cache.annotation.CacheConfig; import org.springframework.cache.annotation.Cacheable; import org.springframework.data.redis.cache.RedisCacheManager; import org.springframework.stereotype.Service; @Service //@CacheConfig(cacheNames="dept"/*,cacheManager = "deptCacheManager"*/) //抽取缓存的公共配置,指定CacheManager, employeeCacheManager在 MyRedisConfig类里定义的 public class DeptService {
    @Autowired DepartmentMapper departmentMapper; // @Qualifier(value = "deptCacheManager") // @Autowired // RedisCacheManager deptCacheManager; / * 缓存的数据能存入redis; * 第二次从缓存中查询就不能反序列化回来; * 存的是dept的json数据;CacheManager默认使用RedisTemplate<Object, Employee>操作Redis * * * @param id * @return */ @Cacheable(cacheNames = "dept",cacheManager = "deptCacheManager")//也可以在方法里指定CacheManager public Department getDeptById(Integer id){
    System.out.println("查询部门"+id); Department department = departmentMapper.getDeptById(id); return department; } // 使用缓存管理器得到缓存,进行api调用 // public Department getDeptById(Integer id){
    // System.out.println("查询部门"+id); // Department department = departmentMapper.getDeptById(id); // // //获取某个缓存 // Cache dept = deptCacheManager.getCache("dept"); // dept.put("dept:1",department); // // return department; // } }
MyRedisConfig.java类代码
讯享网package com.example.learnspringboot09cache.config; import com.example.learnspringboot09cache.bean.Department; import com.example.learnspringboot09cache.bean.Employee; import org.springframework.context.annotation.Bean; import org.springframework.context.annotation.Configuration; import org.springframework.context.annotation.Primary; import org.springframework.data.redis.cache.CacheKeyPrefix; import org.springframework.data.redis.cache.RedisCacheConfiguration; import org.springframework.data.redis.cache.RedisCacheManager; import org.springframework.data.redis.connection.RedisConnectionFactory; import org.springframework.data.redis.core.RedisTemplate; import org.springframework.data.redis.serializer.Jackson2JsonRedisSerializer; import org.springframework.data.redis.serializer.RedisSerializationContext; import org.springframework.format.support.DefaultFormattingConversionService; import java.lang.reflect.Constructor; import java.lang.reflect.InvocationTargetException; import java.net.UnknownHostException; import java.time.Duration; @Configuration public class MyRedisConfig {
    @Bean public RedisTemplate<Object, Employee> empRedisTemplate(RedisConnectionFactory redisConnectionFactory) throws UnknownHostException {
    RedisTemplate<Object, Employee> template = new RedisTemplate<Object, Employee>(); template.setConnectionFactory(redisConnectionFactory); Jackson2JsonRedisSerializer<Employee> ser = new Jackson2JsonRedisSerializer<Employee>(Employee.class); template.setDefaultSerializer(ser); return template; } @Bean public RedisTemplate<Object, Department> deptRedisTemplate( RedisConnectionFactory redisConnectionFactory) throws UnknownHostException {
    RedisTemplate<Object, Department> template = new RedisTemplate<Object, Department>(); template.setConnectionFactory(redisConnectionFactory); Jackson2JsonRedisSerializer<Department> ser = new Jackson2JsonRedisSerializer<Department>(Department.class); template.setDefaultSerializer(ser); return template; }

    /*
    https://blog.csdn.net/_43366662/article/details/121249962

    https://huaweicloud.csdn.net/637ef512df016f70ae4ca5cb.html
     */
    @Primary  //将某个缓存管理器作为默认的  注意:存在在多个CacheManager时,必须指定一个作为默认的
    @Bean
    public RedisCacheManager defaultCacheManager(RedisConnectionFactory connectionFactory) throws InvocationTargetException, IllegalAccessException, InstantiationException {
    //对 对象类型(employee)和string类型的序列化 Jackson2JsonRedisSerializer<Object> jackson2JsonRedisSerializer = new Jackson2JsonRedisSerializer<>(Object.class); Jackson2JsonRedisSerializer<String> keySerializer = new Jackson2JsonRedisSerializer<>(String.class); DefaultFormattingConversionService conversionService = new DefaultFormattingConversionService(); RedisCacheConfiguration.registerDefaultConverters(conversionService); RedisCacheConfiguration redisCacheConfiguration = null; Constructor[] constructors = RedisCacheConfiguration.class.getDeclaredConstructors(); for (Constructor constructor : constructors) {
    constructor.setAccessible(true); if(constructor.getParameterTypes().length==7){
   //因为只有构造方法,所以判断方式比较随意 redisCacheConfiguration = (RedisCacheConfiguration) constructor.newInstance(Duration.ZERO, true, true, CacheKeyPrefix.simple(), RedisSerializationContext.SerializationPair.fromSerializer(keySerializer), RedisSerializationContext.SerializationPair.fromSerializer(jackson2JsonRedisSerializer),conversionService); } } assert redisCacheConfiguration != null; //通过RedisCacheManagerBuilder来创建RedisCacheManager,也可以直接new return RedisCacheManager.RedisCacheManagerBuilder.fromConnectionFactory(connectionFactory).cacheDefaults(redisCacheConfiguration).build(); } @Bean public RedisCacheManager employeeCacheManager(RedisConnectionFactory connectionFactory) throws InvocationTargetException, IllegalAccessException, InstantiationException {
    //对 对象类型(employee)和string类型的序列化 Jackson2JsonRedisSerializer<Employee> jackson2JsonRedisSerializer = new Jackson2JsonRedisSerializer<>(Employee.class); Jackson2JsonRedisSerializer<String> keySerializer = new Jackson2JsonRedisSerializer<>(String.class); DefaultFormattingConversionService conversionService = new DefaultFormattingConversionService(); RedisCacheConfiguration.registerDefaultConverters(conversionService); RedisCacheConfiguration redisCacheConfiguration = null; Constructor[] constructors = RedisCacheConfiguration.class.getDeclaredConstructors(); for (Constructor constructor : constructors) {
    constructor.setAccessible(true); if(constructor.getParameterTypes().length==7){
   //因为只有构造方法,所以判断方式比较随意 redisCacheConfiguration = (RedisCacheConfiguration) constructor.newInstance(Duration.ZERO, true, true, CacheKeyPrefix.simple(), RedisSerializationContext.SerializationPair.fromSerializer(keySerializer), RedisSerializationContext.SerializationPair.fromSerializer(jackson2JsonRedisSerializer),conversionService); } } assert redisCacheConfiguration != null; //通过RedisCacheManagerBuilder来创建RedisCacheManager,也可以直接new return RedisCacheManager.RedisCacheManagerBuilder.fromConnectionFactory(connectionFactory).cacheDefaults(redisCacheConfiguration).build(); } @Bean public RedisCacheManager deptCacheManager(RedisConnectionFactory connectionFactory) throws InvocationTargetException, IllegalAccessException, InstantiationException {
    //对 对象类型(employee)和string类型的序列化 Jackson2JsonRedisSerializer<Department> jackson2JsonRedisSerializer = new Jackson2JsonRedisSerializer<>(Department.class); Jackson2JsonRedisSerializer<String> keySerializer = new Jackson2JsonRedisSerializer<>(String.class); DefaultFormattingConversionService conversionService = new DefaultFormattingConversionService(); RedisCacheConfiguration.registerDefaultConverters(conversionService); RedisCacheConfiguration redisCacheConfiguration = null; Constructor[] constructors = RedisCacheConfiguration.class.getDeclaredConstructors(); for (Constructor constructor : constructors) {
    constructor.setAccessible(true); if(constructor.getParameterTypes().length==7){
   //因为只有构造方法,所以判断方式比较随意 redisCacheConfiguration = (RedisCacheConfiguration) constructor.newInstance(Duration.ZERO, true, true, CacheKeyPrefix.simple(), RedisSerializationContext.SerializationPair.fromSerializer(keySerializer), RedisSerializationContext.SerializationPair.fromSerializer(jackson2JsonRedisSerializer),conversionService); } } assert redisCacheConfiguration != null; //通过RedisCacheManagerBuilder来创建RedisCacheManager,也可以直接new return RedisCacheManager.RedisCacheManagerBuilder.fromConnectionFactory(connectionFactory).cacheDefaults(redisCacheConfiguration).build(); } //CacheManagerCustomizers可以来定制缓存的一些规则 // @Primary //将某个缓存管理器作为默认的, 注意实际开发中还是使用 RedisTemplate<Object, Object> // @Bean // public RedisCacheManager employeeCacheManager(RedisTemplate<Object, Employee> empRedisTemplate){
    // RedisCacheManager cacheManager = new RedisCacheManager(empRedisTemplate); // //key多了一个前缀 // // //使用前缀,默认会将CacheName作为key的前缀 // cacheManager.setUsePrefix(true); // // return cacheManager; // } // @Bean // public RedisCacheManager deptCacheManager(RedisTemplate<Object, Department> deptRedisTemplate){
    // RedisCacheManager cacheManager = new RedisCacheManager(deptRedisTemplate); // //key多了一个前缀 // // //使用前缀,默认会将CacheName作为key的前缀 // cacheManager.setUsePrefix(true); // // return cacheManager; // } }
版权声明:本文内容由互联网用户自发贡献,该文观点仅代表作者本人。本站仅提供信息存储空间服务,不拥有所有权,不承担相关法律责任。如发现本站有涉嫌侵权/违法违规的内容,请联系我们,一经查实,本站将立刻删除。
如需转载请保留出处:https://51itzy.com/kjqy/118999.html