
这段时间,一直在搞这个光流法,从一开始完全不知道,再到现在搞出点东西,毕竟是毕设相关,以此作为纪念
方法
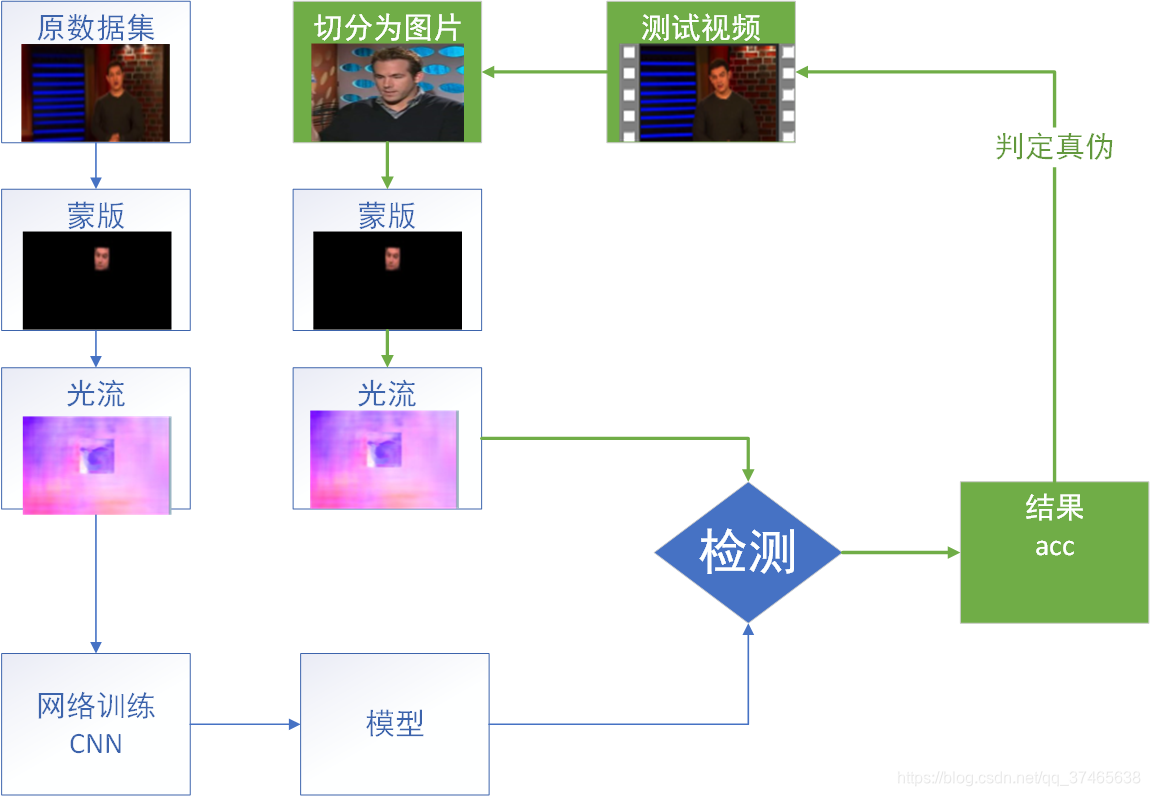
数据集处理
这里我使用的celeb-df数据集
face.py找到人脸
首先在github上下载facenet,里面有一个detect_face.py文件,要把align标为source dir,pycharm才能找到
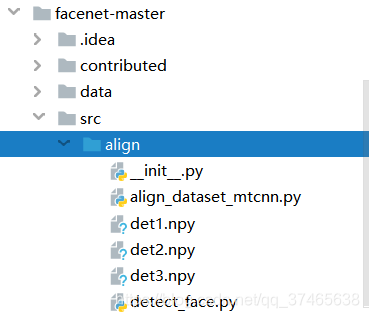
然后在这个基础上编写检测脸部的代码 face.py
""" @Time : 2020/3/6 5:17 @Author : cs @content: """ import re from scipy import misc import tensorflow as tf import detect_face import cv2 import matplotlib.pyplot as plt import imageio import os # def startGetFace(): #传入一张图的地址,返回图中的人脸坐标和原图 def getFace(imagePath): minsize = 20 # minimum size of face threshold = [0.6, 0.7, 0.7] # three steps's threshold factor = 0.709 # scale factor gpu_memory_fraction = 1.0 print('Creating networks and loading parameters') with tf.Graph().as_default(): # gpu_options = tf.GPUOptions(per_process_gpu_memory_fraction=gpu_memory_fraction) # sess = tf.Session(config=tf.ConfigProto(gpu_options=gpu_options, log_device_placement=False)) config = tf.ConfigProto() config.gpu_options.allow_growth = True sess = tf.Session(config=config) with sess.as_default(): pnet, rnet, onet = detect_face.create_mtcnn(sess, None) img = cv2.imread(imagePath) bounding_boxes, _ = detect_face.detect_face(img, minsize, pnet, rnet, onet, threshold, factor) nrof_faces = bounding_boxes.shape[0] # 人脸数目 print('找到人脸数目为:{}'.format(nrof_faces)) print(bounding_boxes) crop_faces = [] for face_position in bounding_boxes: face_position = face_position.astype(int) print(face_position[0:4]) for i in range(len(face_position)): if face_position[i]<0: face_position[i]=0 # cv2.rectangle(img, (face_position[0], face_position[1]), (face_position[2], face_position[3]), (0, 255, 0), 2) # crop = img[face_position[1]:face_position[3], # face_position[0]:face_position[2], ] crop=img # crop = cv2.resize(crop, (256,256), interpolation=cv2.INTER_CUBIC) print(crop.shape) crop_faces.append(crop) # cv2.imwrite(dstPath+filename ,crop) # plt.imshow(crop) # plt.show() # cv2.imshow("image",crop) # cv2.waitKey() return(crop,face_position) return(img,[0,0,0,0]) #如果没有人脸,将直接跳出for循环 讯享网
(注释掉的部分都是之前修改的痕迹,本来想在文章中删除,但是怕一不小心删错,所以可以自行删除)
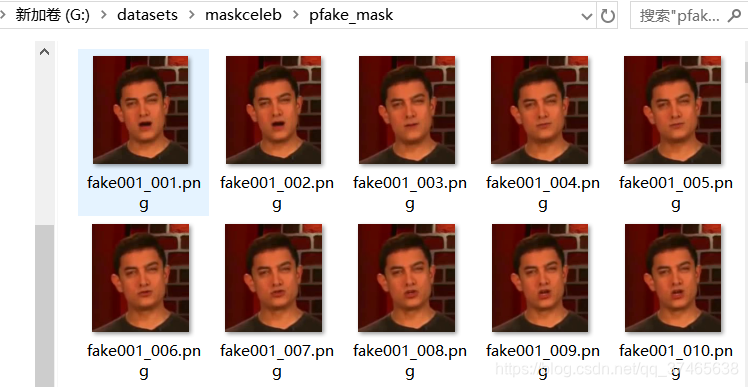
face.py可以检测粗人脸的框图 crop,并返回人脸图像crop和人脸在图像中的位置face_position,但是这样的人脸每一张都大小不一,所以我们将能够框住人脸的224x224的图裁切下来
facemask裁切人脸周围的224x224的图像
因为pwc需要两张图片同样大小,所以我们统一截取为224x224
这里我的存放位置在
讯享网srcPath="G:/datasets/myceleb/preal" dstPath="G:/datasets/maskceleb2/preal_mask/"
""" @Time : 2020/3/6 3:30 @Author : cs @content: """ from image_deal import detectFace from face import getFace import cv2 as cv import numpy as np import os from image_deal import delete import matplotlib.pyplot as plt def facemask(srcPath,dstPath): count=0 for filename in os.listdir(srcPath): count+=1 print(count) # 如果不存在目的目录则创建一个,保持层级结构 if not os.path.exists(dstPath): os.makedirs(dstPath) srcFile=os.path.join(srcPath,filename) dstFile=os.path.join(dstPath,filename) img,faceRect=getFace(srcFile) #这里可能为空 x1, y1, x2, y2 = faceRect[0], faceRect[1], faceRect[2], faceRect[3] h,w,c=img.shape print(faceRect) if x1+y1+x2+y2>0: mask=np.zeros([img.shape[0],img.shape[1]],dtype=np.uint8) left=(x1+x2)//2-112 right=(x1+x2)//2+112 top=(y1+y2)//2-112 bottom=(y1+y2)//2+112 if left<=0: left=0 if right>=w: right=w if top<=0: top=0 if bottom>=h: bottom=h # mask[top:bottom,left:right]=255 image=img[top:bottom,left:right] # image=cv.add(img,np.zeros(np.shape(img),dtype=np.uint8),mask=mask) cv.imwrite(dstFile,image) # cv.rectangle(img, (x1, y1), (x2, y2), (255, 0, 0), 2, 8, 0) # cv.imshow("image",img) # cv.waitKey() print(dstFile+" mask succeeded") else: print("no face") continue srcPath="G:/datasets/myceleb/preal" dstPath="G:/datasets/maskceleb2/preal_mask/" delete(dstPath) facemask(srcPath,dstPath) 这样就可以裁出相同大小的图片了,这里有一个delete()函数,来自于image_deal,关于图片的常用处理,我都放在了image_deal中
讯享网""" @Time : 2020/3/6 3:20 @Author : cs @content: """ import numpy as np import cv2 as cv import os # 检测图片中的脸部并返回坐标 def detectFace(srcFile): face_cascade = cv.CascadeClassifier("myxml/haarcascade_frontalface_default.xml") eye_cascade = cv.CascadeClassifier("myxml/haarcascade_eye_tree_eyeglasses.xml") img = cv.imread(srcFile) gray = cv.cvtColor(img, cv.COLOR_BGR2GRAY) faces = face_cascade.detectMultiScale(gray, 1.1, 5, cv.CASCADE_SCALE_IMAGE, (50, 50), (100, 100)) if len(faces) > 0: for faceRect in faces: x, y, w, h = faceRect # cv2.rectangle(img, (x, y), (x + w, y + h), (255, 0, 0), 2, 8, 0) roi_gray = gray[y:y + h, x:x + w] roi_color = img[y:y + h, x:x + w] # cv2.imshow("img", img) # cv2.waitKey(0) # 只讨论一张脸的情况 return [img, [x, y, x + w, y + h]] return [img,[0,0,0,0]] #这里必须返回值,不然可能没有返回值 # 图片压缩批处理 def compressImage(srcPath, dstPath): count = 0 # 在生成图片前一定要清空dstPath for filename in os.listdir(dstPath): if filename: os.remove(dstPath + filename) for filename in os.listdir(srcPath): # 如果不存在目的目录则创建一个,保持层级结构 if not os.path.exists(dstPath): os.makedirs(dstPath) # 拼接完整的文件或文件夹路径 srcFile = os.path.join(srcPath, filename) dstFile = os.path.join(dstPath, filename) print(srcFile) print(dstFile) # 如果是文件就处理 if os.path.isfile(srcFile): # 打开原图片缩小后保存,可以用if srcFile.endswith(".jpg")或者split,splitext等函数等针对特定文件压缩 sImg = cv.imread(srcFile) w, h, c = sImg.shape print(w, h) """ 保证是同样大小的图片,不然报错 """ dImg = cv.resize(sImg, (w//2, h//2), interpolation=cv.INTER_AREA) # 设置压缩尺寸和选项,注意尺寸要用括号 # dImg.save(dstFile) #也可以用srcFile原路径保存,或者更改后缀保存,save这个函数后面可以加压缩编码选项JPEG之类的 # print("压缩后大小",w//4,h//4) cv.imwrite(dstFile, dImg, [int(cv.IMWRITE_JPEG_QUALITY), 5]) print(dstFile + " compressed succeeded") # 如果是文件夹就递归 if os.path.isdir(srcFile): compressImage(srcFile, dstFile, [int(cv.IMWRITE_JPEG_QUALITY), 5]) # compressImage(pfake,plittlefake) def video2image(videoPath, svPath,name): # delete(svPath) cap = cv.VideoCapture(videoPath) numFrame = 0 test=0 while True: if cap.grab(): flag, frame = cap.retrieve() if not flag: continue else: # cv2.imshow('video', frame) numFrame += 1 newPath = svPath + name+str(numFrame) + ".png" cv.imencode('.png', frame)[1].tofile(newPath) if cv.waitKey(10) == 27: break if numFrame==test: break test=numFrame print("已在"+svPath+"生成 %s 张图片"%numFrame) def delete(imagePath): count=0 for root,dirs,files in os.walk(imagePath): # os.remove(imagePath+"/"+files) for file in files: os.remove(root+"/"+file) count+=1 print("已删除 %s 张图片" % count) #让文件名的数字位数相同 def regularName(imagePath): for file in os.listdir(imagePath): names=file.split("_") if len(names[0])==5: n=names[0][-1] f=names[0][0:4] names[0]=f+'00'+n elif len(names[0]) == 6: n = names[0][4:6] f = names[0][0:4] names[0] = f + "0" + n numbers=names[1].split(".") if len(numbers[0])==1: names[1]="00"+names[1] elif len(numbers[0])==2: names[1]="0"+names[1] newfile=names[0]+"_"+names[1] os.rename(imagePath+file,imagePath+newfile) print("已将"+imagePath+file+"改名为"+newfile) #if __name__ == '__main__': #regularName("G:/datasets/maskceleb/pfake_mask/")
可以看到,这里面包含了视频转图片,删除原有图片,图片批量重命名(可以不使用),还有一个opencv自带的检测人脸机制,但是比起facenet差远了,所以不用
可以得到这些图像
PWC光流处理
好了,进入光流处理环节,具体操作方法可参考

【Tensorflow】如何使用PWC-Net网络输出运动中的光流图像
由于整个代码是在jupyter中完成,所以显得比较凌乱,函数和实现代码混在了一起,这里要注意pwcnet.ckpt-一个光流模型,得预先下载好
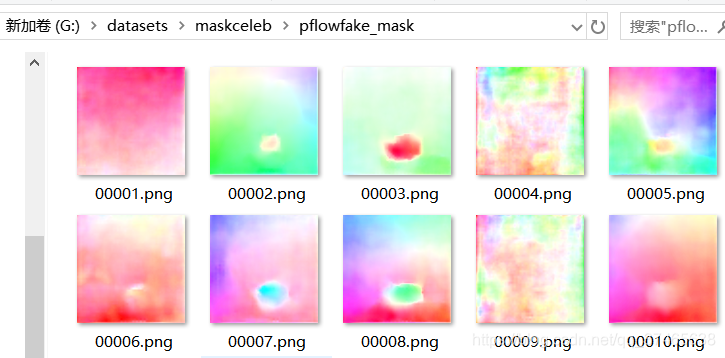
fake_mask就是上一步中裁剪出来的文件夹
pflowfake_mask就是已经生成好光流的文件夹
具体代码如下
""" pwcnet_predict_from_img_pairs.ipynb Run inference on a list of images pairs. Written by Phil Ferriere Licensed under the MIT License (see LICENSE for details) """ from __future__ import absolute_import, division, print_function from copy import deepcopy from skimage.io import imread from model_pwcnet import ModelPWCNet, _DEFAULT_PWCNET_TEST_OPTIONS from visualize import display_img_pairs_w_flows,archive_img_pairs_w_flow_pyrs,plot_img_pairs_w_flows from PIL import Image import os import cv2 as cv from optflow import flow_to_img # TODO: Set device to use for inference # Here, we're using a GPU (use '/device:CPU:0' to run inference on the CPU) gpu_devices = ['/device:GPU:0'] controller = '/device:GPU:0' # TODO: Set the path to the trained model (make sure you've downloaded it first from http://bit.ly/tfoptflow) ckpt_path = './models/pwcnet-lg-6-2-multisteps-chairsthingsmix/pwcnet.ckpt-' # Configure the model for inference, starting with the default options nn_opts = deepcopy(_DEFAULT_PWCNET_TEST_OPTIONS) nn_opts['verbose'] = True nn_opts['ckpt_path'] = ckpt_path nn_opts['batch_size'] = 1 nn_opts['gpu_devices'] = gpu_devices nn_opts['controller'] = controller # We're running the PWC-Net-large model in quarter-resolution mode # That is, with a 6 level pyramid, and upsampling of level 2 by 4 in each dimension as the final flow prediction nn_opts['use_dense_cx'] = True nn_opts['use_res_cx'] = True nn_opts['pyr_lvls'] = 6 nn_opts['flow_pred_lvl'] = 2 # The size of the images in this dataset are not multiples of 64, while the model generates flows padded to multiples # of 64. Hence, we need to crop the predicted flows to their original size nn_opts['adapt_info'] = (1, 436, 1024, 2) def delete(imagePath): count=0 for root,dirs,files in os.walk(imagePath): # os.remove(imagePath+"/"+files) for file in files: os.remove(root+"/"+file) count+=1 print("已删除 %s 张图片" % count) # Instantiate the model in inference mode and display the model configuration nn = ModelPWCNet(mode='test', options=nn_opts) nn.print_config() # img_pairs = [] count=0 def getImagePairs(startNumber,times): startNumber*=times img_pairs = [] files=os.listdir(srcPath) for i in range(startNumber,startNumber+times): name1=files[i].split("_") name2=files[i+1].split("_") if name1[0]!=name2[0]: #保证是同一个人,不然报错 continue else: print(name1,name2) image_path1 = srcPath+files[i] image_path2 = srcPath+files[i+1] image1, image2 = imread(image_path1), imread(image_path2) img_pairs.append((image1, image2)) print(len(img_pairs)) return img_pairs def GeneratePre(img_pairs):# Generate the predictions and display them pred_labels = nn.predict_from_img_pairs(img_pairs, batch_size=1, verbose=False) display_img_pairs_w_flows(img_pairs, pred_labels) return pred_labels # Build a list of image pairs to process # srcPath=plittle_real_mask #光流结对照片的数据集 real_mask="G:/datasets/maskceleb/preal_mask/" fake_mask="G:/datasets/maskceleb/pfake_mask/" pflowfake_mask="G:/datasets/maskceleb/pflowfake_mask/" pflowreal_mask="G:/datasets/maskceleb/pflowreal_mask/" srcPath=plittlefake_mask #光流结对照片的数据集 flow_path=pflowfake_mask def writeFlow(i,img_pairs,pred_labels,times): i*=times # flow_path=pflowreal_mask for row in range(len(img_pairs)): i+=1 if pred_labels is not None: img=flow_to_img(pred_labels[row]) if not os.path.exists(flow_path): os.makedirs(flow_path) sNumber=str(i) while len(sNumber)<5: sNumber="0"+sNumber cv.imwrite(flow_path+sNumber+".png",img,[int(cv.IMWRITE_JPEG_QUALITY),5]) times=10 delete(flow_path) for i in range(3100): img_pairs=getImagePairs(i,times) pred_labels=GeneratePre(img_pairs) writeFlow(i,img_pairs,pred_labels,times) 可以得到如下结果
拆分成数据集
到了最后一步,我们将其分成train validation test,定义一个split_data.py
讯享网""" @Time : 2020/3/6 9:34 @Author : cs @content: """ import os, shutil from image_deal import delete # 含有光流图的总目录 original = 'G:/datasets/maskceleb/' # 存放数据集的目录 base_dir = 'G:/datasets/flowset/' # os.mkdir(base_dir) # 切割数据集 # fnames = ['cat.{}.jpg'.format(i) for i in range(1000)] original_real=original+"pflowreal_mask/" original_fake=original+"pflowfake_mask/" print(original_real) # 建立训练集、验证集、测试集目录 train_dir = os.path.join(base_dir, 'train/') if not os.path.exists(train_dir): os.mkdir(train_dir) validation_dir = os.path.join(base_dir, 'validation/') if not os.path.exists(validation_dir): os.mkdir(validation_dir) test_dir = os.path.join(base_dir, 'test/') if not os.path.exists(test_dir): os.mkdir(test_dir) # 将real,fake照片按照训练、验证、测试分类 train_real_dir = os.path.join(train_dir, 'real/') # if not os.path.exists(train_real_dir): # os.mkdir(train_real_dir) train_fake_dir = os.path.join(train_dir, 'fake/') # os.mkdir(train_fake_dir) validation_real_dir = os.path.join(validation_dir, 'real/') # os.mkdir(validation_real_dir) validation_fake_dir = os.path.join(validation_dir, 'fake/') # os.mkdir(validation_fake_dir) test_real_dir = os.path.join(test_dir, 'real/') # os.mkdir(test_real_dir) test_fake_dir = os.path.join(test_dir, 'fake/') # os.mkdir(test_fake_dir) trainNumber=30000 valNumber=500 testNumber=500 numbers=[0,trainNumber,trainNumber+valNumber,trainNumber+valNumber+testNumber] flowRealPaths=[original_real,train_real_dir,validation_real_dir,test_real_dir] flowFakePaths=[original_fake,train_fake_dir,validation_fake_dir,test_fake_dir] def cleanPath(imgaePath): delete(imgaePath) def cleanAllPath(flowRealPaths,flowFakePaths): for i in range(1,len(flowFakePaths)): delete(flowFakePaths[i]) delete(flowRealPaths[i]) def getDatasets(flowPath_list): fnames = os.listdir(flowPath_list[0]) for i in range(3): count=1 for fname in fnames[numbers[i]:numbers[i+1]]: src = os.path.join(flowPath_list[0], fname) dat = os.path.join(flowPath_list[i+1], fname) shutil.copyfile(src, dat) print("已从"+flowPath_list[0]+"生成"+str(count)+"张 图片到"+flowPath_list[i+1]) count+=1 if __name__ == '__main__': cleanAllPath(flowRealPaths,flowFakePaths) getDatasets(flowRealPaths) getDatasets(flowFakePaths)
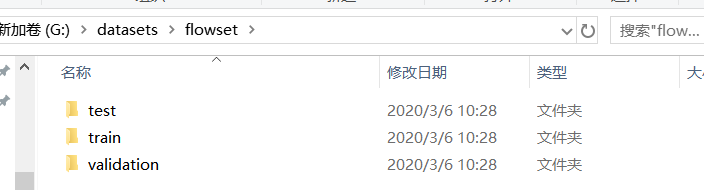
将会生成这样的文件夹,每个文件夹里面都有fake和real数据集,train里面是30000,validation和test分别是500
模型训练网络
为了保证效果,尝试了不同的网络,核心是keras+tensorflow
纯cnn
# 优化 数据增强 from keras import layers from keras import models import matplotlib.pyplot as plt from keras import optimizers from keras.preprocessing.image import ImageDataGenerator import tensorflow as tf import keras config = tf.ConfigProto() config.gpu_options.allow_growth = True keras.backend.tensorflow_backend.set_session(tf.Session(config=config)) train_dir = 'G:/datasets/flowset/train/' validation_dir = 'G:/datasets/flowset/validation/' model = models.Sequential() model.add(layers.Conv2D(32, (3, 3), activation='relu', input_shape=(224, 224, 3))) model.add(layers.MaxPool2D((2, 2))) model.add(layers.Conv2D(64, (3, 3), activation='relu')) model.add(layers.MaxPool2D((2, 2))) model.add(layers.Conv2D(128, (3, 3), activation='relu')) model.add(layers.MaxPool2D((2, 2))) model.add(layers.Conv2D(128, (3, 3), activation='relu')) model.add(layers.MaxPool2D((2, 2))) model.add(layers.Flatten()) model.add(layers.Dropout(0.5)) model.add(layers.Dense(512, activation='relu')) model.add(layers.Dense(1, activation='sigmoid')) model.compile(loss='binary_crossentropy', optimizer=optimizers.RMSprop(lr=1e-4), metrics=['acc']) # 调整像素值 train_datagen = ImageDataGenerator( rescale=1./255, rotation_range=40, width_shift_range=0.2, height_shift_range=0.2, shear_range=0.2, zoom_range=0.2, horizontal_flip=True) test_datagen = ImageDataGenerator(rescale=1./255) train_generator = train_datagen.flow_from_directory( directory=train_dir, target_size=(224, 224), batch_size=32, class_mode='binary') validation_generator = test_datagen.flow_from_directory( directory=validation_dir, target_size=(224, 224), batch_size=32, class_mode='binary') history = model.fit_generator( train_generator, steps_per_epoch=100, epochs=100, validation_data=validation_generator, validation_steps=50) model.save('fake_and_real_small_2.h5') acc = history.history['acc'] val_acc = history.history['val_acc'] loss = history.history['loss'] val_loss = history.history['val_loss'] epochs = range(1, len(acc) + 1) plt.plot(epochs, acc, 'bo', label='Training acc') plt.plot(epochs, val_acc, 'b', label='Validation acc') plt.title('Training and validation accuracy') plt.legend() plt.figure() plt.plot(epochs, loss, 'bo', label='Training loss') plt.plot(epochs, val_loss, 'b', label='Validation loss') plt.title('Training and validation loss') plt.legend() plt.show() 这里只是简单使用了4层神经网络和relu激活函数,最后会生成两张图
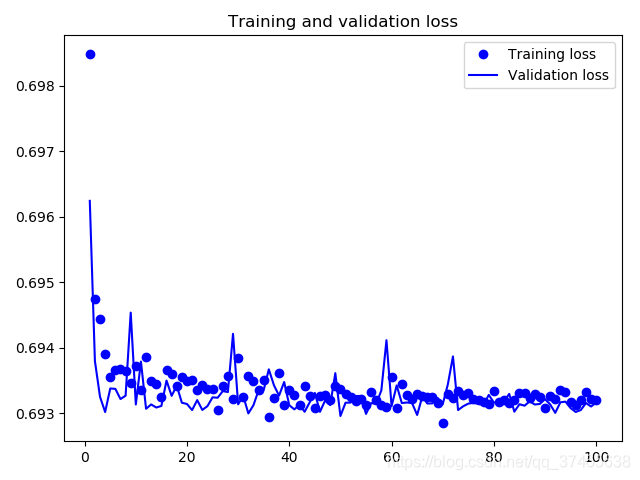
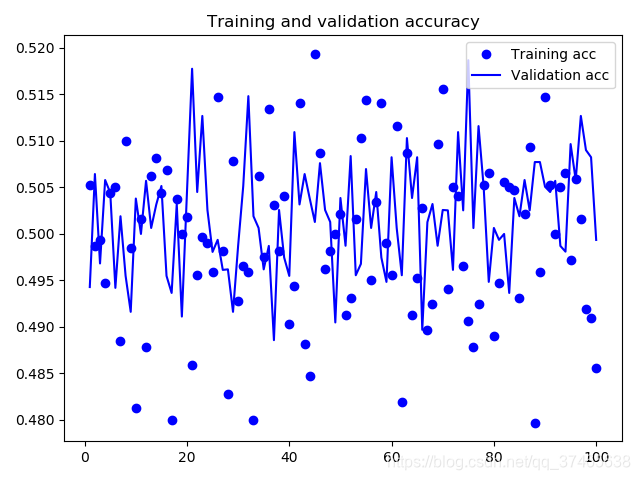
可以看到,效果不是很理想
VGG+CNN
这里我们使用VGG网络进行预特征处理
网络架构
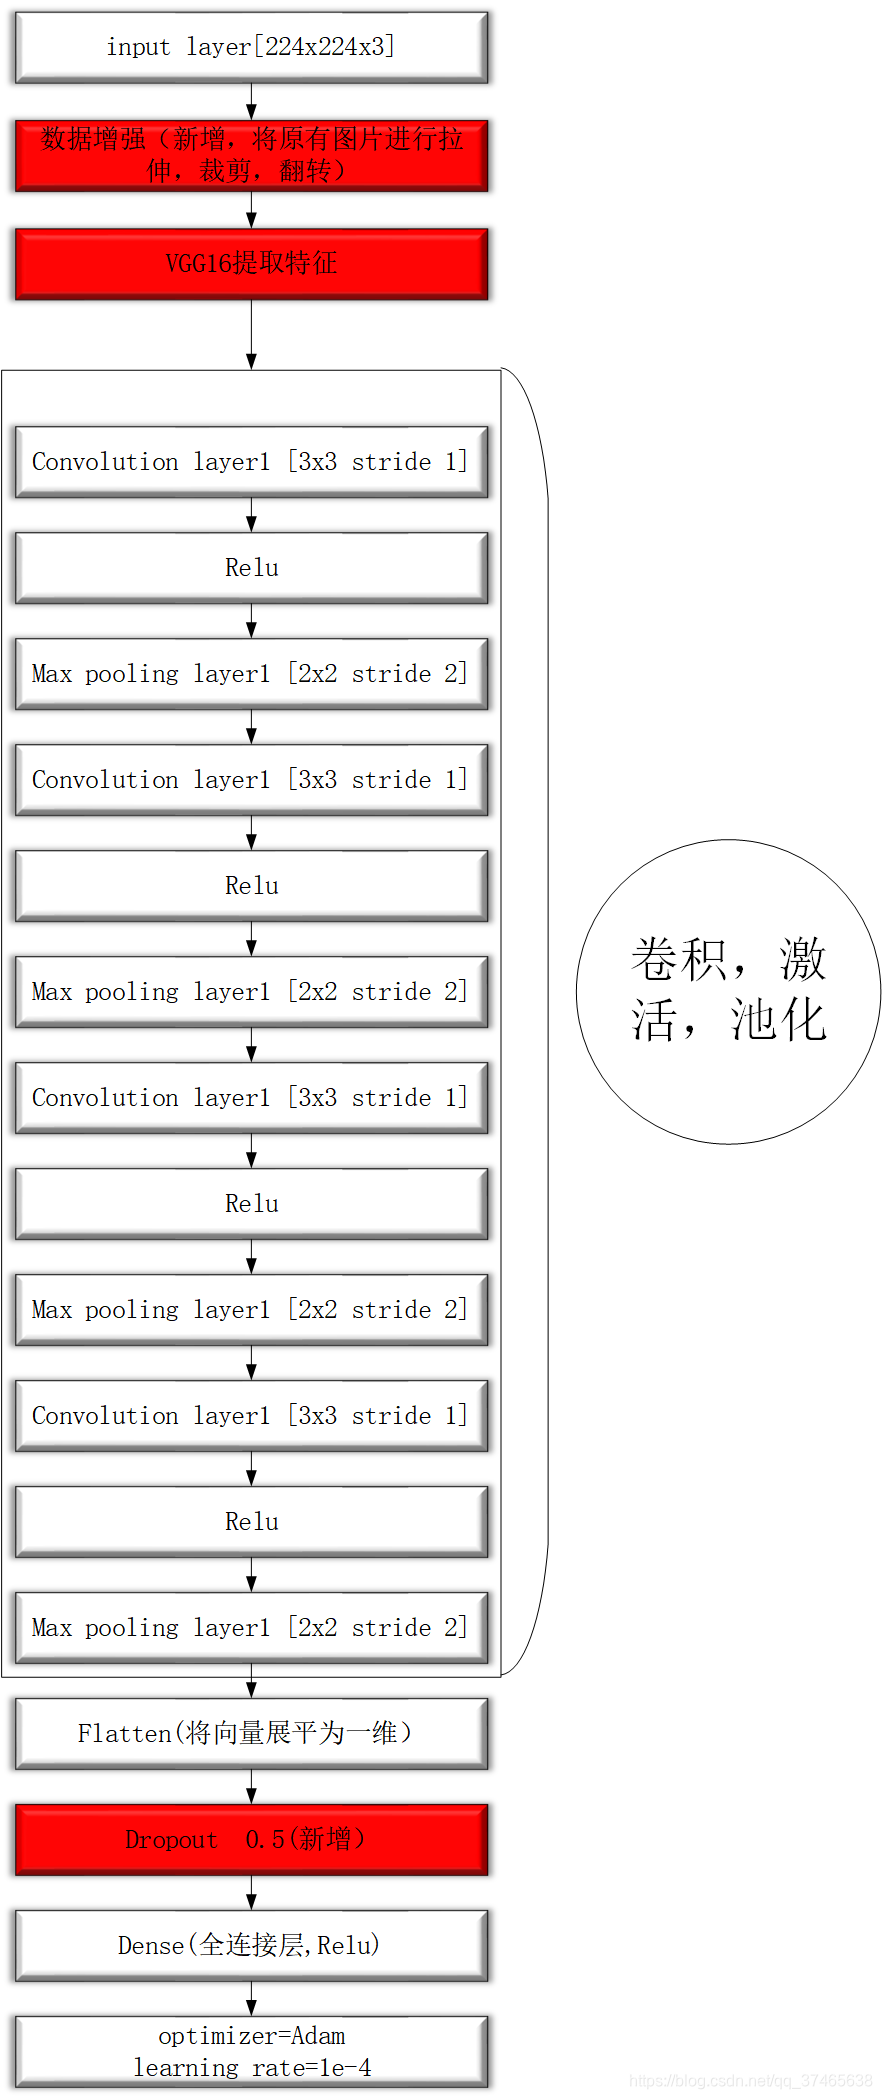
讯享网""" @Time : 2020/3/13 11:50 @Author : cs @content: """ from keras.applications import VGG16 import os import numpy as np from keras.preprocessing.image import ImageDataGenerator from keras import models from keras import layers from keras import optimizers import matplotlib.pyplot as plt conv_base = VGG16(weights='imagenet', include_top=False, input_shape=(224, 224, 3)) base_dir = 'G:/datasets/flowset/' train_dir = os.path.join(base_dir, 'train') validation_dir = os.path.join(base_dir, 'validation') test_dir = os.path.join(base_dir, 'test') datagen = ImageDataGenerator(rescale=1./255) batch_size = 20 train_number=30000 validation_number=500 test_number=500 def extarct_features(directory, sample_count): features = np.zeros(shape=(sample_count, 4, 4, 512)) labels = np.zeros(shape=(sample_count)) generator = datagen.flow_from_directory( directory, target_size=(224, 224), batch_size=batch_size, class_mode='binary') i = 0 for inputs_batch, labels_batch in generator: features_batch = conv_base.predict(inputs_batch) features[i * batch_size : (i + 1) * batch_size] = features_batch labels[i * batch_size : (i + 1) * batch_size] = labels_batch i += 1 if i * batch_size >= sample_count: break return features, labels train_features, train_labels = extarct_features(train_dir, 2000) validation_features, validation_labels = extarct_features(validation_dir, 150) test_features, test_labels = extarct_features(test_dir, 100) train_features = np.reshape(train_features, (2000, 4 * 4 * 512)) validation_features = np.reshape(validation_features, (1000, 4 * 4 * 512)) test_features = np.reshape(test_features, (1000, 4 * 4 * 512)) model = models.Sequential() model.add(layers.Dense(256, activation='relu', input_dim=4 * 4 * 512)) model.add(layers.Dropout(0.5)) model.add(layers.Dense(1, activation='sigmoid')) model.compile(optimizer=optimizers.RMSprop(lr=2e-5), loss='binary_crossentropy', metrics=['acc']) history = model.fit(train_features, train_labels, epochs=30, batch_size=20, validation_data=(validation_features, validation_labels)) acc = history.history['acc'] val_acc = history.history['val_acc'] loss = history.history['loss'] val_loss = history.history['val_loss'] epochs = range(1, len(acc) + 1) plt.plot(epochs, acc, 'bo', label='Training acc') plt.plot(epochs, val_acc, 'b', label='Validation acc') plt.title('Training and validation accuracy') plt.legend() plt.figure() plt.plot(epochs, loss, 'bo', label='Training loss') plt.plot(epochs, val_loss, 'b', label='Validation loss') plt.title('Training and validation loss') plt.legend() plt.show()

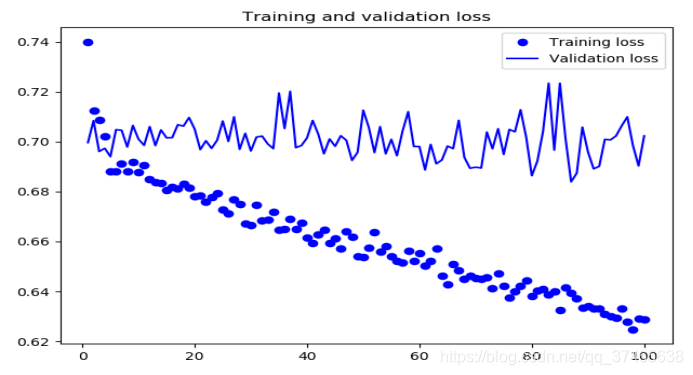
可以看到,效果有所好转,也更加规律
总结
光流法能够检测出运动中的图像变化,对于人脸视频,有其一定的效果
版权声明:本文内容由互联网用户自发贡献,该文观点仅代表作者本人。本站仅提供信息存储空间服务,不拥有所有权,不承担相关法律责任。如发现本站有涉嫌侵权/违法违规的内容,请联系我们,一经查实,本站将立刻删除。
如需转载请保留出处:https://51itzy.com/kjqy/73616.html