
目录
一,腾讯云点播简介
二,准备工作
1,点击:申请腾讯云账号
2,实名
3,购买点播存储包和流量包
三,使用腾讯云自带点播控制台管理点播视频
1,创建应用
2,使用控制台可对视频进行上传,删除,转码等
四,API接入腾讯云点播SDK(以Java为例)
1,上传点播视频
2,获取视频信息
3,删除视频
4,转码视频
五,客户端集成点播播放SDK(以Android为例)
1,搭建环境
2,播放视频
一,腾讯云点播简介
腾讯云点播是腾讯云提供的一款视频点播服务,可以帮助用户将视频文件上传到云端存储,实现快速、稳定、高效的视频播放和管理。腾讯云点播支持多种视频格式和多种分辨率的视频播放,同时还提供了多种功能,如视频加密、水印、转码、截图等,以满足用户的多样化需求。腾讯云点播还提供了丰富的API接口和SDK支持,方便用户在自己的应用中集成点播功能。
二,准备工作
1,点击:申请腾讯云账号

选择:还没账号,注册后在关联
2,实名
注册完账号后需要对账号进行实名,详情参考:腾讯云实名认证方法
3,购买点播存储包和流量包
接下来需要购买腾讯云点播存储包和流量包
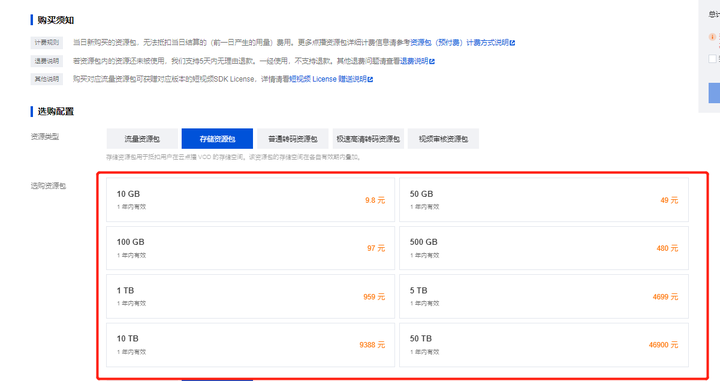
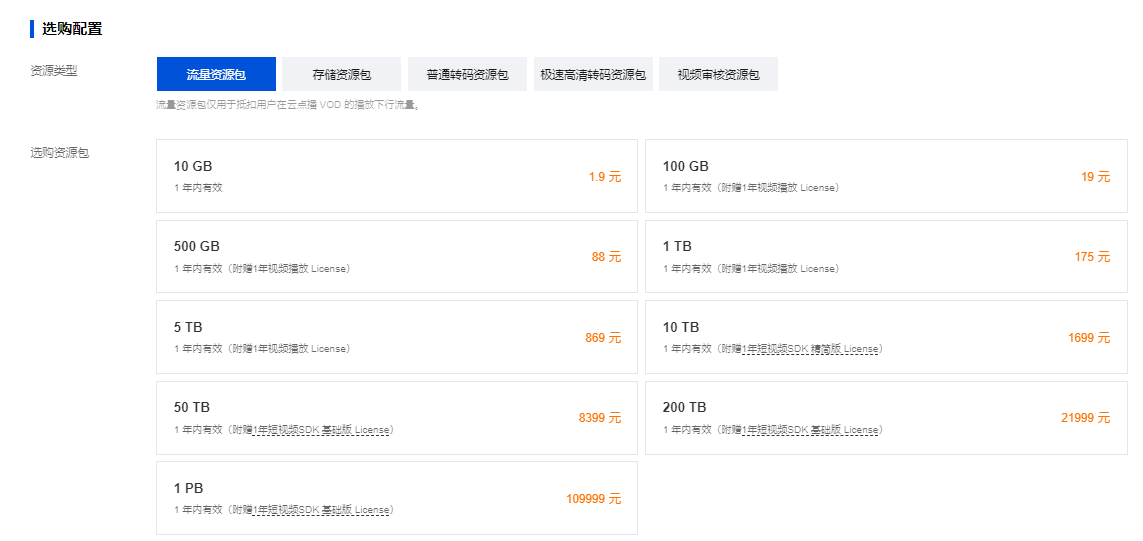
三,使用腾讯云自带点播控制台管理点播视频
1,创建应用
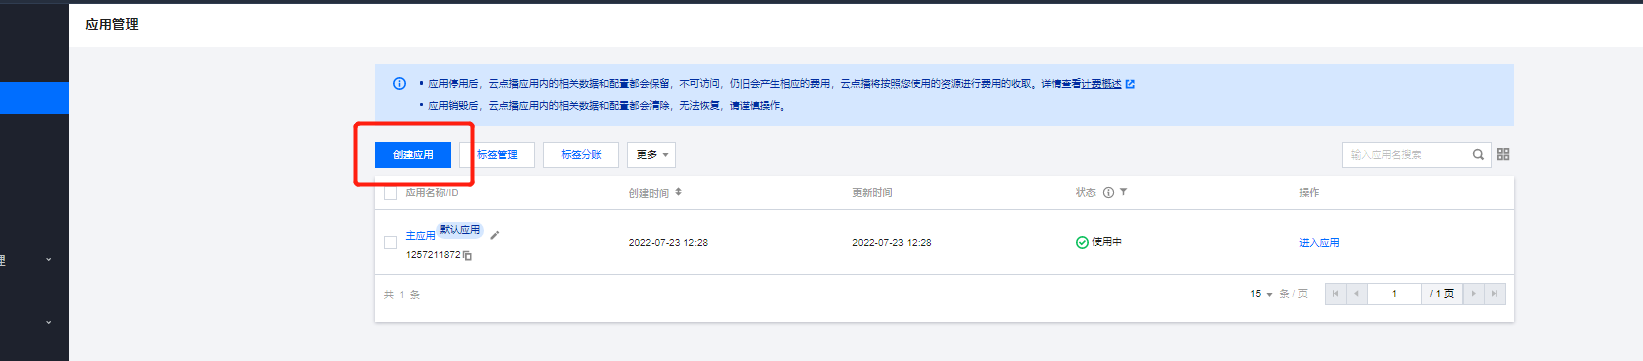
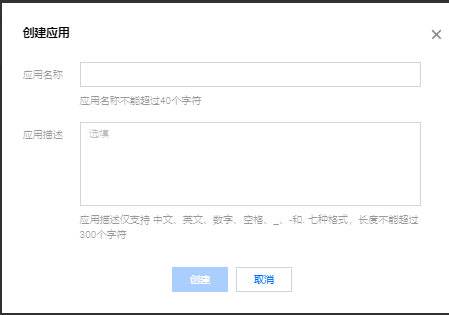
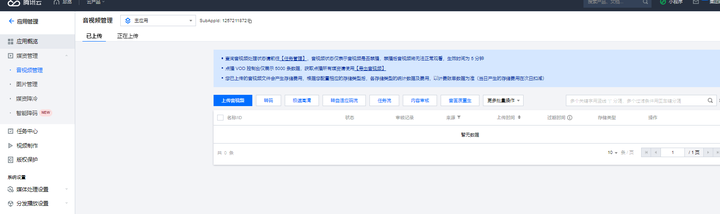
2,使用控制台可对视频进行上传,删除,转码等

四,API接入腾讯云点播SDK(以Java为例)
更多API可参考腾讯云点播API文档
1,上传点播视频
import com.tencentcloudapi.common.Credential; import com.tencentcloudapi.common.profile.ClientProfile; import com.tencentcloudapi.common.profile.HttpProfile; import com.tencentcloudapi.common.exception.TencentCloudSDKException; import com.tencentcloudapi.vod.v.VodClient; import com.tencentcloudapi.vod.v.models.*; public class ApplyUpload { public static void main(String [] args) { try{ // 实例化一个认证对象,入参需要传入腾讯云账户 SecretId 和 SecretKey,此处还需注意密钥对的保密 // 代码泄露可能会导致 SecretId 和 SecretKey 泄露,并威胁账号下所有资源的安全性。以下代码示例仅供参考,建议采用更安全的方式来使用密钥,请参见:https://cloud.tencent.com/document/product/1278/85305 // 密钥可前往官网控制台 https://console.cloud.tencent.com/cam/capi 进行获取 Credential cred = new Credential("SecretId", "SecretKey"); // 实例化一个http选项,可选的,没有特殊需求可以跳过 HttpProfile httpProfile = new HttpProfile(); httpProfile.setEndpoint("vod.tencentcloudapi.com"); // 实例化一个client选项,可选的,没有特殊需求可以跳过 ClientProfile clientProfile = new ClientProfile(); clientProfile.setHttpProfile(httpProfile); // 实例化要请求产品的client对象,clientProfile是可选的 VodClient client = new VodClient(cred, "", clientProfile); // 实例化一个请求对象,每个接口都会对应一个request对象 ApplyUploadRequest req = new ApplyUploadRequest(); // 返回的resp是一个ApplyUploadResponse的实例,与请求对象对应 ApplyUploadResponse resp = client.ApplyUpload(req); // 输出json格式的字符串回包 System.out.println(ApplyUploadResponse.toJsonString(resp)); } catch (TencentCloudSDKException e) { System.out.println(e.toString()); } } }讯享网
2,获取视频信息
讯享网import com.tencentcloudapi.common.Credential; import com.tencentcloudapi.common.profile.ClientProfile; import com.tencentcloudapi.common.profile.HttpProfile; import com.tencentcloudapi.common.exception.TencentCloudSDKException; import com.tencentcloudapi.vod.v.VodClient; import com.tencentcloudapi.vod.v.models.*; public class DescribeMediaInfos { public static void main(String [] args) { try{ // 实例化一个认证对象,入参需要传入腾讯云账户 SecretId 和 SecretKey,此处还需注意密钥对的保密 // 代码泄露可能会导致 SecretId 和 SecretKey 泄露,并威胁账号下所有资源的安全性。以下代码示例仅供参考,建议采用更安全的方式来使用密钥,请参见:https://cloud.tencent.com/document/product/1278/85305 // 密钥可前往官网控制台 https://console.cloud.tencent.com/cam/capi 进行获取 Credential cred = new Credential("SecretId", "SecretKey"); // 实例化一个http选项,可选的,没有特殊需求可以跳过 HttpProfile httpProfile = new HttpProfile(); httpProfile.setEndpoint("vod.tencentcloudapi.com"); // 实例化一个client选项,可选的,没有特殊需求可以跳过 ClientProfile clientProfile = new ClientProfile(); clientProfile.setHttpProfile(httpProfile); // 实例化要请求产品的client对象,clientProfile是可选的 VodClient client = new VodClient(cred, "", clientProfile); // 实例化一个请求对象,每个接口都会对应一个request对象 DescribeMediaInfosRequest req = new DescribeMediaInfosRequest(); // 返回的resp是一个DescribeMediaInfosResponse的实例,与请求对象对应 DescribeMediaInfosResponse resp = client.DescribeMediaInfos(req); // 输出json格式的字符串回包 System.out.println(DescribeMediaInfosResponse.toJsonString(resp)); } catch (TencentCloudSDKException e) { System.out.println(e.toString()); } } }
3,删除视频
import com.tencentcloudapi.common.Credential; import com.tencentcloudapi.common.profile.ClientProfile; import com.tencentcloudapi.common.profile.HttpProfile; import com.tencentcloudapi.common.exception.TencentCloudSDKException; import com.tencentcloudapi.vod.v.VodClient; import com.tencentcloudapi.vod.v.models.*; public class DeleteMedia { public static void main(String [] args) { try{ // 实例化一个认证对象,入参需要传入腾讯云账户 SecretId 和 SecretKey,此处还需注意密钥对的保密 // 代码泄露可能会导致 SecretId 和 SecretKey 泄露,并威胁账号下所有资源的安全性。以下代码示例仅供参考,建议采用更安全的方式来使用密钥,请参见:https://cloud.tencent.com/document/product/1278/85305 // 密钥可前往官网控制台 https://console.cloud.tencent.com/cam/capi 进行获取 Credential cred = new Credential("SecretId", "SecretKey"); // 实例化一个http选项,可选的,没有特殊需求可以跳过 HttpProfile httpProfile = new HttpProfile(); httpProfile.setEndpoint("vod.tencentcloudapi.com"); // 实例化一个client选项,可选的,没有特殊需求可以跳过 ClientProfile clientProfile = new ClientProfile(); clientProfile.setHttpProfile(httpProfile); // 实例化要请求产品的client对象,clientProfile是可选的 VodClient client = new VodClient(cred, "", clientProfile); // 实例化一个请求对象,每个接口都会对应一个request对象 DeleteMediaRequest req = new DeleteMediaRequest(); // 返回的resp是一个DeleteMediaResponse的实例,与请求对象对应 DeleteMediaResponse resp = client.DeleteMedia(req); // 输出json格式的字符串回包 System.out.println(DeleteMediaResponse.toJsonString(resp)); } catch (TencentCloudSDKException e) { System.out.println(e.toString()); } } }4,转码视频
讯享网import com.tencentcloudapi.common.Credential; import com.tencentcloudapi.common.profile.ClientProfile; import com.tencentcloudapi.common.profile.HttpProfile; import com.tencentcloudapi.common.exception.TencentCloudSDKException; import com.tencentcloudapi.vod.v.VodClient; import com.tencentcloudapi.vod.v.models.*; public class ProcessMedia { public static void main(String [] args) { try{ // 实例化一个认证对象,入参需要传入腾讯云账户 SecretId 和 SecretKey,此处还需注意密钥对的保密 // 代码泄露可能会导致 SecretId 和 SecretKey 泄露,并威胁账号下所有资源的安全性。以下代码示例仅供参考,建议采用更安全的方式来使用密钥,请参见:https://cloud.tencent.com/document/product/1278/85305 // 密钥可前往官网控制台 https://console.cloud.tencent.com/cam/capi 进行获取 Credential cred = new Credential("SecretId", "SecretKey"); // 实例化一个http选项,可选的,没有特殊需求可以跳过 HttpProfile httpProfile = new HttpProfile(); httpProfile.setEndpoint("vod.tencentcloudapi.com"); // 实例化一个client选项,可选的,没有特殊需求可以跳过 ClientProfile clientProfile = new ClientProfile(); clientProfile.setHttpProfile(httpProfile); // 实例化要请求产品的client对象,clientProfile是可选的 VodClient client = new VodClient(cred, "", clientProfile); // 实例化一个请求对象,每个接口都会对应一个request对象 ProcessMediaRequest req = new ProcessMediaRequest(); // 返回的resp是一个ProcessMediaResponse的实例,与请求对象对应 ProcessMediaResponse resp = client.ProcessMedia(req); // 输出json格式的字符串回包 System.out.println(ProcessMediaResponse.toJsonString(resp)); } catch (TencentCloudSDKException e) { System.out.println(e.toString()); } } }
五,客户端集成点播播放SDK(以Android为例)
1,搭建环境
如果您的网络连接 mavenCentral 有问题,也可以手动下载 SDK 集成到工程里:
(1). 下载 LiteAVSDK_Player ,下载完成后进行解压。
(2). 将下载文件解压之后 SDK 目录下的 aar 文件拷贝到工程的 app/libs 目录下:
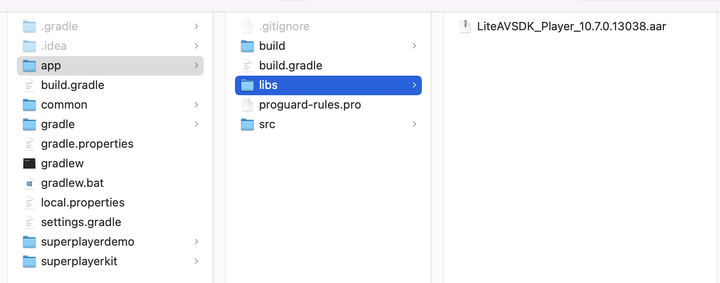
在工程根目录下的 build.gradle 中,添加 flatDir,指定本地仓库路径。

(3). 添加 LiteAVSDK_Player 依赖,在 app/build.gradle 中,添加引用 aar 包的代码。
defaultConfig { ndk { abiFilters "armeabi", "armeabi-v7a", "arm64-v8a" } }讯享网implementation(name:'LiteAVSDK_Player_10.7.0.13038', ext:'aar')
(4). 在 app/build.gradle 的 defaultConfig 中,指定 App 使用的 CPU 架构(目前 LiteAVSDK_Player 支持 armeabi 、armeabi-v7a 和 arm64-v8a)。
defaultConfig { ndk { abiFilters "armeabi", "armeabi-v7a", "arm64-v8a" } }单击播放 Sync Now 按钮同步 SDK,完成 LiteAVSDK 的集成工作。
2,播放视频
步骤1:集成 SDK 开发包
下载和集成 SDK 开发包,请参考同目录下的 SDK 集成指引。
步骤2:配置 License 授权
若您已获得相关 License 授权,需在 腾讯云视立方控制台 获取 License URL 和 License Key:
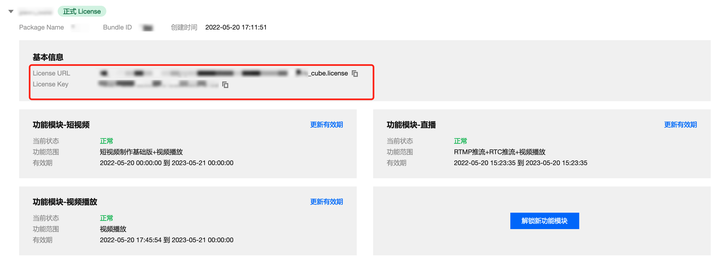
若您暂未获得 License 授权,需先参见 视频播放 License 获取相关授权。
获取到 License 信息后,在调用 SDK 的相关接口前,通过下面的接口初始化 License,建议在 Application 类中进行如下设置:
讯享网public class MApplication extends Application { @Override public void onCreate() { super.onCreate(); String licenceURL = ""; // 获取到的 licence url String licenceKey = ""; // 获取到的 licence key TXLiveBase.getInstance().setLicence(this, licenceURL, licenceKey); TXLiveBase.setListener(new TXLiveBaseListener() { @Override public void onLicenceLoaded(int result, String reason) { Log.i(TAG, "onLicenceLoaded: result:" + result + ", reason:" + reason); } }); } }
步骤3: 添加 View
SDK 默认提供 TXCloudVideoView 用于视频渲染,我们第一步要做的就是在布局 xml 文件里加入如下一段代码:
讯享网<com.tencent.rtmp.ui.TXCloudVideoView android:id="@+id/video_view" android:layout_width="match_parent" android:layout_height="match_parent" android:layout_centerInParent="true" android:visibility="gone"/>
步骤4:创建 Player
接下来创建一个 TXVodPlayer 的对象,并使用 setPlayerView 接口将它与我们刚添加到界面上的 video_view 控件进行关联。
//mPlayerView 即步骤3中添加的视频渲染 view TXCloudVideoView mPlayerView = findViewById(R.id.video_view); //创建 player 对象 TXVodPlayer mVodPlayer = new TXVodPlayer(getActivity()); //关联 player 对象与视频渲染 view mVodPlayer.setPlayerView(mPlayerView);讯享网
步骤5:通过URL启动播放
TXVodPlayer 支持两种播放模式,您可以根据需要自行选择:
TXVodPlayer 内部会自动识别播放协议,您只需要将您的播放 URL 传给 startVodPlay 函数即可。
// 播放 URL 视频资源 String url = "http://.vod2.myqcloud.com/xxxxx/v.f20.mp4"; mVodPlayer.startVodPlay(url); // 播放本地视频资源 String localFile = "/sdcard/video.mp4"; mVodPlayer.startVodPlay(localFile); 步骤6:结束播放
结束播放时记得销毁 view 控件,尤其是在下次 startVodPlay 之前,否则会产生大量的内存泄露以及闪屏问题。
同时,在退出播放界面时,记得一定要调用渲染 View 的onDestroy()函数,否则可能会产生内存泄露和“Receiver not registered”报警。
讯享网@Override public void onDestroy() { super.onDestroy(); mVodPlayer.stopPlay(true); // true 代表清除最后一帧画面 mPlayerView.onDestroy(); }
版权声明:本文内容由互联网用户自发贡献,该文观点仅代表作者本人。本站仅提供信息存储空间服务,不拥有所有权,不承担相关法律责任。如发现本站有涉嫌侵权/违法违规的内容,请联系我们,一经查实,本站将立刻删除。
如需转载请保留出处:https://51itzy.com/kjqy/73452.html