
一、Android 普通app获取root用户权限的原理
Android 普通程序执行su,可以获取root权限。
该过程原理如下:
1.1 手机环境要求:手机已root
首先,该手机已root。这意味着,手机持有者已经完成了以下3步操作:
(1)保证该手机的/system/bin/下面有su可执行文件
cp /data/local/tmp/su /system/bin/ #copy su 到/system/分区 讯享网
(2)保证su的所有者是root用户
讯享网chown root:root su #su的所有者置成root
chmod 4775 /system/bin/su #把su置成-rwsrwxr-x rws的s,保证了运行su的进程的EUID,在运行su期间,变成了su的所有者的UID。
Linux内核为每个进程维护的三个对应的UID值:RUID、EUID、SUID。
每个值,是某个用户的UID。
Linux中,UID用于标识一个用户(例如alice,bob,root)
Android中,UID用于标识一个应用程序
关于进程的EUID,详情参考:https://blog.csdn.net/_/article/details/
这里插入一个小问题:
第一条命令cp /data/local/tmp/su /system/bin/直观上的作用是,把su文件放到环境变量中,这样shell在任意路径下执行命令su都能成功。
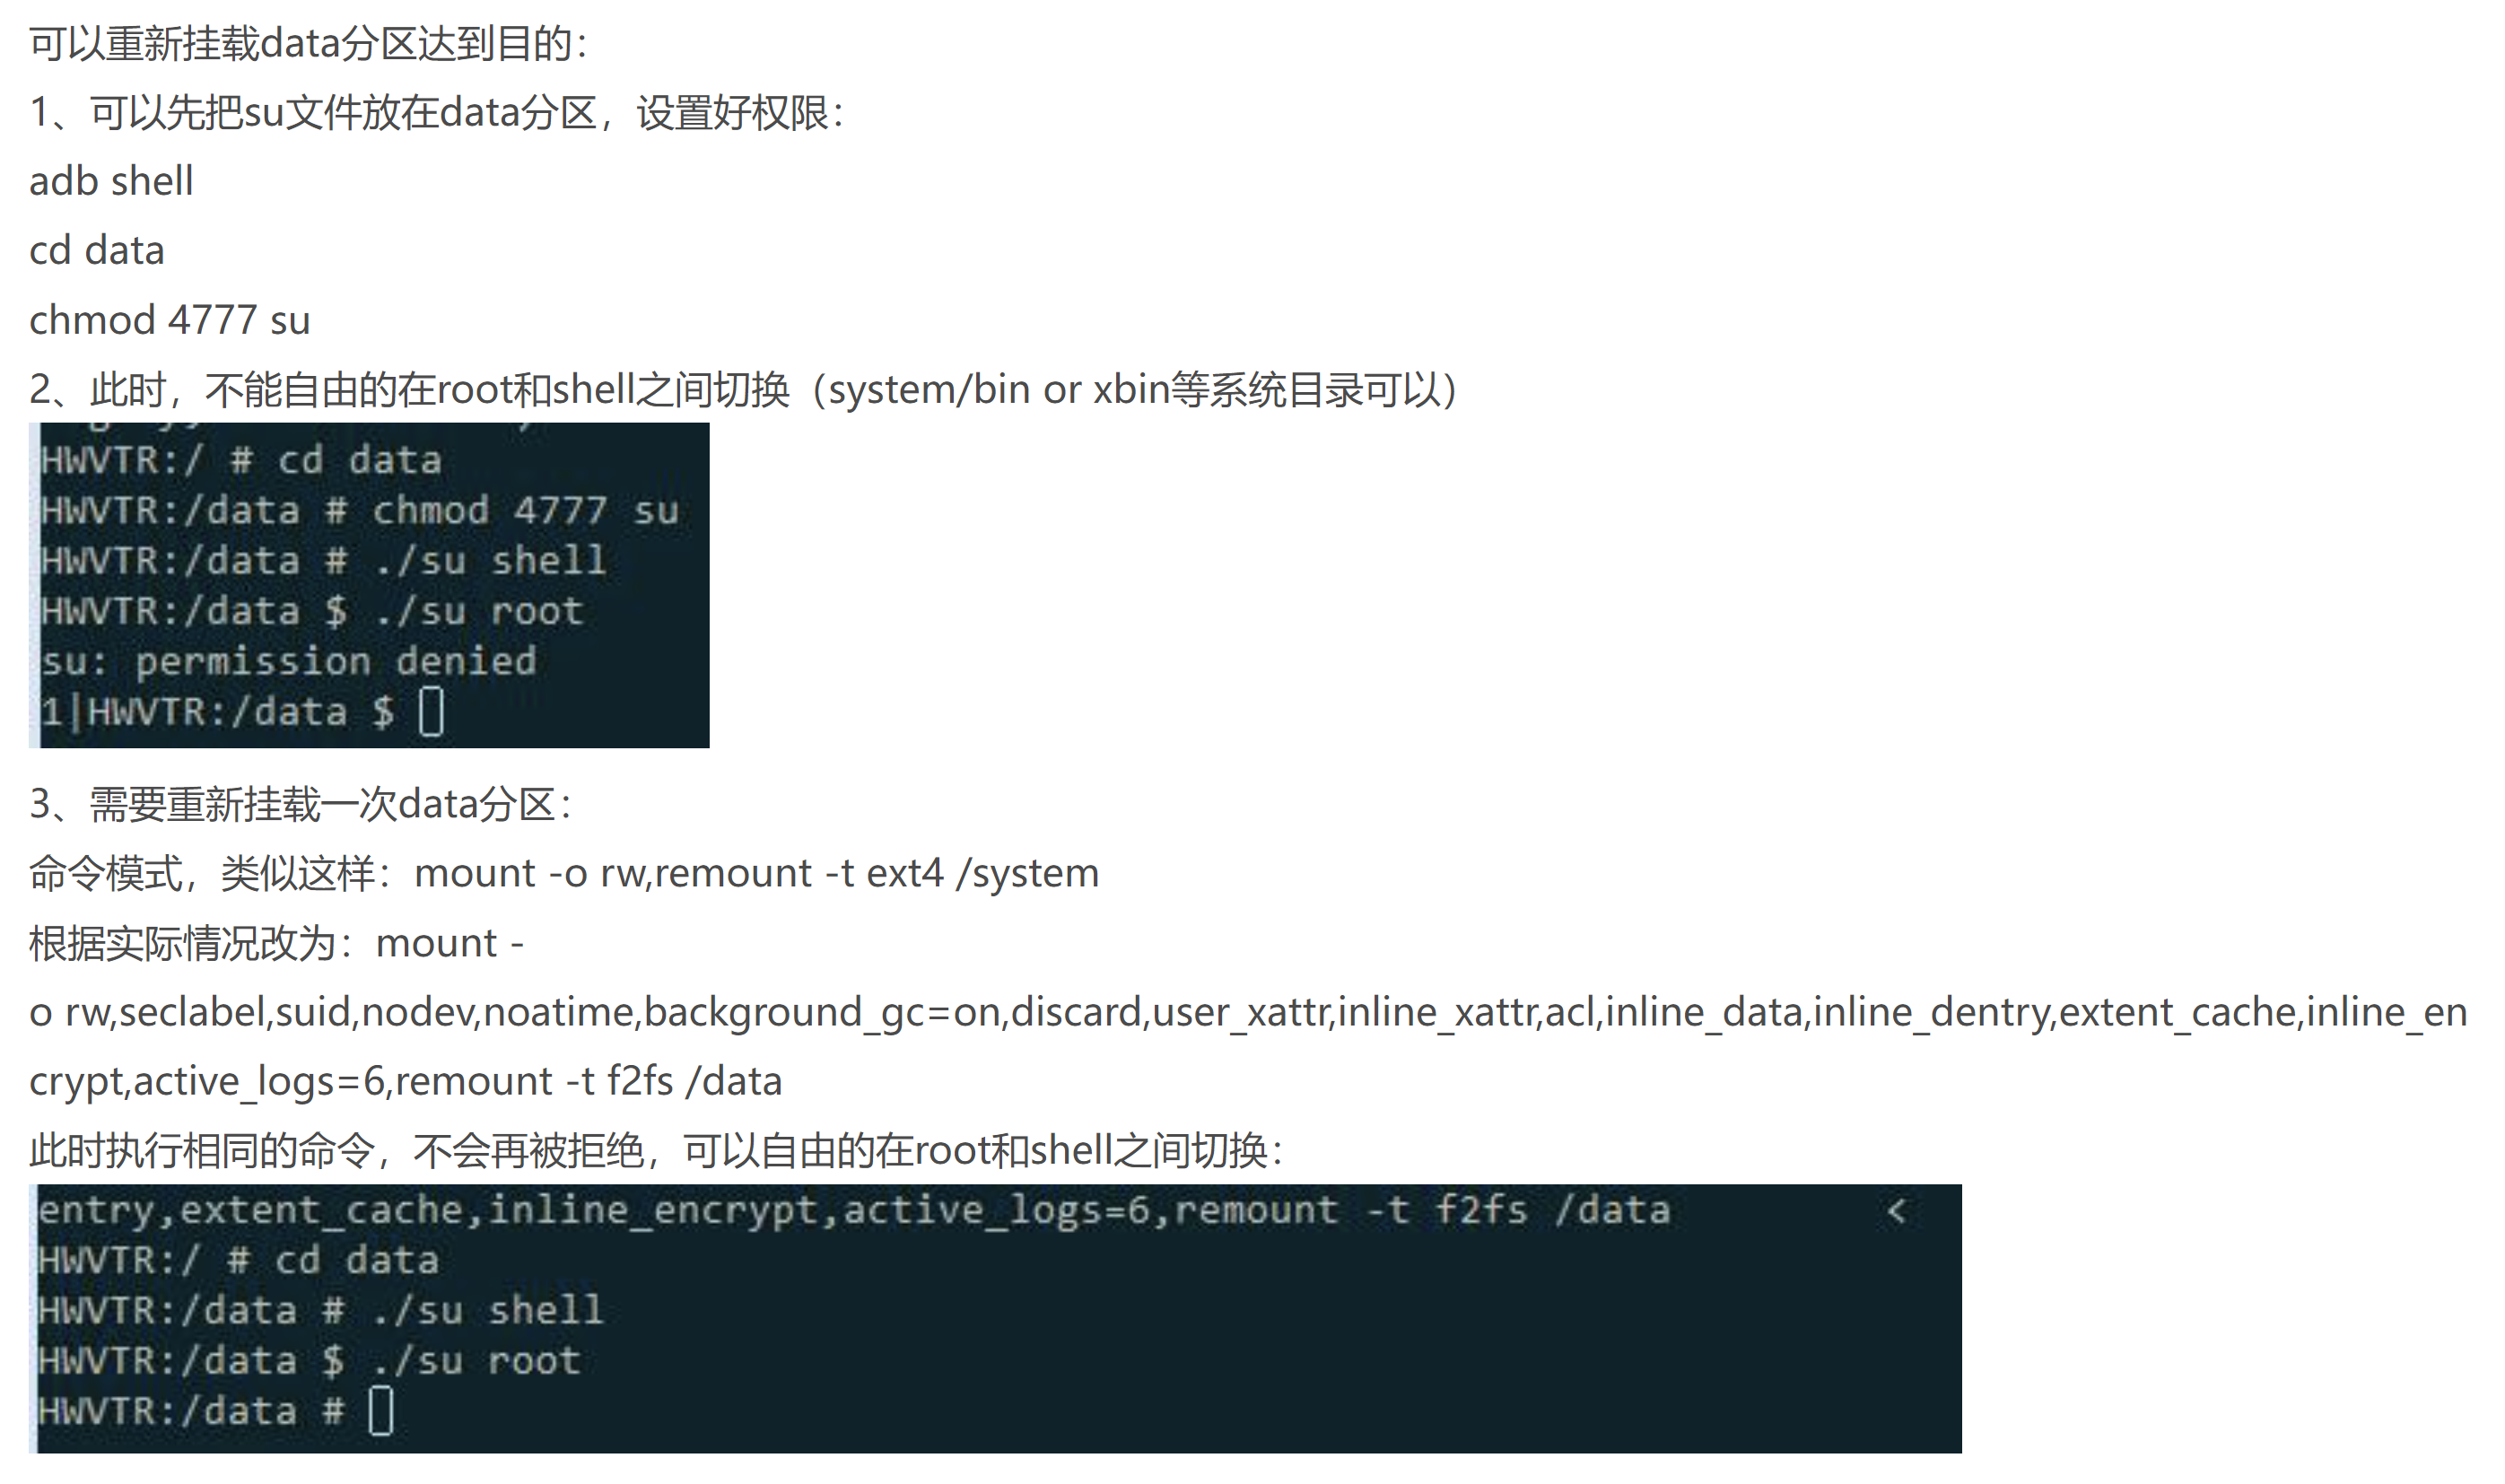
那么,这个copy su文件的过程是必须的吗?如果我不想copy,我直接在/data下放置su文件,并完成第2、3条命令,需要su时直接在/data下执行,可以吗?不可以
因为/data分区在被mount时,就被规定,其中的可执行文件不能有SUID权限
如果非要这么搞,需要重新挂载一次data分区:
mount -o rw,seclabel,suid,nodev,noatime,background_gc=on,discard,user_xattr,inline_xattr,acl,inline_data,inline_dentry,extent_cache,inline_encrypt,active_logs=6,remount -t f2fs /data
讯享网
详情见:https://www.cnblogs.com/cqufengchao/p/6747167.html
1.2 app发起一个shell进程
app执行su命令,在java层通常的实现方式是:
讯享网process = Runtime.getRuntime().exec("su");
这里的Runtime.getRuntime().exec,底层原理是发起一个shell进程,去执行"su"命令。
注意,这里的shell进程很关键。后面将su源代码时会涉及这个。
"su"命令就是执行su文件。
1.3 shell进程运行su文件
一个进程有三个对应的UID:RUID,EUID,SUID
详情参考:https://blog.csdn.net/_/article/details/
由于su文件的权限位中有rws,所以:运行su的进程的EUID,在运行su期间,变成了su的所有者的UID。
而上文已述,su的所有者是root用户,所以运行su的进程的EUID,在运行su期间,变成了root用户的UID。
需要特别注意的是,当shell进程开始运行su的时候,shell进程的EUID,就已经是root用户的UID了。换言之,此时的shell进程,已经拥有root用户权限了。
但是,这种EUID变为root用户UID的情况,是有时效性的,在su文件运行完毕后就失效了。
而之所以运行过一次su文件,进程就能持久性地获得root用户权限,归功于su文件的内容。
其实,只要shell进程,运行的是一个owner是root用户,且权限位为4775的可执行文件,shell进程都能获取到(短暂的)root用户权限。之所以必须要运行su文件,而不是其他文件,就是因为su文件中的代码,能赋予shell进程持久性的root用户权限。
1.4 su中代码赋予shell进程持久性的root用户权限
这里需要解读su源代码。
这里对su源码的关键内容解释如下:
(1)su检查当前进程的RUID,发现其等于AID_SHELL,故允许继续执行
(AID_SHELL也就是Shell用户的UID)
su会检查当前进程的RUID,只有当其是Root用户的UID或Shell用户的UID时,才允许继续执行。
uid_t current_uid = getuid(); //返回当前进程的RUID if (current_uid != AID_ROOT && current_uid != AID_SHELL) error(1, 0, "not allowed"); 对于app发起的shell进程而言,其RUID并不因su文件的rws权限位而变化(rws权限位只影响进程的EUID),所以shell进程的RUID仍是shell用户的UID,而不是root用户的UID。
所以,对于app发起的shell进程而言,这里能执行下去,是因为current_uid等于AID_SHELL,而不是current_uid等于AID_ROOT。
(2)su检查参数列表,发现无参数,故默认切换当前进程到root用户状态
su是Switch User的简写,用于各种用户切换,并不只用于切换到root用户状态。
根据su的源码,当su不加任何参数时,默认切换当前进程到uid = 0且gid = 0的状态,也就是root用户状态。
讯享网int main(int argc, char argv) {
    …… // The default user is root. // 无参数时,默认切换到root uid_t uid = 0; gid_t gid = 0; …… // If there are any arguments, the first argument is the uid/gid/supplementary groups. // 有参数时,切换到参数argv指定的用户状态 if (*argv) {
    …… // 从argv中提取内容,放入uid, gid, gids,覆盖之前uid和gid的默认值 extract_uidgids(*argv, &uid, &gid, gids, &gids_count); …… ++argv; } …… }
(3)su调用setuid函数,将当前shell进程的RUID,设置为root用户进程的UID
// 根据参数(或缺省默认值)设置当前进程的gid和uid if (setgid(gid)) error(1, errno, "setgid failed"); if (setuid(uid)) // 由于当前shell进程的EUID为AID_ROOT, // 所以这里的setuid(uid),会按照setuid的情况(1), // 将当前shell进程的RUID,EUID和SUID均设置为uid error(1, errno, "setuid failed"); 这就是为什么su程序能让shell进程持久性地切换到root用户UID。

关于setuid函数,参考https://blog.csdn.net/_/article/details/
概括而言:
su文件的rws权限位,让当前的shell进程的EUID,成为了su所有者(Root用户)的UID,也就是AID_ROOT(也就是0)
所以,这里的setuid(uid),会按照setuid的情况1,将当前进程的RUID,EUID和SUID都设置为uid,并返回0。由于无参数,所以这里的uid是缺省值AID_ROOT。
如果当前的shell进程的EUID!=AID_ROOT,则属于情况2(当进程的SUID==AID_ROOT时)或情况3(当进程的SUID!=AID_ROOT时),则setuid(uid)至多只影响当前shell进程的EUID,而不影响其RUID和SUID
之后,shell进程会继续执行完su程序。su程序执行完毕后,shell进程的RUID,EUID和SUID均为AID_ROOT,意味着shell进程获得了持久性的Root用户权限。
二、su源码完整解读
下面给出su程序源码的完整解读。
部分参考:https://zhuanlan.zhihu.com/p/
2.1 Android版本
2.2 su 二进制&源码位置
su二进制文件一般在/system/bin 目录或/system/xbin 目录
编译安卓系统源代码时,编译好的su二进制文件在/out/target/product/<vendor>/system/xbin中,
但system.img镜像文件中没有su二进制文件。
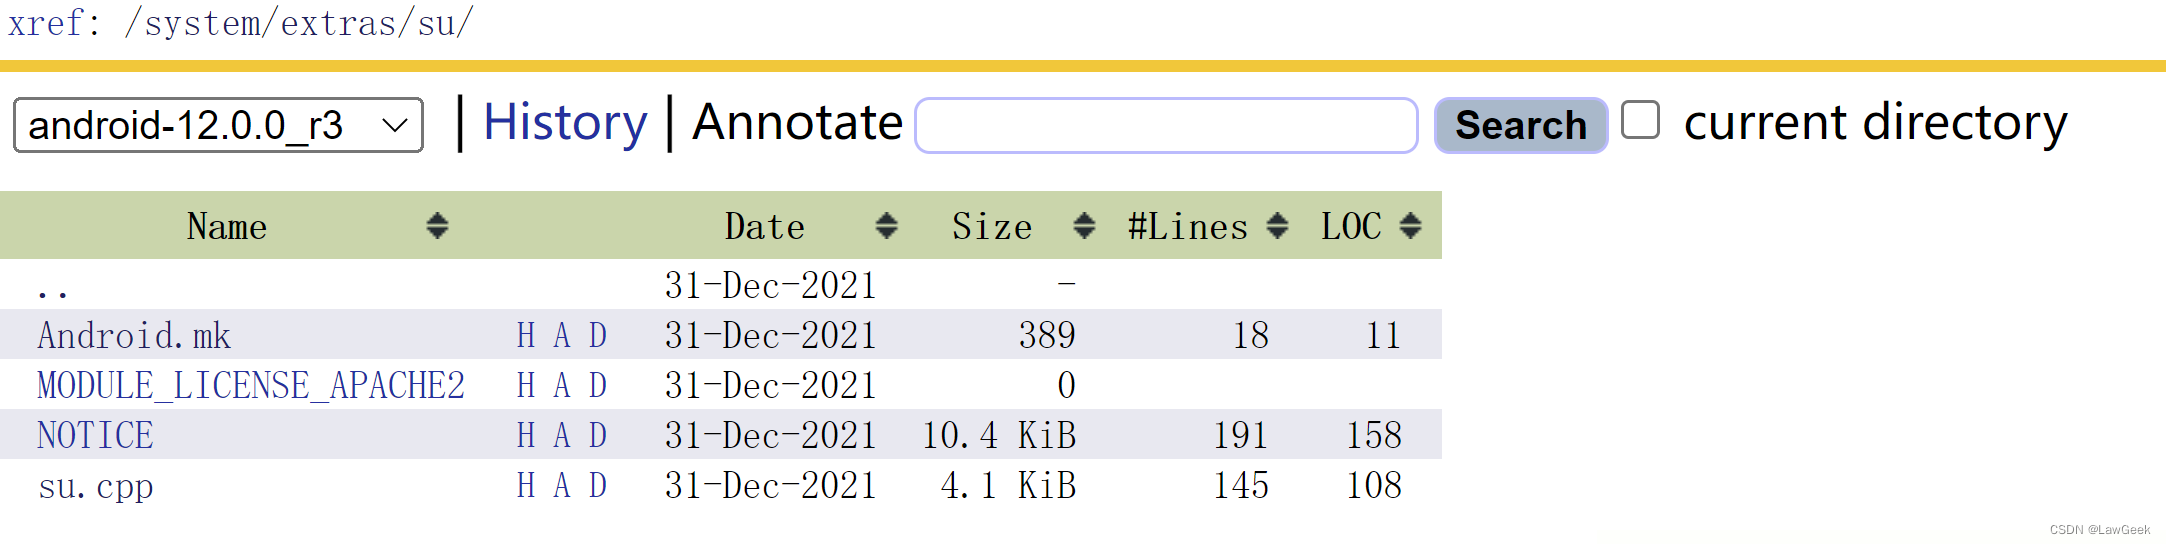
su的源代码在/system/extras/su 目录下:
http://aospxref.com/android-12.0.0_r3/xref/system/extras/su/
2.3 su 源码分析(带注释)
Android.mk:
讯享网LOCAL_PATH:= $(call my-dir) include $(CLEAR_VARS) LOCAL_CFLAGS := -Wall -Werror LOCAL_SRC_FILES:= su.cpp LOCAL_MODULE:= su LOCAL_LICENSE_KINDS:= SPDX-license-identifier-Apache-2.0 LOCAL_LICENSE_CONDITIONS:= notice LOCAL_NOTICE_FILE:= $(LOCAL_PATH)/NOTICE LOCAL_HEADER_LIBRARIES := libcutils_headers LOCAL_MODULE_PATH := $(TARGET_OUT_OPTIONAL_EXECUTABLES) include $(BUILD_EXECUTABLE)
su.cpp源码:
 #include <errno.h> #include <error.h> #include <getopt.h> #include <paths.h> #include <pwd.h> #include <stdio.h> #include <stdlib.h> #include <string.h> #include <unistd.h> #include <private/android_filesystem_config.h> // 根据用户名获取uid和gid void pwtoid(const char* tok, uid_t* uid, gid_t* gid) {
    // 根据用户名获取用户登录信息 struct passwd* pw = getpwnam(tok); if (pw) {
    if (uid) *uid = pw->pw_uid; if (gid) *gid = pw->pw_gid; } else {
    char* end; errno = 0; uid_t tmpid = strtoul(tok, &end, 10); if (errno != 0 || end == tok) error(1, errno, "invalid uid/gid '%s'", tok); if (uid) *uid = tmpid; if (gid) *gid = tmpid; } } // 调用pwtoid,根据用户名获取uid和gid // arg1: main的argv[0](逗号分隔) void extract_uidgids(const char* uidgids, uid_t* uid, gid_t* gid, gid_t* gids, int* gids_count) {
    char *clobberablegids; char *nexttok; char *tok; int gids_found; if (!uidgids || !*uidgids) {
    *gid = *uid = 0; *gids_count = 0; return; } clobberablegids = strdup(uidgids); strcpy(clobberablegids, uidgids); nexttok = clobberablegids; tok = strsep(&nexttok, ","); pwtoid(tok, uid, gid); tok = strsep(&nexttok, ","); if (!tok) {
    /* gid is already set above */ *gids_count = 0; free(clobberablegids); return; } pwtoid(tok, NULL, gid); gids_found = 0; while ((gids_found < *gids_count) && (tok = strsep(&nexttok, ","))) {
    pwtoid(tok, NULL, gids); gids_found++; gids++; } if (nexttok && gids_found == *gids_count) {
    fprintf(stderr, "too many group ids\n"); } *gids_count = gids_found; free(clobberablegids); } // su的用法: // su [WHO [COMMAND...]] // WHO:要切换到的用户,默认为root,逗号分隔 // COMMAND:切换到WHO之后要执行的命令 int main(int argc, char** argv) {
    uid_t current_uid = getuid(); //返回当前进程的RUID // 当前进程的RUID必须是root用户UID 或shell用户UID // 关于shell用户: // 安卓app 获取shell权限时,通常使用: // Process p = Runtime.getRuntime().exec("su"); // 这里的Runtime.getRuntime().exec, // 底层原理是调用操作系统接口,新建一个shell进程异步执行命令 if (current_uid != AID_ROOT && current_uid != AID_SHELL) error(1, 0, "not allowed"); // Handle -h and --help. ++argv; if (*argv && (strcmp(*argv, "--help") == 0 || strcmp(*argv, "-h") == 0)) {
    fprintf(stderr, "usage: su [WHO [COMMAND...]]\n" "\n" "Switch to WHO (default 'root') and run the given COMMAND (default sh).\n" "\n" "WHO is a comma-separated list of user, group, and supplementary groups\n" "in that order.\n" "\n"); return 0; } // The default user is root. // 无参数时,默认切换到root uid_t uid = 0; gid_t gid = 0; // su的核心部分:由setgroups、setgid、setuid完成,设置当前进程的附加组、gid和uid // If there are any arguments, the first argument is the uid/gid/supplementary groups. // 有参数时,切换到参数argv指定的用户状态 if (*argv) {
    gid_t gids[10]; int gids_count = sizeof(gids)/sizeof(gids[0]); // 从argv中提取内容,放入uid, gid, gids,覆盖之前uid和gid的默认值 extract_uidgids(*argv, &uid, &gid, gids, &gids_count); // 根据参数 设置当前进程的附加组 if (gids_count) {
    // int setgroups(size_t size, const gid_t * list); // setgroups()用来 将 当前进程的附加组 设置为 参数2 list数组中所标明的group // setgroups()参数1 size 为list数组的gid_t 数目, 最大值为NGROUP(32) if (setgroups(gids_count, gids)) {
    error(1, errno, "setgroups failed"); } } ++argv; } // 根据参数(或缺省默认值)设置当前进程的gid和uid if (setgid(gid)) error(1, errno, "setgid failed"); if (setuid(uid)) // 由于当前shell进程的EUID为AID_ROOT, // 所以这里的setuid(uid),会按照setuid的情况(1), // 将当前shell进程的RUID,EUID和SUID均设置为uid // 否则按照情况(2)或情况(3),至多只影响当前进程的EUID error(1, errno, "setuid failed"); // Reset parts of the environment. setenv("PATH", _PATH_DEFPATH, 1); unsetenv("IFS"); struct passwd* pw = getpwuid(uid); if (pw) {
    setenv("LOGNAME", pw->pw_name, 1); setenv("USER", pw->pw_name, 1); } else {
    unsetenv("LOGNAME"); unsetenv("USER"); } // Set up the arguments for exec. char* exec_args[argc + 1]; // Having too much space is fine. size_t i = 0; for (; *argv != NULL; ++i) {
    exec_args[i] = *argv++; } // Default to the standard shell. if (i == 0) exec_args[i++] = const_cast<char*>("/system/bin/sh"); exec_args[i] = NULL; execvp(exec_args[0], exec_args); error(1, errno, "failed to exec %s", exec_args[0]); }
三、su daemon 模式
上述方案的核心是在 $PATH 环境变量(例如/system/bin:/system/xbin:/sbin:/vendor/bin:/vendor/xbin)下放置su可执行文件,并给su文件以suid权限。
然而从Android 4.3开始,很多分区(例如/system 和 /data)在一开始挂载时就被设置为nosuid,因此上述方案自然行不通。
如果直接观察 su 文件的权限,也是正常的0755权限,并没有suid位:

所以一个可行的方案是,在设备启动时由init进程开启一个su daemon 守护进程,当有程序调用su时,就作为client与这个server通信,由远程的server完成所有操作。由于init进程具有天然的root权限,由它 fork 出的su daemon自然也是root身份,这就实现了提权。
四、Android系统对app进程root权限的进一步限制
- /system 和 /data 分区以 nosuid option被挂载,让文件的SUID标识失效。
- app进程是由zygote 进程 fork产生的。zygote进程设置了NO_NEW_PRIVS标志,父进程的NO_NEW_PRIVS位会在父进程fork、clone和execve时,被子进程继承 ,并且不能被撤销。NO_NEW_PRIVS标志会让当前进程在执行可执行文件时,进程的EUID和EGID不受可执行文件的SUID和SGID位影响。
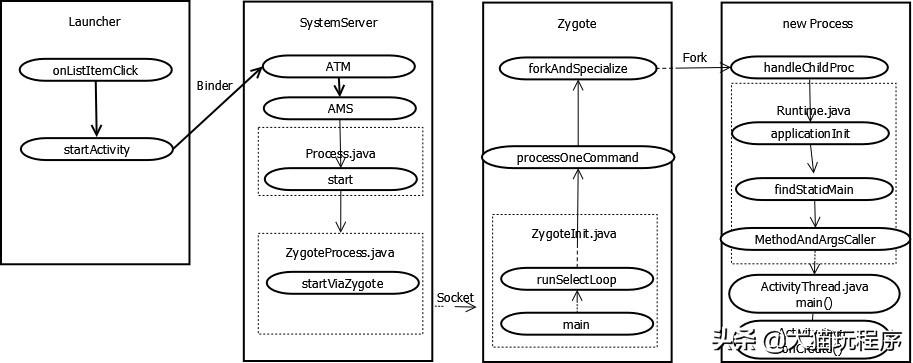
关于zygote进程fork出app进程的过程
参考:https://www.toutiao.com/article//

Android 4.3之后,/system 分区也被以 nosuid option被挂载;
那么,系统进程如何获取root权限呢?
app进程是否可以使用同样的方式呢?
(3)系统进程改用 Capability来获取root权限,但app进程不行。
- 系统daemon可通过可执行文件的capability来获取进程的cap_effective,
- 但app进程不能这样做,因为app进程是由zygote 进程fork出来的;而zygote进程设置了NO_NEW_PRIVS标志,使得app进程无法通过可执行文件的capability来获取cap_effective。
P’(ambient) = (file is privileged) ? 0 : P(ambient)
P’(permitted) = (P(inheritable) & F(inheritable)) | (F(permitted) & P(bounding))) | P’(ambient)
P’(effective) = F(effective) ? P’(permitted) : P’(ambient)
也就是:
P’(effective) = F(effective) ? ( (P(inheritable) & F(inheritable)) | (F(permitted) & P(bounding))) | ( (file is privileged) ? 0 : P(ambient) ) ) : ( (file is privileged) ? 0 : P(ambient) )NO_NEW_PRIVS标志会使SUID和SGID位无法改变进程的 uid 或 gid,file capability也不会被添加到进程的capability中。也就是NO_NEW_PRIVS标志会使获取root权限的 SUID方案和file capability方案 失效。
参考:https://www.kernel.org/doc/html/latest/translations/zh_CN/userspace-api/no_new_privs.html
(4)对app进程切换EUID的其他限制:
- 仅当进程的cap_bset数组中有 SETUID/SETGID capability时,进程才能切换 UID。而从Android 4.4开始,zygote fork app进程时,会对所有fork出来的子进程进行CAPBSET_DROP动作,让子进程不具有任何capability。
- 从Android Oreo开始,OS通过SECCOMP过滤器阻止某些SYSCALL,app进程更改UID/GID的能力被进一步抑制。
(5)SELinux带来的约束
即使一个进程的euid变成了0,或者拥有了所有capability, 它也必须受到SELinux策略的约束。
也就是,SELinux机制进一步约束了root权限进程的行为。
五、Android设备 具体root方案
前文已述,一个shell进程,要想获得root权限,需要执行下列代码:
讯享网cp /data/local/tmp/su /system/bin/ #copy su 到/system/分区 chown root:root su #su的所有者置成root chmod 4775 /system/bin/su #把su置成-rwsr-xr-x
但问题是,上面的每一行代码,都需要root用户权限才能执行。
而上述代码本身就是用于获取root用户权限的。所以再执行上述代码之前,普通app发起的进程,是无法获取root用户权限的。
那么这个逻辑闭环如何打破呢?这就需要root技术。
5.1 使用提权漏洞
一个办法是,找一个本身有root权限的进程来执行上述代码。这样普通app执行process = Runtime.getRuntime().exec("su");就能获得root权限了。
但是,有root权限的进程,都是预装app发起的,代码写死了,普通app没法控制它去执行特定的代码。
这个时候就需要用提权漏洞,来root手机。比如zergRush漏洞,就利用了一个拥有root权限的进程的栈溢出漏洞。
5.2 修改ROM并刷机
版权声明:本文内容由互联网用户自发贡献,该文观点仅代表作者本人。本站仅提供信息存储空间服务,不拥有所有权,不承担相关法律责任。如发现本站有涉嫌侵权/违法违规的内容,请联系我们,一经查实,本站将立刻删除。
如需转载请保留出处:https://51itzy.com/kjqy/59819.html