
什么是Hibernate
Hibernate是一个开放源代码的对象关系映射框架,它对JDBC进行了非常轻量级的对象封装,它将POJO与数据库表建立映射关系,是一个全自动的orm【Object Relational Mapping】框架,hibernate可以自动生成SQL语句,自动执行,使得Java程序员可以随心所欲的使用对象编程思维来操纵数据库。(简单来说就是通过管理对象来操作数据库)
Hibernate的优势:简化了代码,实现了跨数据库的无缝移植
我们这次就是用Hibernate来完成增删改查
下面我们导入pom.xml依赖
<project xmlns="http://maven.apache.org/POM/4.0.0" xmlns:xsi="http://www.w3.org/2001/XMLSchema-instance" xsi:schemaLocation="http://maven.apache.org/POM/4.0.0 http://maven.apache.org/maven-v4_0_0.xsd"> <modelVersion>4.0.0</modelVersion> <groupId>com.thf</groupId> <artifactId>t226_hibernate01</artifactId> <packaging>war</packaging> <version>0.0.1-SNAPSHOT</version> <name>t226_hibernate01 Maven Webapp</name> <url>http://maven.apache.org</url> <properties> <project.build.sourceEncoding>UTF-8</project.build.sourceEncoding> <maven.compiler.source>1.8</maven.compiler.source> <maven.compiler.target>1.8</maven.compiler.target> <junit.version>4.12</junit.version> <servlet.version>4.0.0</servlet.version> <hibernate.version>5.3.0.Final</hibernate.version> <mysql.driver.version>5.1.46</mysql.driver.version> </properties> <dependencies> <dependency> <groupId>junit</groupId> <artifactId>junit</artifactId> <version>${junit.version}</version> <scope>test</scope> </dependency> <dependency> <groupId>javax.servlet</groupId> <artifactId>javax.servlet-api</artifactId> <version>${servlet.version}</version> <scope>provided</scope> </dependency> <dependency> <groupId>org.hibernate</groupId> <artifactId>hibernate-core</artifactId> <version>${hibernate.version}</version> </dependency> <dependency> <groupId>mysql</groupId> <artifactId>mysql-connector-java</artifactId> <version>${mysql.driver.version}</version> </dependency> </dependencies> <build> <finalName>t226_hibernate01</finalName> <plugins> <plugin> <groupId>org.apache.maven.plugins</groupId> <artifactId>maven-compiler-plugin</artifactId> <version>3.7.0</version> <configuration> <source>${maven.compiler.source}</source> <target>${maven.compiler.target}</target> <encoding>${project.build.sourceEncoding}</encoding> </configuration> </plugin> </plugins> </build> </project> 讯享网
然后创建核心配置文件hibernate.cfg.xml
创建hibernate.cfg.xml我们要用到DTD约束
所以下面我们要找到dtd约束 xml文件
我直接截图找dtd文件的位置
第一步:
点开Libraries

讯享网
第二步:
点开Libraries 然后点开Libraries下面的 Maven Dependencies

第三步:
点开Maven Dependencies 之后下面会有很多架包 我们要找到Maven Dependencies 下的hibernate-core-5.3.0Final.jar 的架包 点开 我们点开 org.hibernte包

第四步:
然后我们要滑到最下面 然后我们要选择 hibernate-configuration-3.0.dtd
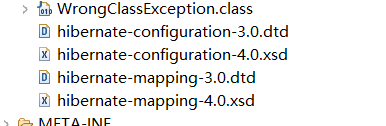
第五步:
打开之后我们要找到这个一串
然后复制到 hibernate.cfg.xml里面去

hibernate.cfg.xml

讯享网<?xml version="1.0" encoding="UTF-8"?> <!DOCTYPE hibernate-configuration PUBLIC "-//Hibernate/Hibernate Configuration DTD 3.0//EN" "http://www.hibernate.org/dtd/hibernate-configuration-3.0.dtd"> <hibernate-configuration> <session-factory> <!-- 1. 数据库相关 --> <property name="connection.username">root</property> <property name="connection.password">123</property> <property name="connection.url">jdbc:mysql://localhost:3306/t226-thf?useUnicode=true&characterEncoding=UTF-8 </property> <property name="connection.driver_class">com.mysql.jdbc.Driver</property> <property name="dialect">org.hibernate.dialect.MySQLDialect</property> <!-- 配置本地事务(No CurrentSessionContext configured!) --> <property name="hibernate.current_session_context_class">thread</property> <!-- 2. 调试相关 --> <property name="show_sql">true</property> <property name="format_sql">true</property> <!-- 3. 添加实体映射文件 --> <mapping resource="com/thf/one/entity/User.hbm.xml" /> <!-- 主键生成策略 --> </session-factory> </hibernate-configuration>
接下来我们要创建一个实体类( User )
package com.thf.one.entity; import java.sql.Date; import java.sql.Timestamp; public class User { private Integer id; private String userName; private String userPwd; private String realName; private String sex; private Date birthday; private Timestamp createDatetime; private String remark; public Integer getId() { return id; } public void setId(Integer id) { this.id = id; } public String getUserName() { return userName; } public void setUserName(String userName) { this.userName = userName; } public String getUserPwd() { return userPwd; } public void setUserPwd(String userPwd) { this.userPwd = userPwd; } public String getRealName() { return realName; } public void setRealName(String realName) { this.realName = realName; } public String getSex() { return sex; } public void setSex(String sex) { this.sex = sex; } public Date getBirthday() { return birthday; } public void setBirthday(Date birthday) { this.birthday = birthday; } public Timestamp getCreateDatetime() { return createDatetime; } public void setCreateDatetime(Timestamp createDatetime) { this.createDatetime = createDatetime; } public String getRemark() { return remark; } public void setRemark(String remark) { this.remark = remark; } @Override public String toString() { return "User [id=" + id + ", userName=" + userName + ", userPwd=" + userPwd + ", realName=" + realName + ", sex=" + sex + ", birthday=" + birthday + ", createDatetime=" + createDatetime + ", remark=" + remark + "]"; } public User(String userName, String userPwd, String realName, String sex, Date birthday, Timestamp createDatetime, String remark) { super(); this.userName = userName; this.userPwd = userPwd; this.realName = realName; this.sex = sex; this.birthday = birthday; this.createDatetime = createDatetime; this.remark = remark; } public User() { super(); } } 我们写一个实体映射文件User.hbm.xml
讯享网<?xml version="1.0" encoding="UTF-8"?> <!DOCTYPE hibernate-mapping PUBLIC "-//Hibernate/Hibernate Mapping DTD 3.0//EN" "http://www.hibernate.org/dtd/hibernate-mapping-3.0.dtd"> <hibernate-mapping> <!-- class标签中的 name:实体类的全路径名 table:实体类对应的数据库表 id标签:name:实体类中的属性(映射的是表的主键) type:属性对应的类型 column:属性对应该=的表中的那个列段 property name:实体类中的属性(映射的是表的非主键) type:属性对应的类型 column:属性对应该=的表中的那个列段 List list = session.createQuery("from User").list(); 为什么我们可以得出一个list集合 1,建模hibernate.cfg.xml对象 从中拿到了com/thf/one/entity/User.hbm.xml 2,建模了User.hbm.xml这个文件拿到了com.thf.one.entity.User拿到了它并且拿到t_hibernate_user 3.User user=class.forName("com.thf.one.entity.User").newInstance(); 拿到User对象 然后Fild f=euser.getClass("userName"); select user_name,user_pwd,... from t_hibernate_user Fild userNameFild=user.getClass("userName"); Fild userPwdFild=user.getClass("userpwd"); 13 xxx xxx 1 2018-11-17 00:00:00 2018-11-17 09:48:48 xxx 14 精华 金燕 女 2018-11-18 09:24:38 开小差 UserNameField.set(user,精华) UserPwdField.set(user,) 最后user中的所有属性之都有了 4.循环上一步操作,最终所有user实咧都放入list集合中List list --> <class name="com.thf.one.entity.User" table="t_hibernate_user"> <id name="id" type="java.lang.Integer" column="id"> <generator class="increment" /> </id> <property name="userName" type="java.lang.String" column="user_name"> </property> <property name="userPwd" type="java.lang.String" column="user_pwd"> </property> <property name="realName" type="java.lang.String" column="real_name"> </property> <property name="sex" type="java.lang.String" column="sex"> </property> <property name="birthday" type="java.sql.Date" column="birthday"> </property> <property insert="false" update="false" name="createDatetime" type="java.sql.Timestamp" column="create_datetime"> </property> <property name="remark" type="java.lang.String" column="remark"> </property> </class> </hibernate-mapping>
然后接下来我们就该写增删改查了
查询:
package com.thf.one.test; import java.util.List; import org.hibernate.Session; import org.hibernate.SessionFactory; import org.hibernate.cfg.Configuration; / * hibernat 中的查询 * @author Administrator * */ public class QueryDemo { public static void main(String[] args) { //对hibernat.cfg.xml进行建模拿到sessionfactory工厂 (两步) 1.建模 2.拿到工厂 Configuration configure = new Configuration().configure("/hibernate.cfg.xml"); SessionFactory sessionFactory = configure.buildSessionFactory(); //通过工厂获取到session会话(操作数据库的) Session session = sessionFactory.openSession(); //直接操作数据库 List list = session.createQuery("from User").list(); for (Object obj : list) { System.out.println(obj); } //关闭资源 session.close(); } } 增加:
讯享网package com.thf.one.test; import java.sql.Date; import java.sql.Timestamp; import java.util.List; import org.hibernate.Session; import org.hibernate.SessionFactory; import org.hibernate.Transaction; import org.hibernate.cfg.Configuration; import com.thf.one.entity.User; / * hibernat 中的增加 * @author Administrator * */ public class AddDemo { public static void main(String[] args) { //对hibernat.cfg.xml进行建模拿到sessionfactory工厂 (两步) 1.建模 2.拿到工厂 Configuration configure = new Configuration().configure("/hibernate.cfg.xml"); SessionFactory sessionFactory = configure.buildSessionFactory(); //通过工厂获取到session会话(操作数据库的) Session session = sessionFactory.openSession(); //获取事务对象 Transaction transaction = session.beginTransaction(); //直接操作数据库 session.save(new User("tanhaifang", "123", "小谭", "女",new Date(System.currentTimeMillis()), new Timestamp(System.currentTimeMillis()),"还没有")); //提交事务 transaction.commit(); //关闭资源 session.close(); } }
删除:
package com.thf.one.test; import java.sql.Date; import java.sql.Timestamp; import java.util.List; import org.hibernate.Session; import org.hibernate.SessionFactory; import org.hibernate.Transaction; import org.hibernate.cfg.Configuration; import com.thf.one.entity.User; / * hibernat 中的删除 * @author Administrator * */ public class DelDemo2 { public static void main(String[] args) { //对hibernat.cfg.xml进行建模拿到sessionfactory工厂 (两步) 1.建模 2.拿到工厂 Configuration configure = new Configuration().configure("/hibernate.cfg.xml"); SessionFactory sessionFactory = configure.buildSessionFactory(); //通过工厂获取到session会话(操作数据库的) Session session = sessionFactory.openSession(); //获取事务对象 Transaction transaction = session.beginTransaction(); //直接操作数据库 User user=new User(); user.setId(15); session.delete(user); //提交事务 transaction.commit(); //关闭资源 session.close(); } } 修改:
讯享网package com.thf.one.test; import java.sql.Date; import java.sql.Timestamp; import java.util.List; import org.hibernate.Session; import org.hibernate.SessionFactory; import org.hibernate.Transaction; import org.hibernate.cfg.Configuration; import com.thf.one.entity.User; / * hibernat 中的修改 * @author Administrator * */ public class EditDemo2 { public static void main(String[] args) { //对hibernat.cfg.xml进行建模拿到sessionfactory工厂 (两步) 1.建模 2.拿到工厂 Configuration configure = new Configuration().configure("/hibernate.cfg.xml"); SessionFactory sessionFactory = configure.buildSessionFactory(); //通过工厂获取到session会话(操作数据库的) Session session = sessionFactory.openSession(); //获取事务对象 Transaction transaction = session.beginTransaction(); //直接操作数据库 //修改方法有两种: //第一种 // User user=new User("tanhaifang", "", "小方", "女",new Date(System.currentTimeMillis()), new Timestamp(System.currentTimeMillis()),"还没有2"); // user.setId(15); // session.update(user); //第二种 User user = session.get(User.class, 15); System.out.println(user); user.setRealName("小方2"); //提交事务 transaction.commit(); //关闭资源 session.close(); } }
版权声明:本文内容由互联网用户自发贡献,该文观点仅代表作者本人。本站仅提供信息存储空间服务,不拥有所有权,不承担相关法律责任。如发现本站有涉嫌侵权/违法违规的内容,请联系我们,一经查实,本站将立刻删除。
如需转载请保留出处:https://51itzy.com/kjqy/41117.html