
本文属于《QTreeView使用系列教程》之一,欢迎查看其它文章。
一、给树中item添加图标
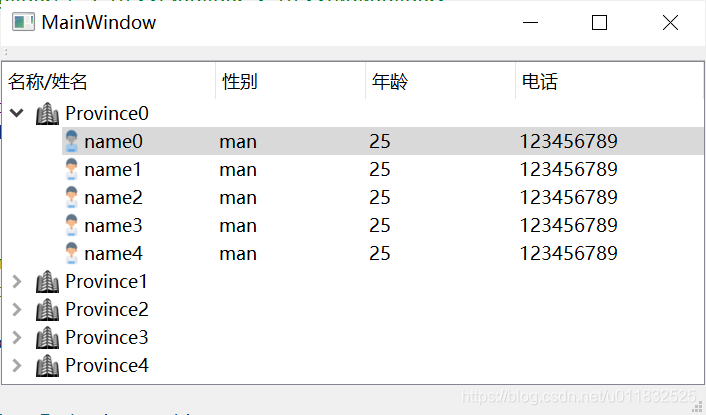
接下来,我们分别给"省份"、"人口"添加不同图标。
首先,在TreeItem.cpp中添加getIcon函数,默认只有第一列"姓名"才允许有图标,再根据当前item类型,分别返回不同图标。
QVariant TreeItem::getIcon(int column) {
    if (column != COLUMN_NAME) return QVariant(); if(_type == PROVINCE) {
    return QIcon(":/res/province.png"); } else if (_type == PERSON) {
return QIcon(":/res/person.png"); } return QVariant(); } 然后,我们在TreeModel.cpp中data()下,添加DecorationRole角色处理,这个就是代表需要返回图标的role。我们调用前面写好的函数返回图标。
讯享网QVariant TreeModel::data(const QModelIndex &index, int role) const {
    if (!index.isValid()) return QVariant(); TreeItem *item = itemFromIndex(index); if (role == Qt::DisplayRole) {
    return item->data(index.column()); } else if (role == Qt::DecorationRole) {
    return item->getIcon(index.column()); } return QVariant(); }
效果:
二、给树中item添加CheckBox
接下来,我们为表项添加复选框。
首先,在TreeItem.cpp中添加3个函数,分别用于提供勾选状态给model,以及界面勾选状态改变后,保存新勾选状态值。checkable()用于判断当前item是否允许勾选。
bool TreeItem::isChecked() const {
    return _checked; } void TreeItem::setChecked(bool check) {
    _checked = check; } bool TreeItem::checkable(int column) const {
    if (column != COLUMN_NAME) // 除第一列外,其他列不允许勾选 {
    return false; } if(_type == PERSON) // 第一列中只允许"人口"勾选 {
    return true; } return false; }
然后,我们在TreeModel.cpp中data()下,添加CheckStateRole角色处理,这个就是代表需要返回勾选状态。我们调用前面写好的函数返回勾选状态。
讯享网QVariant TreeModel::data(const QModelIndex &index, int role) const {
    if (!index.isValid()) return QVariant(); TreeItem *item = itemFromIndex(index); if (role == Qt::DisplayRole) {
    return item->data(index.column()); } else if (role == Qt::DecorationRole) {
    return item->getIcon(index.column()); } else if (role == Qt::CheckStateRole) {
    if (item->checkable(index.column())) {
    return item->isChecked() ? Qt::Checked : Qt::Unchecked; } return QVariant(); } return QVariant(); }
此时,我们发现CheckBox已经可以显示出来了,但是不能勾选。
我们还需要在TreeModel.cpp中添加2个基类重写函数:

在flags函数中根据item的checkable()判断当前item是否允许勾选,然后将结果flags返回。若没有重写这个flags函数,在界面上就无法勾选CheckBox。
Qt::ItemFlags TreeModel::flags(const QModelIndex &index) const {
    if (!index.isValid()) return QAbstractItemModel::flags(index); Qt::ItemFlags flags = QAbstractItemModel::flags(index); TreeItem *item = itemFromIndex(index); if (item->checkable(index.column())) {
    flags |= Qt::ItemIsUserCheckable; } return flags; }
bool TreeModel::setData(const QModelIndex &index, const QVariant &value, int role) {
if (!index.isValid()) return false; if (role == Qt::CheckStateRole) {
TreeItem *item = itemFromIndex(index); if (!item->checkable(index.column())) {
return false; } item->setChecked(value.toInt() == Qt::Checked); emit dataChanged(index, index); return true; } return false; } 到此,我们的CheckBox就添加好了,并且也能够勾选了。
三、CheckBox的勾选改变处理
对model添加信号槽处理,捕获数据改变信号
TreeModel* model = new TreeModel(headers, treeView); connect(model, &QAbstractItemModel::dataChanged, this, &MainWindow::onTreeDataChanged); void MainWindow::onTreeDataChanged(const QModelIndex &topLeft, const QModelIndex &bottomRight) {
TreeItem *item = static_cast<TreeItem*>(topLeft.internalPointer()); if (item->checkable(topLeft.column())) {
QString name = item->data(COLUMN_NAME).toString(); if (item->isChecked()) {
qDebug() << "checked:" << name; } else {
qDebug() << "unchecked:" << name; } } } 效果:
若对你有帮助,欢迎点赞、收藏、评论,你的支持就是我的最大动力!!!
同时,阿超为大家准备了丰富的学习资料,欢迎关注公众号“超哥学编程”,即可领取。
本文涉及工程代码,公众号回复:34AddCheckIcon,即可下载。

版权声明:本文内容由互联网用户自发贡献,该文观点仅代表作者本人。本站仅提供信息存储空间服务,不拥有所有权,不承担相关法律责任。如发现本站有涉嫌侵权/违法违规的内容,请联系我们,一经查实,本站将立刻删除。
如需转载请保留出处:https://51itzy.com/kjqy/27334.html