
OpenMemory Github
Chatgpt
windsurf documentation mcp
经常使用AI IDE(例如cursor、windsurf、codex、claude…)的老铁
一定会遇到以下若干问题:
- 明明已经解决过的问题AI没有“记住”,反复犯同样的问题
- 写了一大堆Rules,但是感觉AI并没有学会灵活使用
- 或者从来没了解过什么是AI工具的Memory,一直都是将AI工具当做对话窗口
- 切换了同一个AI IDE的账户、或者是切换了不同IDE后,AI直接忘记所有之前的经验,很多问题都需要从头调研
这是因为针对cursor这一类AI Coding工具来讲,出于商业化和用户隐私的考虑,断然不能将用户的memory进行导入导出的操作
并且对于cursor这样的工具,如果你不开放你的隐私设置,cursor压根也不会为你的每次对话生成“记忆”
这就导致 几乎每次对话cursor都会丢失我们宝贵的“经验”
这也是为什么我们觉得AI“很傻”
或者是反复踩同一个坑的原因
但是如果打开隐私设置,这就意味着cursor等工具就拥有了我们的隐私
这个放在笔者本人和一些商业化开发的公司团队来说
是不可接受的
所以本地化的长期记忆,对于任何一个持续使用AI工具接管和迭代代码的项目就显得格外重要
好处如下:
- 不会因为换账号、换IDE而丢失我们宝贵的“经验”
- 数据在本地或者是公司部署的固定数据库里存储,数据安全
- 这些宝贵的经验未来都是宝贵的“数字资产”,无论是沉淀成为团队或个人的wiki,或者是新开项目,都可以成为未来的“记忆中台”
- 不反复踩同样的坑,意味着更少的时间、更少的token消耗,我们就能完成更多的任务,降本增效
- 随着项目的不断迭代,对话的次数不断增多,我们的长期记忆会越来越完善,产出质量越来越稳定,产出速度越来越高,返工的代码越来越少,这就是为什么最近特别火的 openclaw 能不断成长的的原因,因为养龙虾的本质就是在养龙虾的“长期记忆”,不断沉淀经验最后成为本地化的得力助手
甚至可以说 未来Agent发展方向一定是拥有大量的群体和个人经验,能高度为特定团体、个人、工作内容服务的
至于通用模型并不能做到成为“万金油”
(仅个人观点,勿喷)
先来一段定义(引用自ChatGPT的回答)
OpenMemory 是一个开源的 长时记忆引擎/记忆层基础设施,旨在为大型语言模型(LLM)和智能体(AI Agents)提供 持久化、本地化、可解释的记忆能力。它可以作为 AI 系统的 “记忆中枢”,帮助 AI 在多次交互或任务之间保留上下文信息,而不是每次都从头开始。
OpenMemory 的主要功能包括:
- 长期记忆存储与检索
支持将 AI 交互中的事实、偏好、上下文等持久化保存,并按需要检索出来,而不是每次从头开始。- 自托管 & 本地运行
项目支持 100% 本地运行(Docker 生态),数据不经过云端,用户完全控制隐私和存储。- 跨系统记忆共享 / MCP 兼容
支持模型上下文协议(MCP),可以与多个兼容客户端(如不同 AI 助手或工具)共享记忆数据库。- 解释能力(Explainable Memory)
OpenMemory 不只是盲目存储向量,还有结构化 / 类型化的记忆组织方式,便于调用和解释。- 向量检索支持 + 多种存储后端
支持与向量存储(如 SQLite/pgvector)、嵌入模型、检索索引等结合,为回忆提供更高效的语义召回。
OpenMemory是怎么工作的?
GPT plus 代充 只需 145[Cursor / Windsurf] ↓ (MCP / API) ↓ OpenMemory Server(本地) ↓ SQLite / Vector DB(本地存储)
为什么要使用OpenMemory?
而不是其他的竞品?
我们结合现在实现AI“长期记忆”的主流方案和开源项目做一个对比:
综上可见,从开源、免费、学习成本、部署难度、安全和本地化等综合考量下
OpenMemory是我们本地构建AI“长期记忆”的不二之选
接下来就跟着老邋遢来一步步部署OpenMemory吧~
任何教程不交代环境就是耍流氓
本次教程的环境一览:
- 系统环境:macos 26.3.1
- Python 3.14.2
- nvm 0.40.3
- node -> v20.19.3
- Docker version 29.1.5, build 0e6fee6c52
上述环境没有的自行AI,安装起来也很简单,Windows下安装步骤基本一致
1. 克隆仓库
git clone https://github.com/CaviraOSS/OpenMemory.git cd OpenMemory 2. 拷贝我编辑好的模板
编辑项目根目录下的.env配置文件(如果看不到按快捷键 command+shift+.(macos),Windows在资源管理器 - 查看中显示隐藏项目)
然后拷贝我编辑好的配置文件并全量覆盖保存
GPT plus 代充 只需 145# ============================================ # OpenMemory - Environment Configuration # ============================================ # -------------------------------------------- # Backend Server Settings # -------------------------------------------- OM_PORT=9090 # API Authentication (IMPORTANT: Set a strong API key for production!) # Generate a secure key: openssl rand -base64 32 # Leave empty to disable authentication (development only) OM_API_KEY= # Rate Limiting # Enable rate limiting to prevent abuse OM_RATE_LIMIT_ENABLED=true # Time window in milliseconds (default: 60000 = 1 minute) OM_RATE_LIMIT_WINDOW_MS=60000 # Maximum requests per window (default: 100 requests per minute) OM_RATE_LIMIT_MAX_REQUESTS=100 # Optional: Log all authenticated requests (set to 'true' for debugging) OM_LOG_AUTH=false # Telemetry (true by default, set to false to opt out of anonymous ping) OM_TELEMETRY=true # Server Mode OM_MODE=standard # standard | langgraph # -------------------------------------------- # Metadata Store # -------------------------------------------- # sqlite (default) | postgres OM_METADATA_BACKEND=sqlite OM_DB_PATH=/data/openmemory.sqlite # PostgreSQL Settings (used when OM_METADATA_BACKEND=postgres) OM_PG_HOST=localhost OM_PG_PORT=5432 OM_PG_DB=openmemory OM_PG_USER=postgres OM_PG_PASSWORD=postgres OM_PG_SCHEMA=public OM_PG_TABLE=openmemory_memories OM_PG_SSL=disable # disable | require # -------------------------------------------- # Vector Store Backend # -------------------------------------------- # Vector storage follows OM_METADATA_BACKEND (sqlite/postgres) unless set to 'valkey' # Options: valkey (Redis-compatible), or leave unset to follow OM_METADATA_BACKEND # Note: When using postgres metadata backend, vectors are stored in the same database OM_VECTOR_BACKEND=sqlite # Table name for vectors (configurable, will be created if it doesn't exist) OM_VECTOR_TABLE=vectors OM_WEAVIATE_URL= OM_WEAVIATE_API_KEY= OM_WEAVIATE_CLASS=OpenMemory # -------------------------------------------- # Embeddings Configuration # -------------------------------------------- # Available providers: openai, gemini, aws, ollama, local, synthetic # Embedding models per sector can be configured in models.yaml # # NOTE: Your selected TIER (fast/smart/deep) affects how embeddings work: # • FAST tier: Uses synthetic embeddings regardless of OM_EMBEDDINGS setting # • SMART tier: Combines synthetic + compressed semantic from your chosen provider # • DEEP tier: Uses full embeddings from your chosen provider # # For SMART/DEEP tiers, set your preferred provider: OM_EMBEDDINGS=ollama # Fallback chain: comma-separated list of providers to try if primary fails # Each provider exhausts its own retry logic before moving to the next # Example: OM_EMBEDDING_FALLBACK=ollama,synthetic # Default: synthetic (always works as final fallback) OM_EMBEDDING_FALLBACK=synthetic # Vector dimension (auto-adjusted by tier, but can be overridden) # • FAST: 256-dim • SMART: 384-dim • DEEP: 1536-dim # OM_VEC_DIM=1536 # Embedding Mode # simple = 1 unified batch call for all sectors (faster, rate-limit safe, recommended) # advanced = 5 separate calls, one per sector (higher precision, more API calls) OM_EMBED_MODE=simple # Advanced Mode Options (only used when OM_EMBED_MODE=advanced) # Enable parallel embedding (not recommended for Gemini due to rate limits) OM_ADV_EMBED_PARALLEL=false # Delay between embeddings in milliseconds OM_EMBED_DELAY_MS=200 # OpenAI-compatible Embeddings Provider # OM_OPENAI_BASE_URL=https://api.openai.com/v1 # Model override for all sector embeddings (leave empty to use defaults) # OM_OPENAI_MODEL=text-embedding-qwen3-embedding-4b # API Configuration # Max request body size in bytes (default: 1MB) OM_MAX_PAYLOAD_SIZE= # -------------------------------------------- # Embedding Provider API Keys # -------------------------------------------- # OpenAI Embeddings OPENAI_API_KEY=your-openai-api-key-here # Google Gemini Embeddings GEMINI_API_KEY=your-gemini-api-key-here # AWS Titan Text Embeddings V2 AWS_ACCESS_KEY_ID=YOUR_ACCESS_KEY AWS_SECRET_ACCESS_KEY=YOUR_SECRET_KEY AWS_REGION=us-east-1 # Ollama Local Embeddings OLLAMA_URL=http://localhost:11434 # Local Model Path (for custom embedding models) LOCAL_MODEL_PATH=/path/to/your/local/model # -------------------------------------------- # Memory System Settings # -------------------------------------------- # ============================================ # PERFORMANCE TIER (Manual Configuration Required) # ============================================ # OpenMemory requires you to manually set the performance tier. # Set OM_TIER to one of: hybrid, fast, smart, or deep # # Available Tiers: # # HYBRID - Keyword + Synthetic embeddings (256-dim) with BM25 ranking # • Recall: ~100% (exact keyword matching) • QPS: 800-1000 • RAM: 0.5GB/10k memories # • Best for: Exact searches, documentation, code search, personal knowledge # • Features: Exact phrase matching, BM25 scoring, n-gram matching, 100% accuracy # • Use when: You need guaranteed exact matches and keyword-based retrieval # # FAST - Synthetic embeddings only (256-dim) # • Recall: ~70-75% • QPS: 700-850 • RAM: 0.6GB/10k memories # • Best for: Local apps, VS Code extensions, low-end hardware # • Use when: < 4 CPU cores or < 8GB RAM # # SMART - Hybrid embeddings (256-dim synthetic + 128-dim compressed semantic = 384-dim) # • Recall: ~85% • QPS: 500-600 • RAM: 0.9GB/10k memories # • Best for: Production servers, AI copilots, mid-range hardware # • Use when: 4-7 CPU cores and 8-15GB RAM # # DEEP - Full AI embeddings (1536-dim OpenAI/Gemini) # • Recall: ~95-100% • QPS: 350-400 • RAM: 1.6GB/10k memories # • Best for: Cloud deployments, high-accuracy systems, semantic research # • Use when: 8+ CPU cores and 16+ GB RAM # # REQUIRED: Set your tier (no auto-detection): OM_TIER=deep # Keyword Matching Settings (HYBRID tier only) # Boost multiplier for keyword matches (default: 2.5) OM_KEYWORD_BOOST=2.5 # Minimum keyword length for matching (default: 3) OM_KEYWORD_MIN_LENGTH=3 OM_MIN_SCORE=0.3 # ============================================ # Smart Decay Settings (Time-Based Algorithm) # ============================================ # Decay interval in minutes - how often the decay cycle runs # The new algorithm uses time-based decay with daily lambda rates (hot=0.005/day, warm=0.02/day, cold=0.05/day) # Unlike batch-based systems, running more frequently doesn't increase decay speed # Decay is calculated from: decay_factor = exp(-lambda * days_since_access / (salience + 0.1)) # # Recommended intervals: # • Testing: 30 minutes (for rapid validation) # • Development: 60-120 minutes (balanced testing) # • Production: 120-180 minutes (optimal - captures meaningful decay deltas while minimizing overhead) # # At 2-3 hours: hot tier decays ~0.04-0.06%, warm ~0.16-0.24%, cold ~0.4-0.6% per cycle OM_DECAY_INTERVAL_MINUTES=120 # Number of parallel decay worker threads (default: 3) OM_DECAY_THREADS=3 # Cold tier threshold - memories below this salience get fingerprinted (default: 0.25) OM_DECAY_COLD_THRESHOLD=0.25 # Reinforce memory salience when queried (default: true) OM_DECAY_REINFORCE_ON_QUERY=true # Enable regeneration of cold memories on query hits (default: true) OM_REGENERATION_ENABLED=true # Maximum vector dimensions (default: 1536) OM_MAX_VECTOR_DIM=1536 # Minimum vector dimensions for compression (default: 64) OM_MIN_VECTOR_DIM=64 # Number of summary compression layers 1-3 (default: 3) OM_SUMMARY_LAYERS=3 # Full Semantic Graph MVP Settings # Use summary-only storage (≤300 chars, intelligent extraction) OM_USE_SUMMARY_ONLY=true # Maximum summary length - smart extraction preserves dates, names, numbers, actions OM_SUMMARY_MAX_LENGTH=300 # Memories per segment (10k recommended for optimal cache performance) OM_SEG_SIZE=10000 # Cache segments (auto-tuned by tier, but can be overridden) # • FAST: 2 segments • SMART: 3 segments • DEEP: 5 segments # OM_CACHE_SEGMENTS=3 # Max active queries (auto-tuned by tier, but can be overridden) # • FAST: 32 queries • SMART: 64 queries • DEEP: 128 queries # OM_MAX_ACTIVE=64 # Brain Sector Configuration (auto-classified, but you can override) # Sectors: episodic, semantic, procedural, emotional, reflective # Auto-Reflection System # Automatically creates reflective memories by clustering similar memories OM_AUTO_REFLECT=false # Reflection interval in minutes (default: 10) OM_REFLECT_INTERVAL=10 # Minimum memories required before reflection runs (default: 20) OM_REFLECT_MIN_MEMORIES=20 # Compression # Enable automatic content compression for large memories OM_COMPRESSION_ENABLED=false # Minimum content length (characters) to trigger compression (default: 100) OM_COMPRESSION_MIN_LENGTH=100 # Compression algorithm: semantic, syntactic, aggressive, auto (default: auto) OM_COMPRESSION_ALGORITHM=auto # -------------------------------------------- # LangGraph Integration Mode (LGM) # -------------------------------------------- OM_LG_NAMESPACE=default OM_LG_MAX_CONTEXT=50 OM_LG_REFLECTIVE=true
3. 使用docker compose启动OpenMemory
docker compose up --build -d 4. 启动后验证健康状态
GPT plus 代充 只需 145curl -sS http://localhost:9090/health
5. 配置mcp server(windsurf为例,cursor同理)
进入windsurf settings
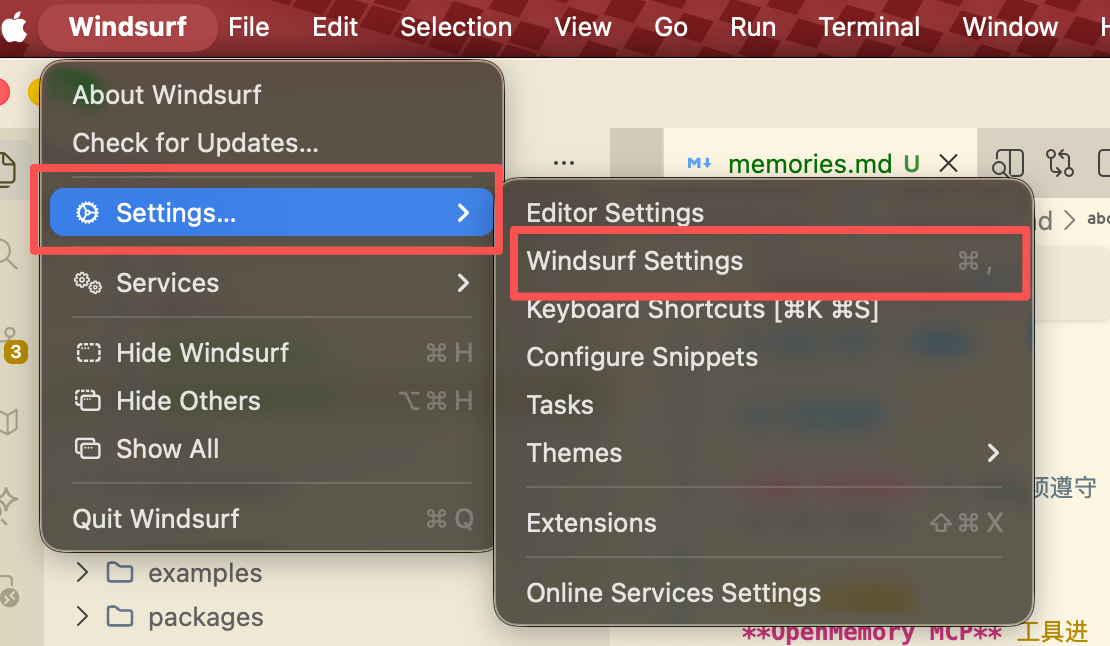
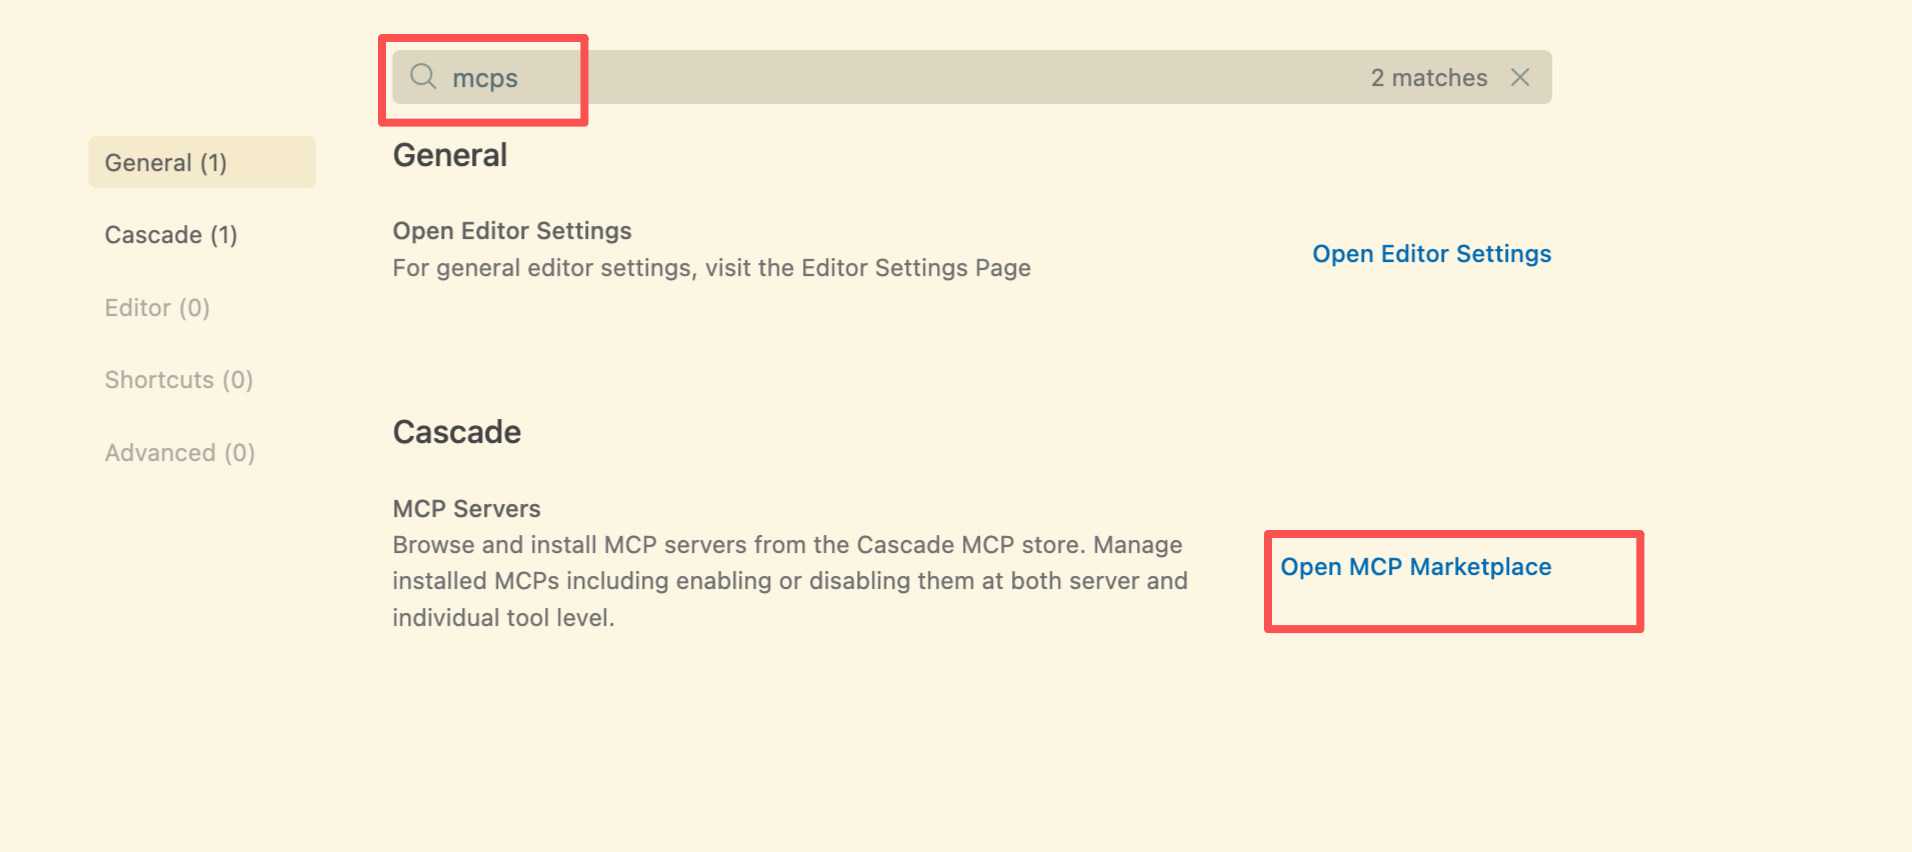
搜索mcp并进入mcp市场
点击齿轮进入自定义mcp config编辑
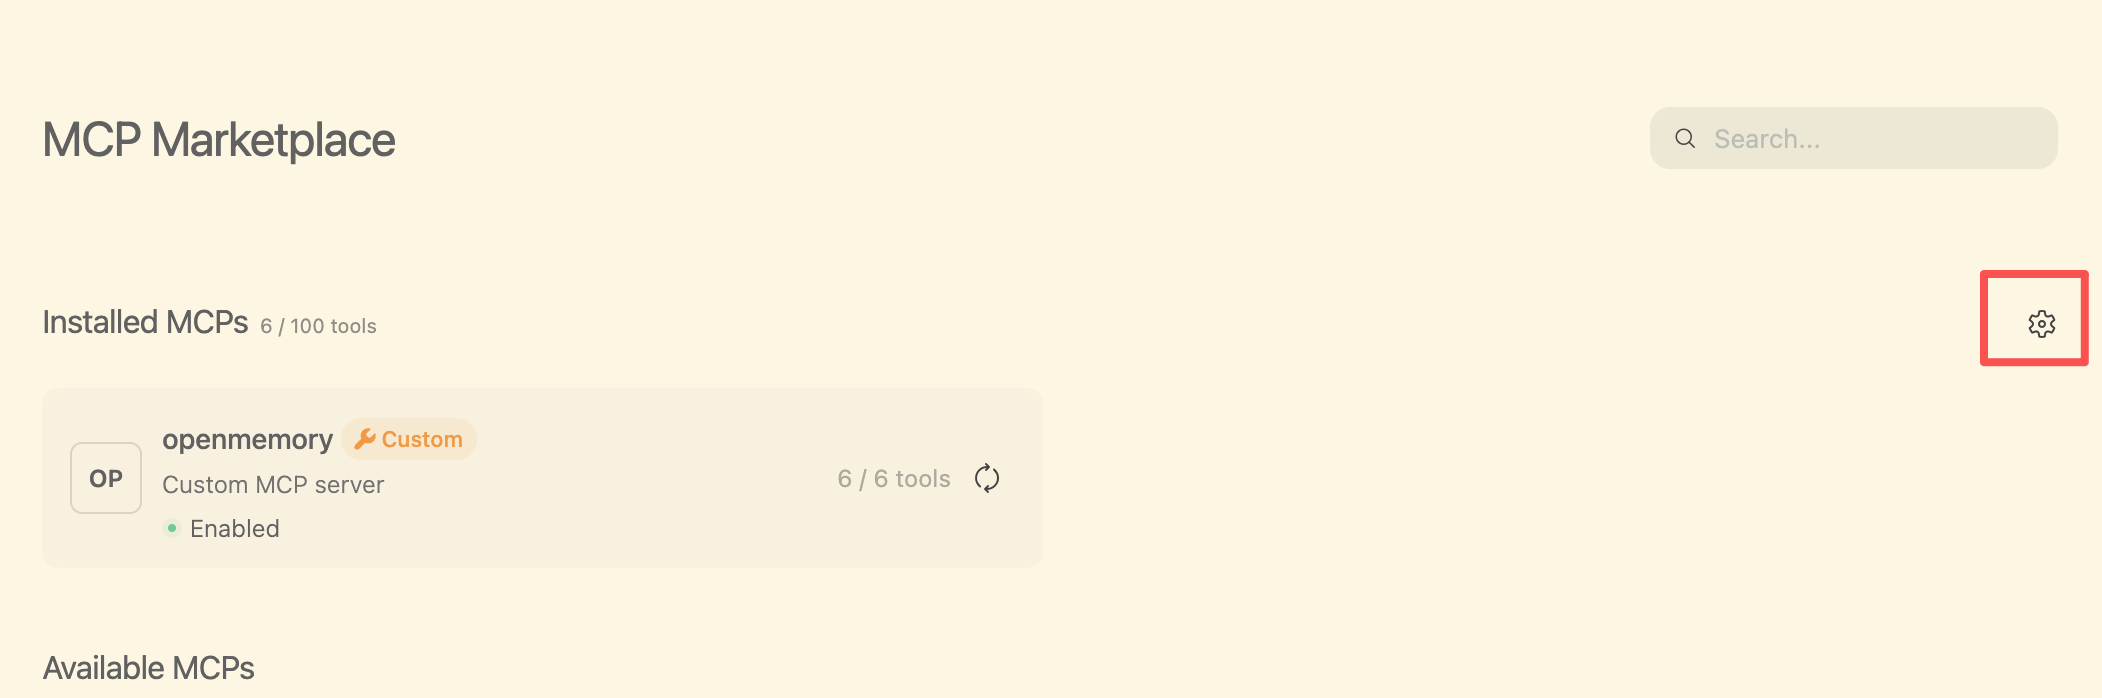
粘贴下面的配置并保存(注意层级关系,如果你有别的mcp注意别覆盖了)
{ "mcpServers": { "openmemory": { "type": "http", "url": "http://localhost:9090/mcp" } } } 保存后重启windsurf或cursor等IDE,以应用该mcp
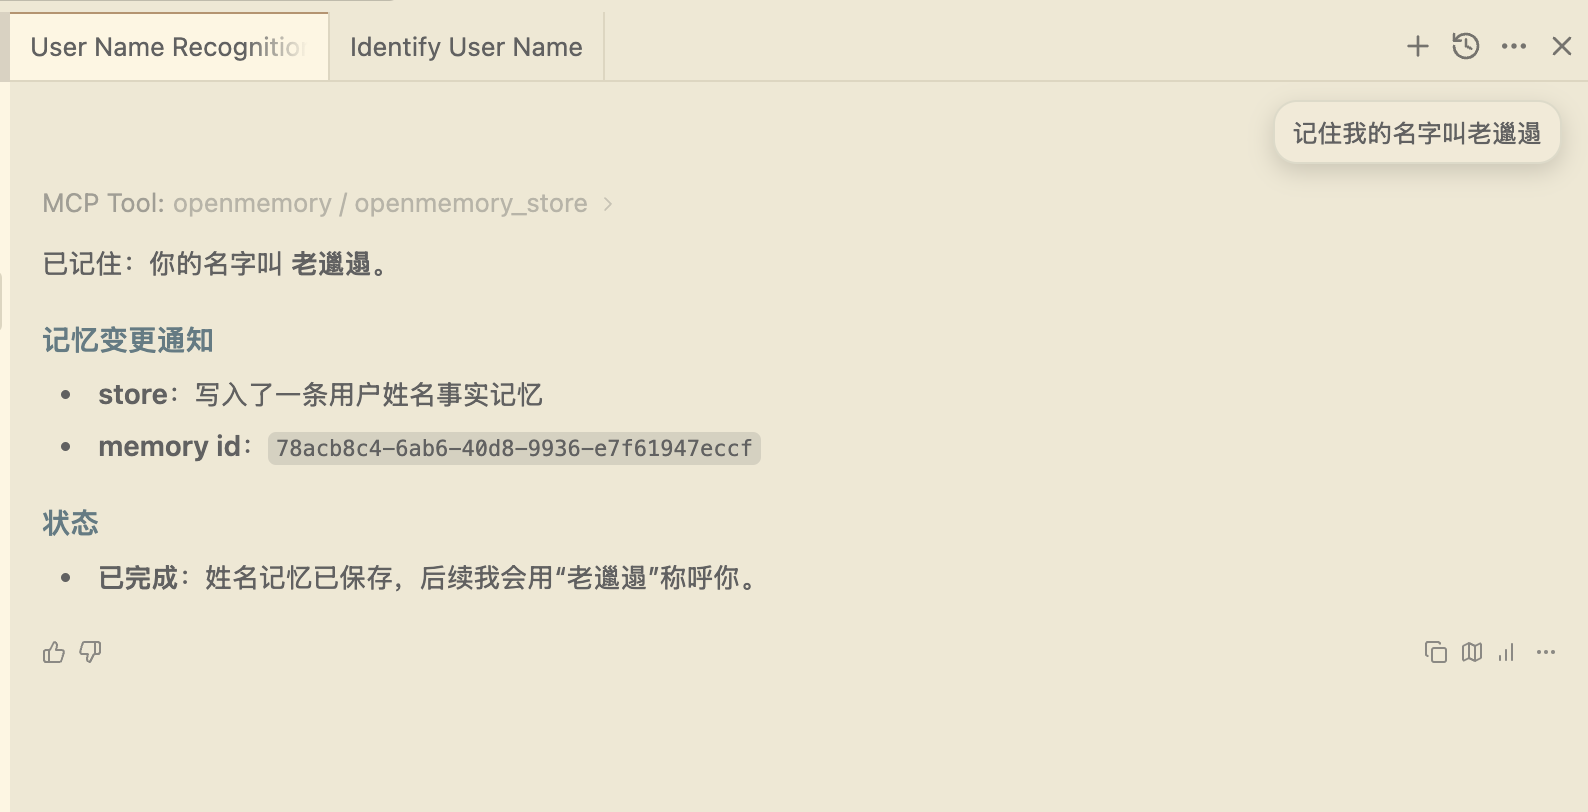
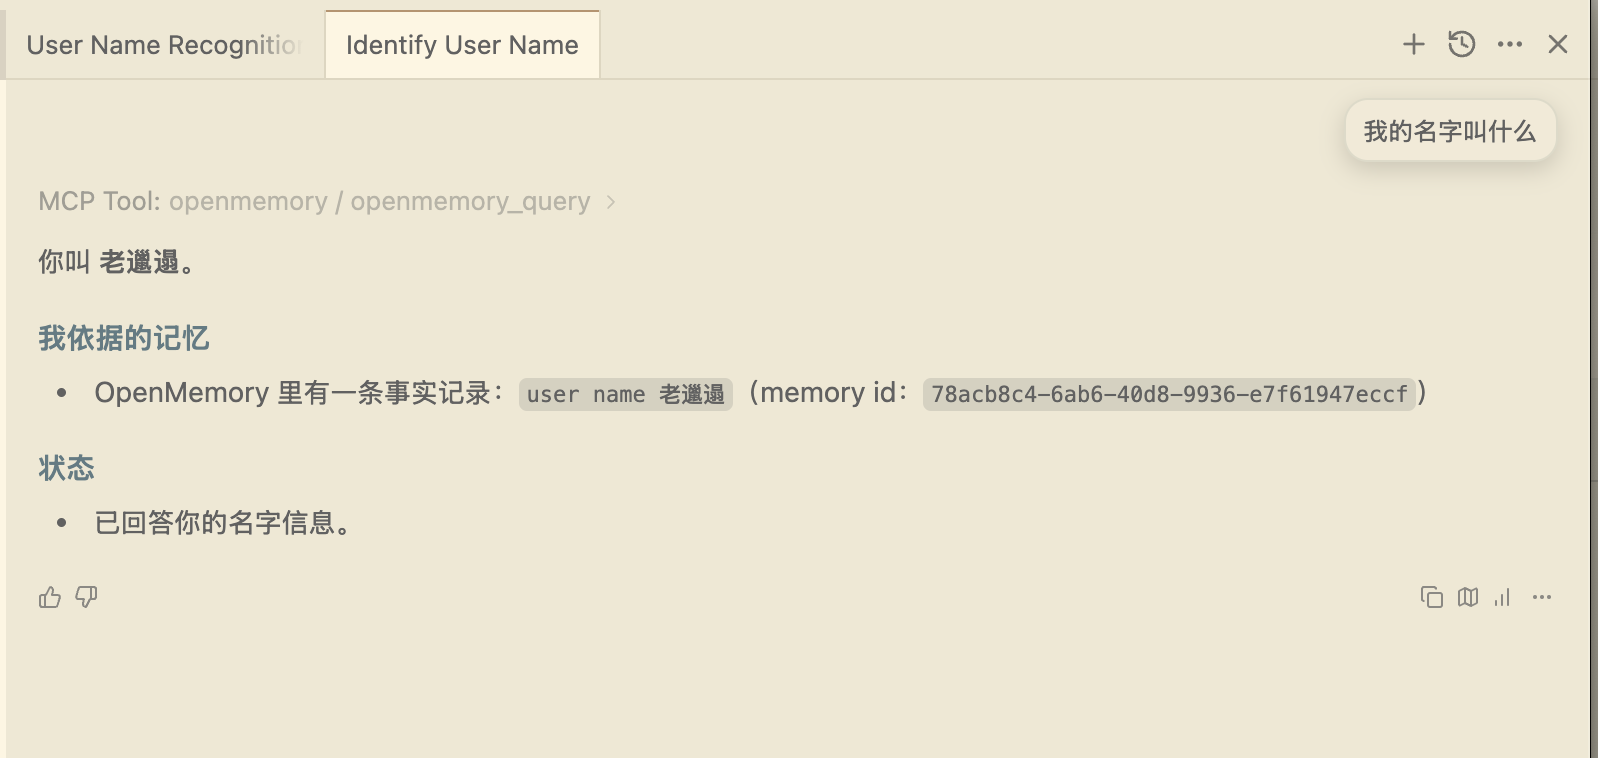
你只需要让其记住某个知识或者经验,然后再新开一个对话问它即可
看下图所示
完成上述工作我们就算是完成了 OpenMemory的基本安装工作
下面我们需要进阶使用
即保证AI能在日常对话中自动将我们的:
1. 成功经验存入记忆
2. 更新过时的老旧的记忆
3. 加强经常使用的记忆
在我们实际的工程中形成长期记忆,帮助我们未来不反复踩坑
需要该方法的小伙伴
点个关注并私信
GPT plus 代充 只需 145AI长期记忆
老邋遢看到后会第一时间回复你们哒~
进阶使用演示

版权声明:本文内容由互联网用户自发贡献,该文观点仅代表作者本人。本站仅提供信息存储空间服务,不拥有所有权,不承担相关法律责任。如发现本站有涉嫌侵权/违法违规的内容,请联系我们,一经查实,本站将立刻删除。
如需转载请保留出处:https://51itzy.com/kjqy/244386.html