
项目中openSeadragon的用法
这是官方文档
1、先创建一个viewer对象
viewer = OpenSeadragon({
    id: that.openSeadragonId, // 根据id绑定dom对象 showNavigator: true, // 是否展示图像导航栏控件 (也就是右下角的玻片) navigatorPosition: 'BOTTOM_RIGHT', // 导航栏控件位置 navigatorSizeRatio: 0.1, // 玻片的展示倍率 prefixUrl: process.env.VUE_APP_STATIC_OPENSEADRAGONICONS, // 图像金字塔文件夹位置 sequenceMode: true, // 多图 tileSources: tileSources // debugMode: true //开启调试模式 // maxZoomPixelRatio: 0.5, // zoomInButton: "zoom-in", //放大 // zoomOutButton: "zoom-out", //缩小 // homeButton: "home", //恢复默认 // fullPageButton: "full-page", //全屏 // nextButton: "next", //下一张图片 // previousButton: "previous", //前一张图片 // visibilityRatio: 0.5, //图片在框内的最小比例 // constrainDuringPan: true //管拖拽,true就不能拖拽了 })
讯享网
2、通过addHandler自定义方法。
讯享网 viewer.addHandler('page', (event) => {
    that.index = event.page that.handleChangeSample() })
本项目中是定义了一个切换下一页的方法
3、一些常用方法
viewer.viewport.zoomTo(2) //缩放到指定的比例 const point = viewer.viewport.imageToViewportCoordinates(x, y) //将图像坐标转为viewer视图坐标 viewer.viewport.panTo(point) // 将视图平移到给定的点。point (x,y) 4、点击小图定位到源视图位置
讯享网 // 点击小图时定位到指定位置,绑定在template中的image图像上的事件 handleImageClick(picture) {
    // BY LCW const rectElementId = picture.imgName const split = rectElementId.split('_') const x = split[0] // 1、根据图片名获取左上角的x y坐标 const y = split[1] const point = viewer.viewport.imageToViewportCoordinates(x, y) //将图像坐标转为viewer视图坐标 viewer.viewport.panTo(point) 将视图平移到给定的点。 if (this.zoomData == '') {
    // 若用户没有选择值, 则给他默认值  this.zoomData = '40px' } viewer.viewport.zoomTo(this.zoomNum) 缩放到指定的比例 },
5、切换下一页viewer视图的实现方法

根据父组件传入的sampleIds,渲染WSI展示页面
// 接收父组件的数据 props: {
    sampleIds: {
// 样本id 可包含多个样本id type: Array, default: () => new Array() }, 讯享网// 给定事件添加事件处理程序 viewer.addHandler('page', (event) => {
that.index = event.page that.handleChangeSample() })

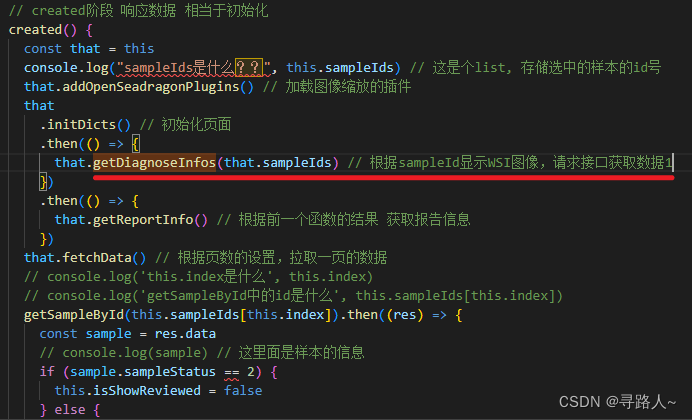
handleChangeSample()函数包含 根据sampleId初始化
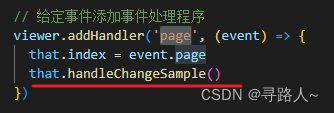
这里的page事件是openSeadragon.js中定义好的事件,原码中的函数是goToPage
以下是处理多选的函数:


6、将图像信息写在视图中
const eles = openSeadragonHtmlElements.addElement({
    id: _.imgName, element: element, x: _.location[0] * rate, y: _.location[1] * rate, width: _.location[2] * rate, height: _.location[3] * rate }) that.initOpenSeadragonRects() //自己封装的方法,将每个细胞的数据加入到页面中
7、圈画功能
思路通过openseadragon的canvas-click事件能够为我们提供web窗口的坐标
↓
// 将其转换为视口坐标,OpenSeadragon坐标的通用语言
const viewportPoint = viewer.viewport.pointFromPixel(webPoint)
↓
// 从视口坐标转换为图像坐标
const imagePoint = viewer.viewport.viewportToImageCoordinates(viewportPoint)
↓
// 生成标注信息,即裁剪出的图像的坐标。固定大小150px
讯享网 const length = 150 const that = this const width = length const height = length const halfLength = length / 2 const x = imagePoint.x - halfLength < 0 ? 0 : imagePoint.x - halfLength const y = imagePoint.y - halfLength < 0 ? 0 : imagePoint.y - halfLength const location = [x, y, width, height]
↓
判断选中的tag是什么类别,就将这个圈画的图片加入到对象的pictureList中
↓
请求接口裁剪出数据,返回pic的路径,前端加入到对应的pictureList中
版权声明:本文内容由互联网用户自发贡献,该文观点仅代表作者本人。本站仅提供信息存储空间服务,不拥有所有权,不承担相关法律责任。如发现本站有涉嫌侵权/违法违规的内容,请联系我们,一经查实,本站将立刻删除。
如需转载请保留出处:https://51itzy.com/kjqy/132150.html