
BRISK特征点描述算法详解
它具有较好的旋转不变性、尺度不变性,较好的鲁棒性等。在图像配准应用中,速度比较:SIFT<SURF<BRISK<FREAK<ORB,在对有较大模糊的图像配准时,BRISK算法在其中表现最为出色。
BRISK算法
特征点检测
BRISK算法主要利用FAST9-16进行特征点检测(为什么是主要?因为用到一次FAST5-8),可参见博客:FAST特征点检测算法。要解决尺度不变性,就必须在尺度空间进行特征点检测,于是BRISK算法中构造了图像金字塔进行多尺度表达。
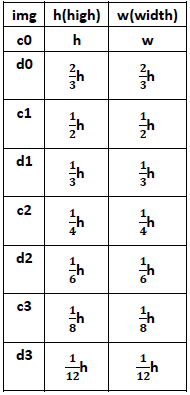
则ci、di层与原图像的尺度关系用t表示为: t ( c i ) = 2 i , t ( d i ) = 2 i ⋅ 1.5 t\left(c_{i}\right)=2^{i}, t\left(d_{i}\right)=2^{i} \cdot 1.5 t(ci)=2i,t(di)=2i⋅1.5,
ci、di层与原图像大小关系为:
讯享网
由于n=4,所以一共可以得到8张图,octave层之间尺度(缩放因子)是2倍关系,intra-octave层之间尺度(缩放因子)也是2倍关系。
亚像素插值
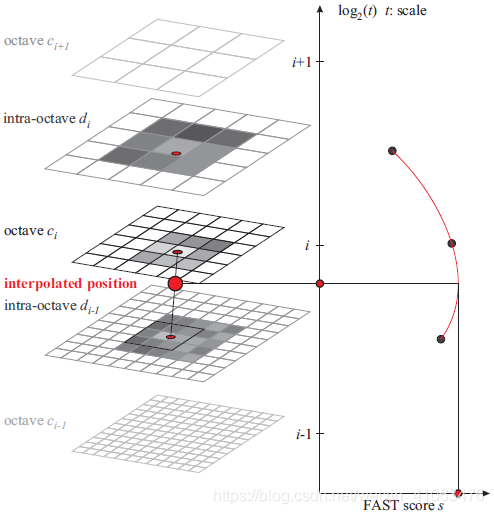
进过上面步骤,得到了图像特征点的位置和尺度,在极值点所在层及其上下层所对应的位置,对FAST得分值(共3个)进行二维二次函数插值(x、y方向),得到真正意义上的得分极值点及其精确的坐标位置(作为特征点位置);再对尺度方向进行一维插值,得到极值点所对应的尺度(作为特征点尺度)。
特征点描述
高斯滤波
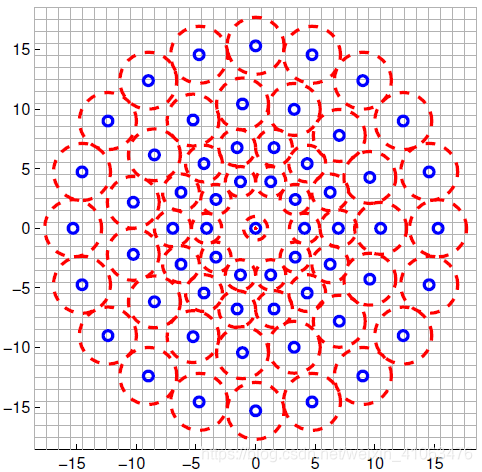
现在,我们得到了特征点的位置和尺度(t)后,要对特征点赋予其描述符。均匀采样模式:以特征点为中心,构建不同半径的同心圆,在每个圆上获取一定数目的等间隔采样点(所有采样点包括特征点,一共N个),由于这种邻域采样模式会引起混叠效应,所以需要对同心圆上的采样点进行高斯滤波。
采样模式如下图,蓝圈表示;以采样点为中心,为方差进行高斯滤波,滤波半径大小与高斯方差的大小成正比,红圈表示。最终用到的N个采样点是经过高斯平滑后的采样点。下图是t=1时的。(文章中:N=60)
局部梯度计算
由于有N个采样点,则采样点两两组合成一对,共有N(N-1)/2钟组合方式,所有组合方式的集合称作采样点对,用集合 A = { ( p i , p j ) ∈ R 2 × R 2 ∣ i < N ∧ j < i ∧ i , j ∈ N } \mathcal{A}=\left\{\left(\mathbf{p}_{i}, \mathbf{p}_{j}\right) \in \mathbb{R}^{2} \times \mathbb{R}^{2} | i<N \wedge j<i \wedge i, j \in \mathbb{N}\right\} A={
(pi,pj)∈R2×R2∣i<N∧j<i∧i,j∈N}表示,其中像素分别是 I ( p i , σ i ) , I ( p j , σ j ) I\left(\mathbf{p}_{i}, \sigma_{i}\right) ,I\left(\mathbf{p}_{j}, \sigma_{j}\right) I(pi,σi),I(pj,σj), σ \sigma σ表示尺度。用 g ( p i , p j ) \mathbf{g}\left(\mathbf{p}_{i}, \mathbf{p}_{j}\right) g(pi,pj)表示特征点局部梯度集合,则有:
g ( p i , p j ) = ( p j − p i ) ⋅ I ( p j , σ j ) − I ( p i , σ i ) ∥ p j − p i ∥ 2 \mathbf{g}\left(\mathbf{p}_{i}, \mathbf{p}_{j}\right)=\left(\mathbf{p}_{j}-\mathbf{p}_{i}\right) \cdot \frac{I\left(\mathbf{p}_{j}, \sigma_{j}\right)-I\left(\mathbf{p}_{i}, \sigma_{i}\right)}{\left\|\mathbf{p}_{j}-\mathbf{p}_{i}\right\|^{2}} g(pi,pj)=(pj−pi)⋅∥pj−pi∥2I(pj,σj)−I(pi,σi)

定义短距离点对子集、长距离点对子集(L个):
S = { ( p i , p j ) ∈ A ∣ ∥ p j − p i ∥ < δ max } ⊆ A \mathcal{S}=\left\{\left(\mathbf{p}_{i}, \mathbf{p}_{j}\right) \in \mathcal{A} |\left\|\mathbf{p}_{j}-\mathbf{p}_{i}\right\|<\delta_{\max }\right\} \subseteq \mathcal{A} S={
(pi,pj)∈A∣∥pj−pi∥<δmax}⊆A
L = { ( p i , p j ) ∈ A ∣ ∥ p j − p i ∥ > δ min } ⊆ A \mathcal{L}=\left\{\left(\mathbf{p}_{i}, \mathbf{p}_{j}\right) \in \mathcal{A} |\left\|\mathbf{p}_{j}-\mathbf{p}_{i}\right\|>\delta_{\min }\right\} \subseteq \mathcal{A} L={
(pi,pj)∈A∣∥pj−pi∥>δmin}⊆A
其中 δ max = 9.75 t δ min = 13.67 t \delta_{\text {max}}=9.75 t \quad \delta_{\min }=13.67 t δmax=9.75tδmin=13.67t, t t t是特征点所在的尺度。
现在要利用上面得到的信息,来计算特征点的主方向(注意:此处只用到了长距离子集),如下:
g = ( g x g y ) = 1 L ⋅ ∑ ( p i , p j ) ∈ L g ( p i , p j ) \mathbf{g}=\left( \begin{array}{c}{g_{x}} \\ {g_{y}}\end{array}\right)=\frac{1}{L} \cdot \sum_{\left(\mathbf{p}_{i}, \mathbf{p}_{j}\right) \in \mathcal{L}} \mathbf{g}\left(\mathbf{p}_{i}, \mathbf{p}_{j}\right) g=(gxgy)=L1⋅∑(pi,pj)∈Lg(pi,pj)
α = arctan 2 ( g y , g x ) \alpha=\arctan 2\left(g_{y}, g_{x}\right) α=arctan2(gy,gx)
b = { 1 , I ( p j α , σ j ) > I ( p i α , σ i ) 0 , otherwise b=\left\{\begin{array}{ll}{1,} & {I\left(\mathbf{p}_{j}^{\alpha}, \sigma_{j}\right)>I\left(\mathbf{p}_{i}^{\alpha}, \sigma_{i}\right)} \\ {0,} & {\text { otherwise }}\end{array}\right. b={ 1,0,I(pjα,σj)>I(piα,σi) otherwise
∀ ( p i α , p j α ) ∈ S \forall\left(\mathbf{p}_{i}^{\alpha}, \mathbf{p}_{j}^{\alpha}\right) \in \mathcal{S} ∀(piα,pjα)∈S
其中, I ( p j α , σ j ) I\left(\mathbf{p}_{j}^{\alpha}, \sigma_{j}\right) I(pjα,σj)带有上标,表示经过旋转a角度后的,新的采样点。由此可得到,512Bit的二进制编码,也就是64个字节(BRISK64)。
#include <cv.h> #include <opencv2/highgui/highgui.hpp> #include <opencv2/core/core.hpp> #include <opencv2/nonfree/features2d.hpp> #include <opencv2/nonfree/nonfree.hpp> #include <Windows.h> using namespace cv; using namespace std; int main() { //Load Image Mat c_src1 = imread( "1.png"); Mat c_src2 = imread("2.png"); Mat src1 = imread( "1.png", CV_LOAD_IMAGE_GRAYSCALE); Mat src2 = imread( "2.png", CV_LOAD_IMAGE_GRAYSCALE); if( !src1.data || !src2.data ) { cout<< "Error reading images " << std::endl; return -1; } //feature detect BRISK detector; vector<KeyPoint> kp1, kp2; double start = GetTickCount(); detector.detect( src1, kp1 ); detector.detect( src2, kp2 ); //cv::BRISK extractor; Mat des1,des2;//descriptor detector.compute(src1, kp1, des1); detector.compute(src2, kp2, des2); Mat res1,res2; int drawmode = DrawMatchesFlags::DRAW_RICH_KEYPOINTS; drawKeypoints(c_src1, kp1, res1, Scalar::all(-1), drawmode);//画出特征点 drawKeypoints(c_src2, kp2, res2, Scalar::all(-1), drawmode); cout<<"size of description of Img1: "<<kp1.size()<<endl; cout<<"size of description of Img2: "<<kp2.size()<<endl; BFMatcher matcher(NORM_HAMMING); vector<DMatch> matches; matcher.match(des1, des2, matches); double end = GetTickCount(); cout<<"耗时:"<<(end - start) <<"ms"<<endl; Mat img_match; drawMatches(src1, kp1, src2, kp2, matches, img_match); cout<<"number of matched points: "<<matches.size()<<endl; imshow("matches",img_match); cvWaitKey(0); cvDestroyAllWindows(); return 0; } 讯享网
实验结果

视频地址
http://v.youku.com/v_show/id_XMTI5MzI3Mzk0OA==.html
代码分析
由于代码都很长,只列出了brisk类的两个方法,其余详见:…\opencv\sources\modules\features2d\src\brisk.c
讯享网// construct the image pyramids(构造图像金字塔) void BriskScaleSpace::constructPyramid(const cv::Mat& image) { // set correct size: pyramid_.clear(); // fill the pyramid: pyramid_.push_back(BriskLayer(image.clone())); if (layers_ > 1) { pyramid_.push_back(BriskLayer(pyramid_.back(), BriskLayer::CommonParams::TWOTHIRDSAMPLE));//d0层是2/3 } const int octaves2 = layers_; for (uchar i = 2; i < octaves2; i += 2) { pyramid_.push_back(BriskLayer(pyramid_[i - 2], BriskLayer::CommonParams::HALFSAMPLE));//c?层是前两层的1/2 pyramid_.push_back(BriskLayer(pyramid_[i - 1], BriskLayer::CommonParams::HALFSAMPLE));//d?层是前两层的1/2(除d0层外) } }
//提取特征点 void BriskScaleSpace::getKeypoints(const int threshold_, std::vector<cv::KeyPoint>& keypoints) { // make sure keypoints is empty keypoints.resize(0); keypoints.reserve(2000); // assign thresholds int safeThreshold_ = (int)(threshold_ * safetyFactor_); std::vector<std::vector<cv::KeyPoint> > agastPoints; agastPoints.resize(layers_); // go through the octaves and intra layers and calculate fast corner scores: for (int i = 0; i < layers_; i++) { // call OAST16_9 without nms BriskLayer& l = pyramid_[i]; l.getAgastPoints(safeThreshold_, agastPoints[i]); } if (layers_ == 1) { // just do a simple 2d subpixel refinement... const size_t num = agastPoints[0].size(); for (size_t n = 0; n < num; n++) { const cv::Point2f& point = agastPoints.at(0)[n].pt; // first check if it is a maximum: if (!isMax2D(0, (int)point.x, (int)point.y)) continue; // let's do the subpixel and float scale refinement: BriskLayer& l = pyramid_[0]; int s_0_0 = l.getAgastScore(point.x - 1, point.y - 1, 1); int s_1_0 = l.getAgastScore(point.x, point.y - 1, 1); int s_2_0 = l.getAgastScore(point.x + 1, point.y - 1, 1); int s_2_1 = l.getAgastScore(point.x + 1, point.y, 1); int s_1_1 = l.getAgastScore(point.x, point.y, 1); int s_0_1 = l.getAgastScore(point.x - 1, point.y, 1); int s_0_2 = l.getAgastScore(point.x - 1, point.y + 1, 1); int s_1_2 = l.getAgastScore(point.x, point.y + 1, 1); int s_2_2 = l.getAgastScore(point.x + 1, point.y + 1, 1); float delta_x, delta_y; float max = subpixel2D(s_0_0, s_0_1, s_0_2, s_1_0, s_1_1, s_1_2, s_2_0, s_2_1, s_2_2, delta_x, delta_y); // store: keypoints.push_back(cv::KeyPoint(float(point.x) + delta_x, float(point.y) + delta_y, basicSize_, -1, max, 0)); } return; } float x, y, scale, score; for (int i = 0; i < layers_; i++) { BriskLayer& l = pyramid_[i]; const size_t num = agastPoints[i].size(); if (i == layers_ - 1) { for (size_t n = 0; n < num; n++) { const cv::Point2f& point = agastPoints.at(i)[n].pt; // consider only 2D maxima... if (!isMax2D(i, (int)point.x, (int)point.y)) continue; bool ismax; float dx, dy; getScoreMaxBelow(i, (int)point.x, (int)point.y, l.getAgastScore(point.x, point.y, safeThreshold_), ismax, dx, dy); if (!ismax) continue; // get the patch on this layer: int s_0_0 = l.getAgastScore(point.x - 1, point.y - 1, 1); int s_1_0 = l.getAgastScore(point.x, point.y - 1, 1); int s_2_0 = l.getAgastScore(point.x + 1, point.y - 1, 1); int s_2_1 = l.getAgastScore(point.x + 1, point.y, 1); int s_1_1 = l.getAgastScore(point.x, point.y, 1); int s_0_1 = l.getAgastScore(point.x - 1, point.y, 1); int s_0_2 = l.getAgastScore(point.x - 1, point.y + 1, 1); int s_1_2 = l.getAgastScore(point.x, point.y + 1, 1); int s_2_2 = l.getAgastScore(point.x + 1, point.y + 1, 1); float delta_x, delta_y; float max = subpixel2D(s_0_0, s_0_1, s_0_2, s_1_0, s_1_1, s_1_2, s_2_0, s_2_1, s_2_2, delta_x, delta_y); // store: keypoints.push_back( cv::KeyPoint((float(point.x) + delta_x) * l.scale() + l.offset(), (float(point.y) + delta_y) * l.scale() + l.offset(), basicSize_ * l.scale(), -1, max, i)); } } else { // not the last layer: for (size_t n = 0; n < num; n++) { const cv::Point2f& point = agastPoints.at(i)[n].pt; // first check if it is a maximum: if (!isMax2D(i, (int)point.x, (int)point.y)) continue; // let's do the subpixel and float scale refinement: bool ismax=false; score = refine3D(i, (int)point.x, (int)point.y, x, y, scale, ismax); if (!ismax) { continue; } // finally store the detected keypoint: if (score > float(threshold_)) { keypoints.push_back(cv::KeyPoint(x, y, basicSize_ * scale, -1, score, i)); } } } } } 参考文献
1、BRISK:binary robust invariant scalable keypoints,2011,ICCV.
版权声明:本文内容由互联网用户自发贡献,该文观点仅代表作者本人。本站仅提供信息存储空间服务,不拥有所有权,不承担相关法律责任。如发现本站有涉嫌侵权/违法违规的内容,请联系我们,一经查实,本站将立刻删除。
如需转载请保留出处:https://51itzy.com/kjqy/128135.html