
1. 配置时钟
The bootloader generator is now fully integrated with MCC Libraries. To the maximum
extent possible, the bootloader leverages MCC for configuration and peripheral usage.
Thus, in addition to selecting the bootloader library, it is also required to select the
memory and supported communications “Peripherals”.
Here are the steps to generate a bootloader using MCC:
- First create a bootloader project and select your device.
- Select XC8 as the build tool (MCC generates XC8 C code).
- Start MCC.
- In the System Module, configure the oscillator. In general, faster is better for
more reliable communications. For this example, the PIC16F18855 is selected,
and configured to use the 32 MHz internal oscillator.
引导加载程序生成器现在与MCC库完全集成。最大限度地在可能的情况下,引导加载程序利用MCC进行配置和外围设备的使用。因此,除了选择引导加载程序库之外,还需要选择内存和支持的通信“外设”。以下是使用MCC生成引导加载程序的步骤:
1首先创建一个引导加载程序项目并选择您的设备。
2选择XC8作为构建工具(MCC生成XC8 C代码)。
3启动MCC。
4在系统模块中,配置振荡器。一般来说,越快越好
更可靠的通信。在本例中,选择了PIC16F18855,配置为使用32MHz内部振荡器。

讯享网

2. 配置串口
不开启中断
Select EUSART. Check “Enable EUSART”, “Enable Transmit” and “Enable
Continuous Receive”. The baud rate does not matter because the bootloader
code auto-bauds to detect the incoming baud rate
选择EUSART。选中“启用EUSART”、“启用传输”和“启用连续接收”。波特率并不重要,因为引导加载程序代码自动波特率检测传入波特率

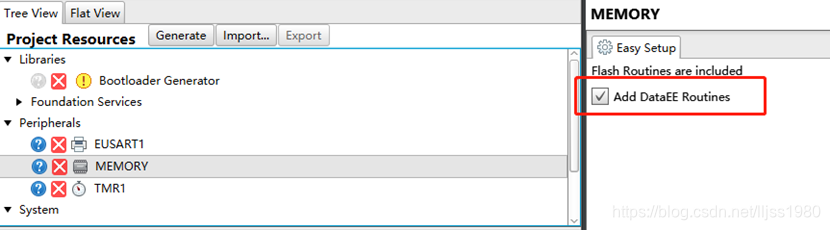
3. memory库
Select the Memory Peripheral. Nothing further needs to be configured. This will
include a memory.h file which has #defines that specify how big the Flash
memory is, write latches and erase row size.
选择内存外围设备。无需进一步配置。这个包括一个memory.h文件,该文件定义了闪存的大小内存是,写入锁存并擦除行大小。
The Reset vector must be aligned to the beginning of an erase row. The
Erase command erases the entire row. The bootloader needs to make sure
it does not erase any part of the bootloader, so any Erase command not
starting on a row boundary will be disallowed.
重置向量必须与擦除行的开始对齐。这个Erase命令删除整行。引导加载程序需要确保它不会擦除引导加载程序的任何部分,因此任何erase命令都不会不允许从行边界开始。
4. bootloader库
Select the Bootloader Generator library. Configure the bootloader for the desired
operation.
选择引导加载程序生成器库。为所需的配置引导加载程序操作。


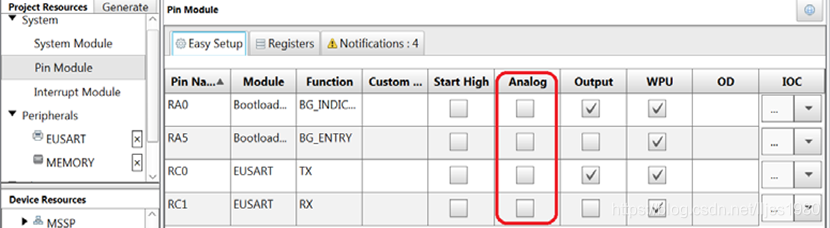
5. GPIO配置
Open the Pin Manager Grid View. Configure pin selections for the bootloader
operation behavior. As shown below, the lab RA0 is used for the Bootloader
Indication pin (output), RA5 is the Bootloader entry pin (input), Tx and Rx are on
RC0 and RC1
打开管脚管理器网格视图。配置引导加载程序的引脚选择操作行为。如下所示,lab RA0用于引导加载程序指示引脚(输出),RA5为引导加载程序输入引脚(输入),Tx和Rx为onRC0和RC1

Select Pin Module from the Project Resources, “System” option. Configure
applicable pins to be digital by deselecting the analog check box option on all
pins used
从项目资源“系统”选项中选择“管脚模块”。配置通过取消选中“所有”上的“模拟”复选框选项,将适用的管脚设置为数字使用的引脚
6. 生成代码
点击 Generate 按钮生成.

7. 代码编译空间设置
For the final step, configure to only build within a specified memory space. Open
the Project Properties window; this can be done by right clicking on a project and
selecting properties. Select XC8 Linker, under the XC8 global options. Select
“Memory Model” under the Option Categories combo box. For example, entering
the value of 0-2FF would restrict the generated code to the first 0x300 words of
ROM when compiling project code. Refer to code size for appropriate ROM
reservation size. To best understand the required ROM range, after a successful
build of the Bootloader project, refer to the “PIC Memory Views” --> “Program
Memory”; or at the Window --> “Dashboard”, Memory Section.
对于最后一步,请配置为仅在指定的内存空间内生成。正常开放项目属性窗口;这可以通过右键单击项目和选择属性。在XC8全局选项下选择XC8链接器。选择选项类别组合框下的“内存模型”。例如,输入值0-2FF会将生成的代码限制为
编译项目代码时的ROM。参考代码大小以获得合适的ROM保留大小。为了更好地理解所需的ROM范围,成功后构建Bootloader项目,请参阅“PIC内存视图”->“程序内存”;或在窗口–>“仪表板”,内存部分。

Specify ROM ranges The compiler initially knows about on-chip ROM only. If external ROM is available then this can be specified via this option. Areas of on-chip ROM that must be reserved can also be listed. Examples: 0-7FF,1000-1FFF ignore on-chip ROM, use only specified ranges; default,3000-3FFF use default on-chip ROM, plus an additional range; default,-7F0-7FF use default ROM, but reserve 16 bytes at 7F0.
指定编译器最初只知道片上ROM的ROM范围。如果外部ROM可用,则可通过此选项指定。必须保留的片上ROM区域也可以列出。示例:0-7FF,1000-1FF忽略片上ROM,只使用指定的范围;默认值,3000-3FFF使用默认片上ROM,外加一个额外的范围;默认值,-7F0-7FF使用默认ROM,但在7F0保留16个字节。
版权声明:本文内容由互联网用户自发贡献,该文观点仅代表作者本人。本站仅提供信息存储空间服务,不拥有所有权,不承担相关法律责任。如发现本站有涉嫌侵权/违法违规的内容,请联系我们,一经查实,本站将立刻删除。
如需转载请保留出处:https://51itzy.com/kjqy/122691.html