

TCP扫描增强器
TCP扫描增强器实现原理,主要是使用TCP三次握手原理
TCP是比我们介绍的要复杂的多,但是我们只介绍一点基础知识。TCP的握手有三个过程。
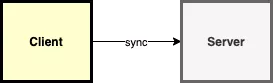
首先,客户端发送一个 syn 的包,表示建立回话的开始。如果客户端收到超时,说明端口可能在防火墙后面,或者没有启用服务器
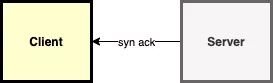
第二,如果服务端应答 syn-ack 包,意味着这个端口是打开的,否则会返回 rst 包。最后,客户端需要另外发送一个 ack 包。从这时起,连接就已经建立。

我们TCP扫描器第一步先实现单个端口的测试。使用标准库中的 net.Dial 函数,该函数接收两个参数:协议和测试地址(带端口号)。
版本一(单端口)
package main import ( "fmt" "net" ) func main() { _, err := net.Dial("tcp", "www.baidu.com:80") if err == nil { fmt.Println("Connection successful") } else { fmt.Println(err) } }讯享网

版本二(多端口)
为了不一个一个地测试每个端口,我们将添加一个简单的循环来简化整个测试过程。
讯享网package main import ( "fmt" "net" ) func main() { for port := 80; port < 100; port++ { conn, err := net.Dial("tcp", fmt.Sprintf("www.baidu.com:%d", port)) if err == nil { conn.Close() fmt.Println("Connection successful") } else { fmt.Println(err) } } }
这种处理方式有个很大的问题,极度的慢。我们可以通过两个操作来处理一下:并行的执行及为每个连接添加超时控制。
我们来看下如何实现并行。第一步先把扫描功能拆分为一个独立函数。这样会使我们的代码看起来清晰。
版本三(并发执行)
我们会引入一个新的方法 WaitGroup ,详细用法信息可以参考标准库文档。在主函数中,我们可以拆分为协程去执行,然后等待执行结束
package main import ( "fmt" "net" "sync" "time" ) func isOpen(host string, port int) bool { time.Sleep(time.Millisecond * 3) conn, err := net.Dial("tcp", fmt.Sprintf("%s:%d", host, port)) if err == nil { _ = conn.Close() return true } return false } func main() { ports := []int{} wg := &sync.WaitGroup{} for port := 1; port < 50000; port++ { wg.Add(1) port := port go func() { opened := isOpen("www.baidu.com", port) if opened { ports = append(ports, port) } wg.Done() }() } wg.Wait() fmt.Printf("opened ports: %v\n", ports) } 版本四(等待超时)
我们的代码已经执行的很快了,但是由于超时的原因,我们需要等待很久才能收到返回的错误信息。我们可以假设如果我们200毫秒内没有收到服务器的回应,就不再继续等待。
讯享网package main import ( "fmt" "net" "sync" "time" ) func isOpen(host string, port int, timeout time.Duration) bool { time.Sleep(time.Millisecond * 1) conn, err := net.DialTimeout("tcp", fmt.Sprintf("%s:%d", host, port), timeout) if err == nil { _ = conn.Close() return true } return false } func main() { ports := []int{} wg := &sync.WaitGroup{} timeout := time.Millisecond * 200 for port := 1; port < 100; port++ { wg.Add(1) go func(p int) { opened := isOpen("www.baidu.com", p, timeout) if opened { ports = append(ports, p) } wg.Done() }(port) } wg.Wait() fmt.Printf("opened ports: %v\n", ports) }
版本五(添加锁)
为什么要添加锁,因为并发执行的话,在往ports数组写的话,会有影响。
现在这个程序会有竞争条件。在只扫描少数端口时,速度比较慢,可能不会出现,但确实存在这个问题。所以我们需要使用 mutex 来修复它。

package main import ( "fmt" "log" "net" "sync" "time" ) var wg sync.WaitGroup var mutex sync.Mutex func isOpen(host string, port int, timeout time.Duration) bool { time.Sleep(time.Millisecond * 1) conn, err := net.DialTimeout("tcp", fmt.Sprintf("%s:%d", host, port), timeout) if err == nil { _ = conn.Close() return true } return false } func main() { startTime := time.Now() ports := []int{} timeout := time.Millisecond * 500 for port := 1; port <= 65000; port++ { go func(p int) { opened := isOpen("www.baidu.com", p, timeout) if opened { mutex.Lock() ports = append(ports, p) log.Printf("端口: %d 已经开通", p) mutex.Unlock() } }(port) } time.Since(startTime) cost := int(time.Since(startTime) / time.Second) fmt.Printf("opened ports: %v\n", ports) fmt.Printf("代码运行时长: %d S", cost) } 版本六(并发控制)
为什么并发控制,不控制的话,在运行时会卡,有时间会导致竞争条件。会影响接口,为了数值的准确性,有必要控制一下并发数量
这里面并发控制,我采用channel,有兴趣可以谷歌一下。
golimit.go
讯享网package golimit type GoLimit struct { ch chan int } func NewGoLimit(max int) *GoLimit { return &GoLimit{ch: make(chan int, max)} } func (g *GoLimit) Add() { g.ch <- 1 } func (g *GoLimit) Done() { <-g.ch }
tcp.go
package main import ( "code/Projects/tcp_Scanning/golimit" "fmt" "log" "net" "sync" "time" ) var wg sync.WaitGroup var mutex sync.Mutex func isOpen(host string, port int, timeout time.Duration) bool { time.Sleep(time.Millisecond * 1) conn, err := net.DialTimeout("tcp", fmt.Sprintf("%s:%d", host, port), timeout) if err == nil { _ = conn.Close() return true } return false } func main() { startTime := time.Now() ports := []int{} timeout := time.Millisecond * 500 g := golimit.NewGoLimit(2000) for port := 1; port <= 65000; port++ { g.Add() go func(g *golimit.GoLimit, p int) { opened := isOpen("10.10.10.1", p, timeout) if opened { mutex.Lock() ports = append(ports, p) log.Printf("端口: %d 已经开通", p) mutex.Unlock() } g.Done() }(g, port) } time.Since(startTime) cost := int(time.Since(startTime) / time.Second) fmt.Printf("opened ports: %v\n", ports) fmt.Printf("代码运行时长: %d S", cost) } 版本七(参数定制)
我们就得到了一个简单的端口扫描器。但有些不好的是,不能很方便的修改域名地址以及端口号范围,我们必须要重新编译代码才可以。Go还有一个很不错的包叫做 flag 。
flag 包可以帮助我们编写命令行程序。我们可以配置每个字符串或数字。我们为主机名及要测试的端口范围和连接超时添加参数。
讯享网package main import ( "code/Projects/tcp_Scanning/golimit" "flag" "fmt" "log" "net" "sync" "time" ) var wg sync.WaitGroup var mutex sync.Mutex func isOpen(host string, port int, timeout time.Duration) bool { time.Sleep(time.Millisecond * 1) conn, err := net.DialTimeout("tcp", fmt.Sprintf("%s:%d", host, port), timeout) if err == nil { _ = conn.Close() return true } return false } func main() { startTime := time.Now() hostname := flag.String("hostname", "", "hostname to test") startPort := flag.Int("start-port", 80, "the port on which the scanning starts") endPort := flag.Int("end-port", 100, "the port from which the scanning ends") timeout := flag.Duration("timeout", time.Millisecond*200, "timeout") golimits := flag.Int("golimit", 1000, "the Program Concurrency") flag.Parse() ports := []int{} //timeout := time.Millisecond * 500 g := golimit.NewGoLimit(*golimits) for port := *startPort; port <= *endPort; port++ { g.Add() go func(g *golimit.GoLimit, p int) { opened := isOpen(*hostname, p, *timeout) if opened { mutex.Lock() ports = append(ports, p) log.Printf("端口: %d 已经开通", p) mutex.Unlock() } g.Done() }(g, port) } time.Since(startTime) cost := int(time.Since(startTime) / time.Second) fmt.Printf("opened ports: %v\n", ports) fmt.Printf("代码运行时长: %d S", cost) }
如果我们想要显示如何使用,我们可以添加一个 -h 参数,来显示使用说明。整个项目不到50行的代码,我们使用到了并行、flag 及 net 包。
速度测试还不错,
并发 2000,扫描65000端口,只需要16s,而且很准确。
如果设置4000的并发,扫描出来的结果可能缺少,只需要8S 。


大家可以多试试。
版权声明:本文内容由互联网用户自发贡献,该文观点仅代表作者本人。本站仅提供信息存储空间服务,不拥有所有权,不承担相关法律责任。如发现本站有涉嫌侵权/违法违规的内容,请联系我们,一经查实,本站将立刻删除。
如需转载请保留出处:https://51itzy.com/kjqy/120533.html