
1 CCR的基本概念
什么是CCR?
CCR( cross-cluster replication):跨集群复制是ES 6.5发布的一个新的特性:可以将两个集群中的数据进行远程复制。
集群复制类似于数据订阅的方式,一个集群的数据可以被多个集群订阅,也就是可以被复制到多个集群上面去。
为什么需要CCR?
CCR可以解决下面的几个场景的问题:
- 集群高可用以及灾难恢复,在不同的地域部署多套ES集群,通过CCR实时同步数据。
- 实现数据的就近访问(地理),数据的就近访问,提升访问速度。
- 集中式的报告集群,通过多个备集群的处理,主集群可以进行分析处理。
2 CCR的使用
CCR是怎么使用的呢?
1. 本地集群连接远程集群
通过远程集群的节点进行连接,使用transport端口,命令如下:
PUT /_cluster/settings {
    "persistent" : {
    "cluster" : {
    "remote" : {
    "leader" : {
    "seeds" : [ "127.0.0.1:9300" ] } } } } }
讯享网
2. 在远程集群创建leader索引
远程集群创建leader索引,和正常创建索引操作一样,需要开启soft_deletes,不过在7.x版本之后,已经默认开启了。
3. 在本地集群创建follower索引
创建follower索引有两种方式:手动创建和自动跟随方式。
手动创建:需要指定远程集群和复制的远程索引
讯享网PUT /<follower_index>/_ccr/follow?wait_for_active_shards=1 {
    "remote_cluster" : "<remote_cluster>", "leader_index" : "<leader_index>" }
自动跟随创建:通过auto_follow API建立自动跟随的模板

PUT /_ccr/auto_follow/<auto_follow_pattern_name> {
    "remote_cluster" : "<remote_cluster>", "leader_index_patterns" : [ "<leader_index_pattern>" ], "follow_index_pattern" : "<follow_index_pattern>" }
这里不详细介绍CCR的使用,更多API请参考官网链接:Cross-cluster replication APIs。
3 CCR的源码分析
CCR的底层是怎么实现的呢?如何将远程集群的数据实时同步到本地集群呢?
主要涉及两部分:全量复制和增量复制
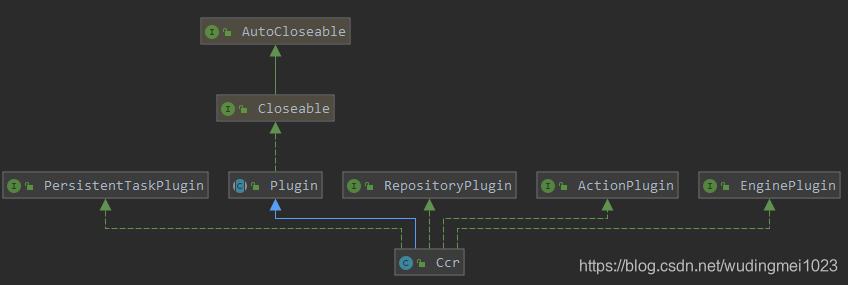
CCR是以plugins插件的形式:入口类在Ccr,继承了ActionPlugin(注册action),PersistentTaskPlugin(注册持久性任务),EnginePlugin(engine引擎接口),RepositoryPlugin(自定义快照接口)。
主要注册了下面几类action。
内部请求action: 内部的核心实现,用于处理数据的同步复制;状态请求action:用于获取follow和ccr的状态;follow actions:开启,暂停以及恢复follow的处理;auto-follow actions:自动跟随follow的处理action。
而且实现了FollowingEngine用于follow shard,实现了CcrRepository依靠远程集群快照用于还原数据。如下所示:
讯享网 public List<ActionHandler<? extends ActionRequest, ? extends ActionResponse>> getActions() {
    return Arrays.asList( // internal actions new ActionHandler<>(BulkShardOperationsAction.INSTANCE, TransportBulkShardOperationsAction.class), new ActionHandler<>(ShardChangesAction.INSTANCE, ShardChangesAction.TransportAction.class), new ActionHandler<>(PutInternalCcrRepositoryAction.INSTANCE, PutInternalCcrRepositoryAction.TransportPutInternalRepositoryAction.class), new ActionHandler<>(DeleteInternalCcrRepositoryAction.INSTANCE, DeleteInternalCcrRepositoryAction.TransportDeleteInternalRepositoryAction.class), new ActionHandler<>(PutCcrRestoreSessionAction.INSTANCE, PutCcrRestoreSessionAction.TransportPutCcrRestoreSessionAction.class), new ActionHandler<>(ClearCcrRestoreSessionAction.INSTANCE, ClearCcrRestoreSessionAction.TransportDeleteCcrRestoreSessionAction.class), new ActionHandler<>(GetCcrRestoreFileChunkAction.INSTANCE, GetCcrRestoreFileChunkAction.TransportGetCcrRestoreFileChunkAction.class), // stats action new ActionHandler<>(FollowStatsAction.INSTANCE, TransportFollowStatsAction.class), new ActionHandler<>(CcrStatsAction.INSTANCE, TransportCcrStatsAction.class), new ActionHandler<>(FollowInfoAction.INSTANCE, TransportFollowInfoAction.class), // follow actions new ActionHandler<>(PutFollowAction.INSTANCE, TransportPutFollowAction.class), new ActionHandler<>(ResumeFollowAction.INSTANCE, TransportResumeFollowAction.class), new ActionHandler<>(PauseFollowAction.INSTANCE, TransportPauseFollowAction.class), new ActionHandler<>(UnfollowAction.INSTANCE, TransportUnfollowAction.class), // auto-follow actions new ActionHandler<>(DeleteAutoFollowPatternAction.INSTANCE, TransportDeleteAutoFollowPatternAction.class), new ActionHandler<>(PutAutoFollowPatternAction.INSTANCE, TransportPutAutoFollowPatternAction.class), new ActionHandler<>(GetAutoFollowPatternAction.INSTANCE, TransportGetAutoFollowPatternAction.class), // forget follower action new ActionHandler<>(ForgetFollowerAction.INSTANCE, TransportForgetFollowerAction.class)); } public Optional<EngineFactory> getEngineFactory(final IndexSettings indexSettings) {
    ..... return Optional.of(new FollowingEngineFactory()); ..... } public Map<String, Repository.Factory> getInternalRepositories(Environment env, NamedXContentRegistry namedXContentRegistry) {
    Repository.Factory repositoryFactory = (metadata) -> new CcrRepository(metadata, client, ccrLicenseChecker, settings, ccrSettings.get(), threadPool.get()); return Collections.singletonMap(CcrRepository.TYPE, repositoryFactory); }
虽然整个复制是在索引层面进行管理的,但实际复制是在shard级别进行的。创建完follower索引之后,会自动配置和leader索引相同的mapping以及settings。然后follower索引中的shard发起request从leader索引中拉取数据。
3.1 全量复制
当创建follower索引时,会先构造快照和仓库,然后进行快照恢复。
先连接远程集群,获取leader index,然后创建follower index,代码如下:
 protected void masterOperation(....) {
    ..... // 连接远程集群 String remoteCluster = request.getRemoteCluster(); client.getRemoteClusterClient(remoteCluster); // 获取远程集群的leaderIndex  String leaderIndex = request.getLeaderIndex(); // 创建follower index ccrLicenseChecker.checkRemoteClusterLicenseAndFetchLeaderIndexMetadataAndHistoryUUIDs( client, remoteCluster, leaderIndex, listener::onFailure, (historyUUID, leaderIndexMetaData) -> createFollowerIndex(leaderIndexMetaData, request, listener)); }
创建follower index的过程如下:
- 先检查leaderIndexMetaData 是否为空,再检查是否开启了soft deletes。
- 根据内部PutInternalCcrRepositoryRequest创建好的快照仓库,快照仓库创建的逻辑在PutInternalCcrRepositoryAction#doExecute->RepositoriesService#registerInternalRepository->RepositoriesService#createRepository,调用的是snapshot模块自身的实现。
- 构建restoreRequest,快照恢复request。
- 在线程池中启动snapshot线程,进入restoreSnapshot方法进行快照恢复,调用的是snapshot模块自身的实现。
- afterRestoreStarted方法监听并处理整个快照恢复过程,当所有的shard都恢复成功之后,返回成功。
这里不深入分析snapshot模块是如何创建快照仓库和恢复快照的,这部分实现原理后续再更新。
讯享网 private void createFollowerIndex(.....) {
    .....// 参数检查 // 创建好的快照仓库 final String leaderClusterRepoName = CcrRepository.NAME_PREFIX + request.getRemoteCluster(); // 构建restoreRequest 快照恢复request final RestoreSnapshotRequest restoreRequest = new RestoreSnapshotRequest(leaderClusterRepoName, CcrRepository.LATEST).indices(request.getLeaderIndex()).indicesOptions(request.indicesOptions()).renamePattern("^(.*)$").renameReplacement(request.getFollowerIndex()).masterNodeTimeout(request.masterNodeTimeout()).indexSettings(settingsBuilder); final Client clientWithHeaders = CcrLicenseChecker.wrapClient(this.client, threadPool.getThreadContext().getHeaders()); // 在线程池中执行snapshot线程请求 threadPool.executor(ThreadPool.Names.SNAPSHOT).execute(new AbstractRunnable() {
    @Override public void onFailure(Exception e) {
    listener.onFailure(e); } @Override protected void doRun() throws Exception {
    // 执行快照恢复 restoreService.restoreSnapshot(restoreRequest, new ActionListener<RestoreService.RestoreCompletionResponse>() {
    @Override public void onResponse(RestoreService.RestoreCompletionResponse response) {
    // 开始恢复之后进行监听 afterRestoreStarted(clientWithHeaders, request, listener, response); } @Override public void onFailure(Exception e) {
    listener.onFailure(e); } }); } }); }
3.2 增量复制
前面讲过复制是在shard级别进行的,每个shard的复制都有对应的shardFollowTask,CCR插件注册了ShardFollowTasksExecutor执行器,follower接收到read request之后,会先将它们放置在写缓存区,ShardFollowTask管理器管理缓存区,并将缓存区的写请求批量提交给followe shard进行数据写入。
代码入口:ShardFollowTasksExecutor#nodeOperation
在每个执行node上执行的操作,进入ShardFollowNodeTask#start,更新follower索引的mapping和settings,确保和leader索引的mapping和settings版本一致。
 updateMapping(0L, leaderMappingVersion -> {
    ...... updateSettings(leaderSettingsVersion -> {
    synchronized (ShardFollowNodeTask.this) {
    currentSettingsVersion = leaderSettingsVersion; } ...... coordinateReads(); }); });
讯享网 synchronized void coordinateReads() {
final int maxReadRequestOperationCount = params.getMaxReadRequestOperationCount(); // 当read容量未满且最新的seq_no小于leader的GlobalCheckpoint(即最新操作),则有数据需要更新 while (hasReadBudget() && lastRequestedSeqNo < leaderGlobalCheckpoint) {
final long from = lastRequestedSeqNo + 1; final long maxRequiredSeqNo = Math.min(leaderGlobalCheckpoint, from + maxReadRequestOperationCount - 1); final int requestOpCount; if (numOutstandingReads == 0) {
requestOpCount = maxReadRequestOperationCount; } else {
requestOpCount = Math.toIntExact(maxRequiredSeqNo - from + 1); } numOutstandingReads++; sendShardChangesRequest(from, requestOpCount, maxRequiredSeqNo); lastRequestedSeqNo = maxRequiredSeqNo; } if (numOutstandingReads == 0 && hasReadBudget()) {
numOutstandingReads++; long from = lastRequestedSeqNo + 1; sendShardChangesRequest(from, maxReadRequestOperationCount, lastRequestedSeqNo); } }
接下一篇:【Elasticsearch源码】CCR源码分析(二)。
版权声明:本文内容由互联网用户自发贡献,该文观点仅代表作者本人。本站仅提供信息存储空间服务,不拥有所有权,不承担相关法律责任。如发现本站有涉嫌侵权/违法违规的内容,请联系我们,一经查实,本站将立刻删除。
如需转载请保留出处:https://51itzy.com/kjqy/119144.html